Vælg en organisation
Advanced settings in Salesforce Maps Marker layer builder
Udgivelsesdato: Aug 18, 2026
Beskrivelse
Løsning
This article explains each advanced option available when creating or editing a Marker Layer in Salesforce Maps, including render mode, render area, marker limits, and marker sorting.
Steps to access advanced options
1. For the given Marker Layer, select the three dots right to the Marker layer's name. Select the Edit button.
2. Select the Display Options tab - Advanced options.
3. You now see advanced options for Marker Layers, described below.
Map Updates
This option enables regular page refreshes if the data set is updating frequently or being monitored by an end-user.
Tooltip Default Tab
This option allows a user to define the tooltip tab that appears when a marker is selected.
Hide Routed Markers Outside of a Window From Today
This option removes plotted markers from view if they exist as part of a route already.
Default Render Mode
This option allows you to select a default render mode for markers. There are:
- Markers: Markers will plot as markers.
- Heatmap: Markers will plot as a heat map, where closely-related markers are colored according to their density.
- Clusters: Large groups of markers are plotted in a cluster.
- Scatter: Markers appear as scattered points.
Default Render Area
This option allows you to specify the render area. You can render across the entire map or within the visible area.
Note: When visible area is enabled, records will not be geocoded and only records with existing latitude and longitude fields will plot.
Marker Limits
This option allows you to limit markers on the map and/or limit markers in a proximity boundary.
- You can set a limit on the number of markers displayed on the map by selecting "Limit Markers on the Map" and adding a "Maximum Markers" limit count.
- You can also use "Limit markers in a proximity boundary" to limit the markers within a certain distance of an address. The units for distance can be selected from the dropdown.
Note: This function skips the geocoding process. If records have not been geocoded, they will not appear on the map.
How Proximity Boundary Limits Are Calculated
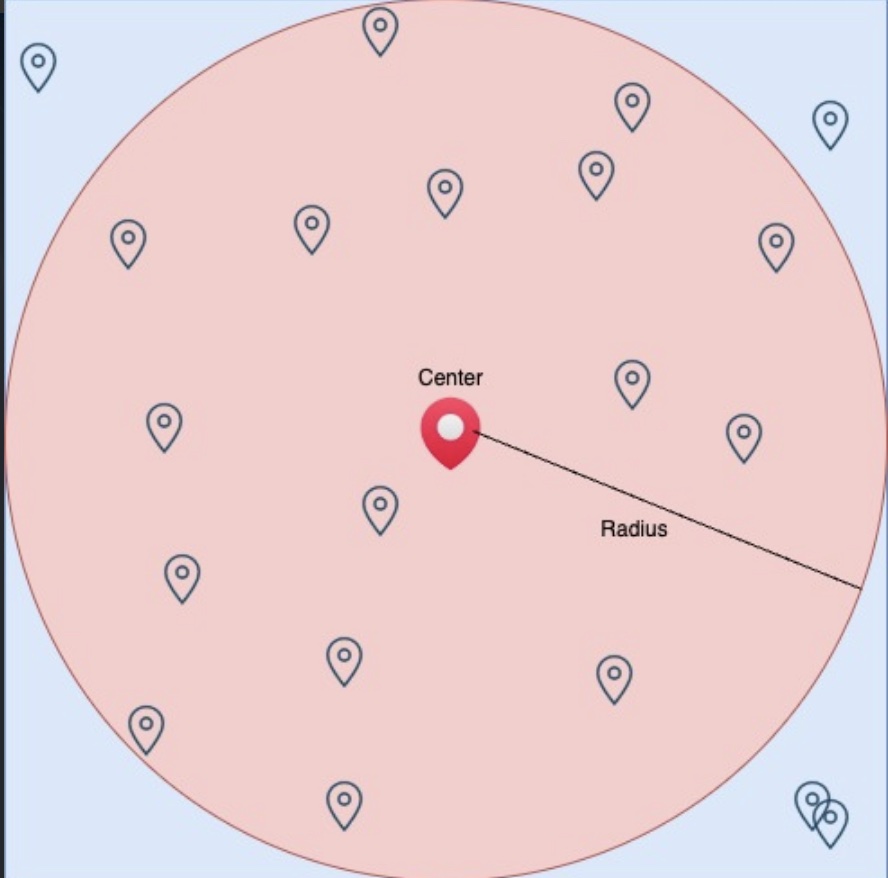
When using "Limit markers in a proximity boundary," fetching and displaying records happens in two steps. First, Salesforce Maps creates a bounding box that encapsulates a circle with a radius of "x" miles (where "x" is the radius set in the layer). It then runs a SOQL query based on the filters defined in the layer, limiting the records to the number of markers set in the layer configuration and within the bounding box.
Next, a second layer of filtering includes only the records that fall within the circle of "x" miles radius. When displaying the records on Maps, only those within the circle are shown — any records fetched by the query that fall within the rectangle but outside the circle are ignored. The image below illustrates this: markers within the circle are displayed, while markers within the bounding box but outside the circle are ignored.
In some cases, when a large number of markers are returned by the SOQL query, there may be records that fall within the square but not the circle. This can lead to discrepancies where some markers are missed or no markers are displayed on Maps. To avoid this, add additional filters to your layer to limit the number of markers returned, or add a field for marker sorting in the layer configuration to ensure the records returned are ordered by the sort field.
Marker Sorting
To ensure specific records are prioritized when limits are reached (e.g., top 100 by Revenue), configure sorting in the Markers tab (not the Advanced tab).
- Ordered by 1 Field: Select a field from the base object to automatically display a numeric order for all markers based on their value. This ensures the "Top X" records are plotted rather than a random selection.
Yderligere ressourcer
Vidensartikelnummer
000380836
Løste denne artikel dit problem?
Giv os besked, så vi kan forbedre os!
