조직 선택
Engagement - Marketing Cloud Test Sends Not Received
게시 일자: May 28, 2026
상세 설명
A Send Preview or Test Send replicates the exact process to send the email to the Subscriber but instead sends the email to the specified email address. There are a few common reasons a Test Send is not delivered.
Table of Contents:
- Identifying the Root Cause
- Email Bounce - The email was sent but not accepted by the recipient's email server.
- Unable to Send to the Specific Subscriber - The email was not sent by Marketing Cloud Engagement for one of several reasons.
- Data Extension EmailAddress Data Type - The sendable Data Extension needs exactly one field with the EmailAddress data type.
- What to Do If None of These Solve My Issue - What to do if you can not identify why the test email was not received
- Additional Root Cause Details
- Subscriber Status - The Subscriber being previewed against must be in an Active Subscriber Status.
- List Detective - The Subscriber's email address must pass List Detective.
- RaiseError AMPscript Function - A Test Send can fail to send because the Subscriber and data evaluate the RaiseError function as True.
FAQs
Q: Why didn't my Marketing Cloud Test Send arrive in my inbox?
A: The most common causes are: (1) the email bounced — check Email Tracking (bounces can take up to 72 hours to appear); (2) Marketing Cloud was unable to send — run a NotSent Tracking Extract and check the Reason field; (3) the Subscriber's status is Unsubscribed or Held; (4) the email address was blocked by List Detective; (5) a RaiseError AMPscript function evaluated to True for that Subscriber; or (6) the Sendable Data Extension has more than one or no EmailAddress DataType field.
Q: How do I find out if Marketing Cloud tried to send the email or was blocked before sending?
A: Run a NotSent Tracking Extract in Automation Studio using your JobID. The output file's Reason field will tell you exactly why each subscriber was skipped — for example, "Account Level Opt Out", "List Detective Exclusion", or "Build Email Error or Send Failure".
Q: My Send Preview failed with an error message — what does that mean?
A: The Send Preview failure is caused by a RaiseError AMPscript function in the email evaluating to True for that Subscriber. The error message shows the value of Parameter 1 (S1) of the RaiseError function. Switch to a different Subscriber to confirm the email sends correctly, or review the AMPscript logic to adjust the RaiseError condition.
Q: The email doesn't appear to have bounced and there's no record in the NotSent extract — what do I do?
A: This typically means the bounce hasn't yet appeared in Tracking (bounces can take up to 72 hours). Try sending the test to a different email domain. If the issue persists, open a Salesforce Support case.
1. Identifying the Root Cause
Email Bounce
When Marketing Cloud Engagement sends an email the email has to be accepted by the recipient's mail server. If it is not accepted the email is considered Bounced and will not be delivered as expected. Email bounces can happen for many reasons and require the recipient's mail server to tell us the email could not be delivered and why. It can take up to 72 hours for bounces to be reflected in Marketing Cloud Engagement Email Tracking.
Identify if the email Bounced
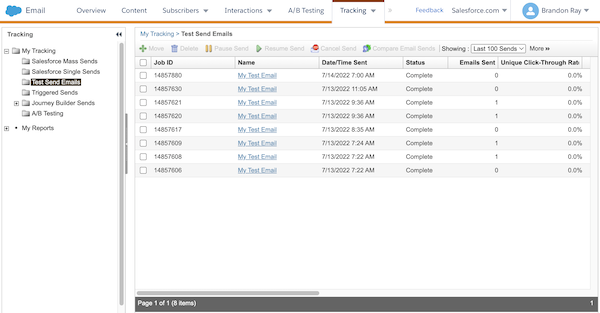
To check if your test send bounced review the Email Tracking for the test send by performing the following steps.
- Navigate to Email Studio
- Hover over Tracking and click Sends
- In the left navigation, window expand the My Tracking folder by clicking +
- Click on the Test Send Emails folder
- Locate the email send and click the Email Name
- In the Send Performance section of the Overview tab, you can see how many of the emails bounced
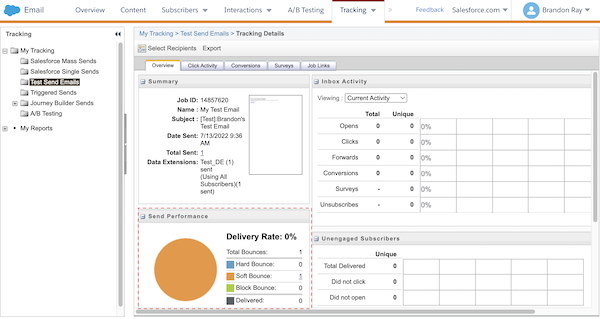
- Click on the number next to Hard, Soft, or Bounce Blocks to get a list of the Subscribers who bounced and the reason.
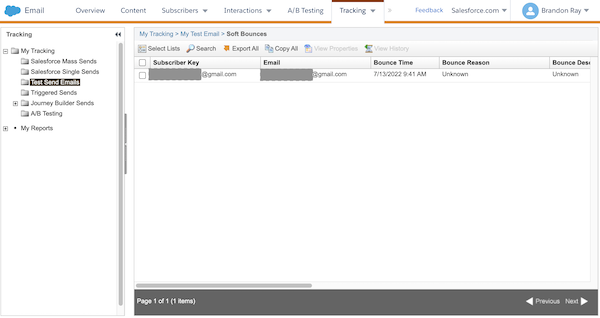
Resolving Bounced Emails
While resolving the issue causing the bounce you can attempt to send the test email to a different email domain. To use the bounced email for future test sends work with your email administrator to resolve the issue listed as the Bounce Reason.
If the email does not appear to have bounced the next step is to run a Not Sent Tracking Extract to see if Marketing Cloud Engagement was unable to send the email.
Additional Information About Bounces
For more information about Email Bounces reasons review the Bounce Reason section at the bottom of the Email Bounce Tracking Extract Output article.
To get the full Bounce response sent by the recipient's email server run a Tracking Extract and make sure you select "Bounce Extract" during the configuration. See the Tracking Data Extract section of this article to learn how to configure and run a Tracking Data Extract.
Unable to Send to the Specific Subscriber
Configure and Run a Not Sent Tracking Extract
A Tracking Data Extract provides granular data regarding several different aspects of email send jobs, such as bounces and Subscribers not sent an email. In this situation, we are primarily interested in the Not Sent extract, but it can be helpful to get the Bounce extract to see the full Bounce message Marketing Cloud Engagement received when an email is not accepted by the recipient's email server.
Review Report on 'Not Sent' subscribers through email sends or watch this quick video to learn how to configure a Tracking Extract. If you want to get Bounce data make sure you also select "Bounce Extract" during the configuration step.
The video above demonstrates how to set up a NotSent Data Extract in Automation Studio, enter a JobID, run the extract, and review the Reason field in the output file to identify why each subscriber did not receive the email.
Review the Not Sent Extract
The Not Sent Data Extract file provides information about Subscribers who were not sent an email. The field we are most interested in is the Reason field. This field tells us why the email was not sent.
The following values are the most common Reasons an email is not sent.

- Account Level Opt Out - The Subscriber has a status of Unsubscribed. The Subscriber Status section of this article to learn more about Subscriber statuses and how to check a specific Subscriber's status.
- Resolution - Use a Subscriber that has an Active Status
- List Detective Exclusion - The email address was caught by List Detective.
- Resolution - Use a Subscriber that will not be excluded by List Detective.
- The List Detective section of this article has additional details about this feature and how you can verify an email will be excluded by List Detective.
- Resolution - Use a Subscriber that will not be excluded by List Detective.
- Build Email Error or Send Failure - The email could not be created for the Subscriber.
- Resolution - Use a Subscriber that does not trigger an AMPscript error during Preview.
- The RaiseError section of this article covers the most common cause for this reason code.
- Resolution - Use a Subscriber that does not trigger an AMPscript error during Preview.
Data Extension EmailAddress Data Type
If the email did not Bounce, there is not a record in the Not Sent extract, and the Subscriber does not exist on the All Subscribers list the Sendable Data Extension may not be configured in a way that allows Marketing Cloud Engagement to send the email.
Watch this quick Salesforce Support video or the information after the video to learn how to configure a sendable data extension and how to check the current configuration.
If a Subscriber hasn’t been added to a List before the Send, Marketing Cloud Engagement attempts to add the SubscriberKey and Email to the All Subscribers or Publication List. A Data Extension with more than one or no EmailAddress DataType field prevents Marketing Cloud Engagement from creating the Subscriber record resulting in the email not being sent.
To check the Data Extension from within the UI, follow these steps:
- Within Email Studio, go into the Subscribers tab
- Under Subscribers, select Data Extensions from the menu
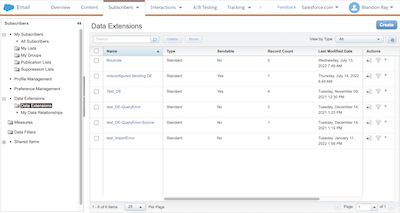
- Locate the folder and Data Extension you’re planning to send to
- After you've clicked into the Data Extension, review the Properties tab and Fields section on the right
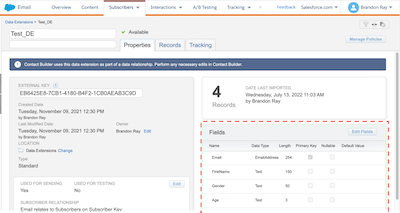
- Review all the Fields and ensure there’s only one EmailAddress DataType field
Note: You can also review the Data Extension via Contact Builder if you wish to use this application inside the Marketing Cloud Engagement
⚠️ If you require two or more EmailAddress DataType fields on the sending Data Extension, it’s suggested to Import the Subscribers into the All Subscribers or a Publication List before the send. This process ensures all Subscribers are in a valid state to receive the email.
⚠️ If you require two or more EmailAddress DataType fields on the sending Data Extension, it’s suggested to Import the Subscribers into the All Subscribers or a Publication List before the send. This process ensures all Subscribers are in a valid state to receive the email.
What to Do If None of These Solve My Issue
If none of these situations are true it is likely that the email has bounced but is not yet reflected in the email tracking. Bounces can take up to 72 hours to appear making it appear that the email was delivered. If you are sending the test send to your company's email domain try using a different email domain to receive your test send or create a support case to understand why the email was not delivered.
2. Additional Root Cause Details
Subscriber Status
Send Preview and Test Sends follow the exact process used to build and send the email to the selected Subscribers. When previewing against a Data Extension, the system uses the Status of the Subscriber in the All Subscribers List to replicate what would occur in a live send. If the Subscriber is in an Unsubscribed or Undeliverable/Held status, Marketing Cloud Engagement doesn’t send the message because the Subscriber wouldn’t receive the message in a live send.
For an overview of Subscriber statuses, review the following video or steps.
The video above explains the different Subscriber status types — Active, Unsubscribed, Held, and Bounced — and how each status determines whether a subscriber receives a Test Send or live email.
To check a Subscriber Status, note down the EmailAddress or SubscriberKey of the record and follow these steps.
- Within Email Studio, go into the Subscribers tab
- Under Subscribers, select the All Subscribers option
- Click the Search button towards the top left of the screen
- You can also select Browse in the top right to limit the search to a particular List you'd like to look within
- Select Email Address or SubscriberKey within the Criteria section
- Add in the value you have for EmailAddress/SubscriberKey
- Click Find Now to search for the records
Review the Subscriber Status that is returned and ensure the Subscriber is Active for the Test Send to be delivered.
List Detective
List Detective prevents email addresses that are known to be invalid, inactive, or spam traps. List Detective is checked for lists during the import process, and for Data Extensions, it is at the time of sending.
Watch this quick screencast from our Support YouTube Channel or read the information after to learn about List Detective and how to check if it is preventing the email from being sent to a Subscriber.
Watch this quick screencast from our Support YouTube Channel or read the information after to learn about List Detective and how to check if it is preventing the email from being sent to a Subscriber.
The video above covers how List Detective works, when it is triggered (during List import vs. at send time for Data Extensions), and how to verify whether an email address is blocked using a List import test or the validateEmail REST API.
If the Subscriber you’re using to send a Test Email isn’t on the All Subscribers list, it checks the Subscriber against List Detective. If it passes the List Detective check, it’s then added to the All Subscribers list, and the Test Email is sent.
There are two ways in which you can check if List Detective prevents an Email Send; Import into a List or REST API.
For a List Import, use the following steps:
- Create a .csv file with two fields; SubscriberKey & EmailAddress
- Go into Email Studio and select Subscribers from the menu
- Within the Subscribers menu, select Lists
- Find the folder the List is saved within
- On the right-hand side, select the icon for Import
- Follow the pop-up to Import the List from the .csv file you created
- Ensure your email is populated in the field before clicking Begin
- When the Import has finished, review the Results File to see if List Detective prevents the email from being added
For more detailed instructions, review the Import into a List Help documentation.
If you're familiar with REST API, you can use the validateEmail resource to check if an EmailAddress is likely to be excluded by List Detective. The following is an example of the body of the request you can use to validate an EmailAddress.
{
  "email": "example@example.com",
  "validators": [ "ListDetectiveValidator" ]
}
RaiseError Function
The RaiseError function is used to exclude small numbers of Subscribers that meet rare evaluations within your code and not exclude large groups of Subscribers. The easiest way to confirm if a Subscriber was excluded from your test send due to RaiseError is to do a Send Preview for the Subscriber.
When you do a Send Preview with a Subscriber that triggers a RaiseError function, the Send Preview fails and generates an error. Within the error is the value of Parameter 1 (S1) in the RaiseError function stating this function was processed by the email.

The RaiseError function allows you to stop the whole send or skip the Subscriber via Parameter 2 (B1) and the boolean option. If you set the value to False and to stop, the Send Alert Manager provides you details about the RaiseError function that stopped the send. The following two items must be configured to allow Alert Manager to provide this information:
When you do a Send Preview with a Subscriber that triggers a RaiseError function, the Send Preview fails and generates an error. Within the error is the value of Parameter 1 (S1) in the RaiseError function stating this function was processed by the email.
The RaiseError function allows you to stop the whole send or skip the Subscriber via Parameter 2 (B1) and the boolean option. If you set the value to False and to stop, the Send Alert Manager provides you details about the RaiseError function that stopped the send. The following two items must be configured to allow Alert Manager to provide this information:
- To receive Alert Manager notifications of failed Jobs within the Marketing Cloud Engagement, select your User.
- Enter a unique Error message in Parameter 1 (S1) of the RaiseError function to include the error in the 'Additional Error details' section of the Alert Manager Email.
If you set parameter 2 of the RaiseError function to True, the Job will skip that Subscriber and continue onto the next Subscriber. Because the Subscriber is skipped and the email doesn't go to an errored state, Alert Manager doesn't provide error details.
솔루션
If your Marketing Cloud Send Preview or Test Send was not delivered, follow these steps in order:
- Check for an Email Bounce — Navigate to Email Studio > Tracking > Sends > Test Send Emails, locate your send, and review the Send Performance section on the Overview tab. Bounces can take up to 72 hours to appear.
- Run a NotSent Tracking Extract — Configure a Tracking Data Extract in Automation Studio selecting "Not Sent Extract" and enter your JobID. Review the Reason field in the output file for the cause of non-delivery (common values: "Account Level Opt Out", "List Detective Exclusion", "Build Email Error or Send Failure").
- Check Subscriber Status — In Email Studio > Subscribers > All Subscribers, search by EmailAddress or SubscriberKey. Ensure the Subscriber's status is Active. If Unsubscribed or Undeliverable/Held, Marketing Cloud will not send the email.
- Check List Detective — If the Subscriber is not on the All Subscribers list, Marketing Cloud checks List Detective before adding them. Import the email address into a List and review the Results File, or use the
validateEmailREST API resource with"validators": ["ListDetectiveValidator"]to check. - Check for RaiseError AMPscript — Do a Send Preview for the Subscriber. If a RaiseError function evaluates to True, the preview will fail with the value of Parameter 1 (S1) in the error message.
- Verify Data Extension EmailAddress DataType — In Email Studio > Subscribers > Data Extensions, open the sending DE's Properties tab and Fields section. Ensure exactly one field has the EmailAddress DataType. More than one or zero will prevent subscriber record creation and stop the send.
추가 자원
Knowledge 기사 번호
000382628
이 기사를 통해 문제를 해결했습니까?
개선을 위한 의견을 보내주세요.
