Välj en organisation
Getting Started: Financial Services with Service in Salesforce
Publiceringsdatum: Apr 14, 2026
Beskrivning
This knowledge article is designed to help you get started with how to leverage Agentforce Financial Services (formerly Financial Services Cloud) with Agentforce Service (formerly Service Cloud) to improve client servicing and case management of wealth clients. It outlines how to approach key use cases related to client servicing and case management from either Lightning Experience or the Classic Service Console, depending on the user role. Product limitations that should be considered are also highlighted in this knowledge article.
Overview
Financial Services Lightning Experience for Case Management
Financial Services with Classic Service Console
Configuring Financial Services in the Classic Service Console
Classic Service Console Features with Financial Services
Financial Services Lightning Components Limitations
Lösning
This knowledge article is designed to help you get started with how to leverage Financial Services with Service to improve client servicing and case management of wealth clients. It outlines how to approach key use cases related to client servicing and case management from either Lightning Experience or the Classic Service Console, depending on the user role. Product limitations that should be considered are also highlighted in this knowledge article.
To configure and deploy Financial Services with Service, customers should work Salesforce Services or a partner. A setup of Financial Services within an org must be completed first before any Service configuration. See Welcome to Financial Services for more details.
Note: This knowledge base article describes the Service functionalities with which the Financial Services features work. Salesforce makes no representation regarding Financial Services features functioning with any other Service functionality not expressly stated in this knowledge base article. Use of Financial Services features with such other Service functionality may not be possible or may require additional configuration steps.
Financial Services Lightning Experience for Case Management
Sample Configuration
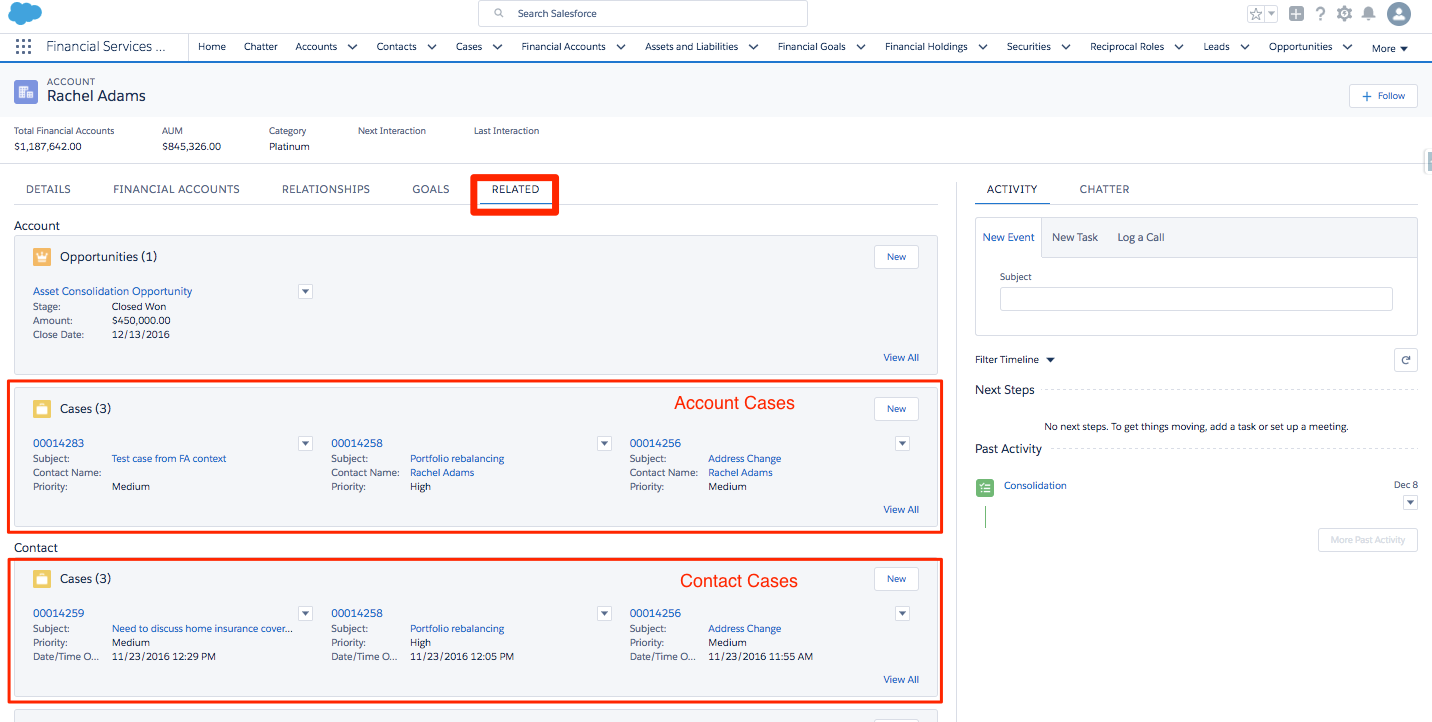
Cases are accessible through related lists from the Related tab on the Client profile page with configuration.
The Cases related list can be configured on the Account (Individual) and/or Contact (Individual) Page Layouts. Adding the related list to the account page layout will only display cases related to the Account part of the Client, and adding the related list to the contact page layout only displays cases related to the Contact part of the client.
If you determine the exact scope of Case usage, you may be able to simplify the user experience by only creating/editing/viewing Cases on only the Account OR Contact. If you cannot fully scope the use cases, the following configuration is suggested:
To ensure that cases associated to both the account and the contact parts of the client are shown in the Related tab on the Client profile, configure both page layouts to display the Case related list. For the most optimal user experience, we recommend that you add the Case Related list to the bottom of the related list section for the Account (Individual) page layout, and the Case Related list to the top of the related list section for the Contact (Individual) page layout.
Managing Cases
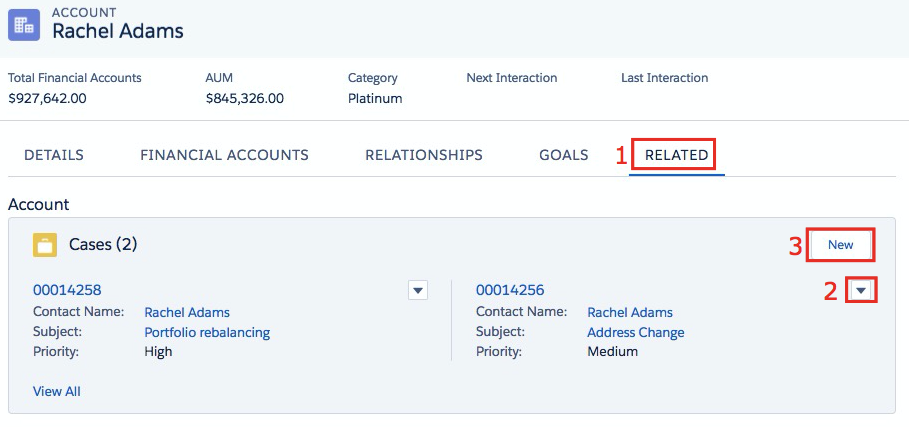
Users that need to view and manage cases related to Individual Clients can follow these steps:
1. To view, navigate to the Related tab on the Client page and see the cases under the Cases related list(s).
2. To edit or delete the case, click on the drop-down against a case.
3. To create a new case for the client from the Cases related list, click the New button.
Sample Configuration
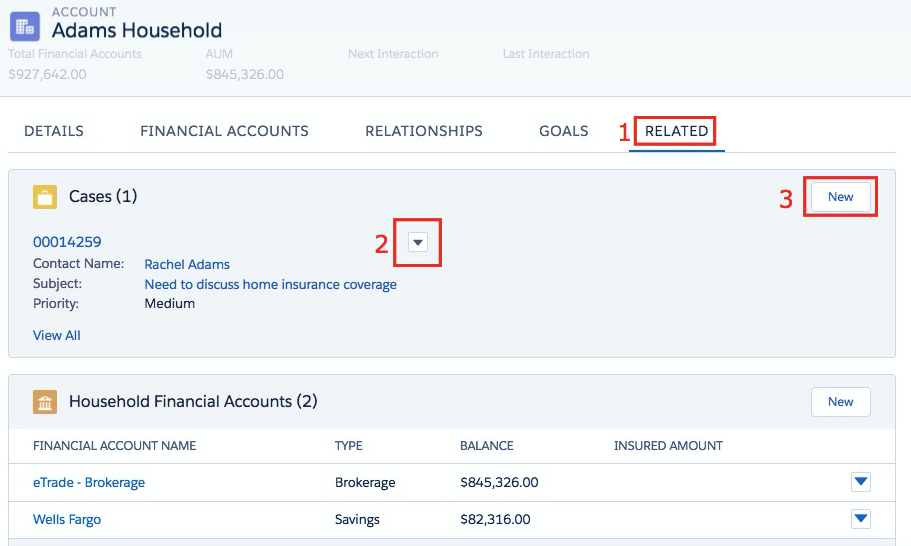
Cases are accessible through related lists in the Related tab on the Household profile page with configuration.
The Cases related list can be added and configured using the Account (Household) Page Layout.
Managing Cases
Users that need to view and manage cases related to Households can follow these steps:
1. To view, navigate to the Related tab on the Household page and see the cases under the Cases related list(s).
2. To edit or delete the case, click on the drop-down against the case.
3. To create a new case for the Household from the Cases related list, click the New button.
Note: Currently, any case associated to a Client does not automatically roll up to the corresponding Household through Financial Services’s roll up functionality.
Financial Services with Classic Service Console
Important User Behavior Note:
While Financial Services is optimized for Lightning Experience, some client servicing uses cases may require the use of Service functionality which is not currently available in Lightning Experience. The following sections provide you with an overview of the Lightning versus Classic Service Console user experience, as well as sample configuration of how some of the Classic Service Console functionality can be leveraged with Financial Services data to support client servicing use cases.
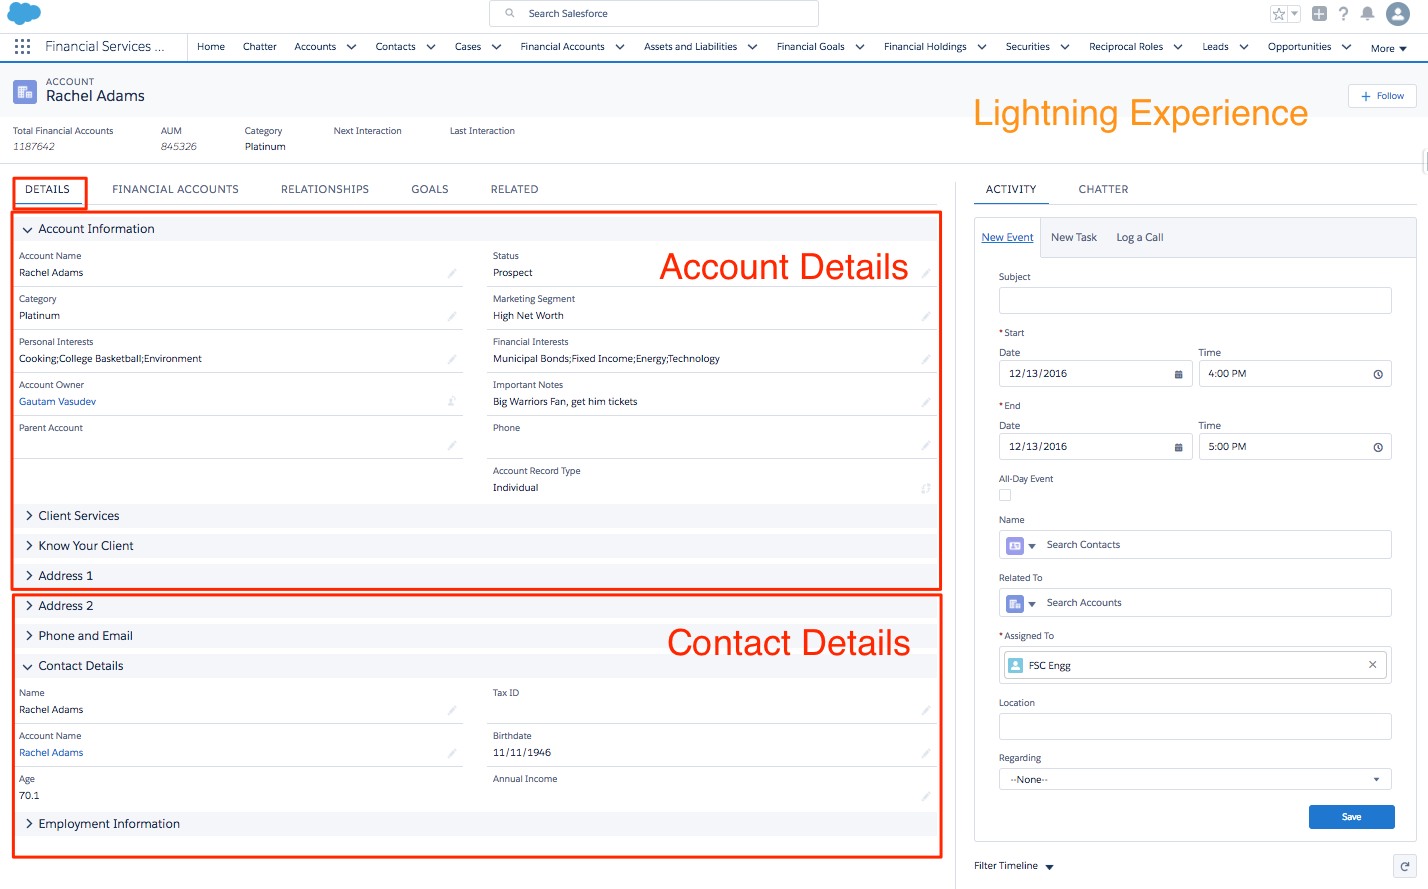
Financial Services represents an individual Client using a combination of the standard Account and Contact objects. The user experience for accessing a Client’s information will vary, as outlined below:
1. Lightning Experience: Clicking on an Individual contact will redirect the user to the Individual’s consolidated Client profile in a unified object view of an individual. In this view, clients appear in Salesforce as an individual, not as separate account and contact records (see screenshot below).
2. Classic Service Console:
- Clicking on an Account–The user will see the account details page.
- Clicking on a Contact–The user will see both the account and contact details pages separately, based on the Sample Configuration Steps 2 - 5 (see screenshot below).

Configuring Financial Services in the Classic Service Console
You can leverage the standard Classic Service Console configuration setup to setup Financial Services in the Classic Service Console. The following is a series of sample configuration steps to get started, however you are encouraged to modify the configuration options as needed for your use case.
Sample Configuration Steps
1. Review the Configure a Salesforce Console Trailhead module, and set up a Console app. Set up Classic Service Console users with the Advisor Profile and Permission Set.
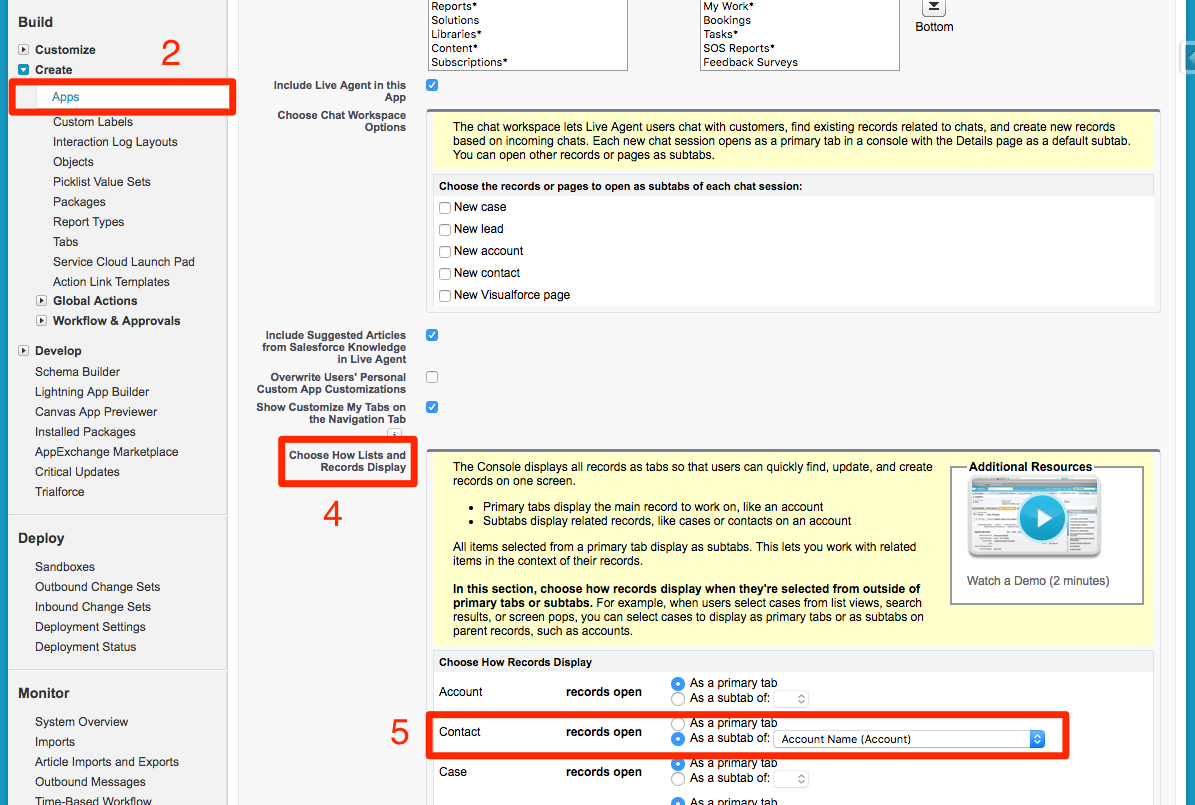
2. Navigate to Setup > Create > Apps.
3. Click on Edit next to the console app that you have set up.
4. Scroll down to the section titled Choose How Lists and Records Display.
5. For Contacts, select the record to open as a subtab of Account Name (Account).
Note: This configuration step allows the user to open both the account details page and the contact details page as two sub-tabs within a single tab, thus allowing the user to access the individual client’s complete records.
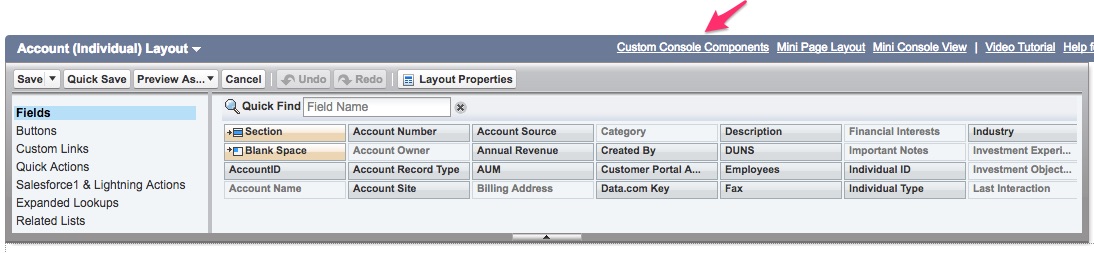
Account (Individual) Page Layout:
6. Navigate to the Account (Individual) page layout.
7. Edit Custom Console Components.
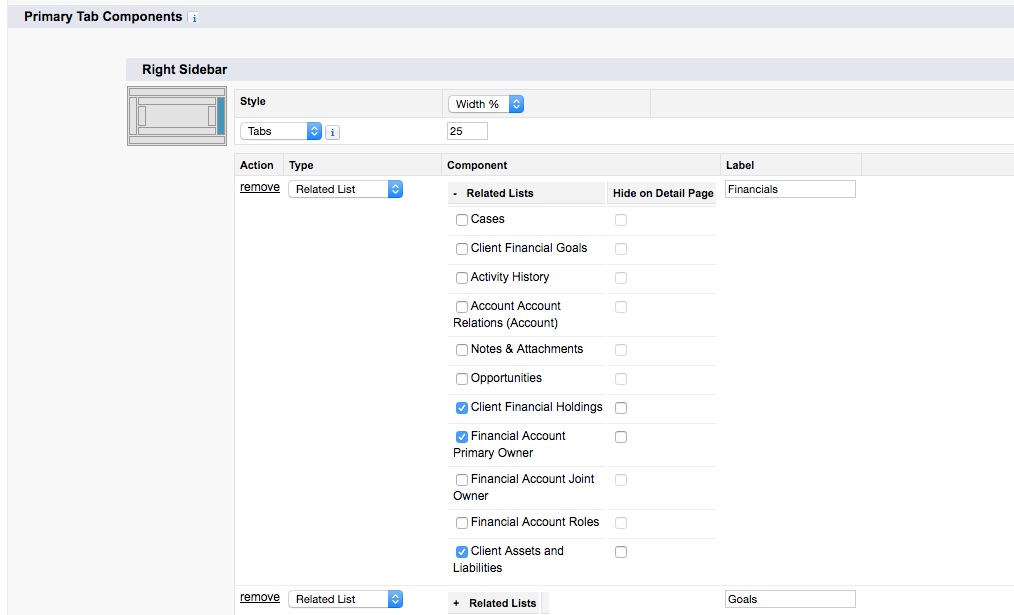
8. Configure the Right Sidebar to show two related list components using the Tabs style:
- Financials (Related Lists: Financial Account Primary Owner, Financial Account Joint Owner, Client Financial Holdings, Client Assets and Liabilities)
- Goals (Related Lists: Client Financial Goals)
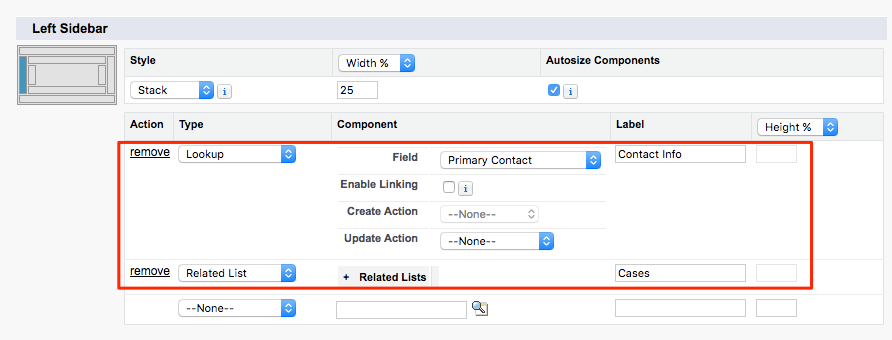
9. Configure the Left Sidebar to show the following components using the Stack style:
- Contact Info (Lookup to Primary Contact)
- Cases
10. Save the page layout.
Contact (Individual) Page Layout:
11. Edit the page layout for Contact (Individual) and add the Related Accounts related list.
- Click on the wrench to open the settings for the Related Account related list.
- Expand the Buttons section by clicking +. Select ‘Add Relationship’.
- Click OK.
- Save the layout.
Account (Household) Page Layout:
12. Edit the page layout for Account (Household) and add the Related Contacts related list.
- Click on the wrench to open the settings for the Related Contacts related list
- Expand the Buttons section by clicking +. Select ‘Add Relationship’.
- Click OK.
- Save the layout.
Note: The Related Contacts related list on the Household profile page displays the members of the household, while the Related Accounts related list on the individual Contact’s page displays the Client’s Household (as well as the Account part of the individual). To create a new membership in a Household, the user can use the ‘Add Relationship’ button on the Related Contacts related list on the Household details page or the Related Accounts related list on the individual Contact details page. It is important to note that, as of the Financial Services Winter ‘17 release, Household membership restrictions apply - an individual can only be a member of one household.
Household membership functionality leverages the Account Contact Relationships object in Salesforce. Thus, the ‘Add Relationship’ button utilizes the Account Contact Relationship page layout in Classic Service Console to create Household Memberships. To assign the packaged page layout to the user’s profile, see steps 13-16.
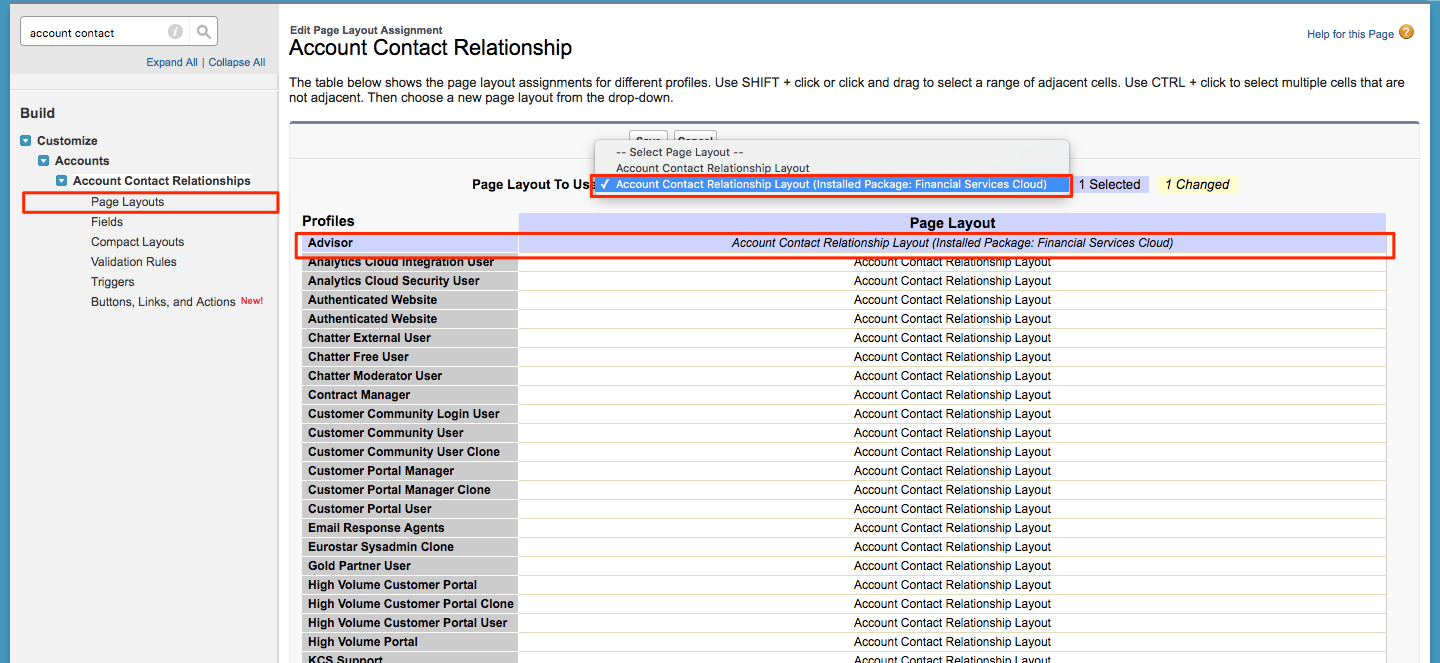
Page Layout Assignment for Account Contact Relationship (Household Memberships)
13. From Setup, navigate to Customize > Accounts > Account Contact Relationships > Page Layouts
14. Click Page Layout Assignments.
15. From the grid displayed,
- For profiles, click Advisor
- For Page Layout, select Account Contact Relationship Layout (Installed Package: Financial Services Cloud)
16. Save your changes.
Configuring in Salesforce Classic UI: Service Console Features with Financial Services
The following Classic Service Console features have been certified for usage with Financial Services:
- Case Management with Financial Services
- CTI Integration with Financial Services
- Omni-Channel with Financial Services
- Live Agent with Financial Services
- History Component with Financial Services
- SOS with Financial Services
See the table below for more details:
| Service Functionality | Financial Services Functionality Note |
| Case Management |
Case management can be made available from either the sidebar component for cases or from the related list in the Detail section. For custom components, we recommend using not more than four components to ensure optimal performance. |
| CTI |
Outbound Calls: The user can place a call to an individual client directly by clicking on a phone number listed on any object. In Classic Service Console, the Activity History related list captures call logs. In Lightning, the information is aggregated in the Activity timeline on the Client profile page. Inbound Calls: If the dialer’s phone number matches the details on the individual account, the Account details page is opened in the Classic Service Console. If the dialer’s phone number matches the details on the individual contact, the Contact details page is opened in the Classic Service Console. Call logs associated only with the Individual Contact are displayed on the Activity timeline on a Client’s profile in Lightning. |
| Omni-Channel |
Omni-Channel has the capability to route all Financial Services objects except Account and Contact (Clients and Households). Refer to the Omni-Channel documentation for more details. |
| Live Agent |
When setting up Live Agent to create a Client (Individual Account and Contact), set up Create Account only. Financial Services automatically creates the contact part of the client when an Account of the individual record type is created. Refer to Live Agent documentation for setup details. |
Financial Services Lightning Component Limitations
Financial Services Lightning components can not be rendered in Salesforce Classic.
- As a result, Financial Services modules on the Home Page such as the Birthday Card, RMD Card, Lead Card, Task Card and Event Card can not be used from within the Classic Service Console.
- Client and Household consolidated profile views can not be accessed in the Classic Service Console.
Knowledge-artikelnummer
000383521
Löste denna artikel ditt problem?
Berätta för oss vad vi kan förbättra!