Vælg en organisation
Add an image to an email signature in Salesforce
Udgivelsesdato: Jul 11, 2024
Beskrivelse
Løsning
Note: HTML code falls outside the scope of Salesforce Support's offerings and this information is provided as a courtesy. For more in-depth coverage of HTML, please review 'HTML5 Tutorial' on w3school site.
In Salesforce Classic
Upload an image into the Documents tab
- Go to the Documents tab, or the '+' icon to view all tabs and choose Documents from there.
- Click New.
- Fill-up the required fields and make sure to select the Externally Available Image checkbox.
- Select which folder you'd like to save the image to.
- Select the Enter the path of the file or click browse to find the file radio button.
- Click the Choose File button and navigate to where the image is located on your computer.
- Click Save.
Get the URL of the uploaded image
- In the Documents tab, click on the newly uploaded image.
- Right-click on the preview pane of the image you uploaded and click on Copy image address.
Add the image to your email signature
- Click your name at the upper-right portion of the screen.
- Click My Settings.
- In the Quick Find search box on the left-side of the screen, enter My Email Settings.
- Click My Email Settings.
- In the Email Signature field, enter <img src = "link here"/>.
- Click Save.
In Lightning Experience
Upload an image into Files tab
- Go to the Files tab, or the App Launcher icon to view all apps and choose Files from there.
- Click the Upload Files button and navigate to where the image is located on your computer.
Get the URL of the uploaded image
1. In the Files tab, click on the drop-down arrow to the far right of the image desired.
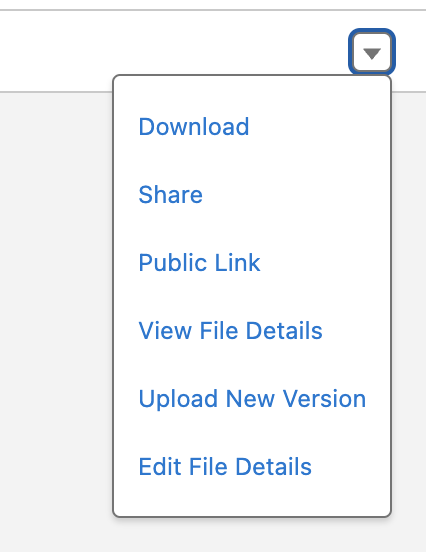
2. Select the Public Link option, then click on the Copy Link button. Note: For newly uploaded file, click on the Create Link button to generate public link, then copy the public link.
3. Paste the copied link on a new browser tab or window.
4. From the new browser tab or window, right-click on the image preview and click on Copy image address. Use the link to add the image to your email signature (continue with the steps below).
Add the image to your email signature
- Click your avatar at the upper-right portion of the screen.
- Click Settings.
- In the Quick Find search box on the left-side of the screen, enter My Email Settings.
- Click My Email Settings.
- In the Email Signature field, enter <img src = "link here"/>.
- Click Save.
It's important to note that this will only work when sending emails in HTML format and does not work if a template is selected, unless the signature logo is included in the template.
If an email is sent in plain text format it will display <img src = "link here"/> in the signature. If you're utilizing a template, you'll need to include the image and signature within the template's body.
If the signature is used as a merge field {{{Sender.Signature}}}, the signature will be considered as text and will display <img src = "link here"/> in the signature.
If the image is broken after adding it to the email signature, try regenerating a file preview by following the steps in this article.
If the Public Link option is not displayed, check your profile or permission settings in this article, Enable Content Deliveries and Public Links.
Yderligere ressourcer
Add Images to Email Templates in Salesforce Classic
Add links to signatures
Vidensartikelnummer
000385763
Løste denne artikel dit problem?
Giv os besked, så vi kan forbedre os!