Vælg en organisation
Share Documents and Folders in Quip
Udgivelsesdato: Oct 16, 2024
Beskrivelse
Learn how to share documents and folders within Quip.
Løsning
Many hands make light work, as they say, and collaborating makes your work lighting-fast and feather-light. Whether you're tracking a project, planning next year's budget, or just getting your team's lunch order, Quip gets the people you need in the documents you're working on.
Your work deserves to be seen. So share it. Here's how:
Contents
- The basics of sharing
- Adding individual people
- Adding content to folders
- Getting a shareable link
- Sharing with people outside of your organization
- A little more about sharing links with external users
- Using Restricted External Sharing
- How can I tell who a document is shared with?
- A note about folders
- How do I request access to something I don't have access to?
- How do I remove access to a document, spreadsheet, folder, or chat room?
The basics of sharing
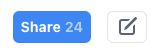
There are three different ways to share content with other people, and all of them are available through the “Share” button at the top right corner of your document window.
Once you click on "Share," a nifty modal window will appear.
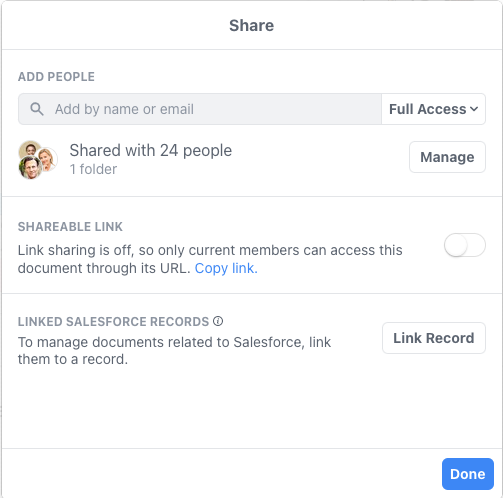
From here, you can:
- Add individual people by manually entering their names or email addresses.
- Add a group of people by adding the document to a folder. Anyone who belongs to the folder will have access to the documents in it.
- Get a shareable link for your document by turning on the Shareable Link toggle. Copy the link and send it over to whoever you want to share it with.
The best part about collaborating with Quip is for every way there is to share, there’s a way to customize access levels through granular permissions. You control how many cooks are in the kitchen.
Adding individual people
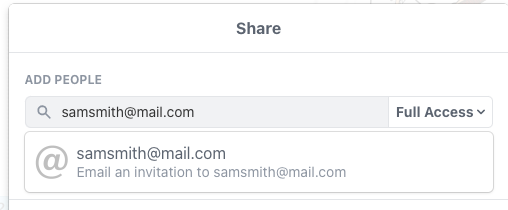
In the "Add by name or email" field, you can:
- Type the name of anyone in your organization. It'll probably autocomplete after the first few characters, by the way.
- Click on the name of someone in your organization. We've listed the people you interact with most, just to save you some time.
- Type the email address of anyone at all, whether they're a part of your organization or not. So you don't lose track of who's who, we've added a handy red badge indicating a person's organization. No need to play detective — we will always let you know when someone is outside of your organization so you can share responsibly.
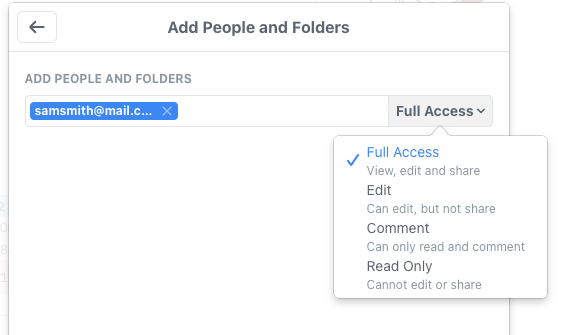
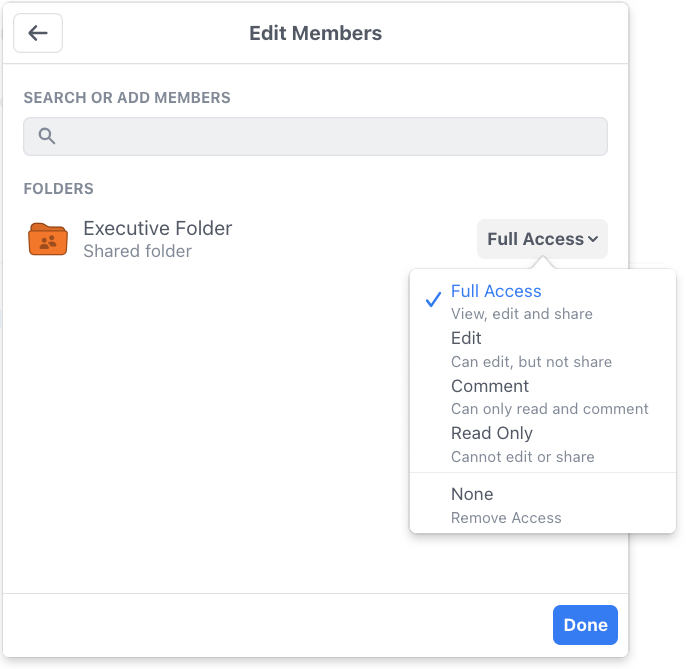
- Assign access permissions. With granular permissions, you can make sure the right level of access is given to the right people. For each person you share your document with, you can grant Full Access, Edit Access, Comment Access or View Only Access.
Adding content to a folder
To share your document with a group of people, just add it to a folder and ensure the group has membership to the folder. This will automatically share your document with everyone who belongs to that folder.
In the search bar, type in the name of the folder and hit “Share.” Easy! Don’t forget to manage the folder’s access level — just like when you share with individuals, you can customize a group’s interaction with your document through granular permissions.
The fun doesn’t stop there—you can also share a document across multiple folders. Changes made anywhere will update the document everywhere, saving you the trouble of versioning. Phew.
By the way: If the folder belongs to 7 people or fewer, all of those people will be notified about the document you just added. If it belongs to more than 7 people, we'll skip the notification. (We've found that for larger groups, these notifications can be more cumbersome than helpful.)
Note: Every site member has a Private Folder by default. Every time a new document is created, it will be housed in your Private Folder. All content in your Private folder will remain private unless the document(s) is shared.
Click here to learn more about folders. Note: The permission to a folder can be either full access or none by design. There is no read-only or other permissions for the folders.
Getting a shareable link
If you're a copy-and-paster, and some of us are, you can share a document or folder with other people by sending them a URL that links to it. Just go to the document you want to share and turn on the Shareable Link toggle in the “Share” dialog.
Below is an example of sharing at a folder level. Click on the 3 dots button and select Share.. from the menu. The rest of the step for toggling and turning on the Shareable Link is the same as the Document sharing example described above.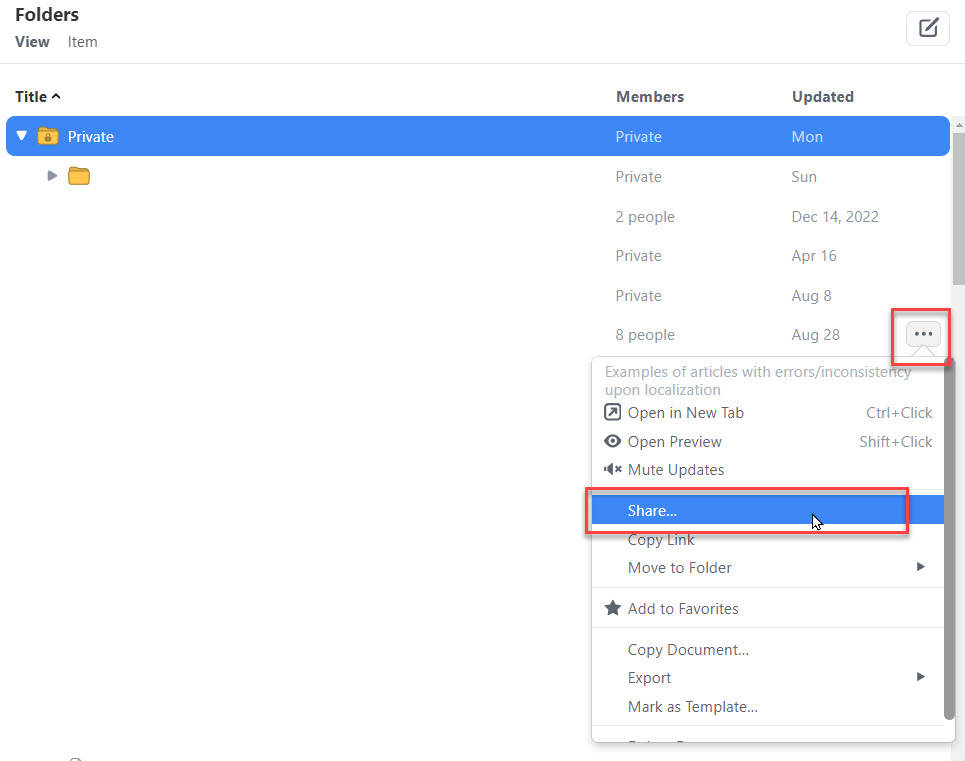
When the Shareable Link toggle is turned off, it means that the document can't be accessed using its URL. (This is the default setting for new documents, by the way.
Since a link can be passed around pretty easily once you've sent it out, there's extra control over what people can and can't do with a document that they arrived at through a URL:
- “View, edit, and comment” means people can view and edit the document, as well as participate in the conversation pane and inline comments.
- “View Only” means they can view the document, but not edit it.
The “View Only” setting includes some additional controls over what a viewer actually gets to view:
- “Show conversation” allows viewers to see the conversation pane of your document.
- “Show diffs” includes the edit history of your document in that conversation pane.
- “Allow new messages” allows other users to add to the document conversation (but not edit the document itself).
- “Allow comments” allows other users to leave comments on the document's contents (but not to edit those contents).
- “Allow requests to edit” lets other users ask permission to edit the document's contents.
In both the “View only” and “View & Edit” settings, you'll also see:
- “Allow access outside of whatever-your-domain-is.com” allows people who are outside of your organization to access the document you're sharing.
- “Notify people at whatever-your-domain-is.com when they’re mentioned” ensures the people in your organization stay up-to-date and connected with relevant notifications.
Keep in mind that “outside of your organization” means anyone outside your organization. If you send a URL to a customer, and that customer sends the URL to George Clooney, then George Clooney will be also able to read your document. So make sure you didn't put anything in there that you wouldn't want George Clooney to see.
Sharing with people outside of your organization
Collaboration isn't just about what happens on your team. That's why we've made it as easy to share with people outside of your company as it is to share within it. Here's how, always starting from the “Share” menu:
- Type in the email address of the person you want to share your work with in the “Add by name or email” field.
- Turn on the shareable link, then click “Copy” to copy the document's URL to your clipboard (and turn on sharing-by-URL in the process). Now you can send that URL to whoever you want, however you want.
When people from outside your organization (specifically-your site) have joined a document, you'll see a little badge in your document's title bar indicating as much. Click on the badge to open the sharing settings and access the full list of members.

A little more about sharing links with external users
An external user’s permissions level is dependent on having a account:
- Visitors with accounts will be able to access the document per the permissions set at the link-level.
- Visitors without accounts will only be able to view your document—not comment on it or edit its contents. They'll be prompted to sign up if they want to do either of those things. And heck, even if they don't want to do those either of those things, we'd love to have them here on Quip anyway. ☺️
Using Restricted External Sharing
If your company is using Quip Enterprise Tier, it has the option to disable external sharing, or to restrict external sharing to an allowlist of permitted collaborators.
If your company has enabled this setting, you won't be able to share documents with anyone outside your company, unless your administrator has added them to the allowlist. You can contact your admin to add your external collaborators; Quip support can't add external collaborators for you. If you try to share with someone who's not on the allowlist, you'll see an error message.
You also won't be able to add any documents to a folder that was created by someone at another company, since that folder and the documents inside would be able to be shared outside your company. (Similarly, you won't be able to add documents or folders to folders that are inside folders created by someone at another company, and so on.) If you try to add a document to a folder created by someone at another company, you'll see an error message.
How can I tell with whom a document is shared?
Look at the "Share" button at the top of your document.
- See a number? That's the number of people who the document has been shared with.
- Don't see a number? Then you're the only person with access to the document.
If you want to know the specific people on any document, click the “Share” button and click “Manage” to view a complete list.
A note about shared folders
Say you’d like to share a nested sub-folder with an individual without providing access to the entire top-level folder. Yikes, sounds more like inception than document sharing. Take a deep breath, keep calm — here’s how to do it:
- Click the “Share” button from within the nested sub-folder.
- Select “Advanced Options” from the dropdown. Congratulations, you’re a power user now.
- Select “Add People to this Folder Only” and type in as many individual names or email addresses as you’d like.
Pro tip: Individuals added to a sub-folder will show up under “Additional People” in the “Share" dropdown menu.
To see who a sub-folder is shared with:
- Click on the “Share” button of the sub-folder.
- Select the top-level folder under the “Group” section. This will bring you to a Folder Permissions view — from here, you can see both the number of members in the top-level folder and the individuals in the sub-folder level.
- Click on either of the numbers to view the specifics of who a folder has been shared with. You can also click on “View All Members” to see a comprehensive list.
How do I request access to something I don't have access to?
Occasionally, you'll find yourself following a link to a document you don't have access to. Don't fret! If you want to request access, it's easy enough to do so. Just click the “Request Access” button that shows up when you try to visit the link.
Who gets notified about your request, you might wonder? Everyone who has access to the document. Keep that in mind if you're asking to see a document that might be shared with a large number of people.
How do I remove access to a document, spreadsheet, folder, or chat room?
The best way to un-share something depends on how you shared it in the first place.
- If you added people to it individually, you can remove them by clicking on the “Share” button, then selecting “Manage.” Next to the folks you want to remove, click on their current access level. This will trigger a dropdown menu with an option to “Remove Access,” among others. Go ahead and click it.
- If you added people via a shared folder, you can trigger the same dropdown menu to “Remove Access”. Additionally, you can either move it out of that shared folder, or you can remove people from the folder itself.
- To move it to a different folder, click on the “Share” button, select “Move this Folder,” and then finally select “Move to Another Folder.” You can either move it to a different shared folder to share it with a different set of people, or you can move it to a private folder to un-share it with everyone.
-
- To remove people from the folder itself, go to that folder, click on the “Share” button, then select “Remove People.” The people you remove will lose access to everything in that folder, so make sure there's nothing in there they need.
.
-
- A mind-blowing detail: If you added people to a document individually in addition to adding people via a shared folder, moving that document back to a private folder will only remove the latter group. The people you added individually will still have access to the document.
- If you added people by sharing a URL with them, you can reduce the level of access people have through that URL, or you can disable that URL entirely.
- Important: Disabling links won't affect people who followed the URL and then joined as collaborators. Once they've added themselves to your content, you'll need to remove them individually by clicking on the “Share” button, selecting “Manage,” and then selecting “Remove People.”
Vidensartikelnummer
000389898
Løste denne artikel dit problem?
Giv os besked, så vi kan forbedre os!