Velg en organisasjon
Auto Submit Salesforce Campaign Record into Approval Process with Flow
Publiseringsdato: Aug 18, 2026
Beskrivelse
Løsning
This article explains how to create an Approval Process for the Campaign object and use an After-Save Record-Triggered Flow to automatically submit a record into that Approval Process.
Step 1: Create an Approval Process
- Click Setup.
- In the Quick Find box, type Approval Processes.
- Click on the Create New Approval Process | Use Standard Setup Wizard button.
- Select the Campaign object for Manage Approval Processes For drop-down.
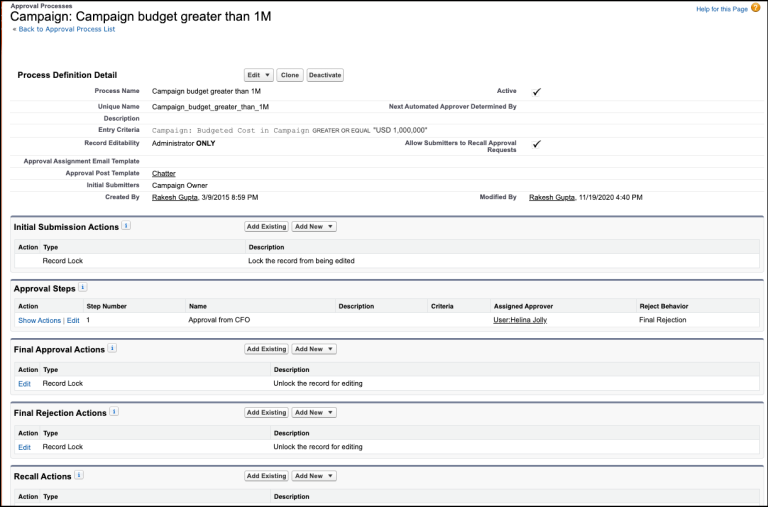
- Now create an approval process, as shown in the following screenshot:
Step 2: Define the Flow Properties
As we have a requirement for submitting the record into the approval process, this is why we have to use the After-save flow.
- Click Setup.
- In the Quick Find box, type Flows.
- Select Flows then click on the New Flow.
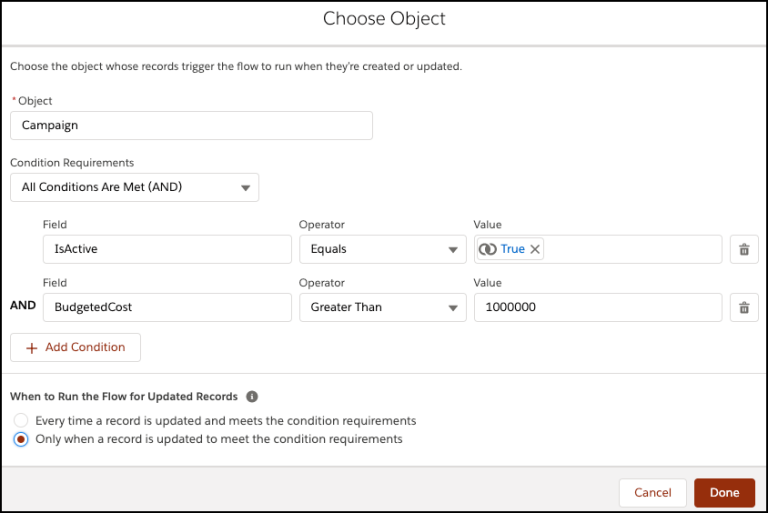
- Select the Record-Triggered Flow option and click on Next and configure the flow as follows:
- How do you want to start building: Freeform
- Trigger the Flow When: A record is created or updated
- Run Flow: After the record is saved
- Object: Campaign
- Select All Condition Are Met (AND).
- Set Conditions
- Row 1
- Field: Campaign | IsActive
- Operator: Equals
- Value: {!$GlobalConstant.True}
- Click Add Condition
- Row 2
- Field: Campaign | Budgeted Cost in Campaign
- Operator: Greater Than
- Value: 1000000
- Row 1
- Select Only when a record is updated to meet the condition requirements.
- Click Done.
Step 3: Call an Action to Submit the Record for Approval
The next step is to submit the campaign record for approval. For this, we will call the Submit for Approval core action.
- Under Toolbox, select Element.
- Drag-and-drop Action element onto the Flow designer.
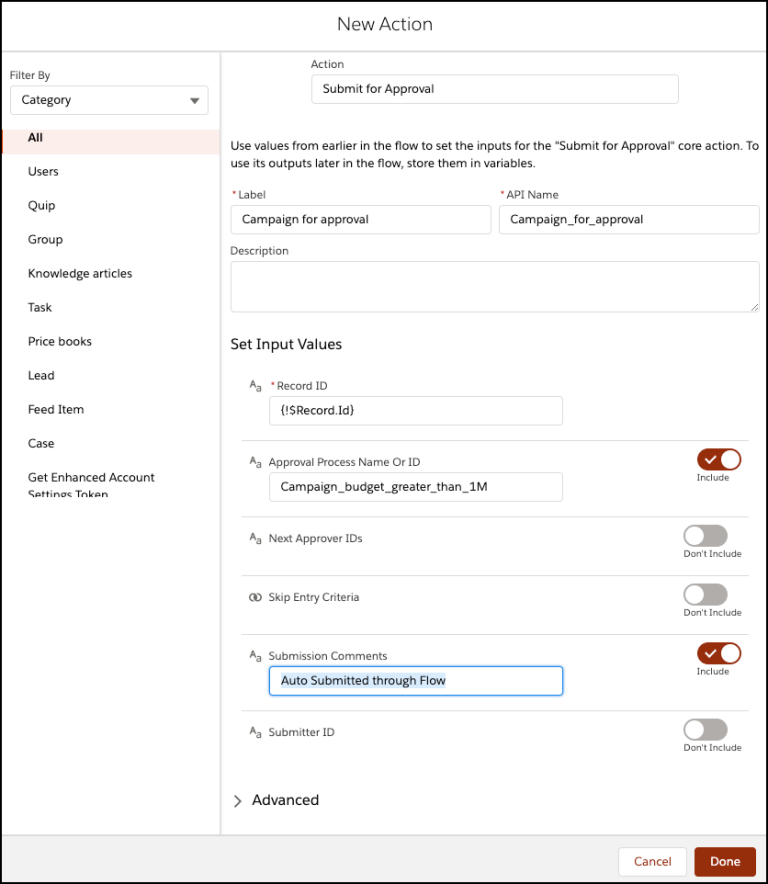
- In the Action box, type Submit for Approval.
- Click on the Submit for Approval Core action.
- Set Input Values:
- Record ID: {!$Record.Id}
- Approval Process Name Or ID: Campaign_budget_greater_than_1M
- Submission Comments: Auto Submitted through Flow
- Click Done.
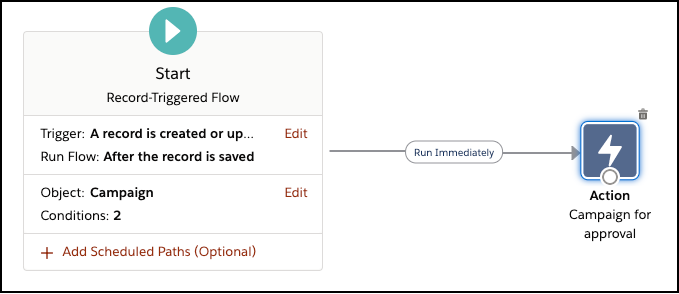
In the end, your Flow will look like the following screenshot:
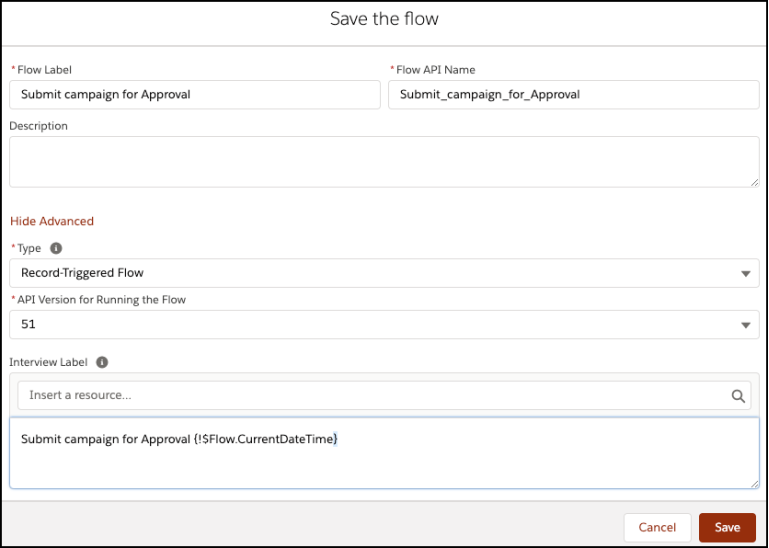
Step 4: Save and Activate the Flow
- Click Save.
- Enter Flow Label the API Name will auto-populate.
- Click Show Advanced.
- Type: Record-Triggered Flow
- API Version for Running the Flow: 51
- Interview Label: Submit campaign for Approval {!$Flow.CurrentDateTime}
- Click Save.
Once everything looks good, click the Activate button.
Written By: Rakesh Gupta | Salesforce MVP
Rakesh is Senior Solution Architect, Salesforce MVP, and Author. With a background in computer science, Rakesh is passionate about solution design and process automation.
Submissions reflect only the opinions of the user who made available the Submission and not the opinions of Salesforce, regardless of whether the user is affiliated with Salesforce, and may contain or constitute products, services, information, data, content and other materials made available by or on behalf of third parties ("Third Party Materials"). Salesforce neither controls nor endorses, nor is Salesforce responsible for, any Third Party Materials, including their accuracy, validity, timeliness, completeness, reliability, integrity, quality, legality, usefulness or safety, or any applicable intellectual property rights. Any Submissions made available through any message board or forum in response to posted questions, or that otherwise purports to answer any questions, including any questions about Salesforce or Programs, are made available for your general knowledge only and should never be relied upon as answers to your specific questions (even if an answer is marked as a "best" answer or with any similar qualifications). You should always contact Salesforce support for answers to your specific questions. Salesforce has no control over Submissions, and is not responsible for any use or misuse (including any distribution) by any third party of Submissions.
If you have questions, tap into the wisdom of our entire Trailblazer Community here: https://trailhead.salesforce.com/trailblazer-community/feed
Flere ressurser
Knowledge-artikkelnummer
000392569
Hjalp denne artikkelen med å løse problemet ditt?
La oss få vite det slik at vi kan forbedre!
