選擇組織
Quip Admin Console
發佈日期: Mar 16, 2026
描述
解決方案
This article covers the following:
- Getting to the admin console
- Managing site members
- Adding new members
- Viewing and editing information about members
- Disabling accounts
- Merging accounts
- Promoting members to admins
- Exporting user activity
Getting to the admin console
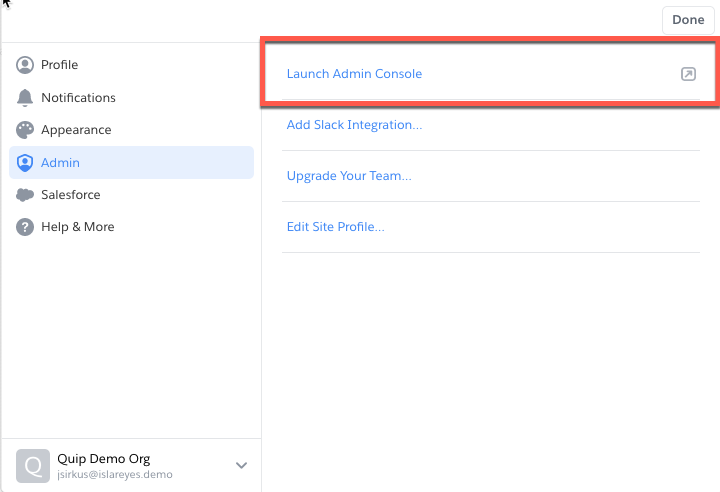
This is where you'll take most of your administrative actions. You can get to the admin console through your account menu:
Click your picture in the bottom left-hand corner > Admin > Launch Admin Console
All Salesforce Anywhere (Quip) paid sites have admin consoles with assigned administrators.
Managing site members
The Admin Console can be navigated from the left-hand side bar of the console. Select Site Members to take action on member-related tasks. Click the drop down menu at the top of the page to navigate the following:
- Enabled members: All active, billable members of your site. Doesn't include provisioned members or bots
- Admins: Members with administrative privileges on your site. That includes you
- Provisioned members: Members who've been added to the site through the admin console (more on that below), but have yet to sign in
- Pending members: Members who've signed up for your site, but have yet to verify their email addresses through the verification email we send to new members
- Deactivated members: Ex-members of your site who have been deactivated by you or another admin.
You can also look up a member using their name or email by clicking Search for Site Member at the top right.
Adding new members
Go to the Site Members tab > Provision Members
Members can be added by either:
- manually adding names and email addresses,
- uploading a CSV file that includes name and email pairs, one pair per row,
- or provisioning everyone from your Salesforce org
Once you’ve chosen how to add your users, click Continue, and on the next screen you’ll have a few different options:
- You can choose whether an email gets sent to the newly provisioned users
- You can choose whether users receive helpful tips & tricks onboarding emails
- You can choose whether users receive digest emails about the collaboration happening in Quip before they sign in
- You can customize the email that gets sent to users (if you choose to send an email), or use our prefilled default text
If you’re provisioning members to your site who already have a personal Quip account, or an account associated with another site, you’ll have a second step where you’ll be able to choose different options for those users. For example, you might choose not to send those users tips & tricks emails, or to send them a different custom email acknowledging that they have a Salesforce Anywhere (Quip) account on another site.
When the provisioned member logs in for the first time, their account will be enabled and added to your bill. (Until then, of course, they cost nothing.)
Viewing and editing information about members
Click on a member's name in the admin console to view and edit their profile, which includes all of the following information:
- Name
- Email address (or addresses, if they have more than one)
- Date they joined your site
- Member status—active, provisioned, etc.
- Role—member, admin, or bot
- Which admin-created group folders they belong to
- Which member-created shared folders they belong to
- Which mobile devices they've installed Quip on
To change a member's name or email address from their profile click Edit at the top right.
To log out a member, assign an admin role, deactivate, or test connection health, click on the drop down menu to the right of Edit.
Disabling accounts
When a member leaves the business:
- Go to the Site Members tab of your admin console
- Find the member you want to deactivate, and click on the drop down menu to the far right of their listing, select Deactivate
To re-enable a member's account, sort Site Members by Deactivated, then enable whoever it is you want bring back.
When an account is disabled, that members content exists in 1 of 2 places.
- If the content is shared with other site members, the other site members still have access to the content, ie content exists for those shared on it.
- If the content is private, it exists, but is not accessible to the member.
Merging accounts
To merge the contents of two accounts, follow the steps below:
- In the Site Members tab, open the drop down menu to the right of Search for Site Member and select Merge Accounts
- Enter the email addresses of the two accounts you want to merge. The contents of the first account will be merged into the second account.
- Merging of two accounts cannot be reversed.
After the merge:
- The first member listed in the merge process will no longer be a part of your organization.
- The second member listed will have access to all the content of the first member.
Additionally, The first member's email address will be added to the second member's profile. The second member can choose to have notifications sent to that new email address instead of (or in addition to) their original email address, if they like.
You can merge a disabled account into an active account. You cannot, however, merge two disabled accounts.
Promoting members to admins
Need a helping hand with this administrative stuff? Promote someone to a customized admin role! Given that the Quip admin console has a number of powerful controls, you may wish to limit which admin can access certain settings. You can use Admin Roles to create custom admin profiles and assign them to specific users. For example, if your organization has a team that responds to user issues, you could create a Help Desk Admin role with the ability to manage users and groups, and therefore respond to tickets, but without access to sensitive security and configuration settings.
For more information on creating custom Admin roles, check out the Admin Roles article.
To assign an admin role:
- Go to the Site Members tab of the admin console in the left-hand side panel
- Find the row with the name of the user you want to promote. Click on the drop down menu at the far right
- Select Assign Admin Role
- Choose the Admin role you'd like to assign and click Save
You can follow the same process to modify an admin's role, or demote back to a regular member. Find the admin you'd like to change the role for, and select Modify Admin Role. Change their role to a custom role you've created, or remove them by clicking Remove as Admin. You can find more about the available Admin Roles and what they cover, here.
Exporting user activity
You can export a list of all users and their activity from the Site Members tab of the Admin Portal. Select Export to CSV in the dropdown located in the upper right-hand corner to export a list of all your users.
If your organization has fewer than 3,000 users, this will immediately export the list and download a .csv file. At larger companies, we’ll send you an email with a link to the file.
The information that will be exported includes:
- Name
- User ID
- Join Date
- Status (Deactivated or Active)
- Role (Member, Admin, or Creator)
- Language in profile (if set)
- Company Name
- Domain
- Subdomain
- Date Last Active
- Date Last Active on Web
- Date Last Active on Mac
- Date Last Active on Windows
- Date Last Active on iPhone
- Date Last Active on Android
知識文章編號
000392613
此文章是否解決您的問題?
請讓我們知道,以便我們改進!