Sélectionner une organisation
How to Integrate SCIM with Quip
Date de publication: Feb 29, 2024
Description
Résolution
This article covers the following information on SCIM Integration and Quip:
- Background
- Authorize API Access for SCIM
- Create, Delete, and Edit Accounts
- Test API Calls
Background
Per its documentation, the System for Cross-domain Identity Management (SCIM) specification is designed to make managing user identities in cloud-based applications and services easier. By integrating SCIM with your Quip site, you can make employee access changes in an identity service (like Active Directory or OneLogin), and those changes will propagate to the employees' Quip accounts.
Specifically, that means you can automate the following processes:
- Account Creation: Creating a new employee's corporate credentials through an identity provider triggers the creation of a new Quip account for that employee
- Account Disabling: Disabling an employee's corporate credentials through an identity provider will automatically disable that employee's Quip account, too
Full SCIM documentation is available here.
Authorize API Access
Authorization tokens are only available for Quip Enterprise customers.
To get an authorization token, head over to:{yourcompany}.quip.com/business/admin/scim
Be sure to substitute {yourcompany} with the actual subdomain of your Quip site.
Note that:
- All requests to the SCIM APIs should include the token as the
Authorizationheader - You'll need to be an administrator of your company's Quip site to access this page.
Create, Delete, and Edit Accounts
Create Accounts
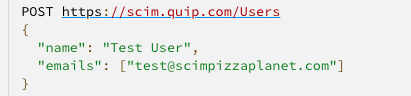
When creating credentials in your identity service for a new employee, you can use the Quip API to automatically set up a new Quip account for that user.
Make a POST call to scim.quip.com/Users and send a JSON dictionary that describes the user. Quip will return a JSON which includes the new unique Quip User ID for that employee.
Example Call:
Get User IDs
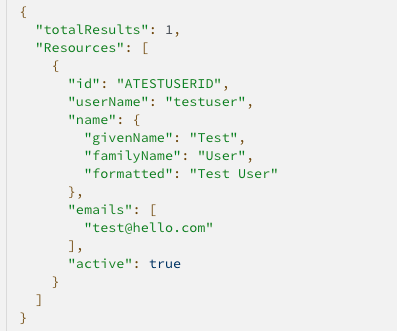
The User ID for each Quip account is the key attribute to triggering account actions via the API. So the first step, before actually taking any of these actions, is to call the API to retrieve a list of all existing Quip accounts along with the associated User ID and email address(es).
To do so, make a GET call to scim.quip.com/Users with appropriate attribute parameters. This will return all users within your Quip instance, along with email addresses and user IDs (which will be the link between your other systems and Quip).
Example Call:
Example Response:
Now that each user has its associated Quip User ID, additional calls can be made for that user's account.

Get User IDs By Email
The users being returned can be restricted by using filters. For instance, an “eq” filter on the “emails” field will return only the user with that email, if one exists.
Example Call:

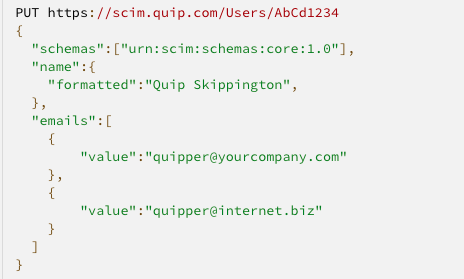
Update a User Name or Email
To update a user's name or email addresses, issue the new name and emails in a PUT toscim.quip.com/User/{user's Quip ID]
Where {user's quip ID} is the actual ID of the user, of course
Example Call:
Disable Accounts
To disable a user's Quip account, make a DELETE call toscim.quip.com/Users/{user's quip ID}
Where {user's quip ID} is the actual ID of the user, naturally.
Example Call:
Please Note: A “DELETE” call does NOT delete the user's Quip account—it only disables it. The user will lose all access to Quip and will not be able to log in, but none of their data will be deleted or lost, and any content they shared with other users will remain shared with those users.

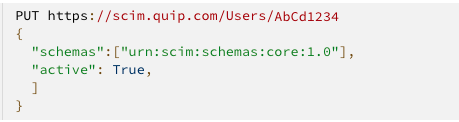
Re-enable a Disabled Account
To re-enable a previously disabled account, set their active flag to “True” in a PUT toscim.quip.com/User/{user's Quip ID]
Where {user's quip ID} is the actual ID of the user, of course
Example call:
Disable Active User Session
This can be accomplished by disabling and immediately re-enabling an account according the the instructions listed above.
Test API Calls
Before automating account changes via SCIM, we recommend testing these calls on dummy users within your Quip instance (versus sandbox environments). Here's how:
- Create a test user in your identity management system, including a unique email address.
- Make the POST call to scim.quip.com/Users to receive a new Quip User ID unique to that employee.
- Once that newly created account is confirmed as active, make a DELETE call to scim.quip.com/Users/[QuipUserID] to disable that employee's Quip account.
Numéro d’article de la base de connaissances
000392638
Cet article a-t-il résolu votre problème ?
Dites-nous ce que nous pouvons améliorer !