조직 선택
Create a report that captures Account's date field history
게시 일자: Apr 2, 2026
상세 설명
A customer would like to report on the frequent changes to the contract expiration date in the Account object over a period of time. This process is important for tracking changes to a date field on Account records, including when and by whom the changes were made. It provides valuable insights for auditing, compliance, and understanding the timeline of interactions and updates related to account management.
솔루션
To set the context, let's assume that the customer has a custom field created called Contract Expiration Date in the Account object that captures the expiration of a contract linked to the account. In order to report on historical changes to the contract expiration date, the steps below need to be followed.
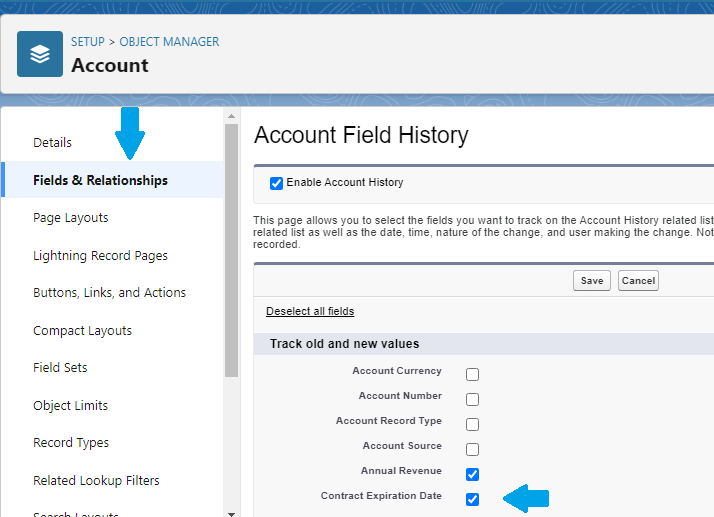
Step 1. Enable Field History Tracking for Account and Required field
a. Navigate to Setup | Object Manager | Accounts | Fields & Relationships | Click Set History Tracking
b. Click Enable Account History
c. Select required field Contract Expiration Date and Save. See the screenshot as below
With the above setting enabled, the system will then start to track every change made to the Contract Expiration Date for a record. Salesforce will also provide a standard report type associated with the object for which it was enabled. In this case, for the account object, we will be seeing Account History as a report type available, as shown below.
Step 2. Create a Report to keep track of any changes to the Contract Expiration Date
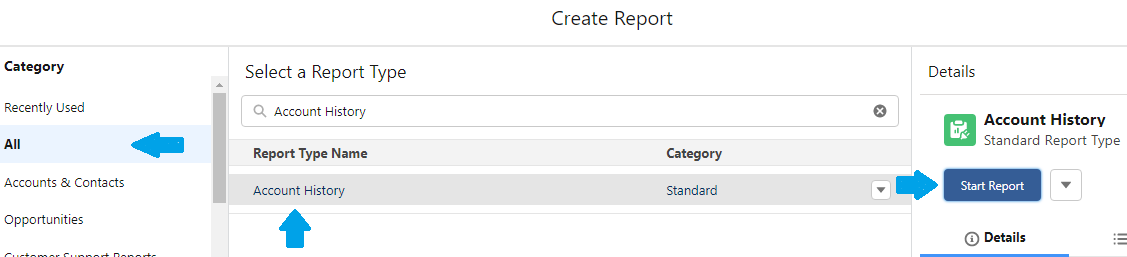
a. Go to the Reports Tab
b. Click on the New Report button
c. Select All under Category
d. In Select a Report Type search field, enter Account History and click on it
e. Click on Start Report button.
b. Click on the New Report button
c. Select All under Category
d. In Select a Report Type search field, enter Account History and click on it
e. Click on Start Report button.
Step 3. After clicking Start Report, we would see the Report Builder, where the below steps needed to be followed. As we want to track changes to the Contract Expiration Date field, we will be adding a report filter for the Field/Event Column. The filter will look like Field/Event = Contract Expiration Date.
a. From the Filters panel, click on Add Filter. In the Add Filter field, enter and select Field/Event
b. Under the Filters by Field/Event screen, select the operator Equals and enter Contract Expiration Date as your value, then click Apply. We can add more fields and comma-separate them if we need to keep track of more than one
b. Under the Filters by Field/Event screen, select the operator Equals and enter Contract Expiration Date as your value, then click Apply. We can add more fields and comma-separate them if we need to keep track of more than one
Step 4. As shown in the screenshot above, we also define the Edit Date value as All Time. Edit Date captures the date and time when the change was applied. We can define any period for this column as desired. We then apply Group By to the Account Name column so that we can report on all changes to the Contract Expiration Date on an account basis.
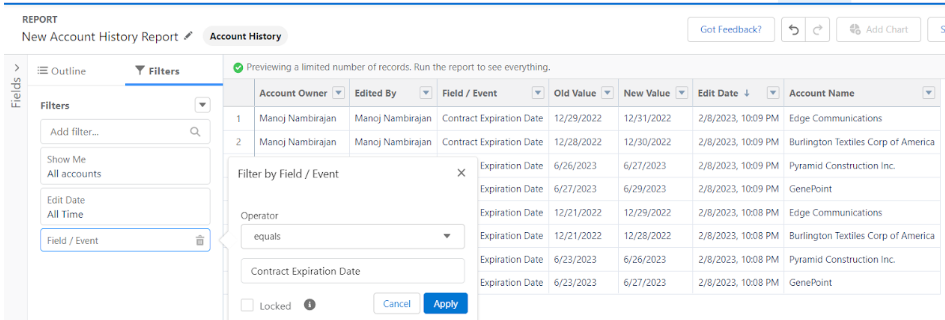
a. Under the Filters section, modify Edit Date filter by clicking on it. From Filter by Edit Date screen, choose All Time as Range. Click Apply button
b. Click on Outline panel, under Group Rows, enter and select Account Name, then click Run.
b. Click on Outline panel, under Group Rows, enter and select Account Name, then click Run.
As you will see in the final report , we have below-critical columns, which help us track the changes applied
- Edited By: Identifies the user who made the column update
- Field/Event: Capture the field enabled for history tracking and updated by the user
- Old Value: This refers to the old value of the field
- New Value: Refers to the new value of the field
- Edit Date: The date on which the field was updated
With the above approach, we can thus track historical changes and updates to the required fields within the object. As per Salesforce limitations, we can track 20 fields per object, but this limit can be increased upon raising a case with Salesforce Support.
Knowledge 기사 번호
000394574
이 기사를 통해 문제를 해결했습니까?
개선을 위한 의견을 보내주세요.