조직 선택
Display the Count of Emails against a Case via Flow
게시 일자: Jun 3, 2026
상세 설명
This article explains how to use Salesforce Flow to automatically count the number of emails sent and received against a Case record. When an email is created on a Case (whether incoming or outgoing), a Record-Triggered Flow on the Email Message object increments a custom Number field on the related Case to maintain a running email count.
Test all steps in a Sandbox and thoroughly test before making changes in a Production environment.
This is an example use case that counts all incoming and outgoing emails. You can add additional conditions to the Flow logic to count only specific email types, such as incoming emails or draft emails.
솔루션
Create a Flow on Email Message
Check your Organization Routing Address
Create a Number field on the Case Object
Step 1. Navigate to Setup

Step 2. Click on Object Manager and then Case

Step 3. Click on Fields & Relationships and New

Step 4. Set the field type as Number and click on Next

Step 5. Set the Number field properties. For this example we will use these values. Once you are done click on Next button
| Field Label | Count of Emails |
| Length | 18 |
| Decimal Places | 0 |
| Description | This field is populated by a flow and counts the number of incoming and outgoing emails against a case |
| Help Text | Displays the count of emails related to the case |
| Default Value | 0 |
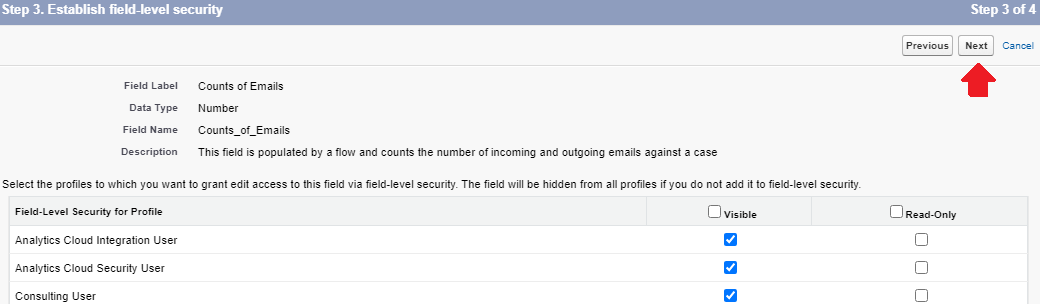
Step 6. Mark the field as accessible to the relevant Profiles (or permission sets) and then press Next.
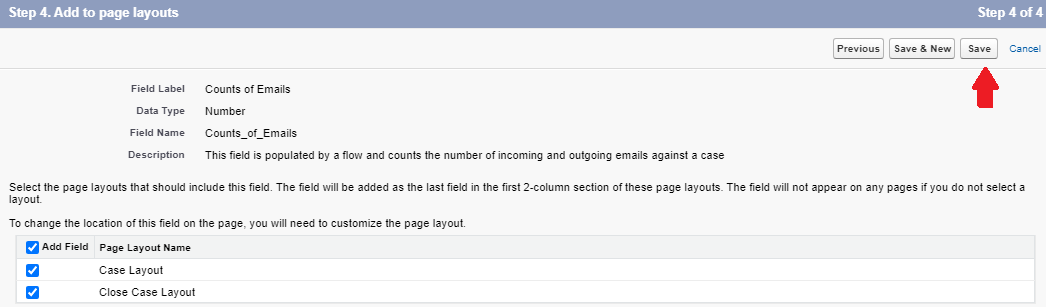
Step 7. Select the necessary Page layouts to add to and then press Save
Create a Flow to count emails related to a Case
Step 1. Navigate to Setup
Step 2. In the Quick Find enter and click on Flows

Step 3. Click on New Flow. Set the Flow as a Record-Triggered Flow and press on Create

Step 4. Set the Object as Email Message. In the Trigger the Flow When, choose A record is created

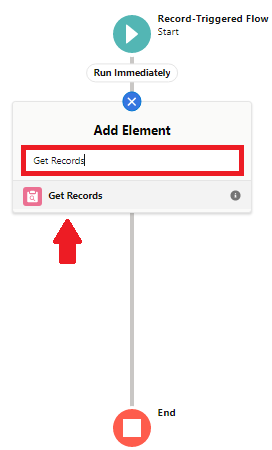
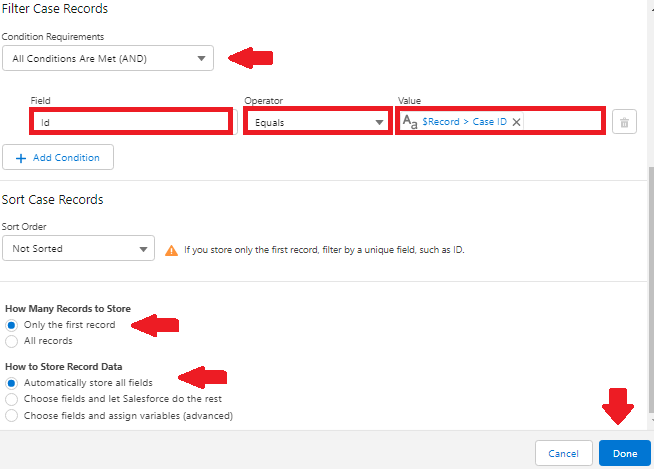
Step 7. Configure your Get Records element as below to get related cases.
a. Give it a Name; in this example, use (Get_Related_Case). The API name will automatically be filled in.
b. Enter your Description. (e.g Fetches the Case Record related to the Email Message)
c. In Get Records of This Object, set the object to Case
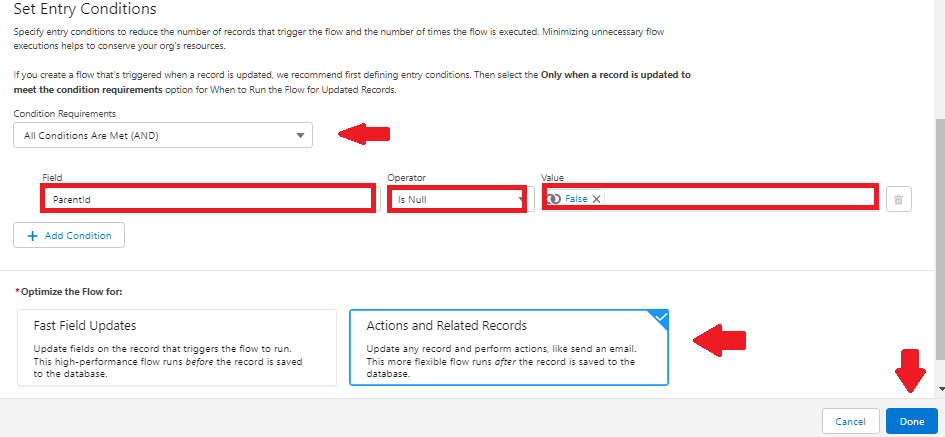
d. In Condition Requirements, select All Conditions Are Met (AND)
i. Field = Id
ii. Operator = Equals
iii. Value = {!$Record.ParentId}
e. In How Many Records to Store, select Only the first record
f. In How to Store Record Data, select Automatically store all fields. Click on Done

Step 8. From here, let’s create a formula that takes the current value from the Case Email Counter and increments it by 1
a. Select Formula as Resource Type
b. Enter API Name (e.g CaseEmailCount)
c. Add Description (e.g Takes the initial email count from the Case and increment this by 1)
d. In Data Type, select Number
e. In the Formula field, use the one below. Click on Check Syntax and Done
{!Get_Related_Case.Counts_of_Emails__c} + 1

Step 9. Now let’s update the Case field, in the Flow Canvas click on the + sign and select Update Records
a. Enter a Label, and the API name will be generated automatically
b. Enter Description (e.g Sets the Email Counter on the related Case)
c. In How to Find Records to Update and Set Their Values, select Specify conditions to identify records, and set fields individually
e. Set the Object as Case
f. In Condition Requirements to update Records, select All Conditions Are Met (AND)
i. Field = Id
ii. Operator = Equals
iii. Value = {!$Record.ParentId}
g. In Set Field Values for the Case Records, add the following details below. Once completed, click on Done
i. Field = Counts_of_Emails__c
ii. Vaue = {!CaseEmailCount}
This is how your Flow should look once it is complete

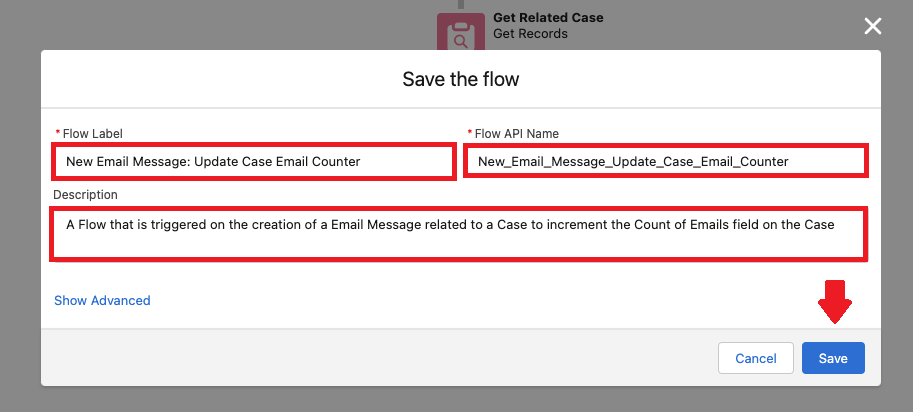
Step 10. From the Flow Builder, press Save, define a Flow Label, and set a Description (the API name will automatically be generated)
Step 11. Click on Activate

Once the Flow is activated, it's time to test your work
Note: As you can’t currently debug an Email Message Record-Triggered Flow natively, the best way to test this is to email your email-to-case routing address.
You can find your routing address by navigating to Salesforce Setup.
Note: As you can’t currently debug an Email Message Record-Triggered Flow natively, the best way to test this is to email your email-to-case routing address.
You can find your routing address by navigating to Salesforce Setup.
Step 1. Navigate to Setup
Step 2. Use the Quick Find to search for Email-to-Case

Step 3. Click on Edit next to the necessary routing address
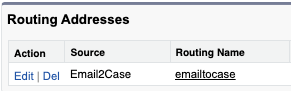
Step 4. From here, you should see the address under Email Services Address

Tip: If you don’t see this in a Sandbox, press Save and then Edit to generate the address.
This address will be unique to each Salesforce environment, so it will be different between sandboxes and production.
Sending an email to this address should generate a Case and therefore trigger the Email Message Record-Triggered Flow.
_________________________________________________
Written by: Tom Bassett | Salesforce Answers Leader
Tom Bassett is a Solution Architect at Trigg Digital and has 5+ years of experience with the Salesforce platform. He aspires for customers to gain the most out of the CRM and spreads the Ohana culture by supporting the wider Trailblazer Community with new feature ideas and providing answers to questions posted. He co-leads the London Architect Community group and also contributes to Salesforce Ben as an expert Author.
Submissions reflect only the opinions of the user who made available the Submission and not the opinions of Salesforce, regardless of whether the user is affiliated with Salesforce, and may contain or constitute products, services, information, data, content and other materials made available by or on behalf of third parties ("Third Party Materials). Salesforce neither controls nor endorses, nor is Salesforce responsible for, any Third Party Materials, including their accuracy, validity, timeliness, completeness, reliability, integrity, quality, legality, usefulness or safety, or any applicable intellectual property rights. Any Submissions made available through any message board or forum in response to posted questions, or that otherwise purports to answer any questions, including any questions about Salesforce or Programs, are made available for your general knowledge only and should never be relied upon as answers to your specific questions (even if an answer is marked as a “best” answer or with any similar qualifications). You should always contact Salesforce support for answers to your specific questions. Salesforce has no control over Submissions, and is not responsible for any use or misuse (including any distribution) by any third party of Submissions.
If you have questions, tap into the wisdom of our entire Trailblazer Community here: https://trailhead.salesforce.com/trailblazer-community/feed
Knowledge 기사 번호
000394643
이 기사를 통해 문제를 해결했습니까?
개선을 위한 의견을 보내주세요.