Välj en organisation
How to assign Case to a Queue based on the picklist value via Record-Triggered Flow
Publiceringsdatum: Jun 18, 2026
Beskrivning
Optimize case management processes in Salesforce by automating the distribution of Case records to their relevant queues using a Record-Triggered Flow. With each Case Type picklist value representing a specific queue, the Flow is configured to detect changes to the Type value of a Case record and automatically route the record to its corresponding queue.
By implementing this solution, you ensure that cases are accurately directed to the appropriate team, resulting in enhanced efficiency and superior service delivery.
Lösning
Create a Record-Triggered Flow
Set up the Configure Start window
Create a Text Formula Resource
Create a Record Variable
Add the Get Records element
Add the Assignment element
Add the Update Records element
__________________________________________________________________________
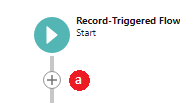
Step 1. Create a Record-Triggered Flow
a. From any page in Lightning, click on the Gear icon in the top right corner
b. Select Setup and in the Quick Find box, enter and click on Flows
c. Click on the New Flow button
d. Select Record-Triggered Flow and click on Create button
Step 2. Set up the Configure Start window
a. Choose the object you want to assign to a queue, such as Leads or Cases. For this example, we will select Case
b. Under the Configure Trigger section, choose A record is updated
c. In the Set Entry Conditions section, choose All Conditions are Met (AND)
d. Configure your Entry conditions depending on your business requirements. Use the + Add condition button to add another condition if needed
d. Configure your Entry conditions depending on your business requirements. Use the + Add condition button to add another condition if needed
e. From the Optimize the Flow section, choose Fast Field Updates
f. Finally, click the Done button
f. Finally, click the Done button
Step 3. Create a Text Formula Resource that maps your Case condition (in your situation, it is the Type) to the Queue name
a. Click on the Toggle Toolbox located in the upper-left-hand corner of your Flow Builder page
b. Navigate to the Manager tab and click on New Resource
c. Choose Formula from the Resource Type drop-down menu
d. Fill in the API Name (e.g., formulaTextCaseTypeQueueMap)
e. Select Text as the Data Type
f. Enter the Formula below (See Sample Formula) in the Formula Editor
g. Click the Check Syntax button to ensure you have no errors,
h. Once you have confirmed that the formula is error-free, click on the Done button to complete the creation of your Text Formula Resource
g. Click the Check Syntax button to ensure you have no errors,
h. Once you have confirmed that the formula is error-free, click on the Done button to complete the creation of your Text Formula Resource
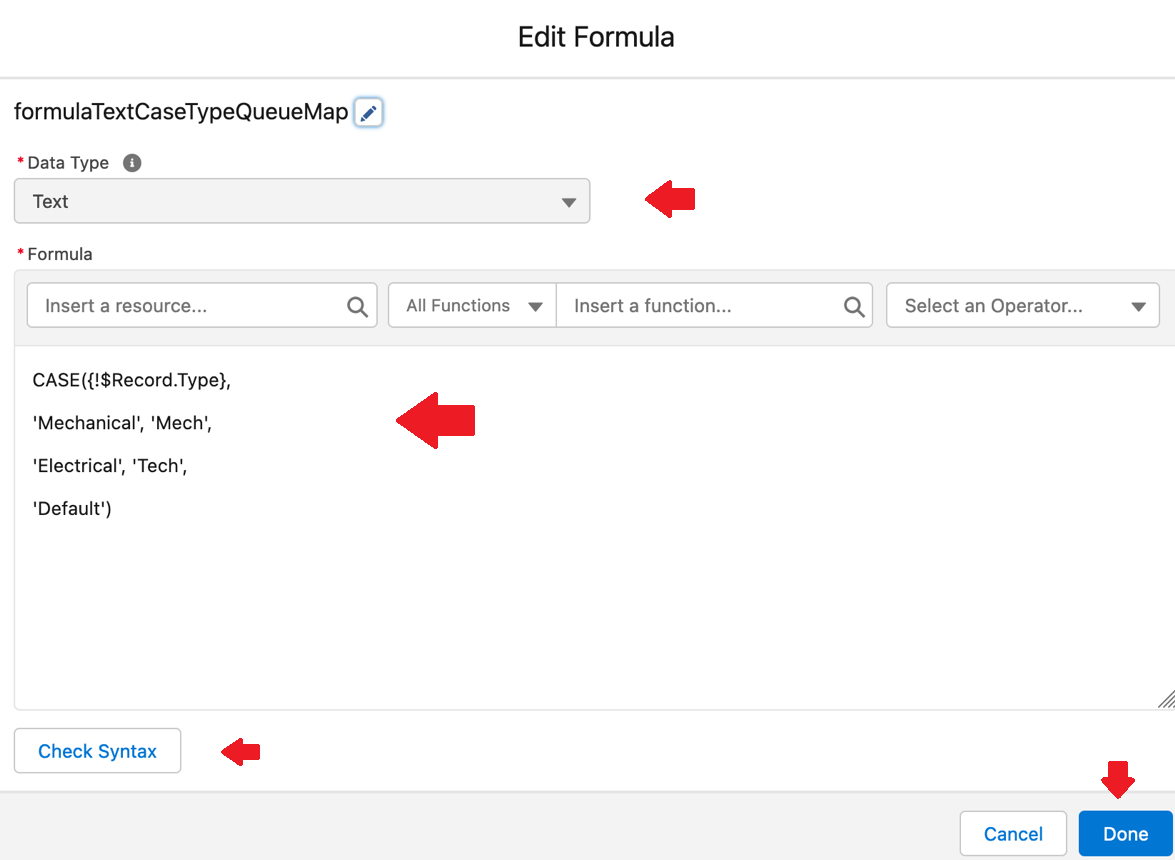
Sample Formula:
CASE({!$Record.Type},
'Mechanical', 'Mech',
'Electrical', 'Tech',
'Default')
Step 4. Create a Record Variable
a. Navigate to the Manager tab and click on New Resource
b. Choose Variable from the Resource Type drop-down menu
c. Fill in the API Name (e.g., varRecordQueueSelected)
d. Select Record as the Data Type
e. Set the Object to Group
f. Click on the Done button to complete the creation of your new Record Variable
b. Choose Variable from the Resource Type drop-down menu
c. Fill in the API Name (e.g., varRecordQueueSelected)
d. Select Record as the Data Type
e. Set the Object to Group
f. Click on the Done button to complete the creation of your new Record Variable
Step 5. Add the Get Records element
a. On Flow Designer, add a new element by clicking the +icon
b. Select the Get Records element from the list of available elements
c. Enter a Name for the element in the Label field (the API Name will be auto-populated)
b. Select the Get Records element from the list of available elements
c. Enter a Name for the element in the Label field (the API Name will be auto-populated)
d. Set Object to Group
e. Under the Filter Group Records section, select All Conditions Are Met (AND) in the Condition Requirements
f. Set the first field as DeveloperName, select Equals as the operator, and enter formulaTextCaseTypeQueueMap as the value
g. Click on the + Add Condition button to add another condition
h. Set the second field as Type, select Equals as the operator, and enter Queue as the value
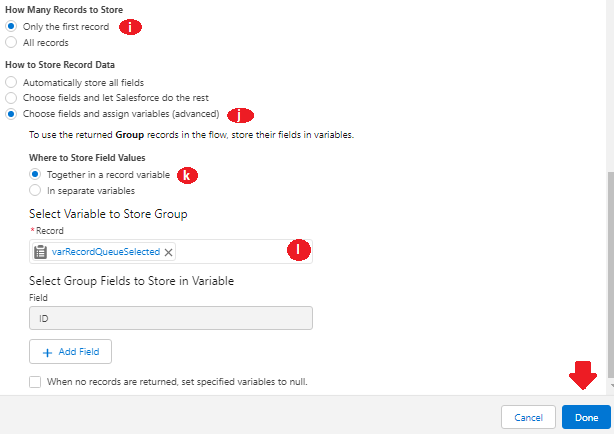
i. In the How Many Records to Store section, select Only the first record
j. In the How to Store Record Data section, select Choose fields and assign variables (advanced)
k. In the Where to Store Field Values section, select Together in a record variable
l. In the Select Variable to Store Group section, set the Record field to varRecordQueueSelected, and click on the Done button
e. Under the Filter Group Records section, select All Conditions Are Met (AND) in the Condition Requirements
f. Set the first field as DeveloperName, select Equals as the operator, and enter formulaTextCaseTypeQueueMap as the value
g. Click on the + Add Condition button to add another condition
h. Set the second field as Type, select Equals as the operator, and enter Queue as the value
i. In the How Many Records to Store section, select Only the first record
j. In the How to Store Record Data section, select Choose fields and assign variables (advanced)
k. In the Where to Store Field Values section, select Together in a record variable
l. In the Select Variable to Store Group section, set the Record field to varRecordQueueSelected, and click on the Done button

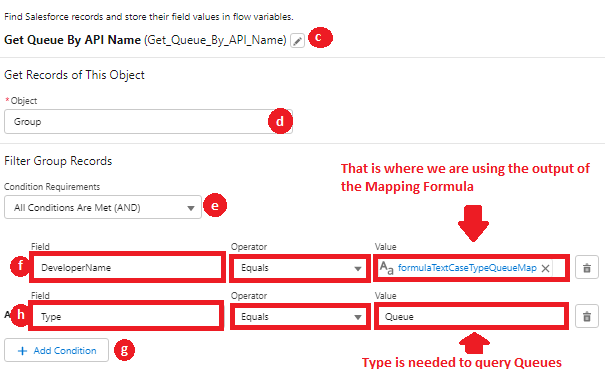
To query the Group object representing the Queue, you need to specify the following:
a) The DeveloperName (API Name) of the Queue, which is our Text Formula resource.
b) The Type of the Group object to filter the results and narrow them down to the Queue.
NOTE: I am setting the retrieved Queue record into a separate Record Variable. Feel free to use the Text Variable (depending on your preference).
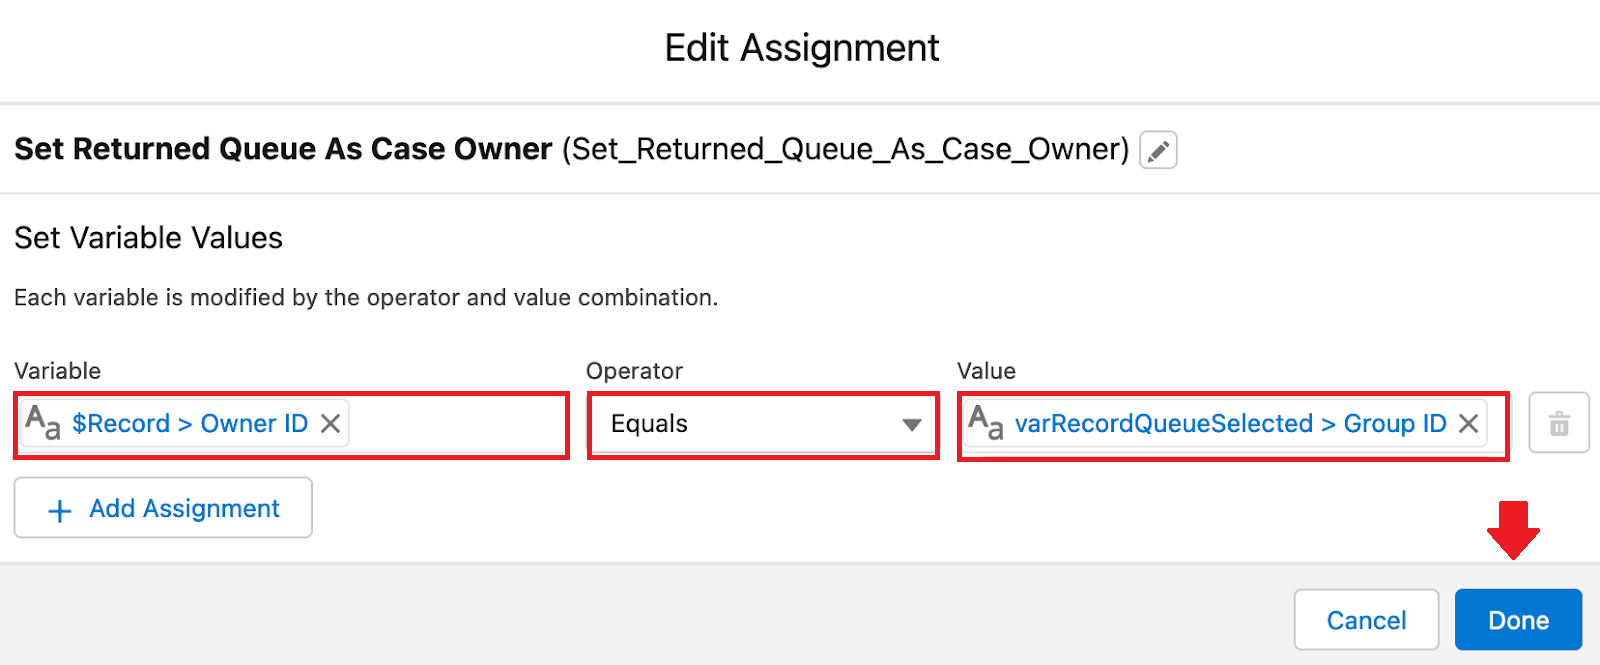
Step 6. Add the Assignment element to set the retrieved Queue Id as the new Case Owner
a. On Flow Designer, add a new element by clicking the +icon
b. Select the Assignment element from the list of available elements
c. Enter a Name for the element in the Label field (the API Name will be auto-populated)
d. In the Set Variable Values section, set the Variable field as $Record > Owner ID, select Equals as the operator, and enter varRecordQueueSelected > Group ID as the value
e. Click on the Done button
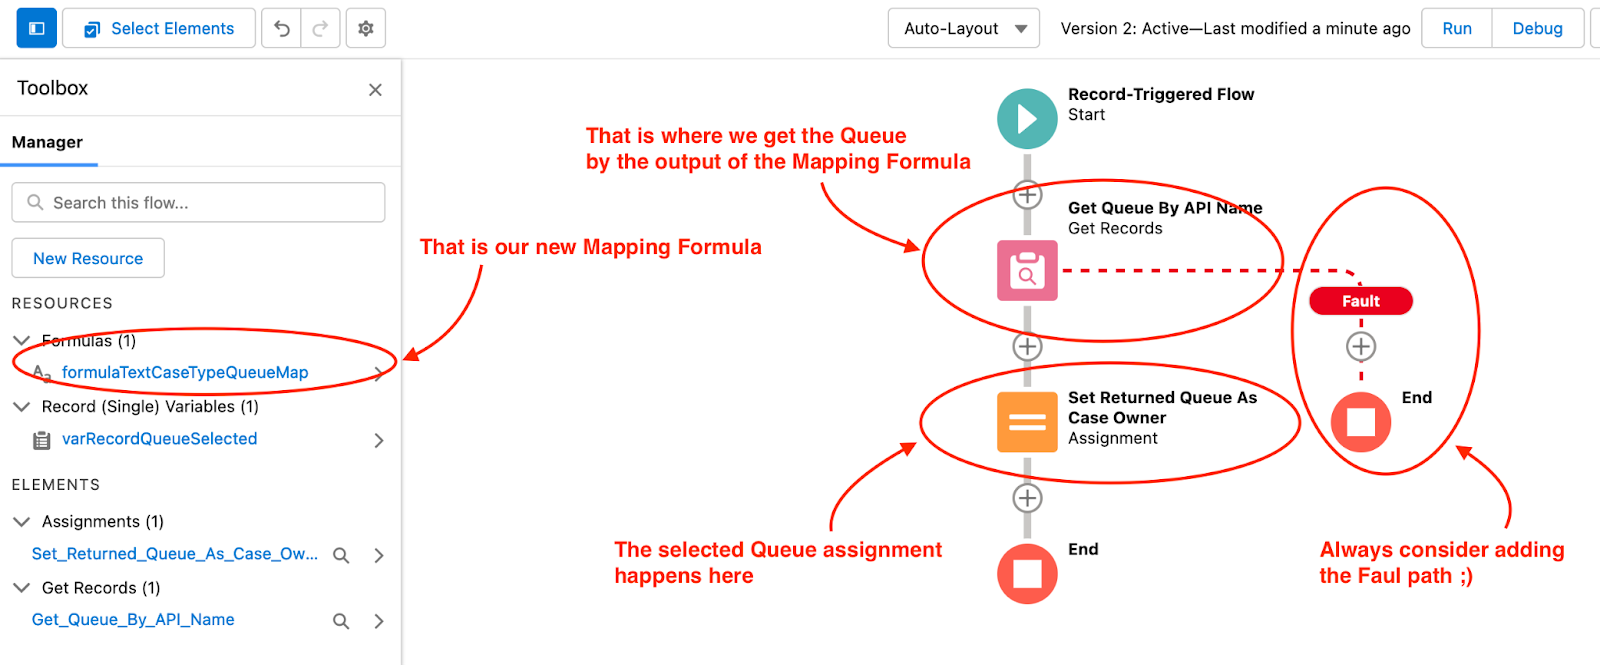
This is your Flow before adding the Update Records element:
Step 7. Add the Update Records element
a. On Flow Designer, click on the +icon to add a new element
b. From the list of available elements, select the Update Records element
c. In the Label field, enter a Name for the element. The API Name will be auto-populated
d. In the Set Variable Values section, set the field as $Record > Owner ID, select Equals as the operator, and enter varRecordQueueSelected > Group ID as the value
e. Click on the Done button
c. In the Label field, enter a Name for the element. The API Name will be auto-populated
d. In the Set Variable Values section, set the field as $Record > Owner ID, select Equals as the operator, and enter varRecordQueueSelected > Group ID as the value
e. Click on the Done button
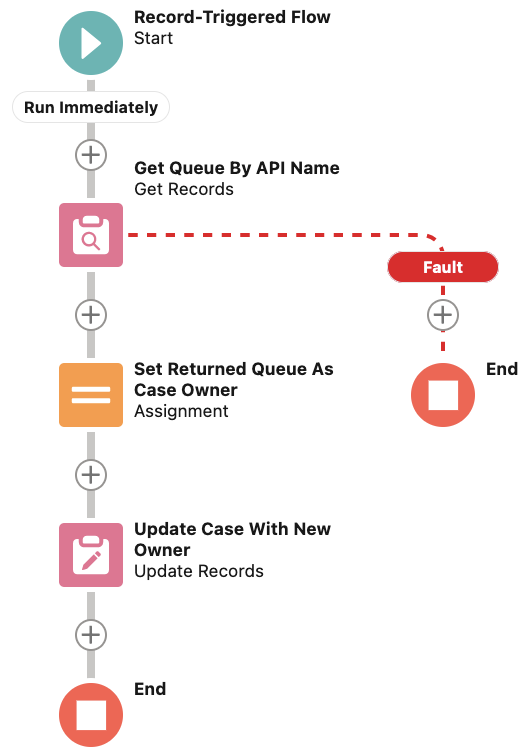
Make sure you add your missing logic pieces along with the Fault path to catch errors. As a result, the final Flow looks like this:
Step 8: Save and Activate the Flow
You're done! The Queue could now be assigned based on a picklist (Type) value. We also used the fewest Get Record elements possible.
__________________________________________________
Written by: Sergey Zenko | Salesforce Answers Leader
Sergey Zenko is a highly skilled Salesforce ISV and Consulting Partner at Bacon Formula Ltd. He is 6x Salesforce certified and brings immense value to enterprises of any size through his expertise in SaaS solutions design, implementation, and support. He is passionate about helping trailblazers get the most out of Trailblazer Community.
Submissions reflect only the opinions of the user who made available the Submission and not the opinions of Salesforce, regardless of whether the user is affiliated with Salesforce, and may contain or constitute products, services, information, data, content, and other materials made available by or on behalf of third parties ("Third Party Materials). Salesforce neither controls nor endorses, nor is Salesforce responsible for, any Third Party Materials, including their accuracy, validity, timeliness, completeness, reliability, integrity, quality, legality, usefulness or safety, or any applicable intellectual property rights. Any Submissions made available through any message board or forum in response to posted questions, or that otherwise purport to answer any questions, including any questions about Salesforce or Programs, are made available for your general knowledge only and should never be relied upon as answers to your specific questions (even if an answer is marked as a “best” answer or with any similar qualifications). You should always contact Salesforce support for answers to your specific questions. Salesforce has no control over Submissions and is not responsible for any use or misuse (including any distribution) by any third party of Submissions.
If you have questions, tap into the wisdom of our entire Trailblazer Community here: https://trailhead.salesforce.com/trailblazer-community/feed
Ytterligare resurser
Knowledge-artikelnummer
000395047
Löste denna artikel ditt problem?
Berätta för oss vad vi kan förbättra!