Vælg en organisation
Salesforce Platform Flow: Count Contacts and Update Account Field
Udgivelsesdato: Mar 31, 2026
Beskrivelse
This article will guide you on how to use a Record-Triggered Flow so you can automatically count the total number of contacts directly linked to the account whenever a new contact is created or updated. Furthermore, this article will provide instructions on how to seamlessly update the account with the accurate count of contacts
Business Use case:
Track the number of active Contacts per Account for segmentation - when Contacts are added/removed, automatically update the Contact Count field on the Account
Løsning
Solution Overview
Step 1. Create a custom Number field in the Account object
a. From any page in Lightning, click on the Gear icon in the top right corner. Select Setup and navigate to the Object Manager tab. Scroll down from the list of available objects until you find the Account. Once you see it, click on it to select it
b. From the sidebar, click Fields & Relationships
c. Click New to create a custom field
d. Choose Number as the field Data Type and click on the Next button
e. Enter the Field Name in the Field Label section as Contact Count. The Field Name populates automatically. Set the Decimal places to 0, and click on the Next button
f. Set the Field-level security to determine whether the field should be visible for specific Profiles and Permission sets, and then click Next
g. Choose the Page layouts that should display the field and then press on Save button
Step 2. Create a Record-Triggered Flow
a. Click on the Home tab
b. In the Quick Find box, enter and click on Flows
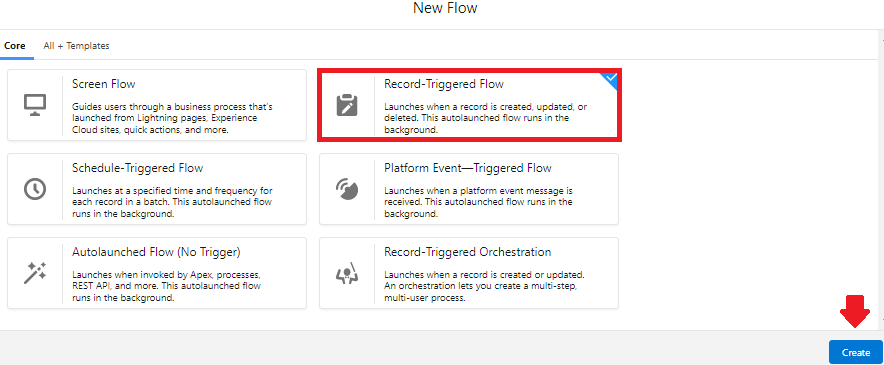
c. Click on the New Flow button
d. Select Record-Triggered Flow and click on Create button
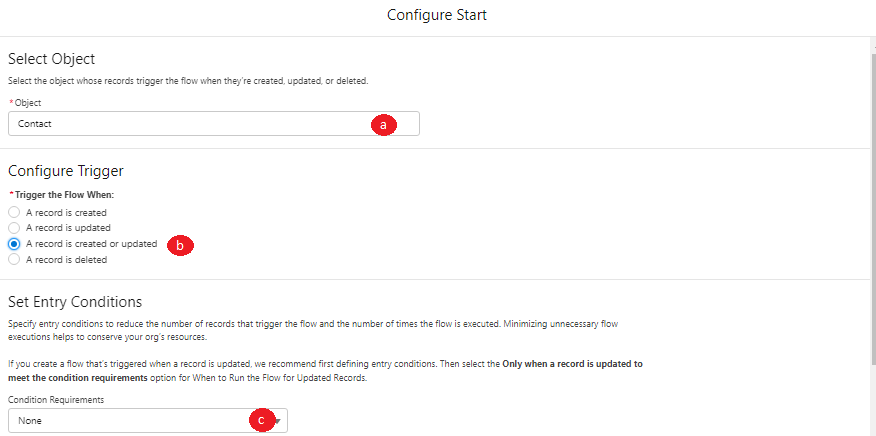
Step 3. Set up the Configure Start window
a. Set the object to Contact
b. Choose A record is created or updated in the Trigger the Flow When section
b. Choose A record is created or updated in the Trigger the Flow When section
c. In the Set Entry Condition section, leave the Condition Requirements drop-down to None
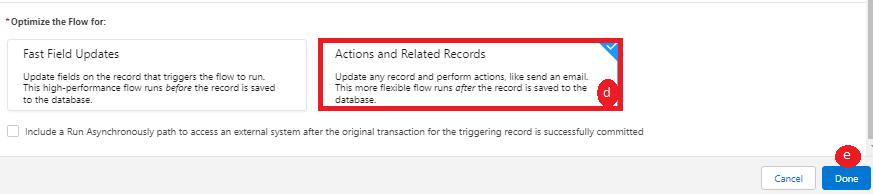
d. In Optimize the Flow for, select Actions and Related Records
e. Click on Done
d. In Optimize the Flow for, select Actions and Related Records
e. Click on Done
Step 4. Add a Get Records element
a. On Flow Designer, click on the +icon and select the Get Records element
b. Enter a Name for the element in the Label field (e.g., Get Contacts). The API Name will be auto-populated
c. Set the Condition Requirements dropdown to All Conditions Are Met (AND). Add the following details as your Filter conditions:
- Field: AccountId
- Operator: Equals
- Value: {!$Record.AccountId}
d. In the How Many Records to Store section, select All records
e. In the How to Store Record Data section, select Automatically store all fields
f. Click on Done
e. In the How to Store Record Data section, select Automatically store all fields
f. Click on Done
Step 5. Create a New Resource
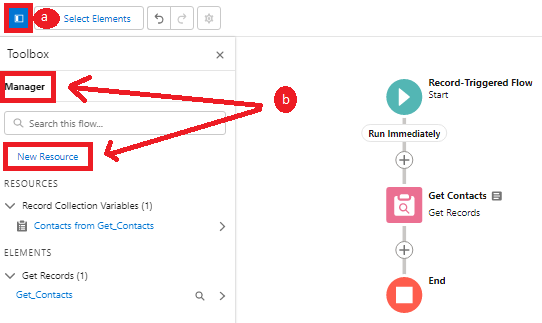
a. Click on the Toggle Toolbox located in the upper left corner of your Flow Builder canvas
b. Navigate to the Manager tab and click on New Resource
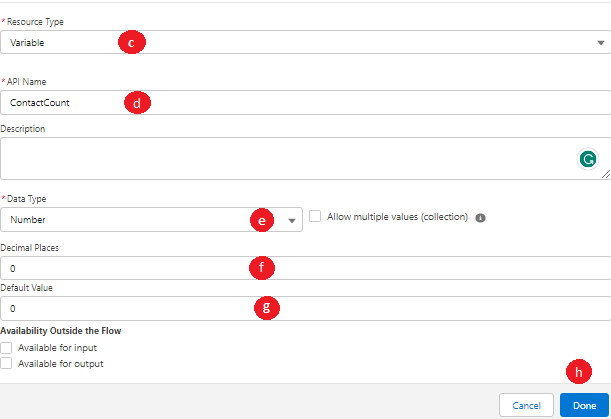
c. Choose Variable from the Resource Type drop-down menu
d. Enter an API name (e.g., ContactCount) and optionally provide a description for your variable
e. Select Number as the Data Type
f. Set the Decimal Places to 0
g. Set the Default value to 0
b. Navigate to the Manager tab and click on New Resource
c. Choose Variable from the Resource Type drop-down menu
d. Enter an API name (e.g., ContactCount) and optionally provide a description for your variable
e. Select Number as the Data Type
f. Set the Decimal Places to 0
g. Set the Default value to 0
h. Click on Done
Step 6. Add an Assignment element
a. On Flow Designer, click on the +icon and select the Assignment element
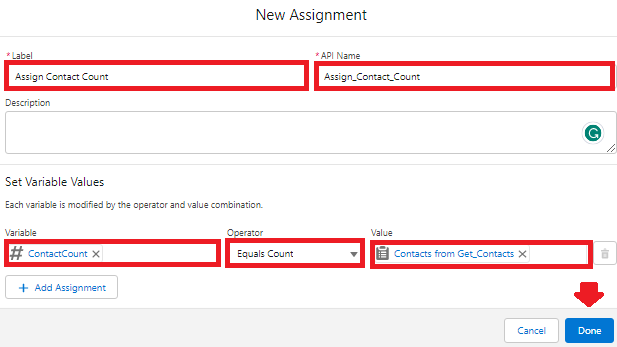
b. Enter a Name for the element in the Label field (e.g., Assign Contact Count). The API Name will be auto-populated
c. In the Set Variable Values section, set the Variable field to {!ContactCount}, select Equals Count as the operator, and enter {!Get_Contacts} as the value
d. Click on the Done button
Step 7. Add the Update Records element
a. On Flow Designer, click on the +icon and select the Update Records element
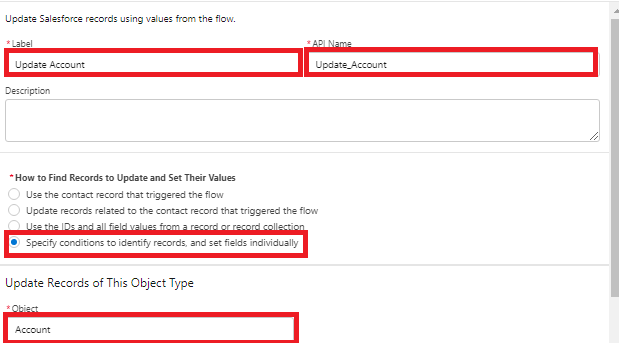
b. In the Label field, enter a Name for the element. The API Name will be auto-populated
c. In the How to Find Records to Update and Set Their Values section, select Specify conditions to identify records, and set fields individually
d. Set the object to Account
b. In the Label field, enter a Name for the element. The API Name will be auto-populated
c. In the How to Find Records to Update and Set Their Values section, select Specify conditions to identify records, and set fields individually
d. Set the object to Account
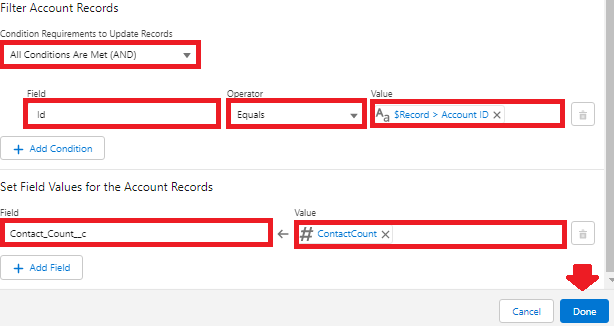
e. Set the Condition Requirements dropdown to All Conditions Are Met (AND) and add the following details as your Filter Conditions:
- Field: AccountId
- Operator: Equals
- Value: {!$Record.AccountId}
f. In the Set Field Values for the Account Records section enter the details below:
- Field: Contact_Count__c
- Value: {!ContactCount}
Step 8. Save and Activate your Flow
You're done!
Written by: Tom Bassett | Forum Ambassador
Tom Bassett is a Solution Architect at Trigg Digital and has 5+ years of experience with the Salesforce platform. He aspires for customers to gain the most out of the CRM and spreads the Ohana culture by supporting the wider Trailblazer Community with new feature ideas and providing answers to questions posted. He co-leads the London Architect Community group and also contributes to Salesforce Ben as an expert Author.
Submissions reflect only the opinions of the user who made available the Submission and not the opinions of Salesforce, regardless of whether the user is affiliated with Salesforce, and may contain or constitute products, services, information, data, content, and other materials made available by or on behalf of third parties ("Third Party Materials). Salesforce neither controls nor endorses, nor is Salesforce responsible for, any Third Party Materials, including their accuracy, validity, timeliness, completeness, reliability, integrity, quality, legality, usefulness or safety, or any applicable intellectual property rights. Any Submissions made available through any message board or forum in response to posted questions, or that otherwise purport to answer any questions, including any questions about Salesforce or Programs, are made available for your general knowledge only and should never be relied upon as answers to your specific questions (even if an answer is marked as a “best” answer or with any similar qualifications). You should always contact Salesforce support for answers to your specific questions. Salesforce has no control over Submissions and is not responsible for any use or misuse (including any distribution) by any third party of Submissions.
If you have questions, tap into the wisdom of our entire Trailblazer Community here: https://trailhead.salesforce.com/trailblazer-community/feed
Vidensartikelnummer
000395389
Løste denne artikel dit problem?
Giv os besked, så vi kan forbedre os!