Välj en organisation
Display Zero Sums in Salesforce Lightning Experience Reports and Charts
Publiceringsdatum: Apr 3, 2026
Beskrivning
When running a grouped report in Salesforce, if there is no data for a specific grouping, the report displays nothing. This can be frustrating, especially when grouping by dates and trying to analyze a trend. Graphs only display dates with a value, making it difficult to identify periods with no data. As a result, we may miss out on identifying periods when business was particularly bad.
There is currently an idea related to this issue, which can be found at the following link:
Lösning
This example is intended for generating a report based on the Opportunity object, with a focus on grouping the data by owners and Close date, however, it is important to note that the same approach can be adapted for any other object as well.
Create a new Formula field on the Opportunity object
Create a Scheduled-Triggered Flow on Opportunities
Create a Record-Triggered Flow
Create a second Record-Triggered Flow
_____________________________________________________________________________________
Create a new Formula field on the Opportunity object
Step 1. From any page in Lightning, click on the Gear icon in the top right corner. Select Setup and navigate to the Object Manager tab. Scroll down from the list of available objects until you find the Opportunity. Once you see it, click on it to select it
Step 2. From the sidebar, click Fields & Relationships
Step 3. Click New to create a custom field
Step 4. Choose Formula as the field Data Type and click on the Next button
Step 5. Enter the formula name in the Field Label section as Opportunity Count. The Field Name populates automatically. Select Number as Formula Return Type and set the Decimal places to 0, and click on the Next button
Step 6. Enter the Formula below (See Sample Formula) into the Formula canvas and click the Check Syntax button to ensure you have no errors. Optionally, fill in the Description and Help Text box
Step 7. In the Blank Field Handling section, select Treat blank fields as blanks. Click on the Next button
Step 8. Set the Field-level security to determine whether the field should be visible for specific profiles and Permission sets, and then click Next
Step 9. Choose the Page layouts that should display the field and then press on Save button
Step 7. In the Blank Field Handling section, select Treat blank fields as blanks. Click on the Next button
Step 8. Set the Field-level security to determine whether the field should be visible for specific profiles and Permission sets, and then click Next
Step 9. Choose the Page layouts that should display the field and then press on Save button
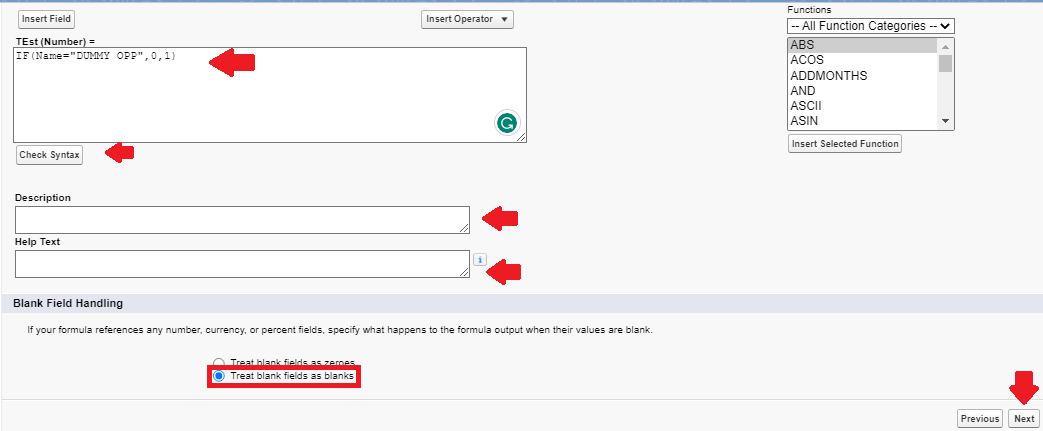
Sample Formula:
IF(Name="DUMMY OPP",0,1)
Create a Scheduled-Triggered Flow on Opportunities
Step 1. From any page in Lightning, click on the Gear icon in the top right corner
Step 2. Select Setup and in the Quick Find box, enter and click on Flows
Step 3. Click on the New Flow button
Step 4. Select Scheduled-Triggered Flow and click on Create button
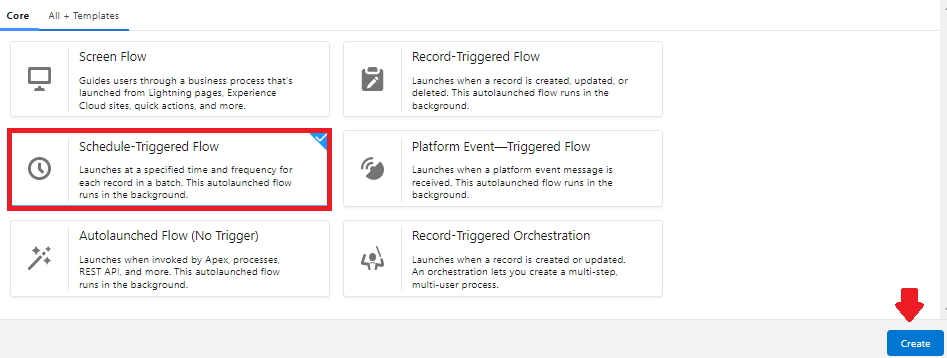
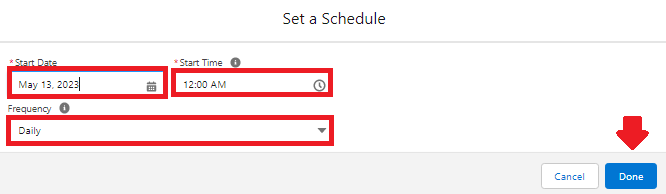
Step 5. Click on +Set Schedule, then select tomorrow’s date and set the time to midnight. Ensure that the Frequency is set to Daily, and click Done
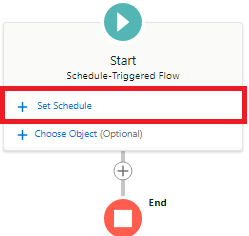
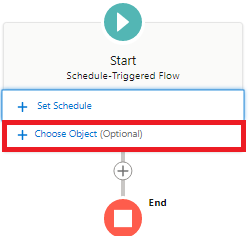
Step 6. Click on +Choose Object (Optional) link in the Start element and set the object to User
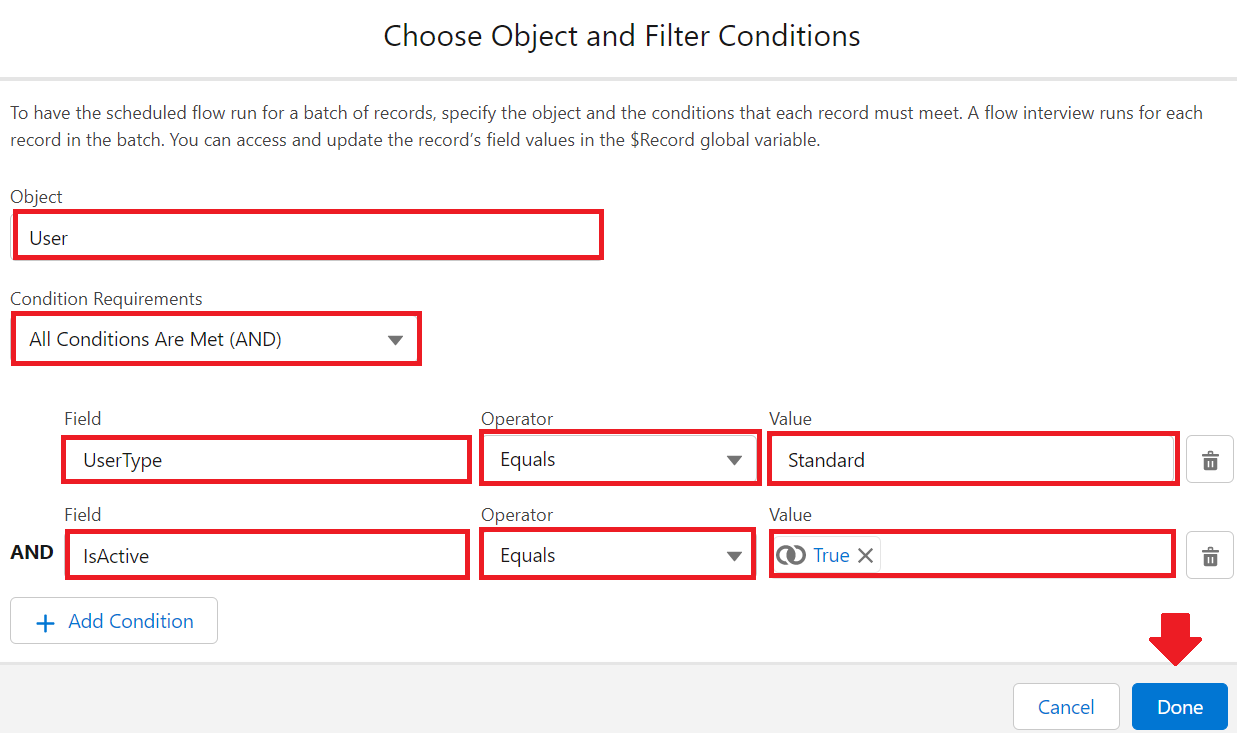
Step 7. Apply any necessary filters. For example, you may want to exclude your Experience Cloud users (at least, the Guest user, if in use, has to be excluded or it will throw errors). Ensure that inactive users are filtered out. Click on Done
Step 8. Add the Create Records element to the canvas
a. On Flow Designer, click on the +icon and select the Create Records element
b. Enter a Name for the element in the Label field. The API Name will be auto-populated
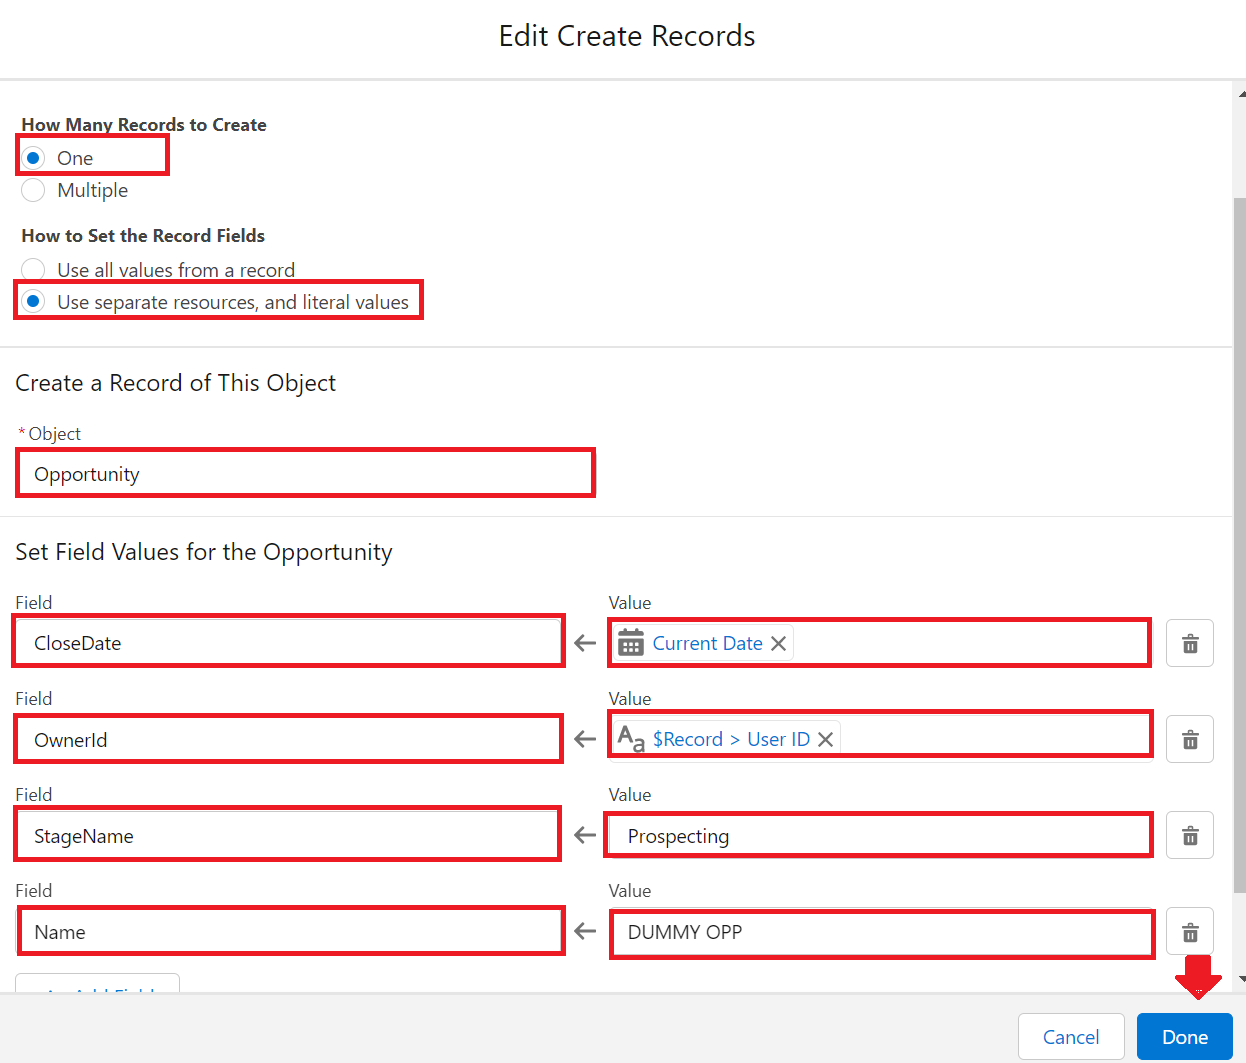
c. Select One for How Many Records to Create and Use separate resources, and literal values in the How to Set the Record Fields section
d. Set the object to Opportunity
e. Add the necessary field values, ensuring that mandatory fields are set to a value
i. Since this element will create Opportunities, make sure to set the OwnerId to the $Record.Id
ii. For the Close Date, set it to {!$Flow.CurrentDate}
iii. The Name should also be unique and an exact match to the value in the formula field created earlier. In this article, we will use DUMMY OPP as an example
iv. Finally, set up the Stage since it’s a required field:
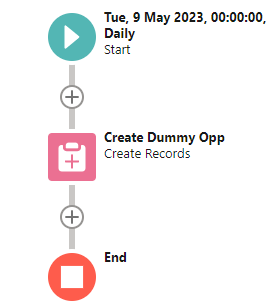
Your Scheduled-Triggered Flow should now look like this:
Step 9. Save and Activate your Flow
Note: It's also possible to run another Scheduled-Triggered Flow to create past and/or future opportunities, but this approach can be more complex and may result in a large number of records to create. Therefore, it is important to be aware of the flow and storage limits to avoid any issues
Create a Record-Triggered Flow
Step 1. Click on the Back arrow located on the top left of the Flow Builder canvas and click on the New Flow button
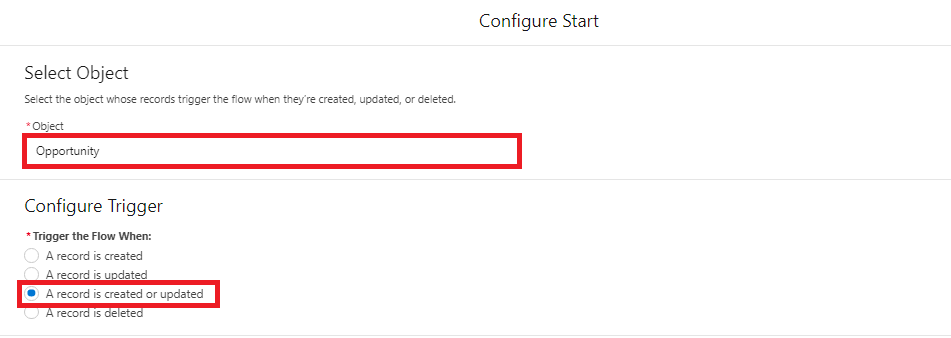
Step 2. Set the object to Opportunity and choose A record is created or updated in the Trigger the Flow When section
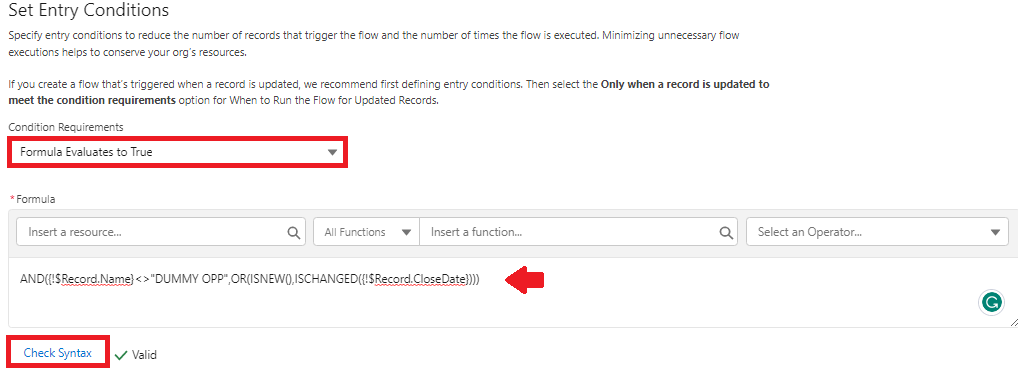
Step 3. Set the Condition Requirements dropdown to Formula Evaluates To True and enter the formula (See sample formula) in the formula canvas and click on the Check Syntax button to ensure that there are no errors
Sample Formula:
Step 5. In Optimize the Flow for, select Actions and Related Records and click Done
Step 6. Add a Get Records element
Step 7. Add a Decision element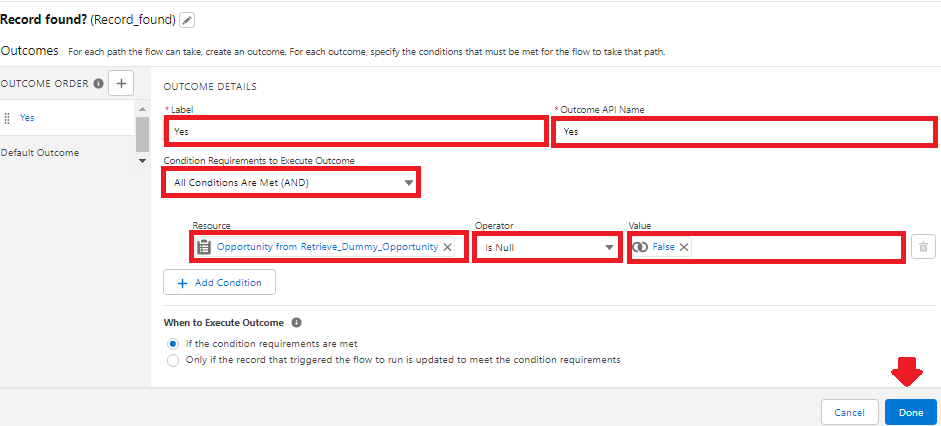
Step 8. End the flow in the No (default) branch of the Decision element
Step 9. In the Yes branch, add a Delete Records element
Sample Formula:
AND({!$Record.Name}<>"DUMMY OPP",OR(ISNEW(),ISCHANGED({!$Record.CloseDate})))
Step 4. Set the When to Run the Flow for Updated Records section to Every time a record is updated and meets the condition requirementsStep 5. In Optimize the Flow for, select Actions and Related Records and click Done
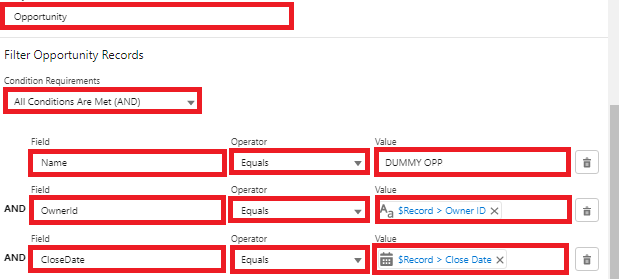
Step 6. Add a Get Records element
a. On Flow Designer, click on the +icon and select the Get Records element
b. Enter a Name for the element in the Label field (e.g., Retrieve Dummy Opportunity). The API Name will be auto-populated
c. Set the Condition Requirements dropdown to All Conditions Are Met (AND). Add the following details as your Filter conditions:
First Filter Condition
- Field: Name
- Operator: Equals
- Value: DUMMY OPP
Second Filter Condition
- Field: OwnerId
- Operator: Equals
- Value: {!$Record.OwnerId}
Third Filter Condition
- Field: Close Date
- Operator: Equals
- Value: {!$Record.CloseDate}
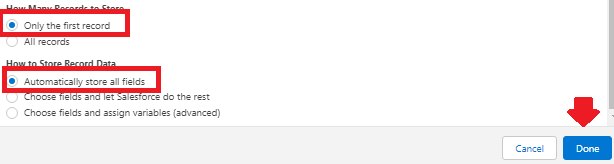
d. Set How Many Records to Store to Only the first record, and How to Store Record Data to Automatically store all, then click Done
Step 7. Add a Decision element
a. On Flow Designer, click on the +icon and select the Decision element
b. Enter a Name for the element in the Label field (e.g., Record found?). The API Name will be auto-populated
c. Change the name of New Outcome to Yes and set the filters to:
- Variable: {!Retrieve_Dummy_Opportunity.Id}
- Operator: Is Null
- Value: {!$GlobalConstant.False}
d. Change the Name of the Default outcome to No (Optional). Click on Done
Step 8. End the flow in the No (default) branch of the Decision element
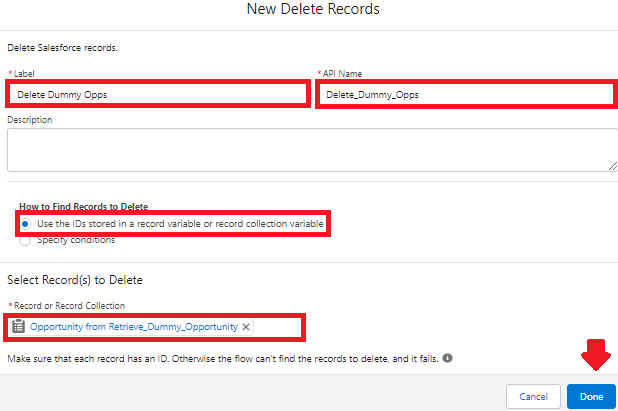
Step 9. In the Yes branch, add a Delete Records element
a. On Flow Designer, below the Yes node, click on the +icon and select the Delete Records element
b. Enter a Name for the element in the Label field (e.g., Delete Dummy Opps). The API Name will be auto-populated
c. Select Use the IDs stored in a record variable or record collection variable In the How to Find Records to Delete section
d. Enter the Get Record variable ({!Retrieve_Dummy_Opportunity}) in the Record or Record Collection field and click Done
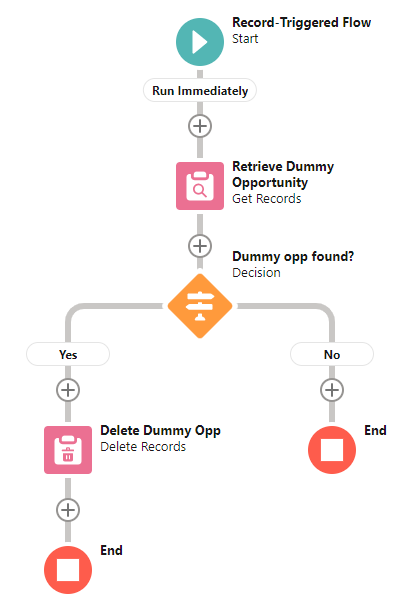
Your Record-Triggered Flow should look like this:
Step 10. Save and Activate your Flow
Create a second Record-Triggered Flow
Step 1. Click on the Back arrow located on the top left of the Flow Builder canvas and click on the New Flow button
Step 2. Set the object to Opportunity and select A record is deleted in the Trigger the Flow When section
Step 3. Set the Condition Requirements dropdown to All Conditions Are Met (AND) and add the following details as your Entry Conditions:
- Field: Name
- Operator: Does not equal
- Value: DUMMY OPP
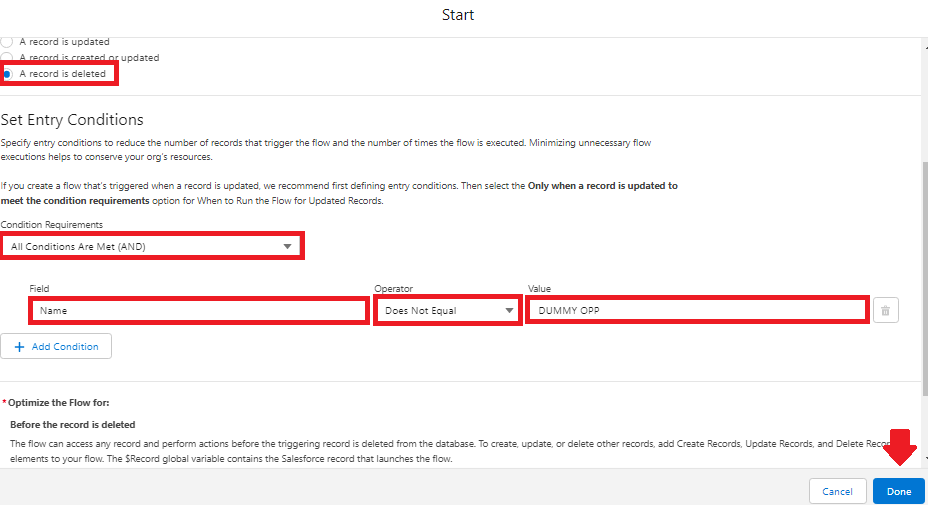
Step 4. Click on Done
Step 5. Add a Get Records element to the canvas
a. On Flow Designer, click on the +icon and select the Get Records element
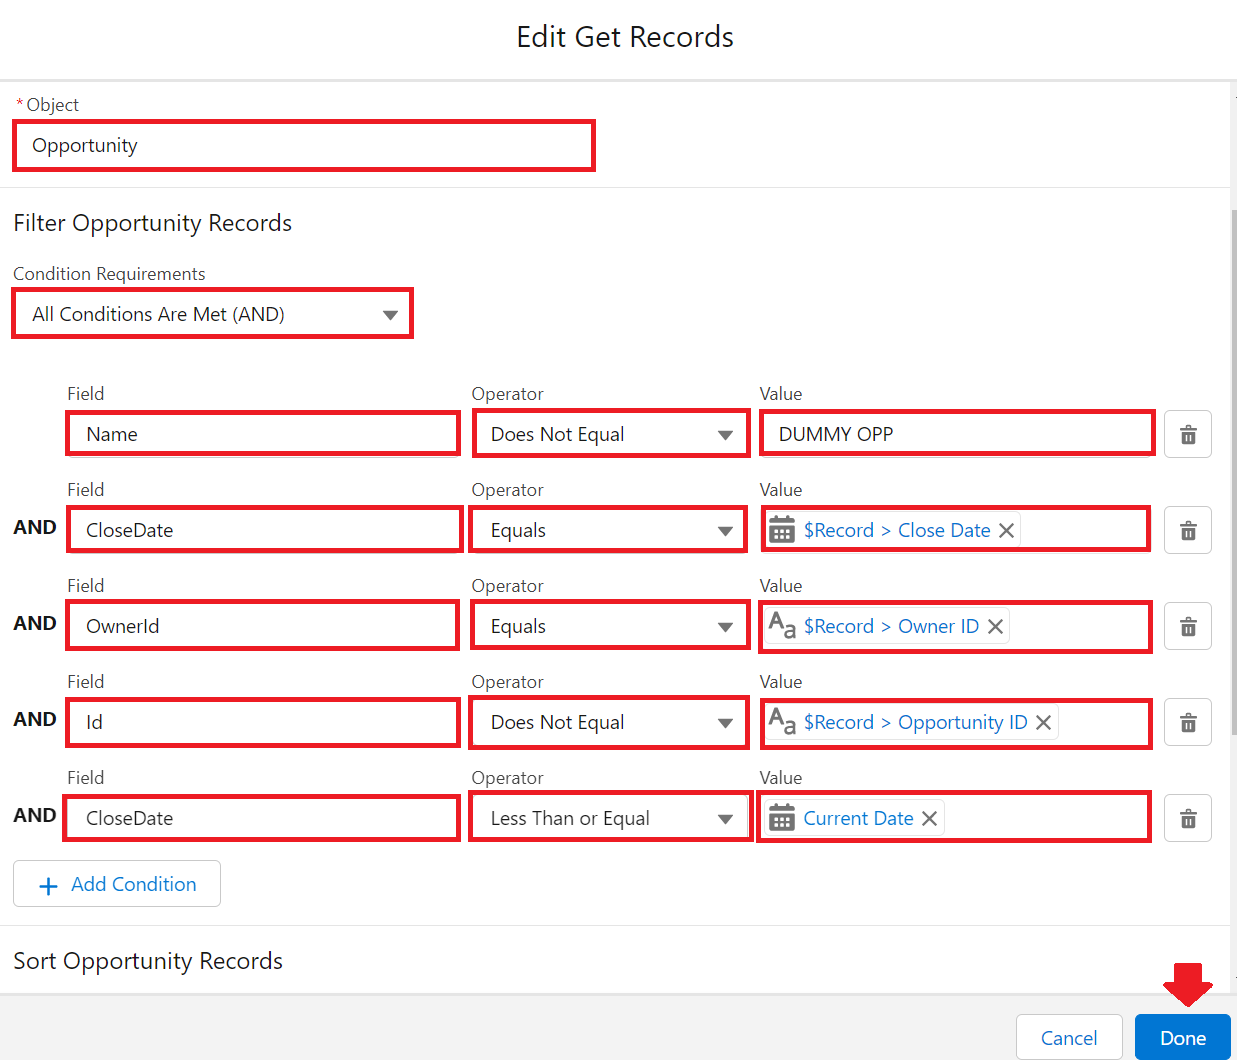
b. Enter a Name for the element in the Label field (e.g., Record found?). The API Name will be auto-populated. Add the following details as your Filter conditions:
First Filter Condition
First Filter Condition
- Field: Name
- Operator: Does Not Equal
- Value: DUMMY OPP
Second Filter Condition
- Field: Close Date
- Operator: Equals
- Value: {!$Record.CloseDate}
Third Filter Condition
- Field: OwnerId
- Operator: Equals
- Value: {!$Record.OwnerId}
Fourth Filter Condition
- Field: Id
- Operator: Does Not Equal
- Value: {!$Record.Id}
Fifth Filter Condition
- Field: Close Date
- Operator: Less than or equal
- Value: {!$Flow.CurrentDate}
c. Set How Many Records to Store to Only the first record, and set How to Store Record Data to Automatically store all. Then click on the Done button
Note: Remove the last filter if you have also created future DUMMY OPP records
Step 6. Add a Decision element
a. On Flow Designer, click on the +icon and select the Decision element
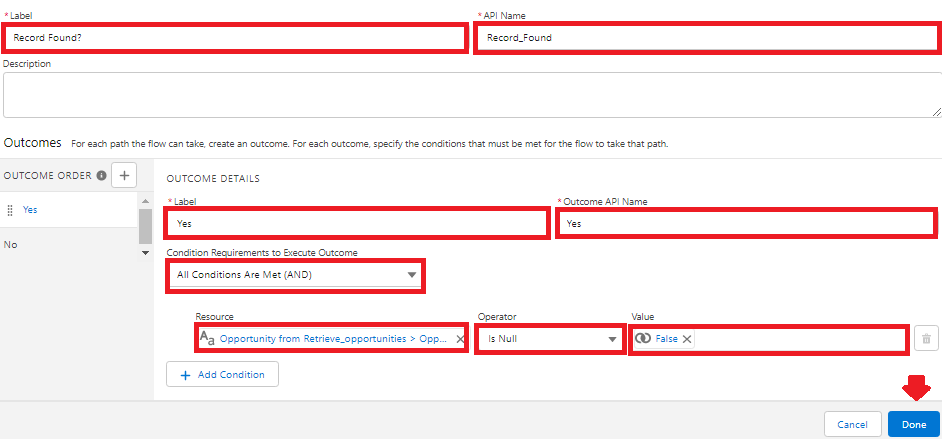
b. Enter a Name for the element in the Label field (e.g., Record found?). The API Name will be auto-populated
c. Change the Name of the New Outcome to Yes and set the filters to:
- Field: {!Retrieve_opportunities.Id}
- Operator: Is null
- Value: {!$GlobalConstant.False}
Step 7. End the flow in the Yes branch
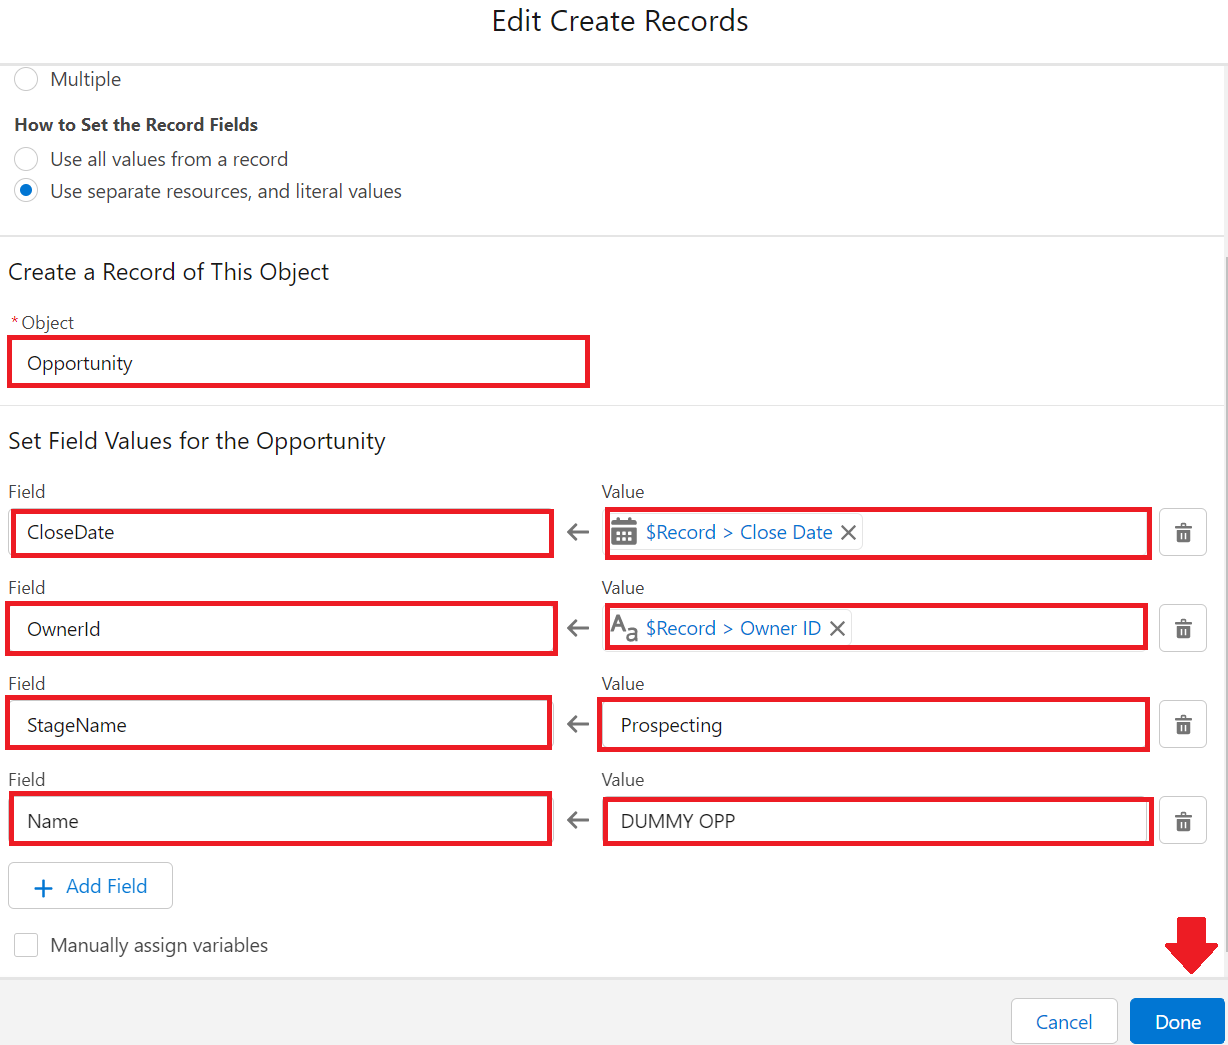
Step 8. In the No branch of the decision, add a Create Records element to create the dummy opportunity, similar to the first Scheduled-Triggered flow. However, this time set the Close Date to {!$Record.CloseDate}. Click on Done
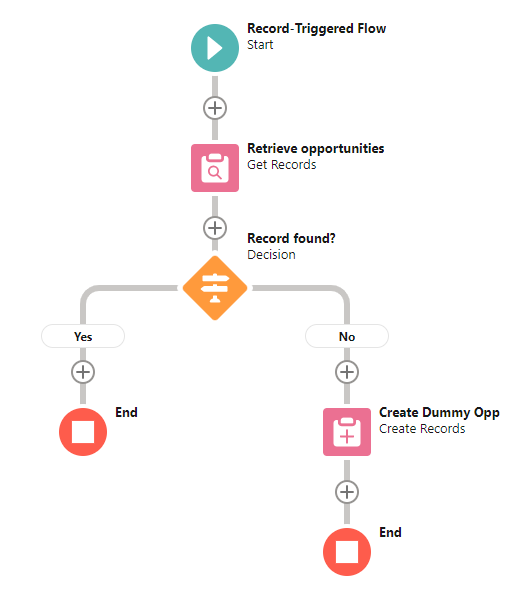
Your second Record-Triggered Flow should look like this:
Step 9. Save and Activate your Flow
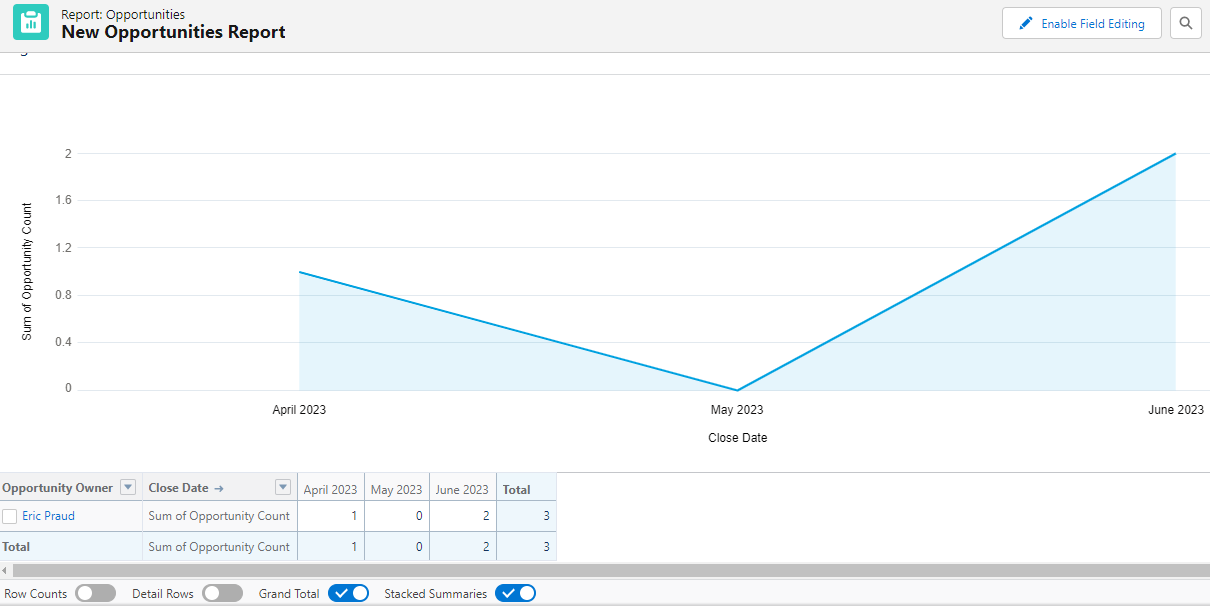
You can now create a report on opportunities that have a close date up until today. If you have created a dummy opportunity for future dates, you can set the date range to the future in the report. Instead of using the record count in the report, you should use the sum of the formula field you created at the beginning. Also, ensure that you turn the toggle for Row Counts to the off position.
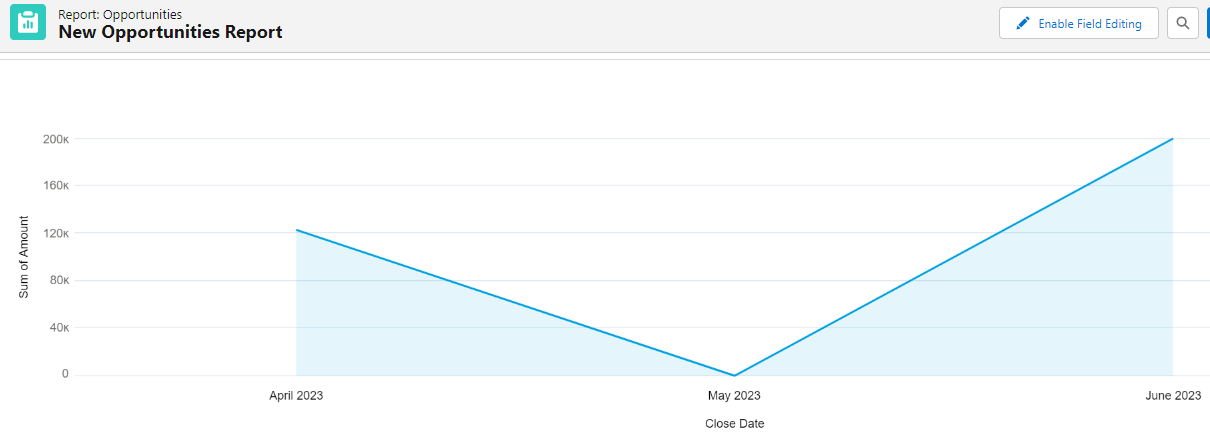
You can also generate a report on the amount field, which will show as 0 in a graph since it is not set in the flows.
Note:
- This solution can consume quite a bit of storage, so make sure you delete unneeded dummy records frequently.
- This solution was contributed by a Salesforce MVP. Community contributions are provided for informational purposes.
_____________________________________________________
Written by: Eric Praud | Salesforce MVP
Eric is a Senior Consultant at Epam PolSource and has been working in the Salesforce ecosystem for the past 12 years. He started his Salesforce career as a Salesforce support agent. Like many others, he stumbled across the platform accidentally and hasn’t looked back since. Eric is very active in the Answers community and has been a Salesforce MVP since March 2021.
Submission reflects only the opinion of the user who made available the Submission and not the opinions of Salesforce, regardless of whether the user is affiliated with Salesforce, and may contain constitute products, services, information, data, content, and other materials made available by or on behalf of third parties ("Third Party Materials). Salesforce neither controls nor endorse, nor is Salesforce responsible for, any Third Party Materials, including their accuracy, validity, timeliness, completeness, reliability, integrity, quality legality, usefulness or safety, or any applicable intellectual property rights. Any Submission made available through any message board or forum in response to posted questions, or that otherwise purports to answer any questions, including any questions about Salesforce or Programs, are made available for your general knowledge only and should never rely upon s answer to your specific questions (even if an answer is marked as a "best answer or with any similar qualifications). You should always contact Salesforce support for answers to your specific questions. Salesforce has no control over Submissions and is not responsible for any use or misuse (including any distribution) by any third party of Submissions.
If you have questions, tap into the wisdom of our entire Trailblazer Community here: https://trailhead.salesforce.com/trailblazer- community/feed
Knowledge-artikelnummer
000395398
Löste denna artikel ditt problem?
Berätta för oss vad vi kan förbättra!
