Seleccionar una organización
Salesforce Platform Flow: Enforce Parent Sharing on Lookup Relationships
Fecha de publicación: Mar 31, 2026
Descripción
In a Lookup Relationship, the Sharing Settings for related objects typically function independently. However, certain business scenarios may necessitate the enforcement of the "Controlled By Parent" Setting on related objects. To address this requirement, we can leverage the power of Record-Triggered Flows.
Lookup Relationship: A flexible object relationship where child records are independent of the parent. This means the child records do not inherit sharing settings or permissions from the parent record
Controlled By Parent: A sharing setting that makes child records inherit the visibility of the parent record. This is typically used in Master-Detail relationships but can be mimicked in Lookup relationships using automation.
Record-Triggered Flow: An automation that runs when records are created, updated, or deleted. It can be used to perform actions like updating related records or creating sharing rules.
By default, Lookup relationships do not inherit parent sharing settings. To grant parent record owners access to child records, you can use a Record-Triggered Flow. This flow can automatically create sharing records for the child objects, ensuring the parent record owner has the necessary access.
Solución
Business Challenge: In this help article, we’ll cover the Master-Detail Sharing Setting on Account and Contact that shares a Lookup relationship. Once we set the Contact Sharing Setting to Private, the Account Owner will not be able to view the Contacts related to its Account.
For that, we need to have the relationship design the same as "Controlled by Parent" on a Child object in a Master-Detail Relationship. This relationship actually creates a copy of the access level of the Parent (Master) record to the Child (Detail) record. This means if we set the Contact Organization-wide security to Private. The parent should have access to all the child's records.
Since the relationship between both the Account and Contact objects is Lookup, Organization-wide security access is independent of the parent. And also is not possible through the Sharing Rules. Automation is required to make this happen and copy the "Controlled By Parent" functionality in a Lookup relationship.
We need to give access to the Contacts to only its owner and Account owner. We have created a custom flow to create “Share” records.
Flow Solution
The breakdown of the flow which we created is as follows:
1. Check Contact Sharing Settings if Private
2. Update/Edit Contact Organization Wide Defaults (OWD) to Private
3. Create A New Flow
4. Fetch Parent Account Record
5. Fetch Related Contact Records
6. Loop through Contacts to get IDs
7. Contact Ids Assignment
8. Fetch Contact Share Records based on the Contact Ids
9. Again Looping through Contacts
10. Filter Contact Share Records
11. Assign Filter Share Records Count
12. Check if there are Previous Share Records Exist for the Current Contact
13. Create a new Contact share record
14. Add the Contact Share Records to the Collection
15. Insert Contact Share Records
_____________________________________________
Sharing Model Background
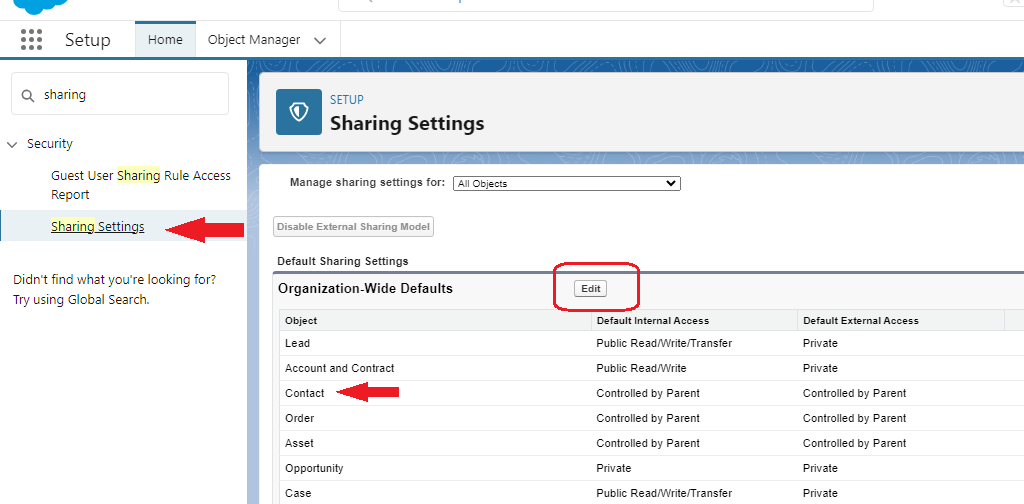
1. Check Contact Sharing Settings if Private
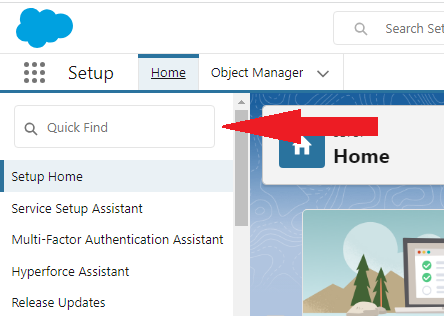
Go to Setup > Quick Find > Sharing Settings
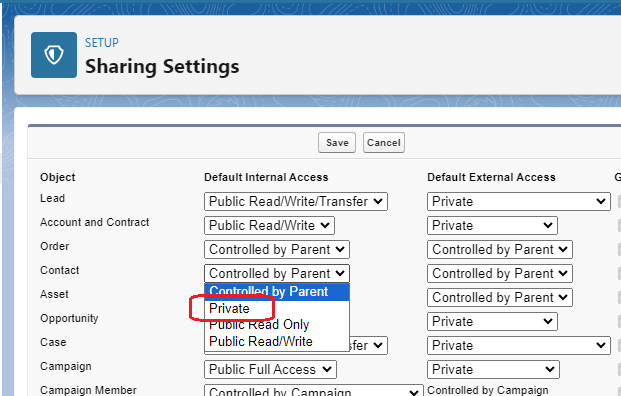
2. Update/Edit Contact Organization Wide Defaults (OWD) to Private
Search and Open Sharing Settings and click Edit then Update the Sharing settings of Contacts to Private. By setting it to private we can create the Contact Share record.
Configuration Steps
3. Create A New Flow
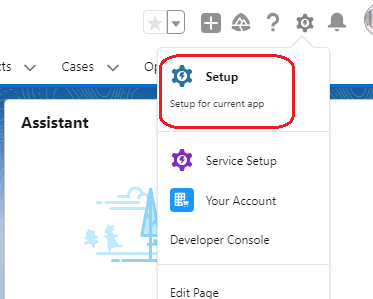
A. Click Setup
B. Search for the Flows on the Quick Find, And click Flows.
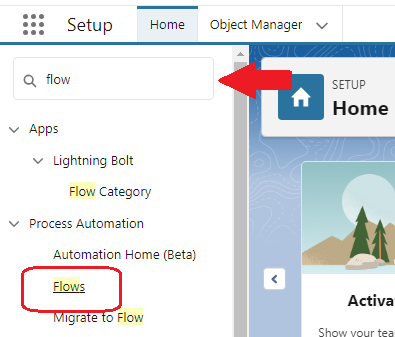
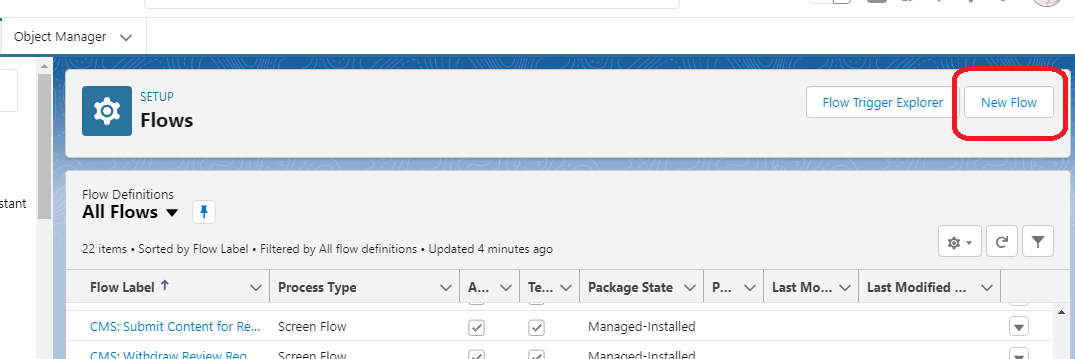
C. On the Flow Screen click New Flow.
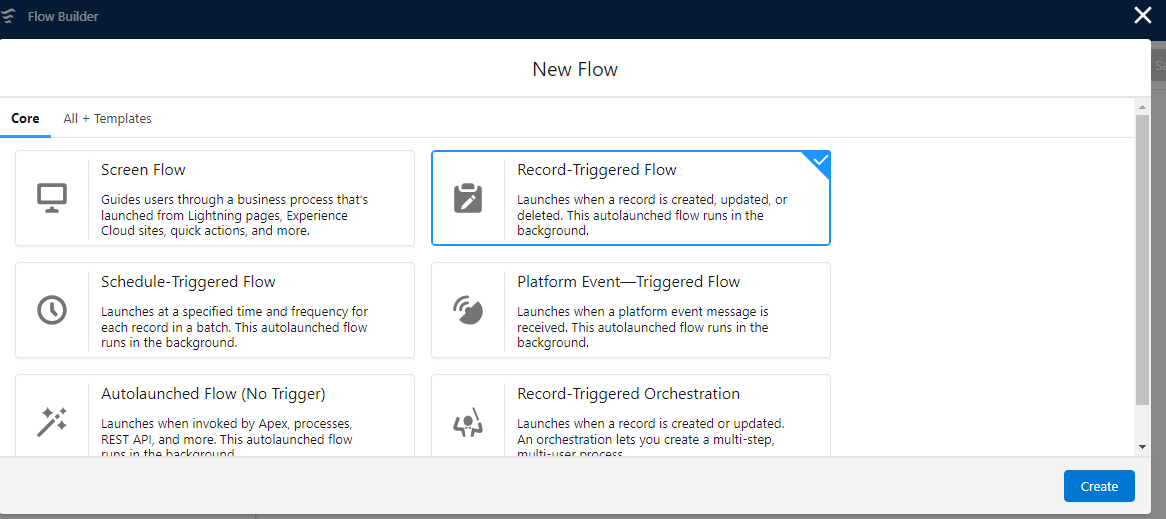
D. Select the Record-Trigger flow from the Flow Types and Click Create.
E. Add Contact on the Object dropdown
F. In the Configure Trigger section, Select the option ‘A record is created or updated’ to run the flow when the record is created or updated.
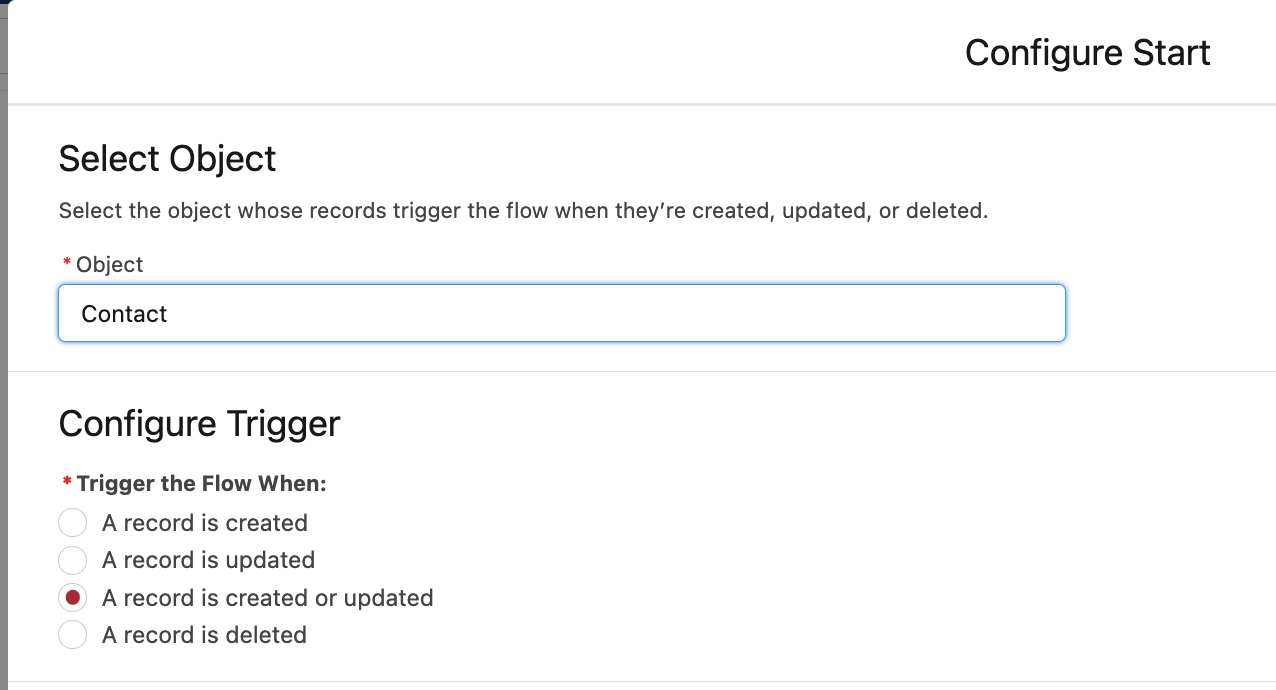
G. Keep Condition Requirements as None.
H. Lastly, select Action and Related Records from the Optimize the Flow section.
I. Click Done
4. Fetch Parent Account Record
A. In the Flow canvas
B. Click the + icon under the Start. Scroll down and select the Get Records element.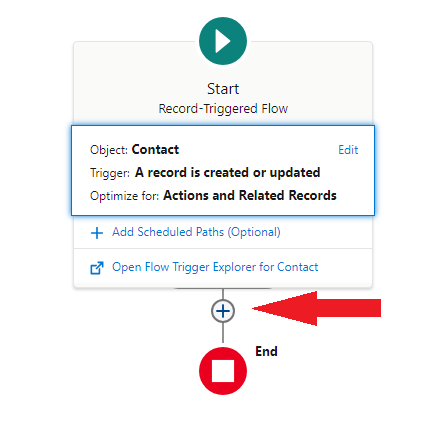

B. Click the + icon under the Start. Scroll down and select the Get Records element.
C. On the Get Records screen, Add ‘Get Parent Account’ as a Label. API Name will be auto-populated once you enter the Label.
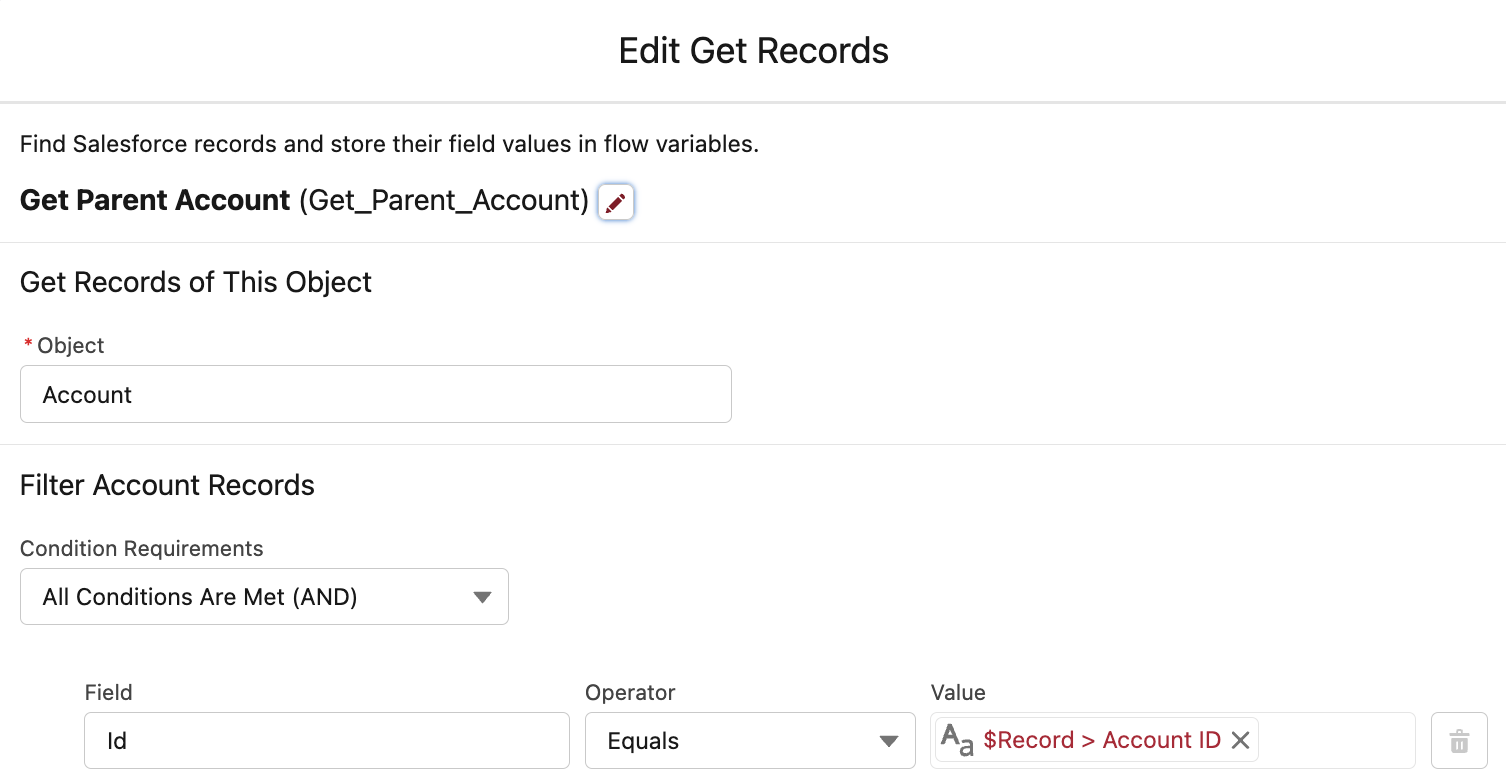
D. In the Get Records for this Object section, Select Account.
E. In the Filter Account Records section, Make sure ‘All Conditions are Met (AND)’ is selected under the Condition Requirements.
F. Add the Id (Account Id) in the Value Field. And the Operator should be ‘equals’.
G. In the Value Column, scroll down and select ‘$Record’ and then select Account Id from the triggered record fields.
H. Keep sorting as Not Sorted
I. Select ‘Only the first Record’ from the How Many Records section?
J. In the ‘How to store Record data’, select the option ‘Choose fields and let Salesforce do the rest’.
K. Scroll down and add OwnerId in the field.
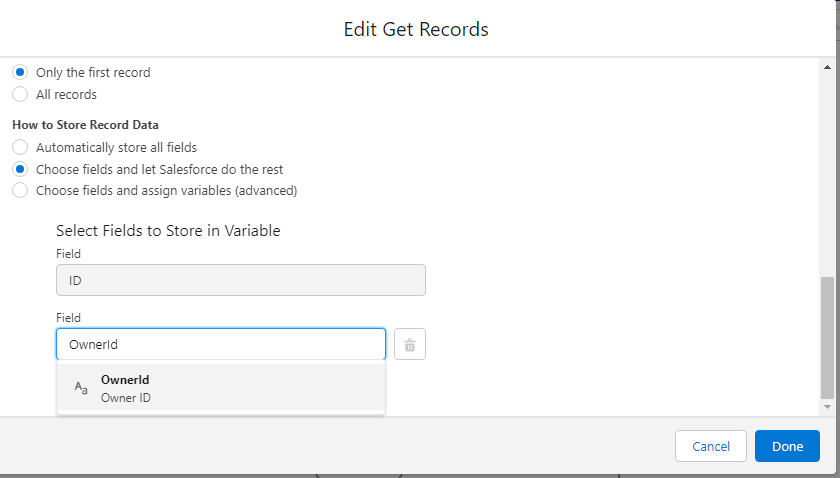
L. Click Done.
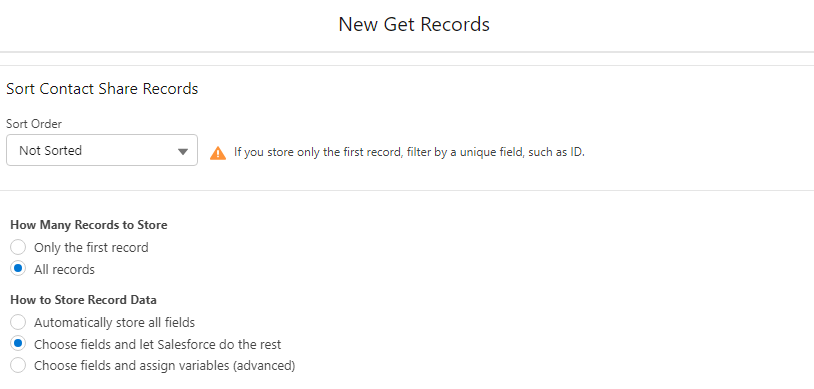
5. Fetch Related Contact Records
A. In the Flow canvas
B. Click the + icon under the Get Parent Account element. Scroll down and select the Get Records element.
C. On the Get Records screen, Add ‘Get Other Contacts of the Account’ as a Label. API Name will be auto-populated once you enter the Label.
D. In the Get Records for this Object section, Select Contact.
E. In the Filter Contacts Records section, Make sure ‘All Conditions are Met (AND)’ is selected under the Condition Requirements.
F. Add the AccountId (Account Id) in the Field. And the Operator should be ‘equals’.
G. In the Value Column, scroll down and select Account from 'Get_Parent_Account’ and then select Id (Account Id) from the Account fields
H. Keep sorting as Not Sorted
I. Select ‘All Records’ from the How Many Records section?
J. In the ‘How to store Record data’, select the option ‘Choose fields and let Salesforce do the rest’
K. Click Done
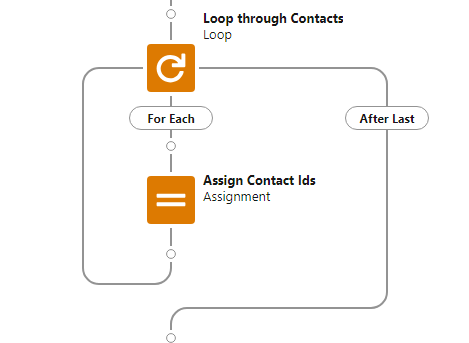
6. Loop Through Contacts To Get IDs
A. In the Flow canvas
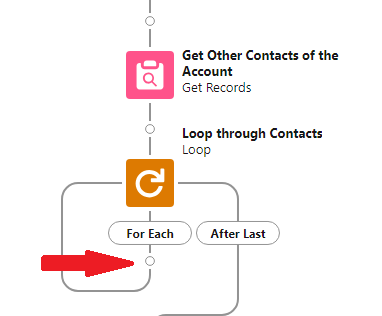
B. Click the + icon under the Get Other Contacts of the Account element. Scroll down and select the Loop element.
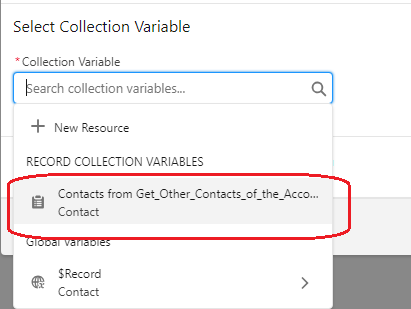
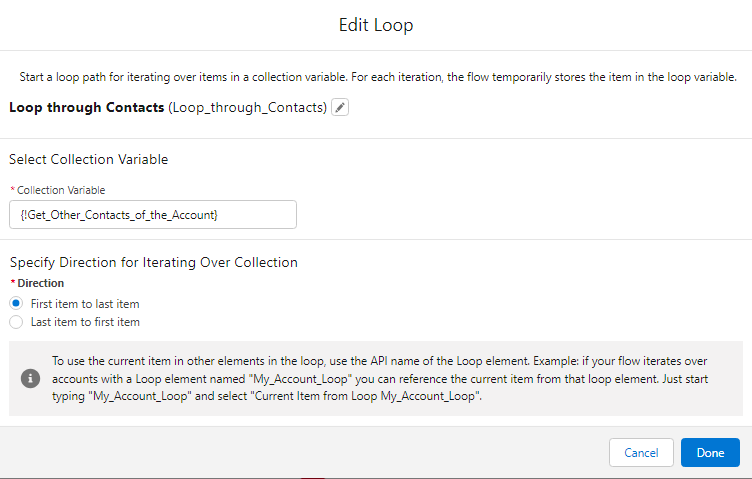
C. On the Loop screen, Add ‘Loop through Contacts’ as a Label. API Name will be auto-populated once you enter the Label.
D. Select ‘Contacts from Get_Other_Contacts_of_the_Account’ as the Collection Variable.
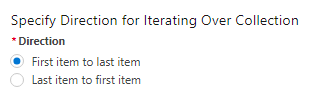
E. Make sure the Direction is selected as ‘First Item to Last item’.
F. Click Done.
7. Contact Ids Assignment
A. In the Flow canvas
B. Click the + icon on the For Each section under the ‘Loop through Contacts’ element. Scroll down and select the Assignment element.
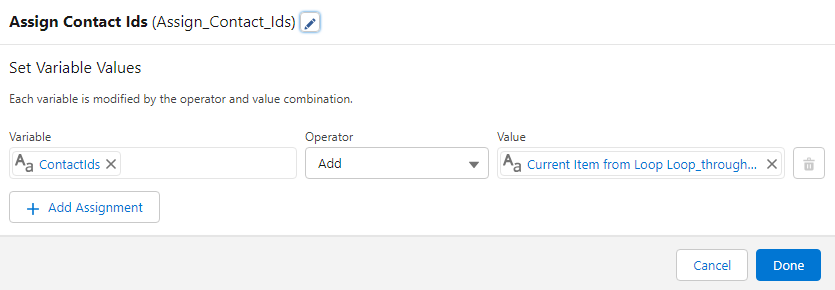
C. On the Assignment screen, Add ‘Assign Contact Ids’ as a Label. API Name will be auto-populated once you enter the Label.
D. In the Set Variable Values Section, under the variable Click ‘ + New Resource’. It will open a New Resource screen.
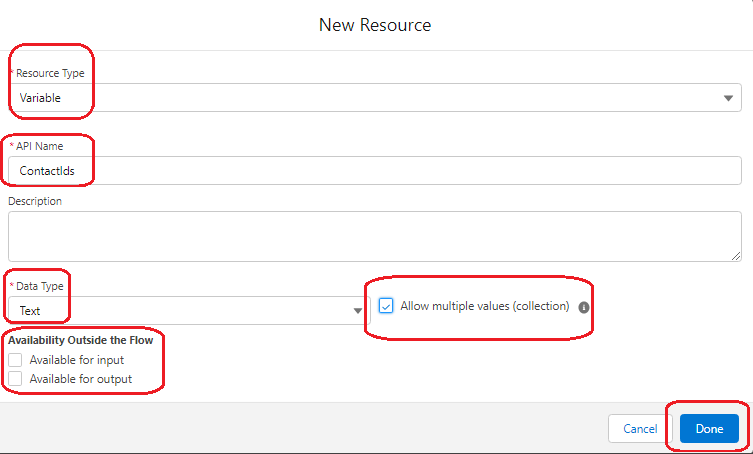
E. In the New Resource Screen, select Resource Type as Variable.
F. Set ‘ContactIds’ as the API Name.
G. Select Text as a Data Type and check the Allow multiple values (collection) checkbox.
H. Make sure the Flow availability options should be unchecked.
I. Click Done.
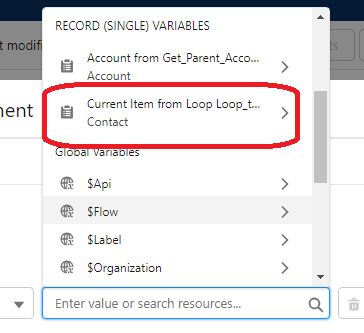
J. Once you get back to the Assignment screen. Select Add as an Operator.
K. In the value scroll down and select the ‘Current Item from Loop Loop_through_Contacts’ and then Select the Id (Contact Id) from the fields.
L. Click Done
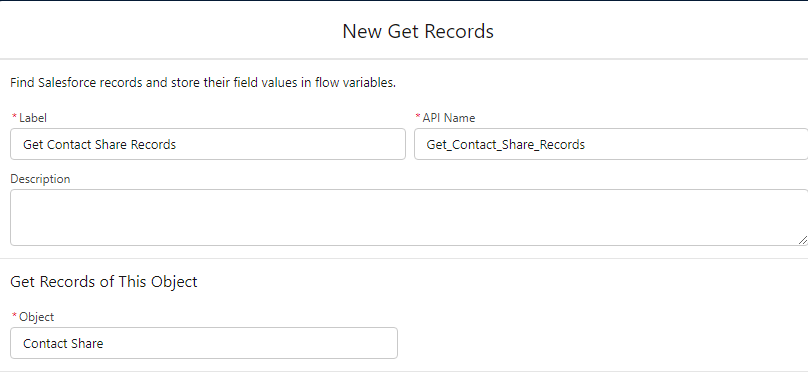
8. Fetch Contact Share Records based on the Contact Ids
A. In the Flow canvas
B. Click the + icon on the After Last section under the ‘Loop through Contacts’ element. Scroll down and select the Get Records element.
C. On the Get Records screen, Add ‘Get Contact Share Records’ as a Label. API Name will be auto-populated once you enter the Label.
D. In the Get Records for this Object section, Select Contact Share.
E. In the Filter Account Records section, Make sure ‘All Conditions are Met (AND)’ is selected under the Condition Requirements.
F. Add the ContactId (Contact Id) in the Field. And the Operator should be ‘In’.
G. In the Value Column, scroll down and select ‘ContactIds’.
H. Click ‘+ Add Condition’.
I. In the new Condition add the ‘UserOrGroupId’ in the Field. Select the ‘Equals’ as an operator.
J. In the Value Column, scroll down and select ‘Account from Get_Parent_Account’ and then select OwnerId from the Account fields.
K. Keep sorting as Not Sorted
L. Select ‘All Records’ from the How Many Records section?
M. In the ‘How to store Record data’, select the option ‘Choose fields and let Salesforce do the rest’.
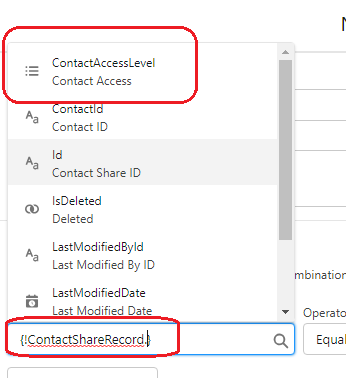
N. Select ContactId and UserOrGroupId under the Contact Share fields.
O. Click Done
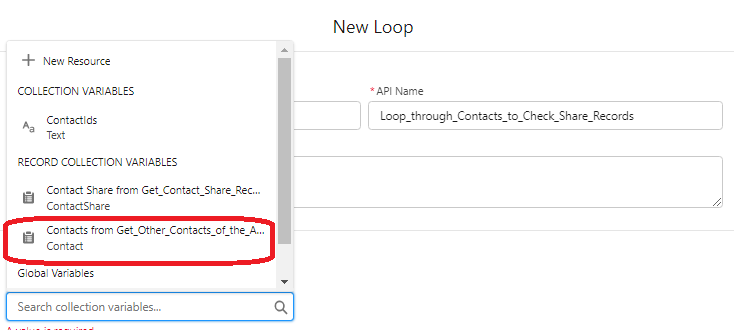
9. Again Looping through Contacts
A. In the Flow canvas
B. Click the + icon under the Get Contact Share Records element. Scroll down and select the Loop element.
C. On the Loop screen, Add ‘Loop through Contacts to Check Share Records’ as a Label. API Name will be auto-populated once you enter the Label.
D. Select ‘Contacts from Get_Other_Contacts_of_the_Account’ as the Collection Variable.
E. Make sure the Direction is selected as ‘First Item to Last item’.
F. Click Done.
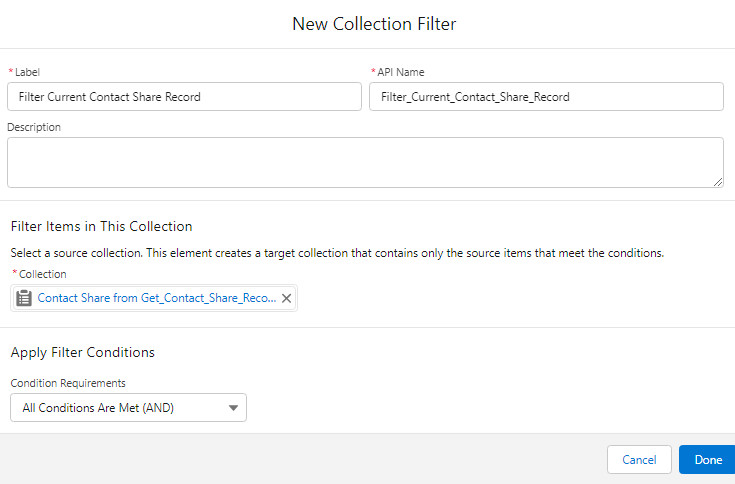
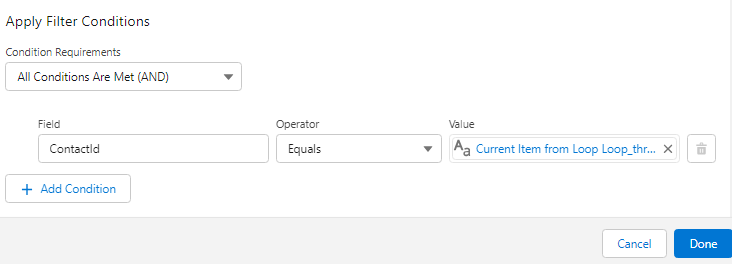
10. Filter Contact Share Records
A. In the Flow canvas
B. Click the + icon on the For Each section under the ‘Loop through Contacts to Check Share Records’ element. Scroll down and select the Collection Filter element.
C. On the Collection Filter screen, Add ‘Filter Current Contact Share Record’ as a Label. API Name will be auto-populated once you enter the Label.
D. Select ‘Contact Share from Get_Contact_Share_Records’ in the Collection section.
E. In the Apply Filter Condition add the ContactId in the Field. Select the ‘Equals’ as an operator.
F. For the Value, scroll down and select ‘Current Item from Loop_through_Contacts_to_Check_Share_Records’ and then select Id (Contact Id) from the Contact fields.
G. Click Done.
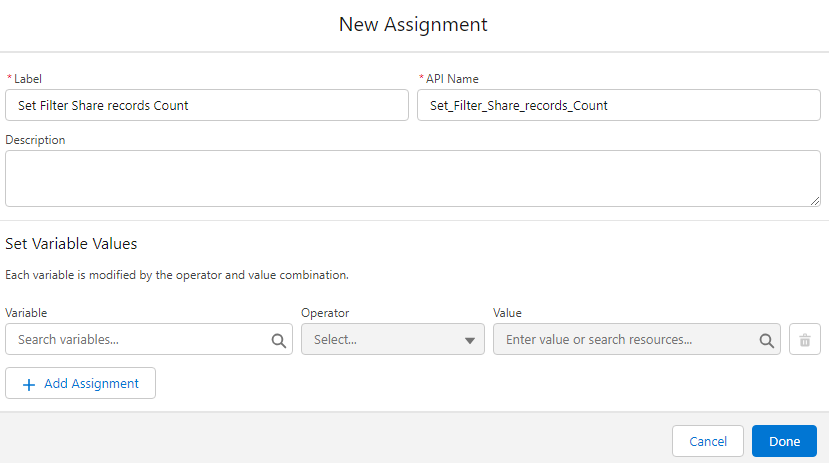
11. Assign Filter Share Records Count
A. In the Flow canvas
B. Click the + icon under the ‘Filter Current Contact Share Records’ element. Scroll down and select the Assignment element.
C. On the Assignment screen, Add ‘Set Filter Share records Count’ as a Label. API Name will be auto-populated once you enter the Label.
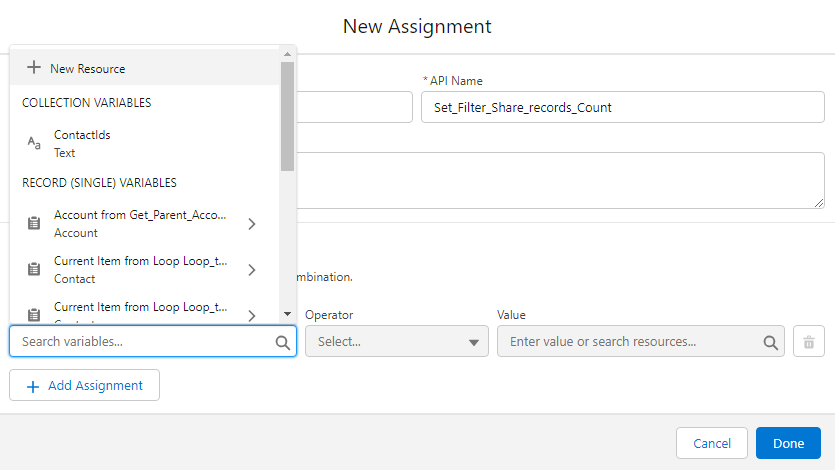
D. In the Select Variable Section, under the variable Click ‘ + New Resource’. It will open a New Resource screen.
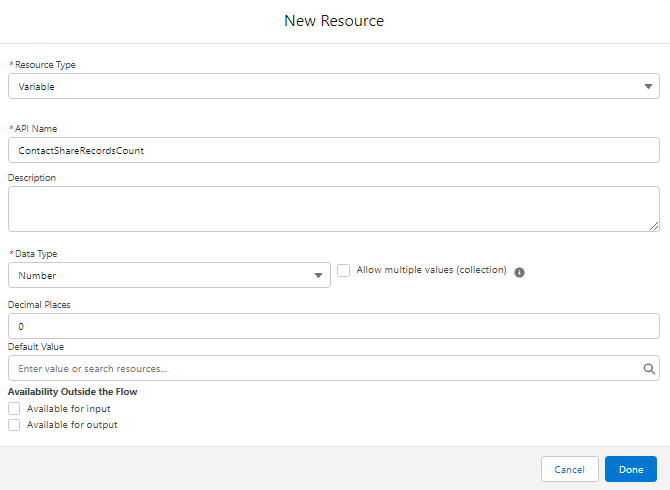
E. In the New Resource Screen, select Resource Type as Variable.
F. Set ‘ContactShareRecordsCount’ as the API Name.
G. Select Number as a Data Type and make sure Allow multiple values (collection) checkbox should be unchecked.
H. Set Decimal Places to 0.
I. Keep Default Value empty.
J. Make sure the Flow availability options should be unchecked.
K. Click Done
L. Once you get back to the Assignment screen. Select Equals Count as an Operator.
M. In the Value scroll down and select the ‘Contact Share from Filter_Current_Contact_Share_Record’.
N. Click Done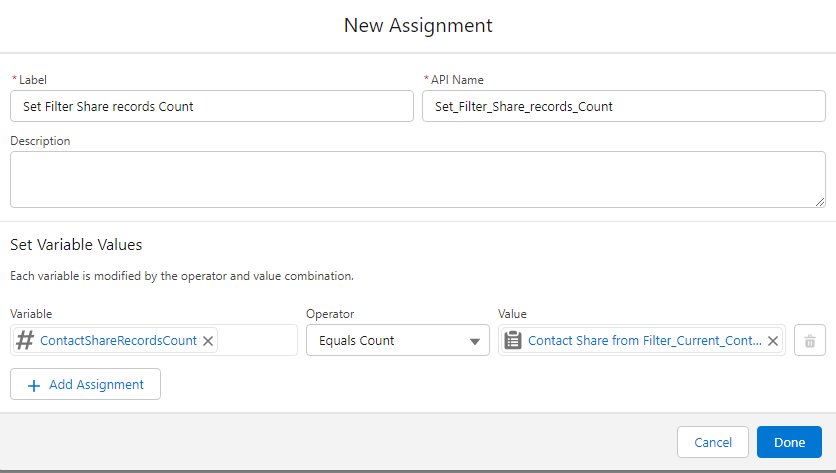
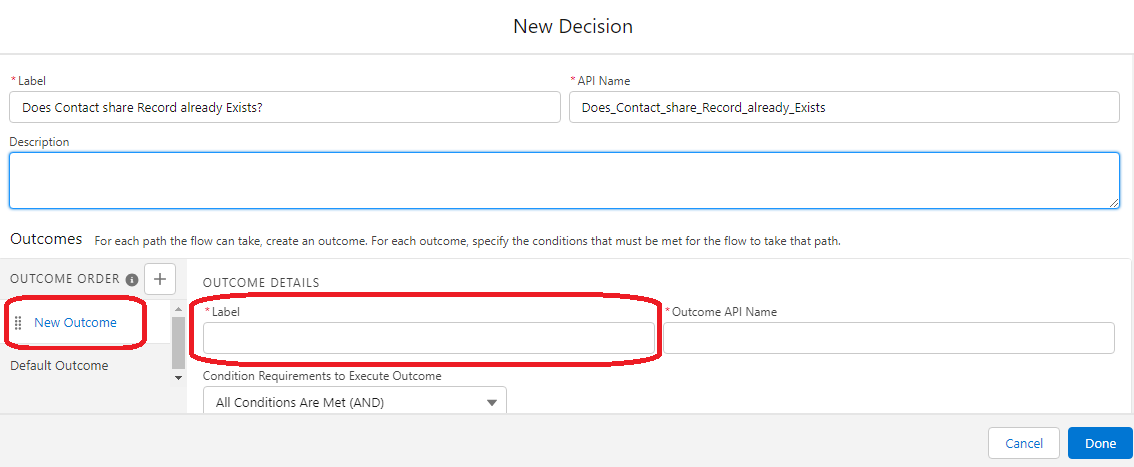
12. Check if there are Previous Share Records Exist for the Current Contact
A. In the Flow canvas
B. Click the + icon under the ‘Set Filter Share records Count’ element. Scroll down and select the Decision element.
C. In the New Decision screen, Add ‘Does Contact share Record already Exists?’ as a Label. API Name will be auto-populated once you enter the Label.
D. In the New Outcome Tab, Set ‘Already Exists’ as a Label. API Name will be auto-populated once you enter the Label.
E. Under the Resource, select ContactShareRecordsCount and select Operator as ‘Greater Than’.
F. Add 0 as a Value.
G. Select the Default Outcome tab, and enter ‘Not Exists’ as a Label.
H. Done
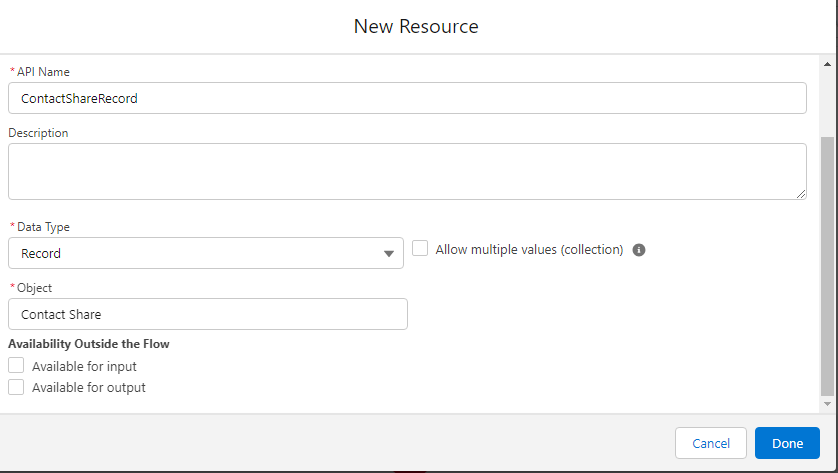
13. Create A New Contact Share Record
A. In the Flow canvas
B. Click the + icon in the Not Exist section under the ‘Does Contact share Record already Exists?’ element. Scroll down and select the Assignment element.
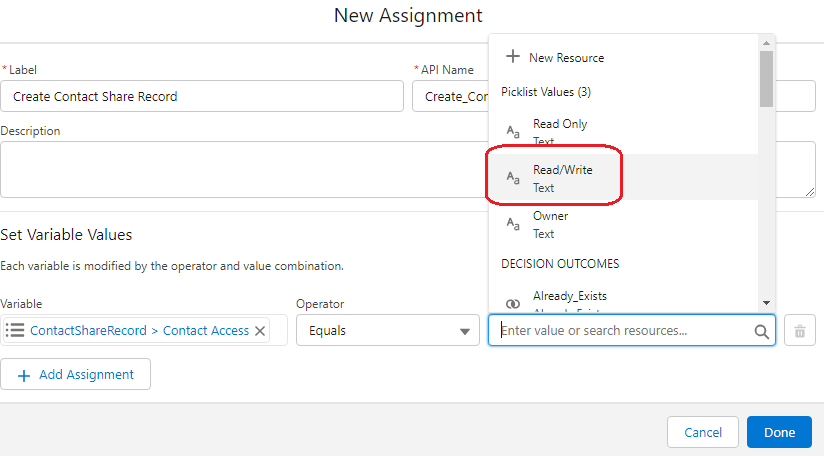
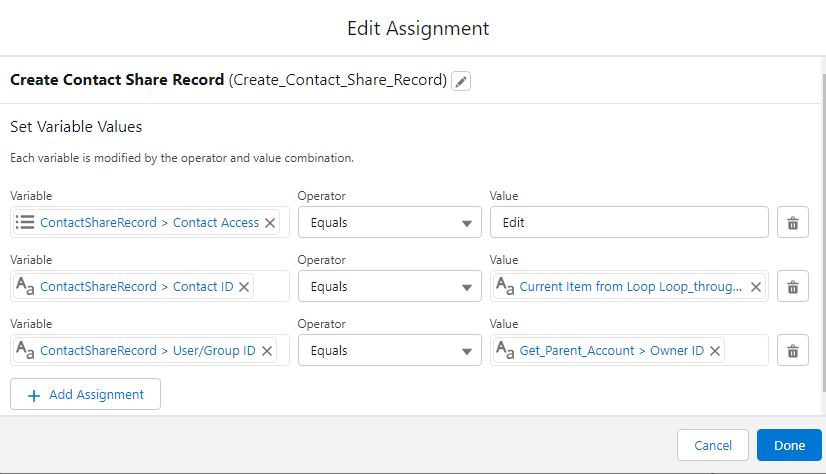
C. On the Assignment screen, Add ‘Create Contact Share Record’ as a Label. API Name will be auto-populated once you enter the Label.
D. In the Select Variable Section, under the variable Click ‘ + New Resource’. It will open a New Resource screen.
E. In the New Resource Screen, select Resource Type as Variable.
F. Set ‘ContactShareRecord’ as the API Name.
G. Select Record as a Data Type and make sure Allow multiple values (collection) checkbox should be unchecked.
H. Set Contact Share as an Object.
I. Make sure the Flow availability options should be unchecked.
J. Click Done.
K. Once you get back to the Assignment screen.
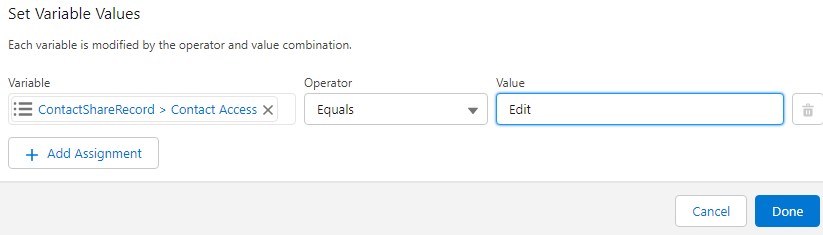
L. Select ContactShareRecord in the Variable and then Select Contact Access Level field. Select Equals Count as an Operator.
M. Select ‘Read/Write’ in the Value.
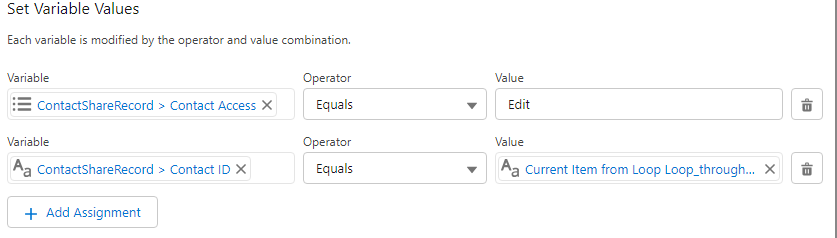
N. Click '+ Add Assignment' and then again Select ContactShareRecord in the Variable and then Select Contact Id. Select Equals Count as an Operator.
O. In the Value scroll down and select the ‘Current Item from Loop_through_Contacts_to_Check_Share_Records’ and Select Id (Contact Id) from the Contact Fields.
P. Click '+ Add Assignment' and then again Select ContactShareRecord in the Variable and then Select User/Group Id. Select Equals Count as an Operator.
Q. In the Value scroll down and select the ‘Account from Get_Parent_Account’ and Select Owner Id from the Account fields.
R. Click Done.
14. Add the Contact Share Records to the Collection
A. In the Flow canvas
B. Click the + icon under the ‘Create Contact Share Record’ element. Scroll down and select the Assignment element.
C. On the Assignment screen, Add ‘Add Contact Share records’ as a Label. API Name will be auto-populated once you enter the Label.
D. In the Select Variable Section, under the Variable Click ‘ + New Resource’. It will open a New Resource screen.
E. In the New Resource Screen, select Resource Type as Variable.
F. Set ‘ContactShareRecords’ as the API Name.
G. Select Record as a Data Type and check the Allow multiple values (collection) checkbox.
H. Set Contact Share as an Object.
I. Make sure the Flow availability options should be unchecked.
J. Click Done.
K. Once you get back to the Assignment screen. Select Add as an Operator.
L. In the Value section select the ‘ContactShareRecord’.
M. Click Done.
15. Insert Contact Share Records
A. In the Flow canvas
B. Click the + icon on the After Last section under the ‘Loop through Contacts to Check Share Records’ element. Scroll down and select the Create Records element.
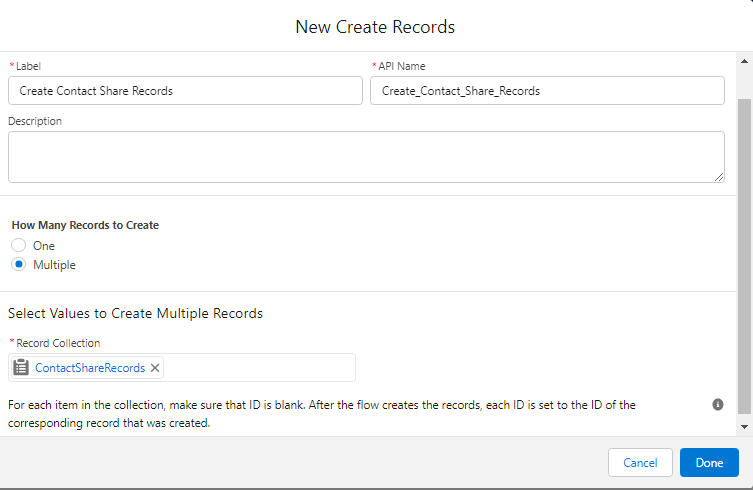
C. On the Create New Record screen, Add ‘Create Contact Share Records’ as a Label. API Name will be auto-populated once you enter the Label.
D. In the How many records to Create select Multiple
E. Select ContactShareRecords in the Record Collection.
F. Click Done.
Flow Overview:
_____________________________________________
Written by: Maham Hassan | Salesforce MVP
Maham Hassan is 2x Mom, Salesforce MVP, Director & Application Architect @ Cloud-1 & Check Automate, Co-Leader of Pakistan Dreaming, 11x Certified, Trailblazer Mentor, Community Group Leader & All Star Ranger.
Submissions reflect only the opinions of the user who made available the Submission and not the opinions of Salesforce, regardless of whether the user is affiliated with Salesforce, and may contain or constitute products, services, information, data, content and other materials made available by or on behalf of third parties ("Third Party Materials). Salesforce neither controls nor endorses, nor is Salesforce responsible for, any Third Party Materials, including their accuracy, validity, timeliness, completeness, reliability, integrity, quality, legality, usefulness or safety, or any applicable intellectual property rights. Any Submissions made available through any message board or forum in response to posted questions, or that otherwise purports to answer any questions, including any questions about Salesforce or Programs, are made available for your general knowledge only and should never be relied upon as answers to your specific questions (even if an answer is marked as a “best” answer or with any similar qualifications). You should always contact Salesforce support for answers to your specific questions. Salesforce has no control over Submissions, and is not responsible for any use or misuse (including any distribution) by any third party of Submissions.
If you have questions, tap into the wisdom of our entire Trailblazer Community here: https://trailhead.salesforce.com/trailblazer-community/feed


Número del artículo de conocimiento
000395996
¿Resolvió este artículo su problema?
¡Háganos saber cómo podemos mejorar!