Välj en organisation
Salesforce Platform: Clone Opportunity with Products Using Flow
Publiceringsdatum: Aug 18, 2026
Beskrivning
In this help article we will explore how to clone an Opportunity while maintaining it’s Opportunity Products/Line Items.
Opportunity Products (Opportunity Line Items): These are the products or services added to an Opportunity in Salesforce. They include details like pricing, quantity, and discounts, and are associated with the Opportunity.
Example scenario: When a deal is lost but the customer requests a revised proposal, sales reps can clone the Opportunity along with all its products (Opportunity Line Items). This avoids the need to manually re-add each product, saving time and ensuring accuracy.
Lösning
This tutorial shows how to build a Screen Flow that clones an Opportunity together with all of its Opportunity Products (Line Items), since Salesforce's standard clone feature does not carry line items over automatically.
Build the Flow ### Step 1: Create a Flow
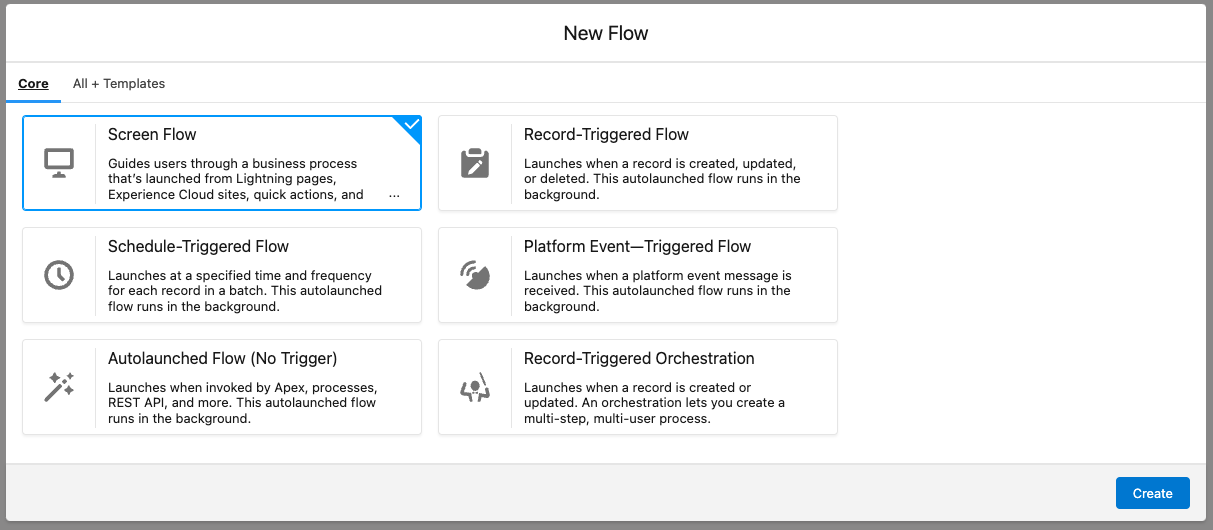
Click New Flow from the flow menu within Salesforce setup. Choose Screen Flow.
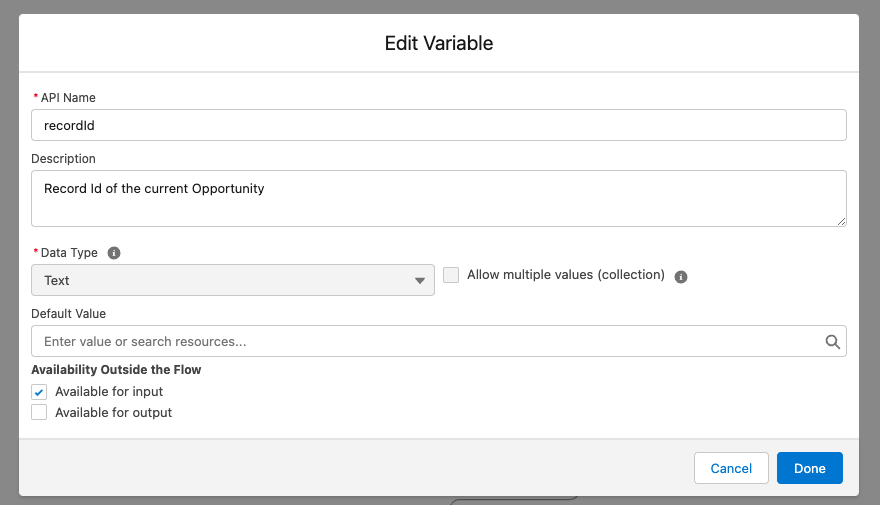
Now we need to create a way to store the record Id of the Opportunity we're going to be on at the time — the one we want to clone.
### Step 2: Create a Resource to Get the Current Opportunity Id
Within Flow, navigate to Toolbox > Manager > New Resource:
- Resource Type: Variable
- API Name: recordId
- Description: Record Id of the current Opportunity
- Data Type: Text
- Availability Outside the Flow: Available for input
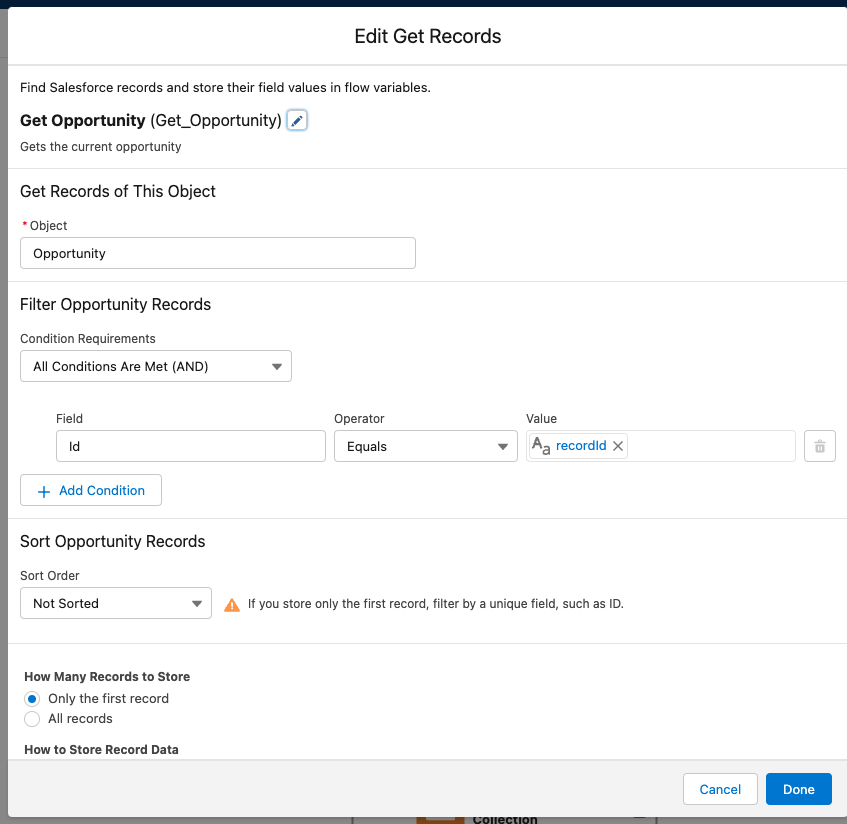
Now that we've stored the record Id of the opportunity, we need to get the record in flow in order to get some of its details for the new cloned record.
### Step 3: Add the Element to Get the Current Opportunity
Add Element > Get Records:
- Label: Get Opportunity
- API Name: Get_Opportunity
- Description: Gets the current opportunity
- Object: Opportunity
- Condition Requirements: All Conditions Are Met (AND)
- Field: Id
- Operator: Equals
- Value: {!recordId}
- Sort Order: Not Sorted
- How Many Records to Store: Only the first record
- How to Store Record Data: Automatically store all fields
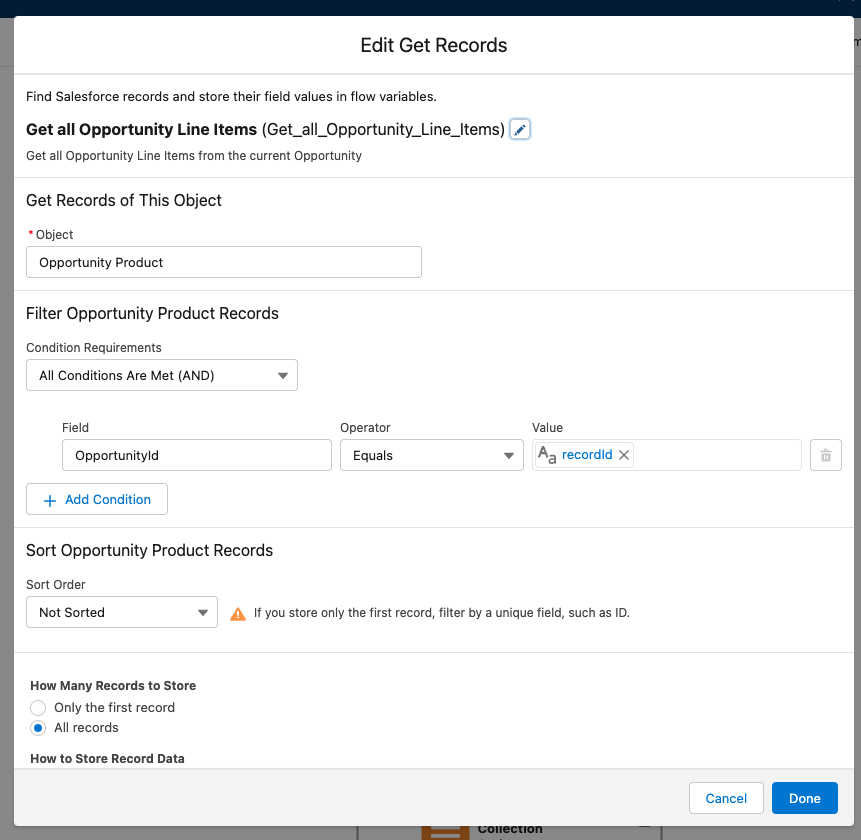
Once we've got the Opportunity record we need to also get the related Opportunity Product/Line Items.
### Step 4: Add the Element to Get the Current Opportunity Line Items
Add Element > Get Records:
- Label: Get all Opportunity Line Items
- API Name: Get_Opportunity
- Description: Get all Opportunity Line Items from the current Opportunity
- Object: Opportunity Product
- Condition Requirements: All Conditions Are Met (AND)
- Field: OpportunityId
- Operator: Equals
- Value: {!recordId}
- Sort Order: Not Sorted
- How Many Records to Store: All records
- How to Store Record Data: Automatically store all fields
In this next step we need to create the cloned Opportunity record. We can do that by adding a Create Records element and mapping the relevant fields.
### Step 5: Add the Element to Create the New Opportunity
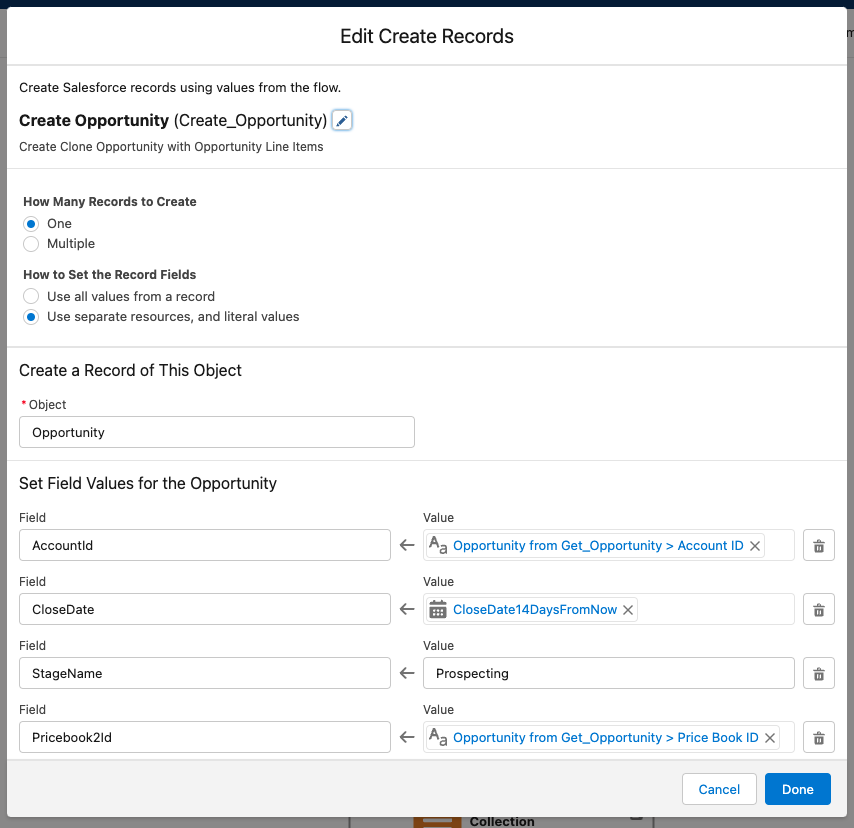
Add Element > Create Records:
- Label: Create Opportunity
- API Name: Create_Opportunity
- Description: Create Clone Opportunity with Opportunity Line Items
- How Many Records to Create: One
- How to Set the Record Fields: Use separate resources, and literal values
- Object: Opportunity
- Field: Name <- Value: {!Get_Opportunity.Name} + "NEW"
- Field: AccountId <- Value: {!Get_Opportunity.AccountId}
- Field: CloseDate <- Value: Formula (14 days from now)
- Field: StageName <- Value: Prospecting
- Field: Pricebook2Id <- Value: {!Get_Opportunity.Pricebook2Id}
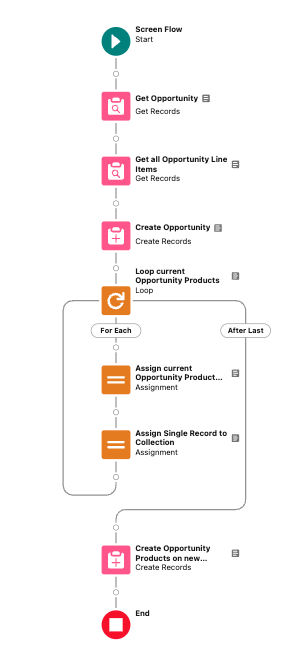
Now, in order to add all of the Opportunity Products/Line Items, we need to loop over all of the ones associated to the old Opportunity, map the values we want to keep, and also point the new Opportunity Products/Line Items to the newly created Opportunity record. We do this by looping over all of the Opportunity Products/Line Items, using the Assign element to map our old Opportunity Products/Line Items into a new Opportunity Products/Line Items variable, keeping the values we want and ensuring the new Opportunity Id is added. Finally, to maintain a bulkified design, we add that newly created record variable to a collection, in order for us to create them all in one go.
### Step 6: Add the Element to Loop Over the Current Opportunity's Line Items
Add Element > New Loop:
- Label: Loop current Opportunity Products
- API Name: Create_Opportunity_Products_on_new_Opportunity
- Description: Loop current Opportunity Products to add to the new Opportunity
- Collection Variable: {!Get_all_Opportunity_Line_Items}
- Direction: First item to last item
Add the resource to create the new Opportunity Product/Line Item record variable via Toolbox > Manager > New Resource:
- Resource Type: Variable
- API Name: New_Opportunity_Product
- Description: New Opportunity Product based on all of the previous values (except from the assigned opportunity Id)
- Data Type: Record
- Object: Opportunity Product
- Allow multiple values (collection): False
Add the resource to store a collection of new Opportunity Products/Line Items via Toolbox > Manager > New Resource:
- Resource Type: Variable
- API Name: New_Opportunity_Products
- Description: Collection of the new Opportunity Products
- Data Type: Record
- Allow multiple values (collection): True
- Object: Opportunity Product
### Step 7: Map the Old Opportunity Products/Line Items to the New Record Variable
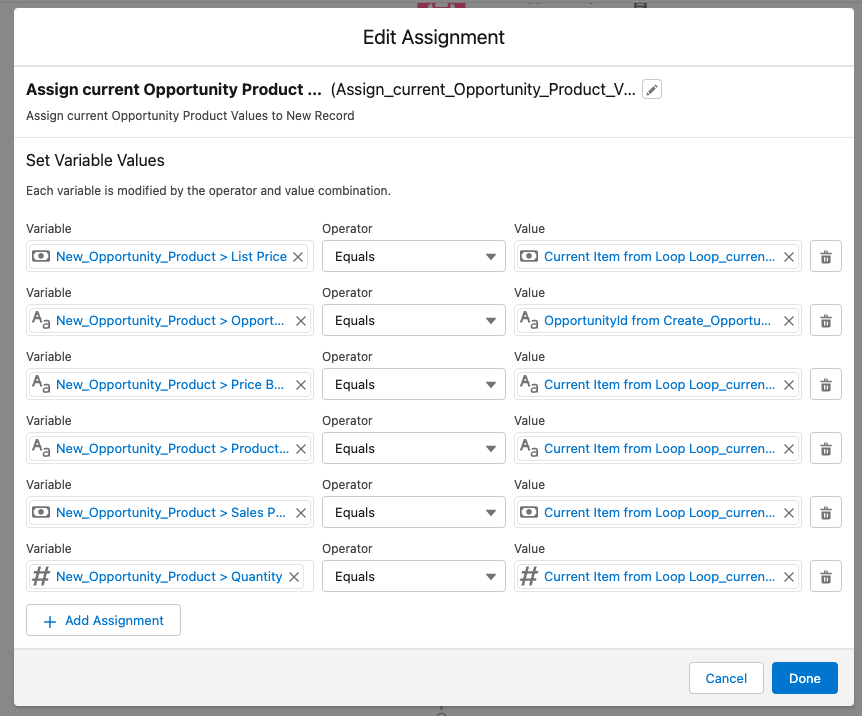
Add Element > New Assignment:
- Label: Assign current Opportunity Product Values to New Record
- API Name: Assign_current_Opportunity_Product_Values_to_New_Record
- Description: Assign current Opportunity Product Values to New Record
- Variable: {!New_Opportunity_Product.ListPrice}
- Operator: Add
- Value: {!Loop_current_Opportunity_Products.ListPrice}
Do this for all values you wish to map. Note: ensure the newly created Opportunity Id is mapped:
- Variable: {!New_Opportunity_Product.OpportunityId}
- Operator: Equals
- Value: {!Create_Opportunity}
Now add that record to a collection for bulkified record creation.
Add Element > New Assignment:
- Label: Assign Single Record to Collection
- API Name: Assign_Single_Record_to_Collection
- Description: Assign current Opportunity Product Values to New Record
- Variable: {!New_Opportunity_Product.ListPrice}
- Operator: Equals
- Value: {!Loop_current_Opportunity_Products.ListPrice}
### Step 8: Create the Opportunity Products/Line Item Records
Add Element > Create Records:
- Label: Create Opportunity Products on new Opportunity
- API Name: Create_Opportunity_Products_on_new_Opportunity
- Description: Create Clone Opportunity with Opportunity Line Items
- Variable: {!New_Opportunity_Products}
- Operator: Add
- Value: {!New_Opportunity_Products}
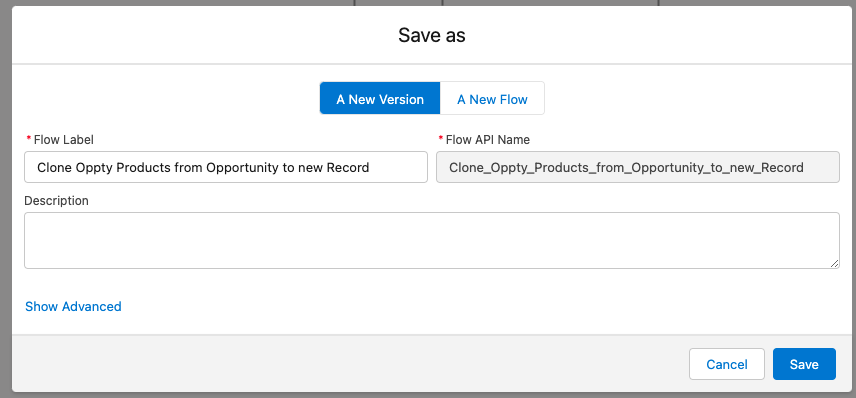
Save & Activate your Flow.
Add your Flow to an Opportunity record page either as a flow component or a button.
## About This Article
Written by: Jonathan Fox | Salesforce Answers Leader. Jonathan Fox is the proud owner of the Trailblazer Golden Hoodie. He currently works as a Technical Architect for Intellect Design Arena, a Salesforce implementation partner in the FinServ industry. Salesforce Architect community group leader, Salesforce Military Trailblazer, and all-round advocate for the Salesforce platform, Jonathan looks to help and share wherever possible.
## Disclaimer
Submissions reflect only the opinions of the user who made available the Submission and not the opinions of Salesforce, regardless of whether the user is affiliated with Salesforce, and may contain or constitute products, services, information, data, content, and other materials made available by or on behalf of third parties ("Third Party Materials"). Salesforce neither controls nor endorses, nor is Salesforce responsible for, any Third Party Materials, including their accuracy, validity, timeliness, completeness, reliability, integrity, quality, legality, usefulness, or safety, or any applicable intellectual property rights. Any Submissions made available through any message board or forum in response to posted questions, or that otherwise purport to answer any questions, including any questions about Salesforce or Programs, are made available for your general knowledge only and should never be relied upon as answers to your specific questions (even if an answer is marked as a "best" answer or with any similar qualifications). You should always contact Salesforce support for answers to your specific questions. Salesforce has no control over Submissions, and is not responsible for any use or misuse (including any distribution) by any third party of Submissions. If you have questions, tap into the wisdom of our entire Trailblazer Community here: https://trailhead.salesforce.com/trailblazer-community/feed
Ytterligare resurser
Considerations for Cloning Opportunities
Clone Opportunities with Products (Classic)
Knowledge-artikelnummer
000396659
Löste denna artikel ditt problem?
Berätta för oss vad vi kan förbättra!
