Valitse organisaatio
Salesforce Platform Flow: Select Multiple Records with Data Table Component
Julkaisupäivä: Nov 21, 2024
Kuvaus
Key Difinitions:
- Screen Flow (user-interactive automation)
- Data Table (component for displaying and selecting records)
Business Scenario:
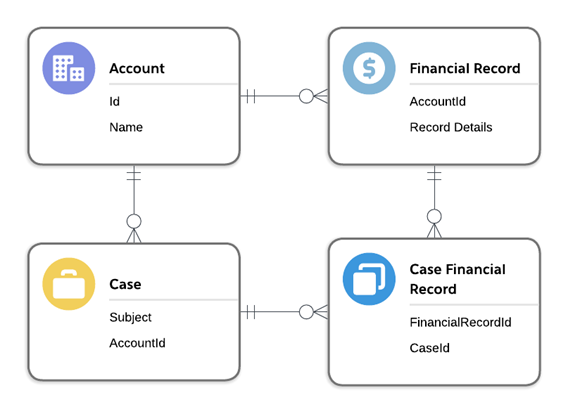
A business has a data model in which an Account can have multiple related Financial Records. Cases can also be related to Financial Records using a junction object to support a many-to-many relationship. A user should be able to utilize a screen flow embedded on a Case record page to select from the Account’s related Financial Records. A Case Financial Record should then be created for each of the selected records in the data table. The entity relationship for this data model is outlined below:
Ratkaisu
Solution Overview:
We can use a screen Flow with a Data Table component to display the Case’s Account’s related Financial Records, allowing the user to choose which records to relate to the current Case. The screen Flow can be embedded directly on the Case record page to allow for ease of use.
As a best practice, be sure to build and test Flows in a Sandbox before deploying to a Production environment.
Step-by-Step Configuration:
Step 1: From Setup, navigate to the Home tab. In the Quick Find search box, search for Flows. Click on Flows to navigate to the Flow setup page
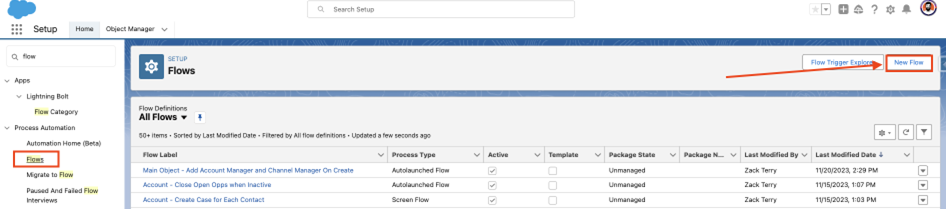
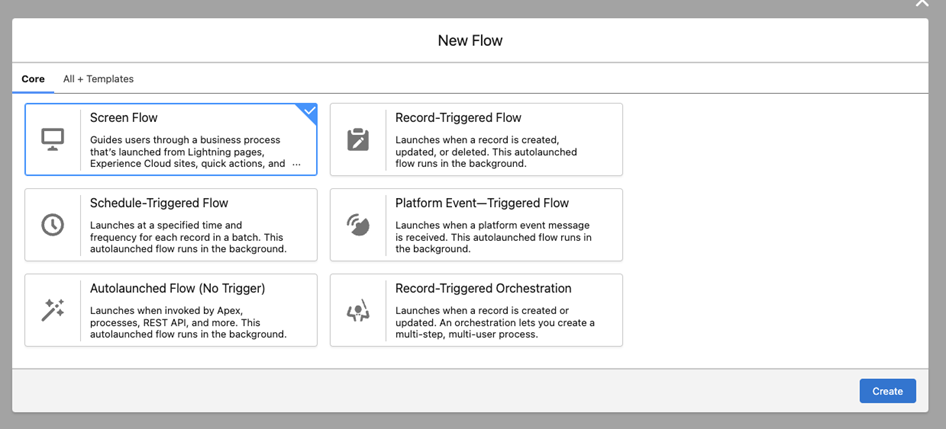
Step 2: Select New Flow from the top right side of the page. A new window will open - select Screen Flow, then click the Create button
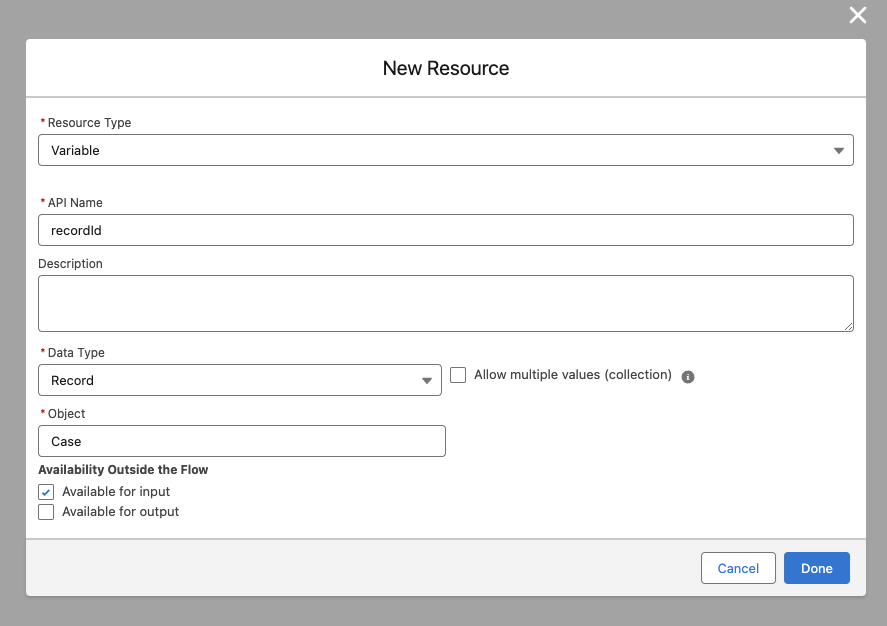
Step 3: The Flow Canvas is now open - from here, we will configure the Flow logic necessary to display the Case’s Account’s related Financial Records, allow the user to choose a set of records, and ultimately create Case Financial Records for the current Case. Before we start with the Flow logic, we first need to create a recordId Variable to store the value of the Case and all its fields. We will use this Variable to capture the source Case record and it’s field values so that we can easily use this information in the Flow
- Expand the Flow Toolbox at the top left of the canvas

- Click on New Resource
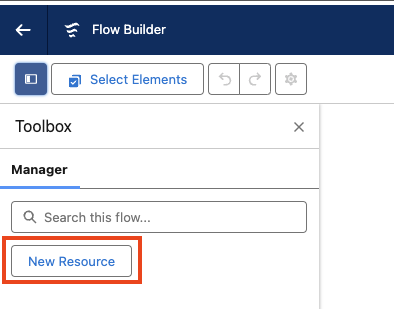
- Create a Variable and set the API Name to recordId - it’s important for this to match exactly
- Set the Data Type to Record, the Object to Case, and select Available for Input
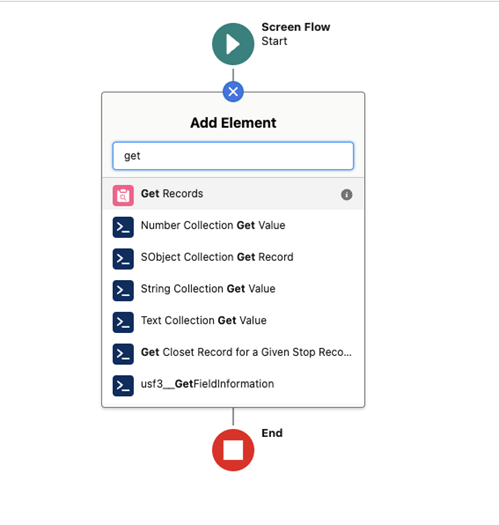
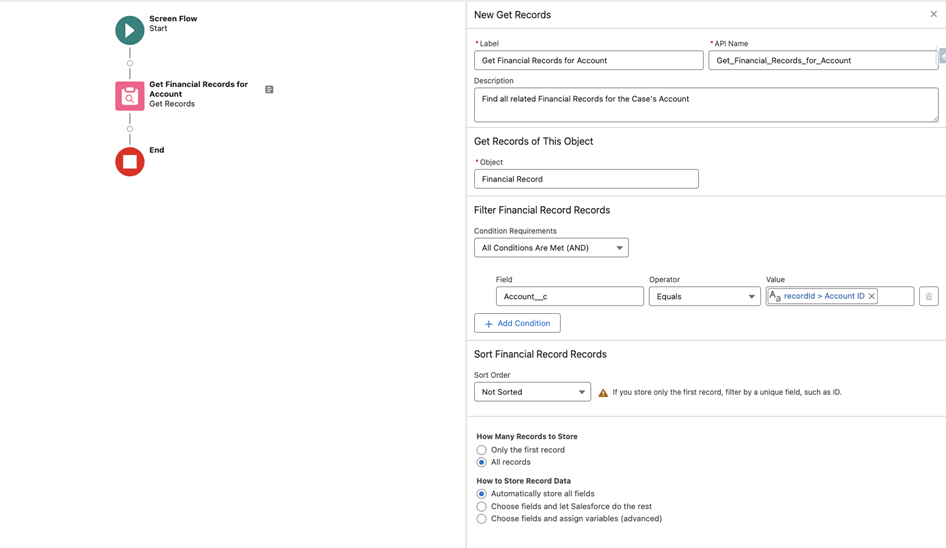
Step 4: Add a Get Records Element to the Canvas - we will configure this to find Financial Records for the Case’s related Account
- Provide a Label and Description for the Element
- Set the criteria to find Financial Records where the Account__c is the same as the Case’s Account record - this is stored in our recordId Variable as {!recordId.AccountId}
- Set the Element to find All Records, and leave the option enabled for Automatically store all fields
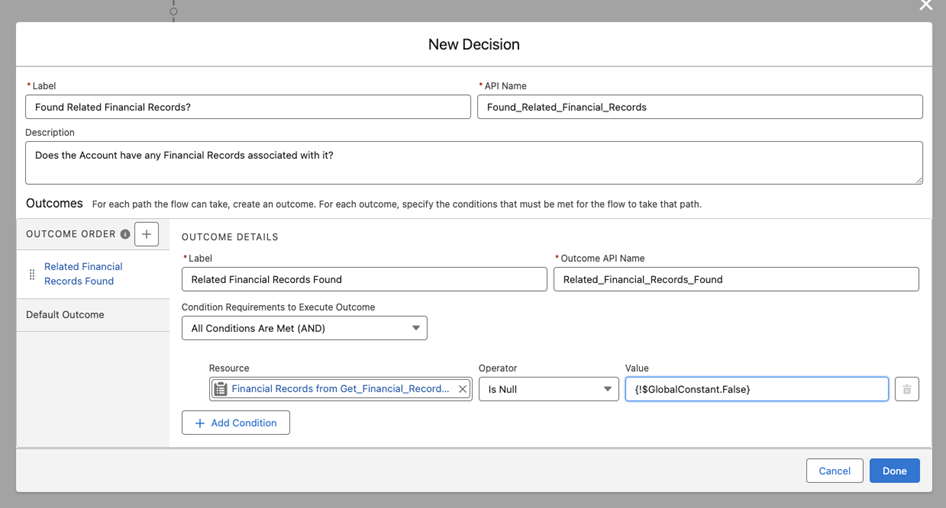
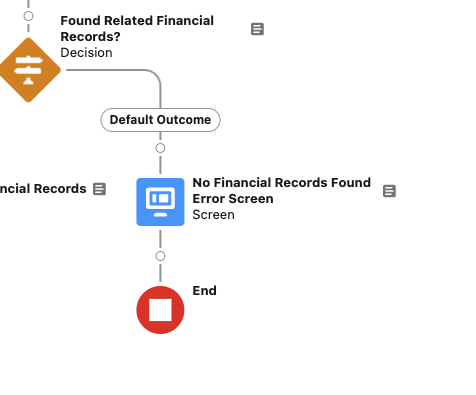
Step 5: Add a Decision Element to the Canvas - we will use this to determine if any Financial Records were found related to the Cases' Account
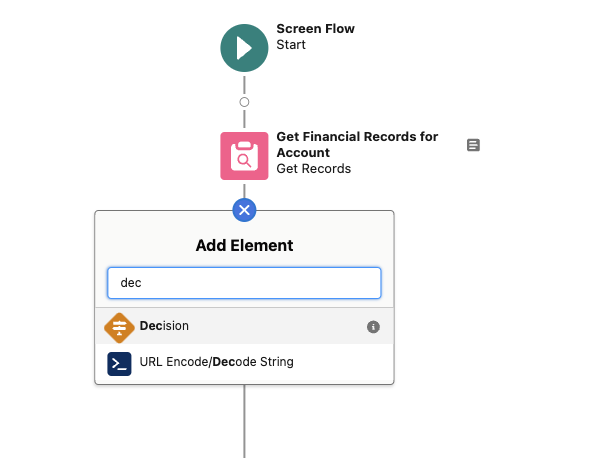
- Provide a Label and Description
- Label the first Outcome tab and check that the output of the previous Get Element {!Get_Financial_Records_for_Account} has a value - use Is Null {!$GlobalConstant.False}
- Leave the Default Outcome as-is
Step 6: Add a Screen Element for the Default Outcome path - we will display a message letting the user know that the Account has no related Financial Records (If you wish to add more logic here, such as giving the user the ability to add Financial Records, this could be configured, but will not be covered in this tutorial)
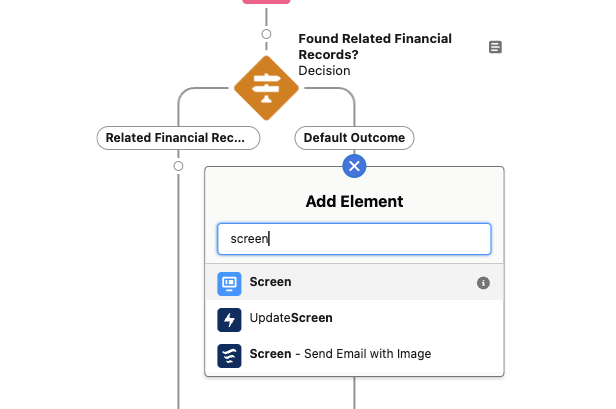
- Provide and Label and Description for the Screen Element
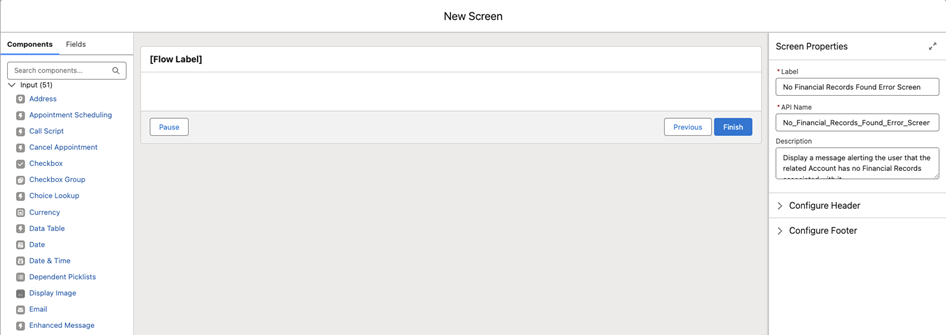
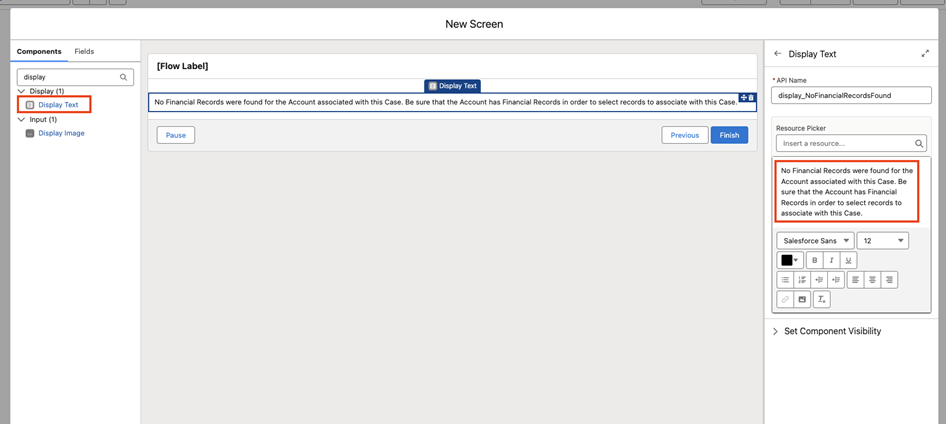
- Add a Display Text component to the Screen - you can find this along the left sidebar in the Components tab - configure a message to let the user know no Financial Records were found
Optional: customize this path further to add additional functionality - for this example, the Flow will be set to End if this path is taken
Step 7: Add a Screen Element for the Decision Path which found related Financial Records - we will use this screen to display those records in a Data Table and allow the user to select which records to associated with the Case
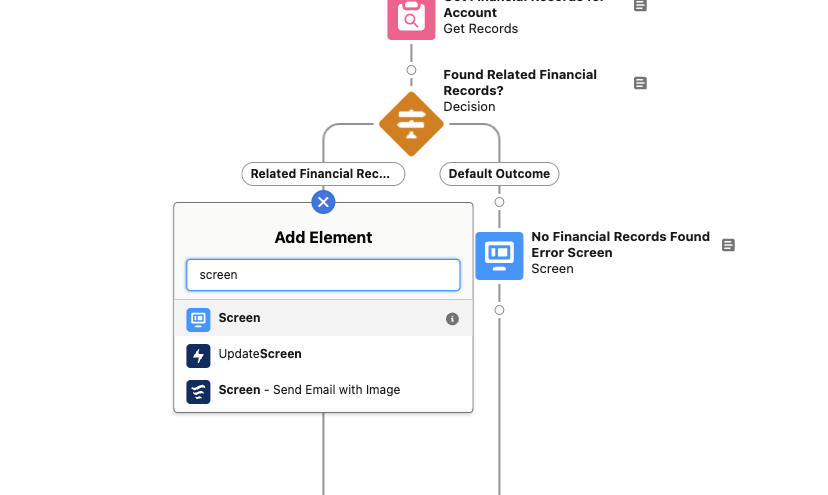
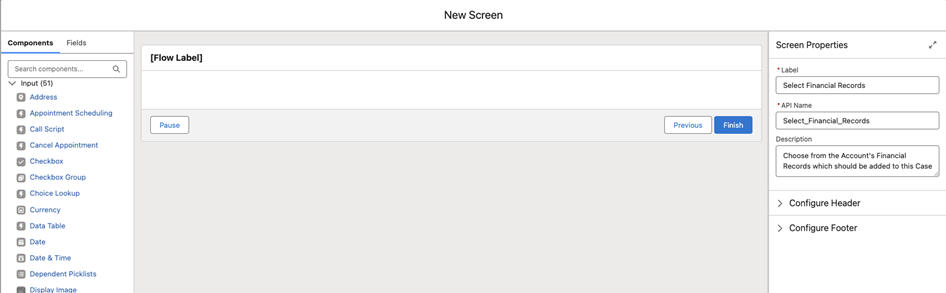
- Provide and Label and Description for the Screen Element
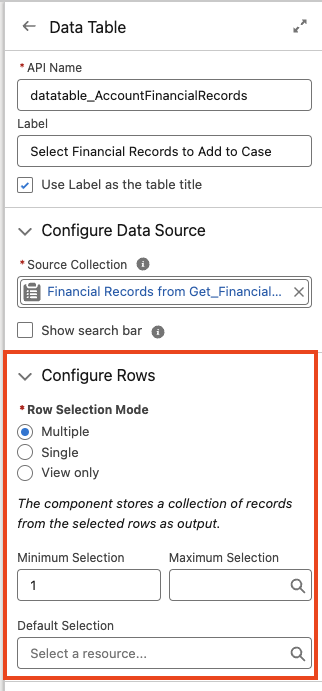
- Add a Data Table component to the Screen - provide the API Name and Label. You may optionally select to use the Label as the Title for the table.
- Choose {!Get_Financial_Records_for_Account} for the Source Collection - this will contain the Financial Records found via the previous Get Records Element
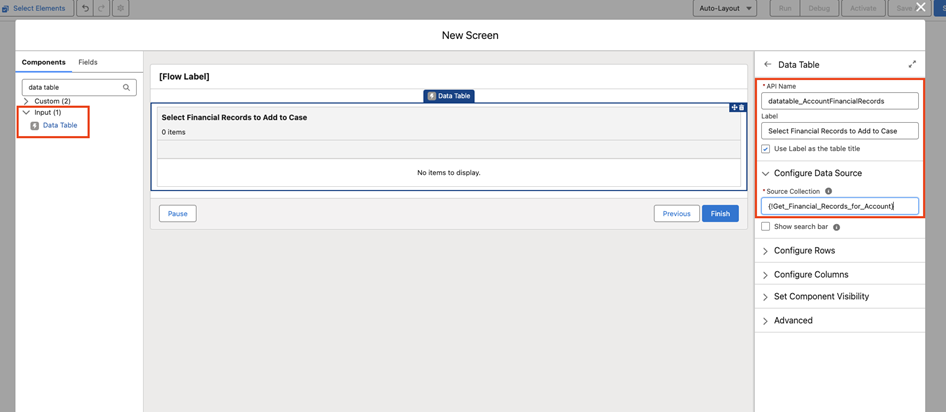
- Configure the Rows to allow for Multiple Selection - optionally define a minimum and maximum number of records which can be selected. A default selection can also be defined, if desired - this will pre-select records for the user. A minimum of 1 will be used for this example to ensure the user must select at least one record.
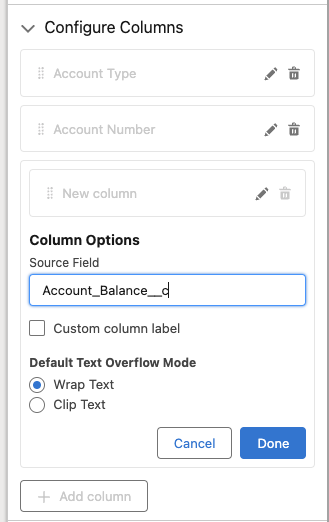
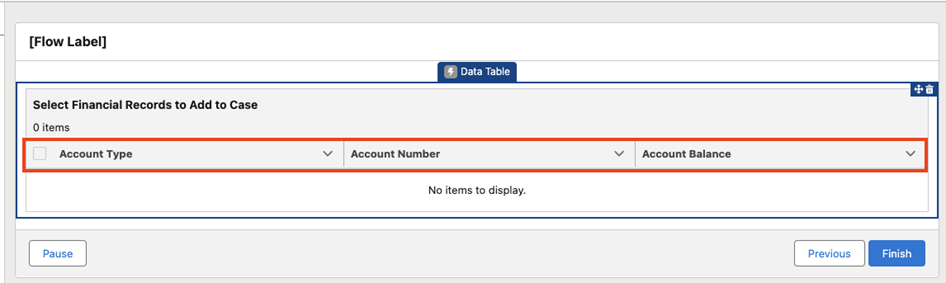
- Configure Columns to provide the desired fields to display from the Financial Records on the Data Table - for this example, we select Account Type, Account Number, and Account Balance
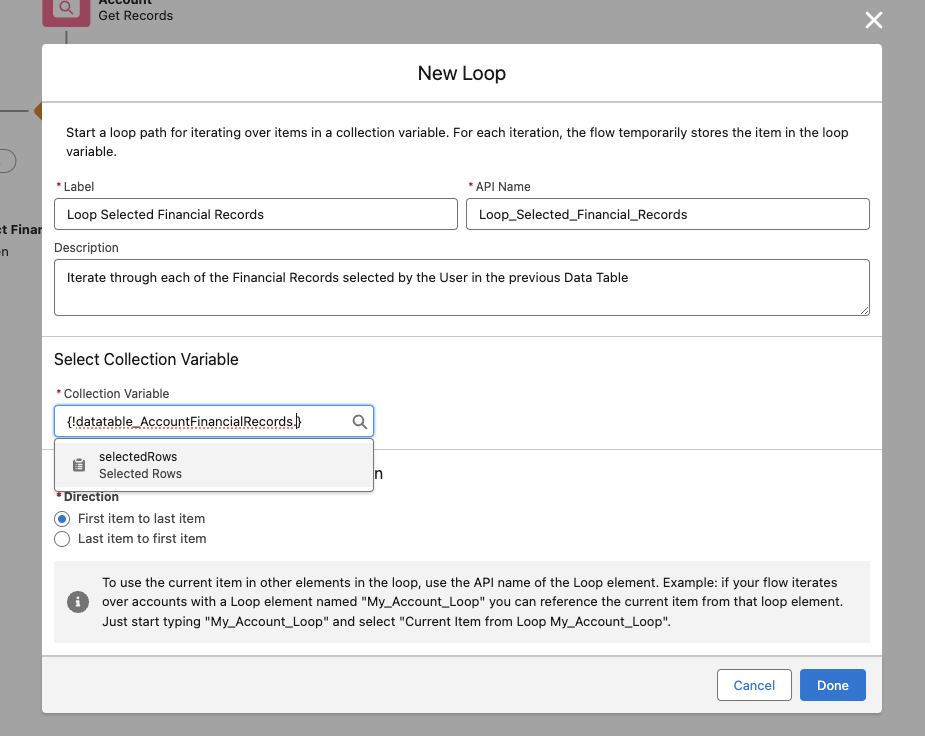
Step 8: Add a Loop Element to the Canvas. Give the Element a Label and Description. This Element will loop through each of the records selected by the user in the Data Table
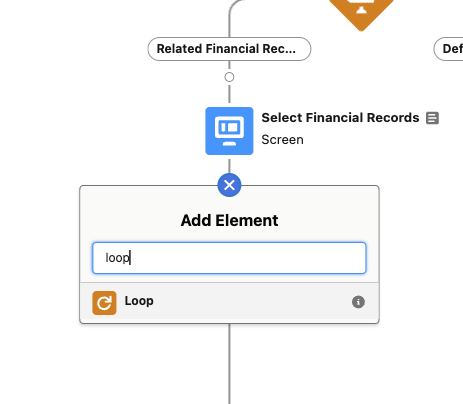
- Select the Data Table’s Selected Rows as the Collection Variable to iterate through - {!datatable_AccountFinancialRecords.selectedRows} - this will contain the records selected by the User
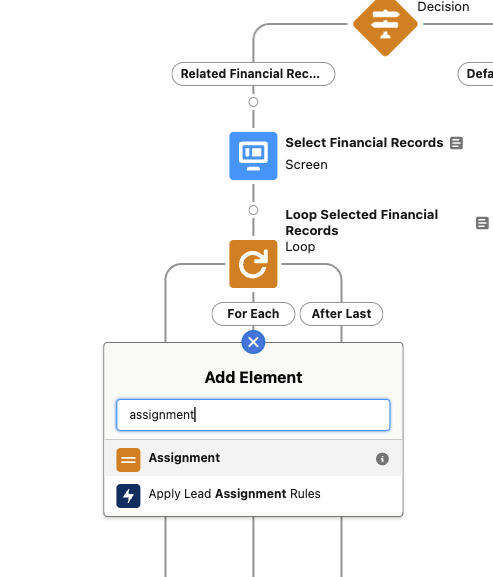
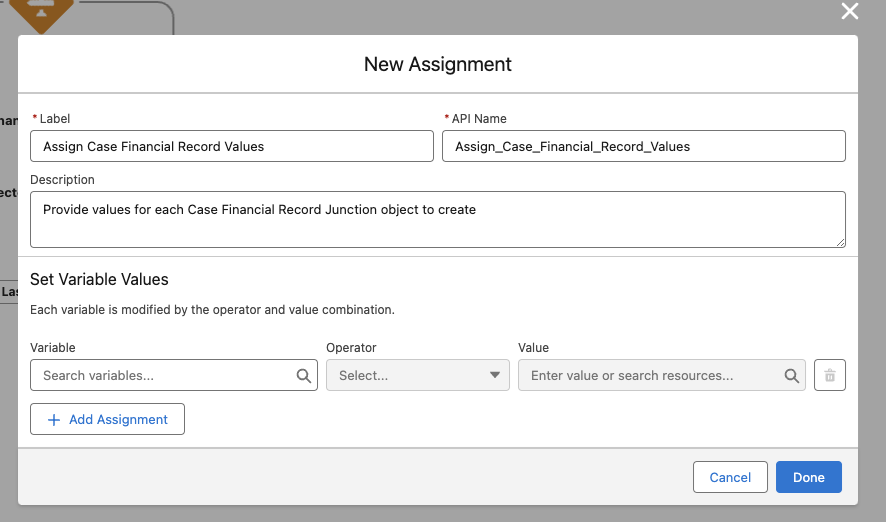
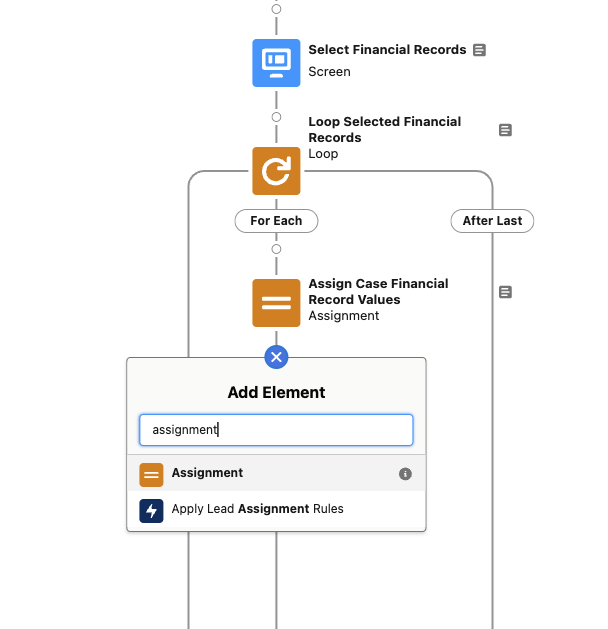
Step 9: Add an Assignment Element to the Canvas - this will be used to assign values for the Case Financial Records (the junction object) to create for each of the selected Financial Records
- Provide a Label and Description
- When selecting a Variable, add a New Resource - select Variable as the Resource Type, and select Record as the Data Type. Select Case Financial Record as the Object, and select Available for Input
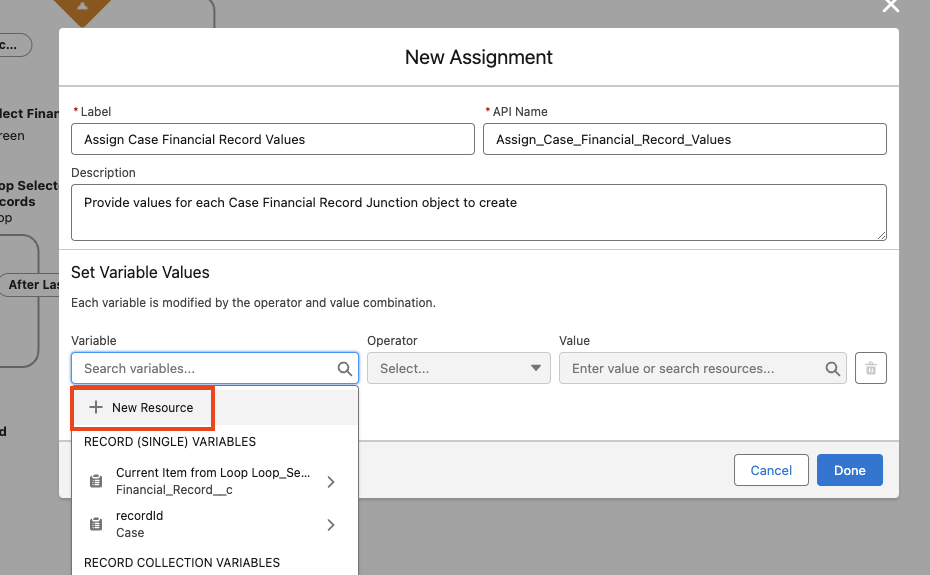
- Set the Value of {!var_CaseFinancialRecord.Case__c} to {!recordId.Id} - this sets the Case__c value for the junction record to the value of the current Case

- Set the Value of {!var_CaseFinancialRecord.Financial_Record__c} to {!Loop_Selected_Financial_Records.Id} - this sets the Financial_Record__c value to the value of the currently looped Financial Record
Step 10: Add another Assignment Element to the canvas - this will be used to add the previously assigned Case Financial Record values to a collection - provide a Label and Description

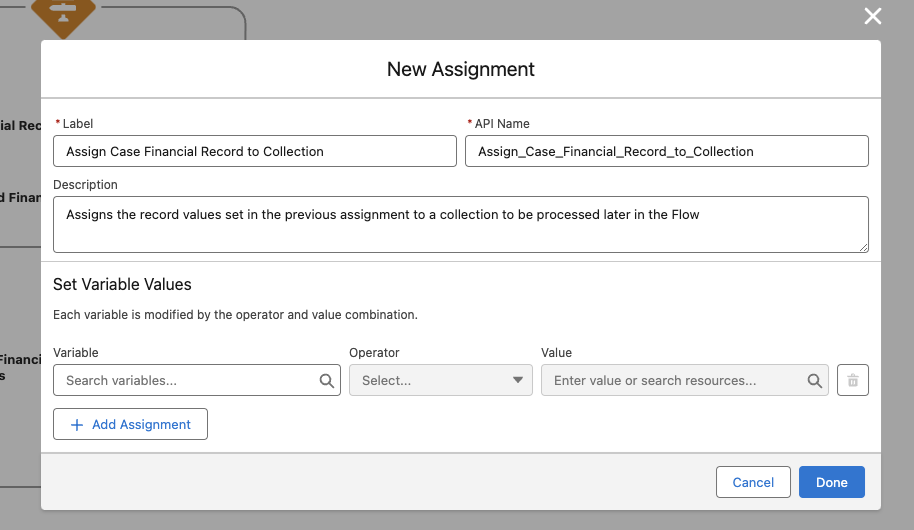
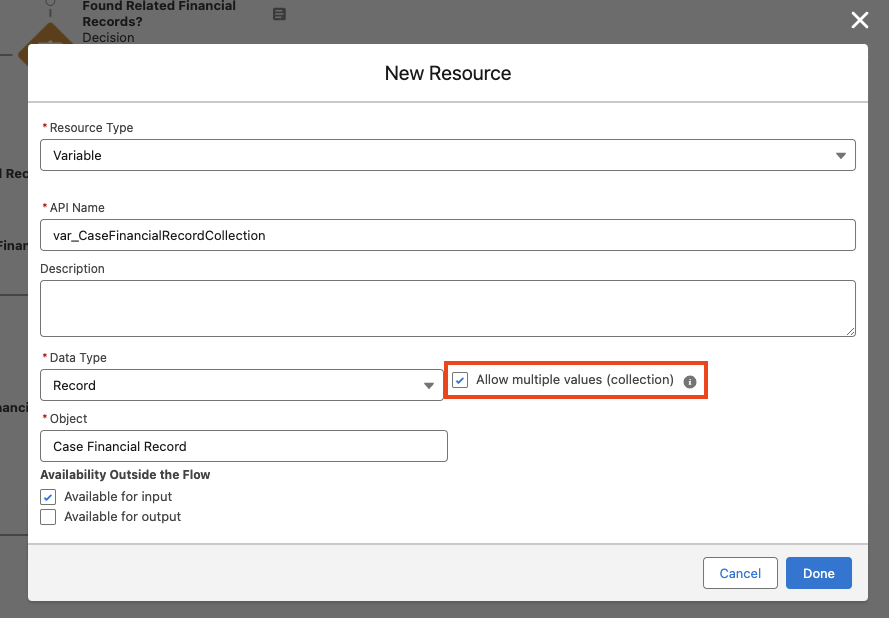
- As in the previous step, add a New Resource directly from the Variable selection. Similarly, select Variable as the Resource Type, and select Record as the Data Type. Select Case Financial Record as the Object, and select Available for Input. Be sure to check the box for Allow multiple values (collection)
- Select {!var_CaseFinancialRecordCollection} and Add the entire Variable {!var_CaseFinancialRecord} to the collection
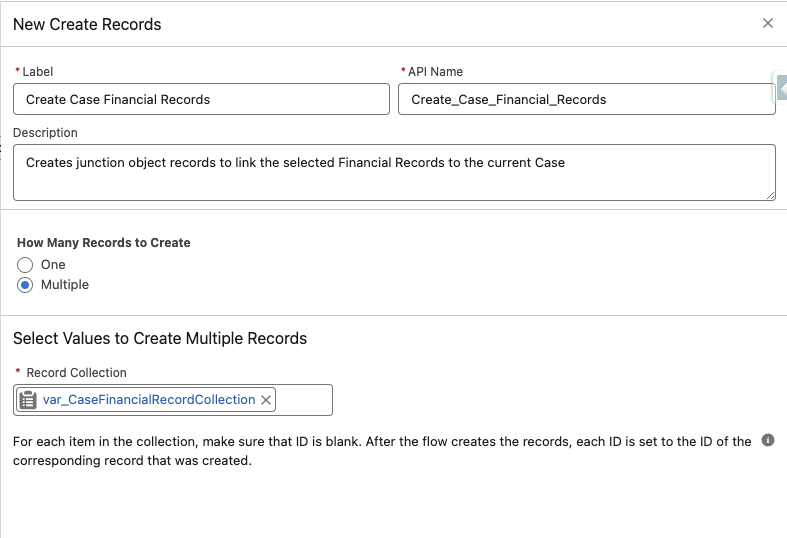
Step 11: Outside of the Loop, add a Create Records Element - select to create multiple records and select {!var_CaseFinancialRecordCollection} as the records to create (as a best practice, a Fault Path should also be specified in the event the Create Element fails - this is not covered in this tutorial)
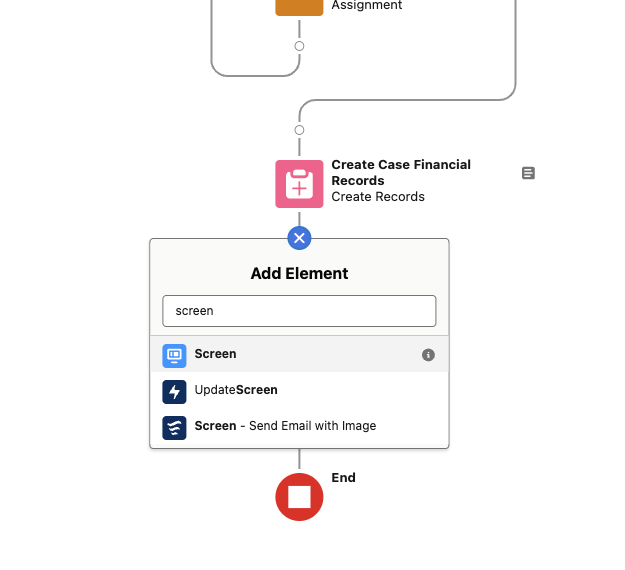
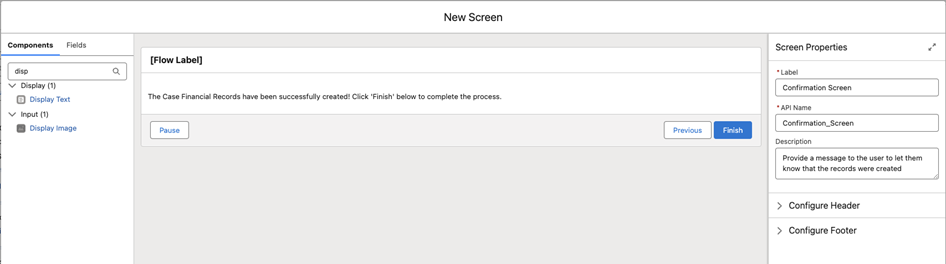
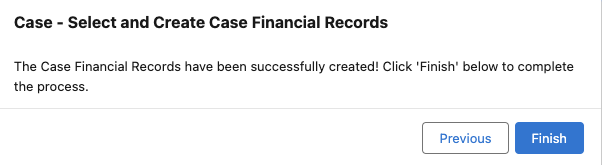
Step 12: Add a final Screen Element to serve as confirmation that the records were created successfully.
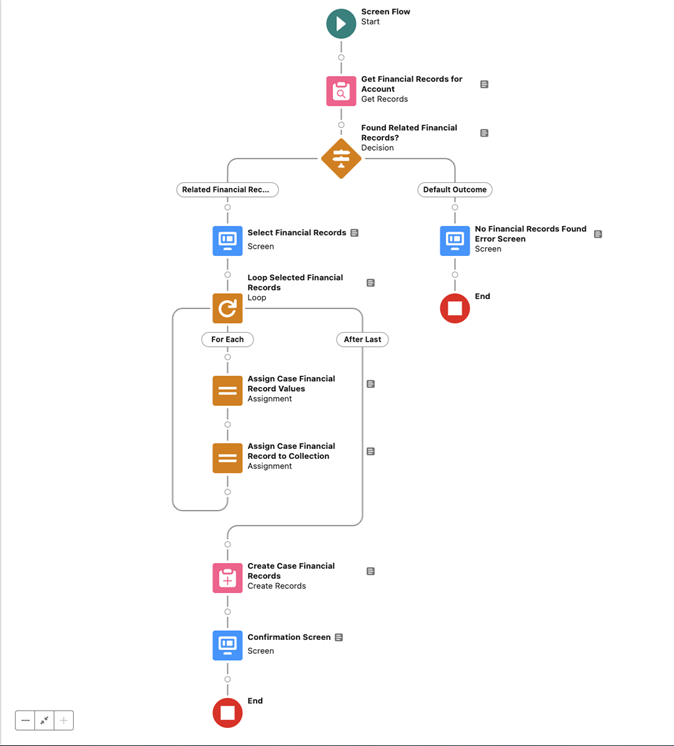
Step 13: Review, Debug, and Test the Flow results - the completed Flow may look something like this
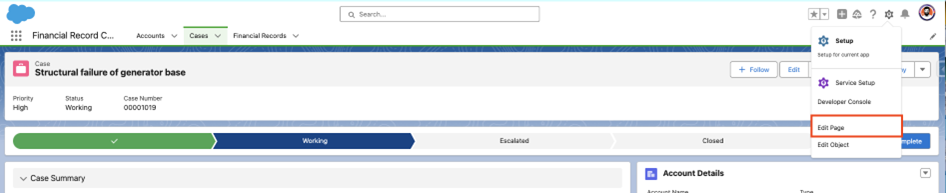
Step 14: Activate the Flow and Embed it on a Case record page. To embed the Flow on a Case record page, navigate to a Case record, and select Edit Page from the Setup icon dropdown menu.


- Drag the Flow component to the desired location on the page
- Select the Flow to run from the component - this should be the name of the Flow we created throughout this tutorial
- Be sure to select the option to Pass all field values from the record into this Flow Variable for the recordId Variable - this ensure the Case record is passed to the Flow to provide context for the Flow logic
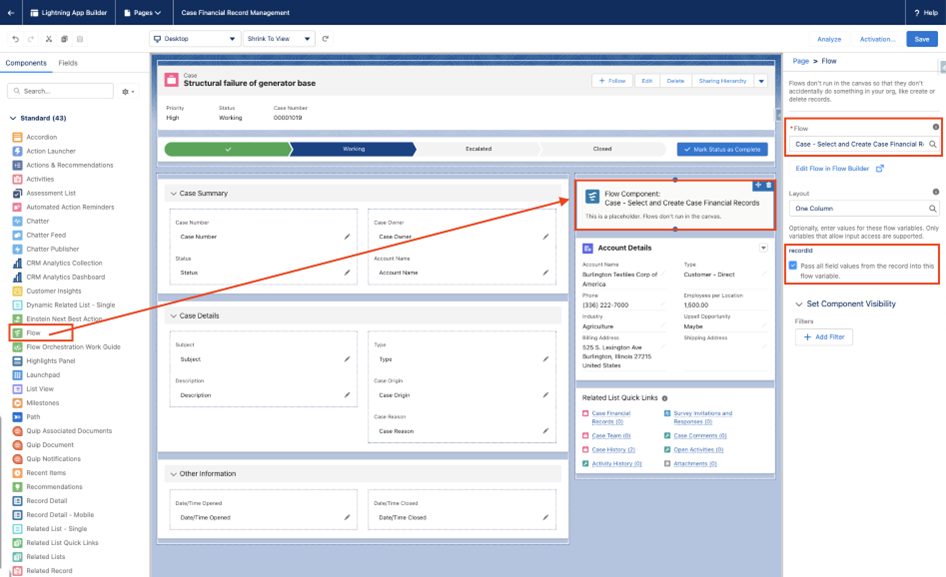
- Be sure to Save and Activate the page, if needed - navigating back to the record page should display the Screen Flow with the needed context
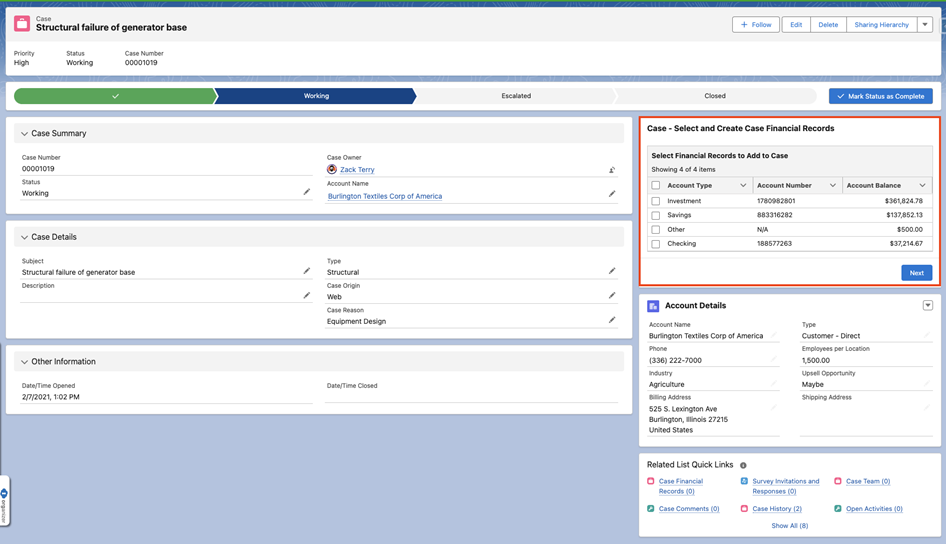
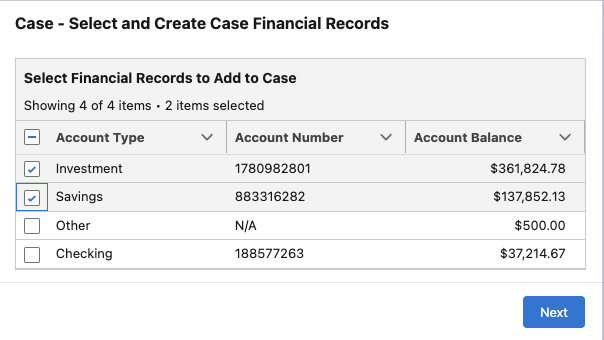
- Here’s the results of the Flow when selecting two financial records from the Data Table
Notes:

- As a best practice, always be sure to build and test your Flow in a sandbox
- Additional enhancements can be made to this Flow by checking to see if Case Financial Records exist prior to displaying them in the Data Table - this ensures existing records are not available for selection
- The Embedded Flow Component could also be set to conditionally display based on certain Case record data (for example, only show the component when the Case has a value for AccountId)
- All data used in this example is entirely fictional
- This tutorial is based on this post in the Trailblazer Community
_____________________________________________
Written by: Zack Terry | Salesforce Answers Leader
Zack Terry is a Senior Salesforce Solution Architect at Fast Slow Motion, which aims to be a blessing to business leaders by helping them implement and maximize their use of the Salesforce platform. At the time of writing, Zack has worked in the Salesforce ecosystem for nearly a decade, holds 20 Salesforce Credentials, and has achieved the rank of “All-Star Ranger” on Trailhead. He regularly participates as an Answers Leader in the Salesforce Trailblazer Community.
Submissions reflect only the opinions of the user who made available the Submission and not the opinions of Salesforce, regardless of whether the user is affiliated with Salesforce, and may contain or constitute products, services, information, data, content and other materials made available by or on behalf of third parties ("Third Party Materials). Salesforce neither controls nor endorses, nor is Salesforce responsible for, any Third Party Materials, including their accuracy, validity, timeliness, completeness, reliability, integrity, quality, legality, usefulness or safety, or any applicable intellectual property rights. Any Submissions made available through any message board or forum in response to posted questions, or that otherwise purports to answer any questions, including any questions about Salesforce or Programs, are made available for your general knowledge only and should never be relied upon as answers to your specific questions (even if an answer is marked as a “best” answer or with any similar qualifications). You should always contact Salesforce support for answers to your specific questions. Salesforce has no control over Submissions, and is not responsible for any use or misuse (including any distribution) by any third party of Submissions.
If you have questions, tap into the wisdom of our entire Trailblazer Community here: https://trailhead.salesforce.com/trailblazer-community/feed
Knowledge-artikkelin numero
000925354
Ratkaisiko tämä artikkeli ongelmasi?
Anna palautetta, jotta voimme kehittyä!