Valitse organisaatio
How to Configure Anypoint VPN with Google Cloud VPN
Julkaisupäivä: Aug 1, 2025
Tehtävä
GOAL
This article provides the configuration steps for Anypoint VPN with Google Cloud VPN on Google Cloud Platform (GCP) using BGP.Important: This Knowledge Article aims to provide basic guidelines for configuring Anypoint VPN with Google Cloud VPN. The contents of the article are to be used at your own risk and are provided as-is. For further information on configuring GCP, please reach out to Google support.
Vaiheet
1. Prepare the GCP side
You must create the VPN gateway on the GCP side. This creates an external IP addresses that you need for the Anypoint VPN setup.
For further guidance on these points, please refer to the GCP documentation for Creating an HA VPN gateway.
NOTE: Please be sure that your GCP VPC is created and ready
a) Obtain GCP VPN IP
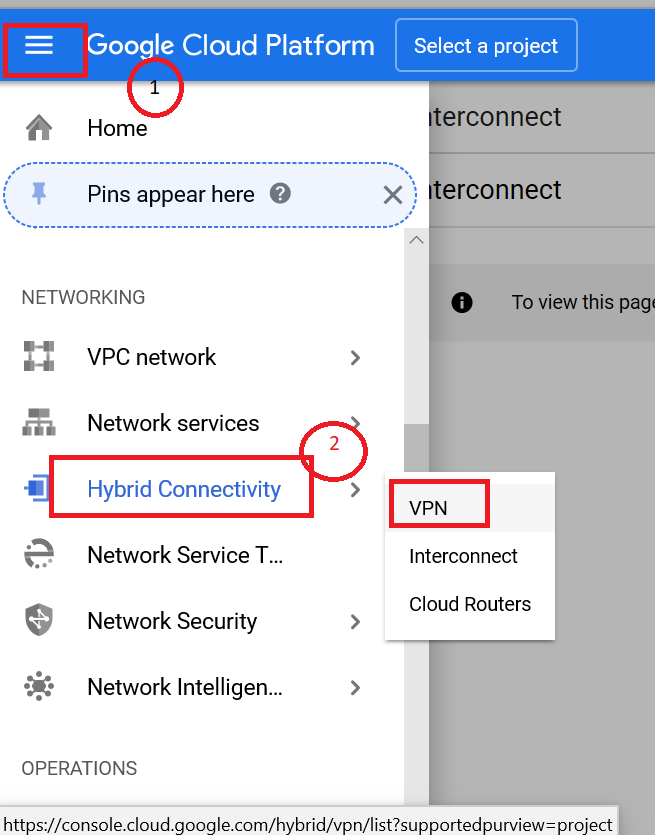
b) Choose Cloud VPN Gateways - Create VPN Gateway
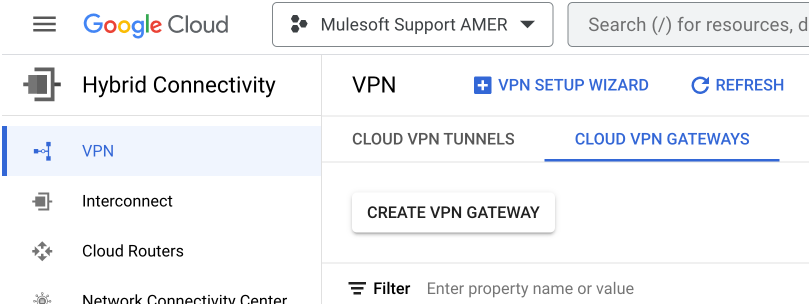
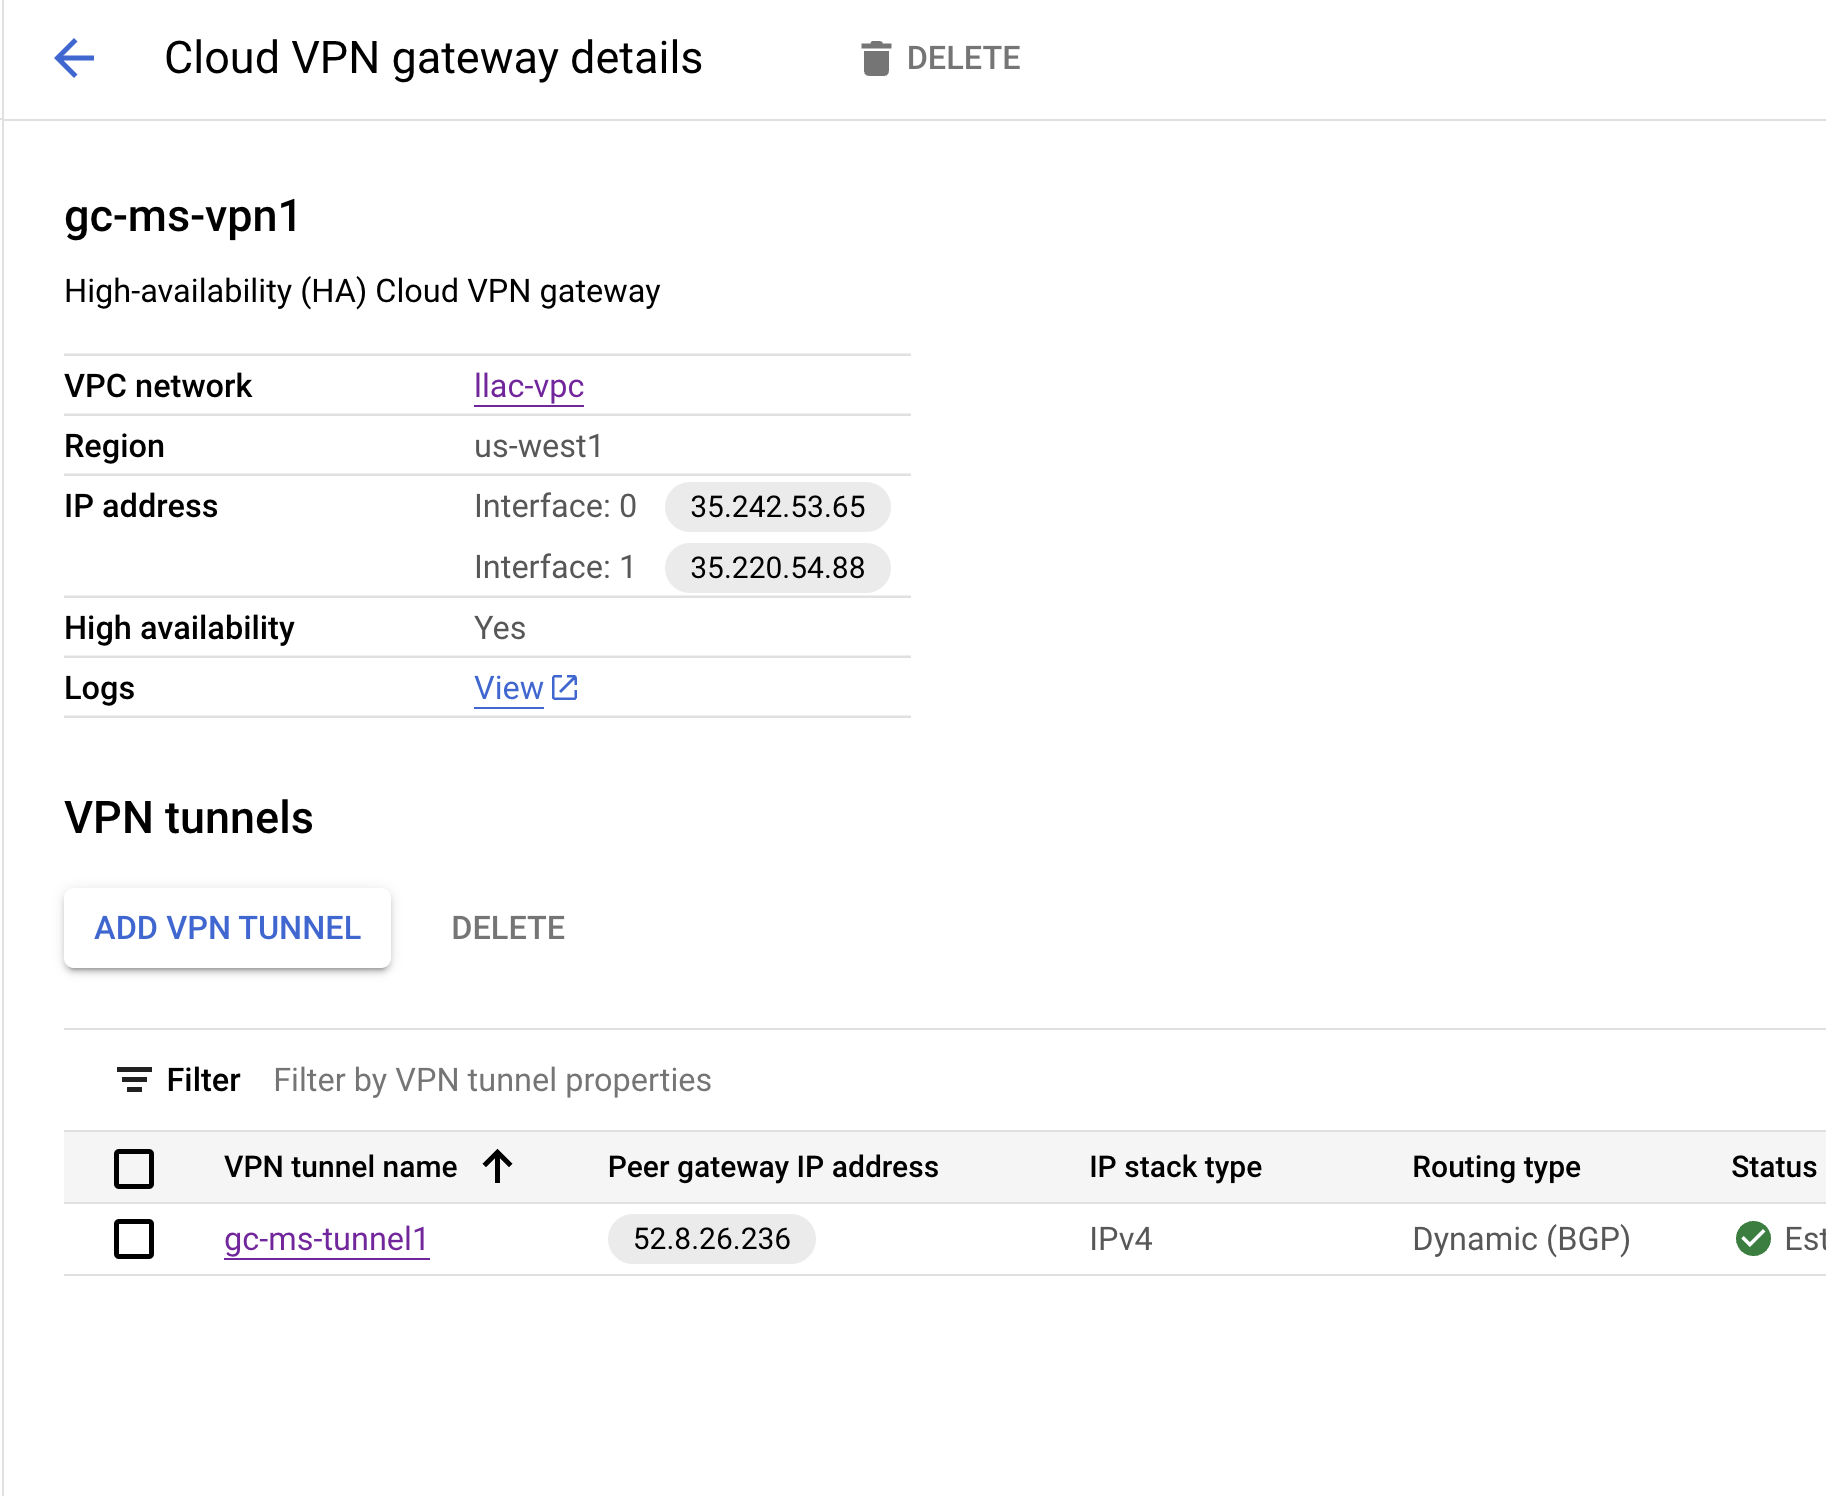
c) Give any name. Example: gcp-ms-vpn1 and scroll down to "Create". This will reserve a set of GCP VPN IP for MuleSoft VPN.
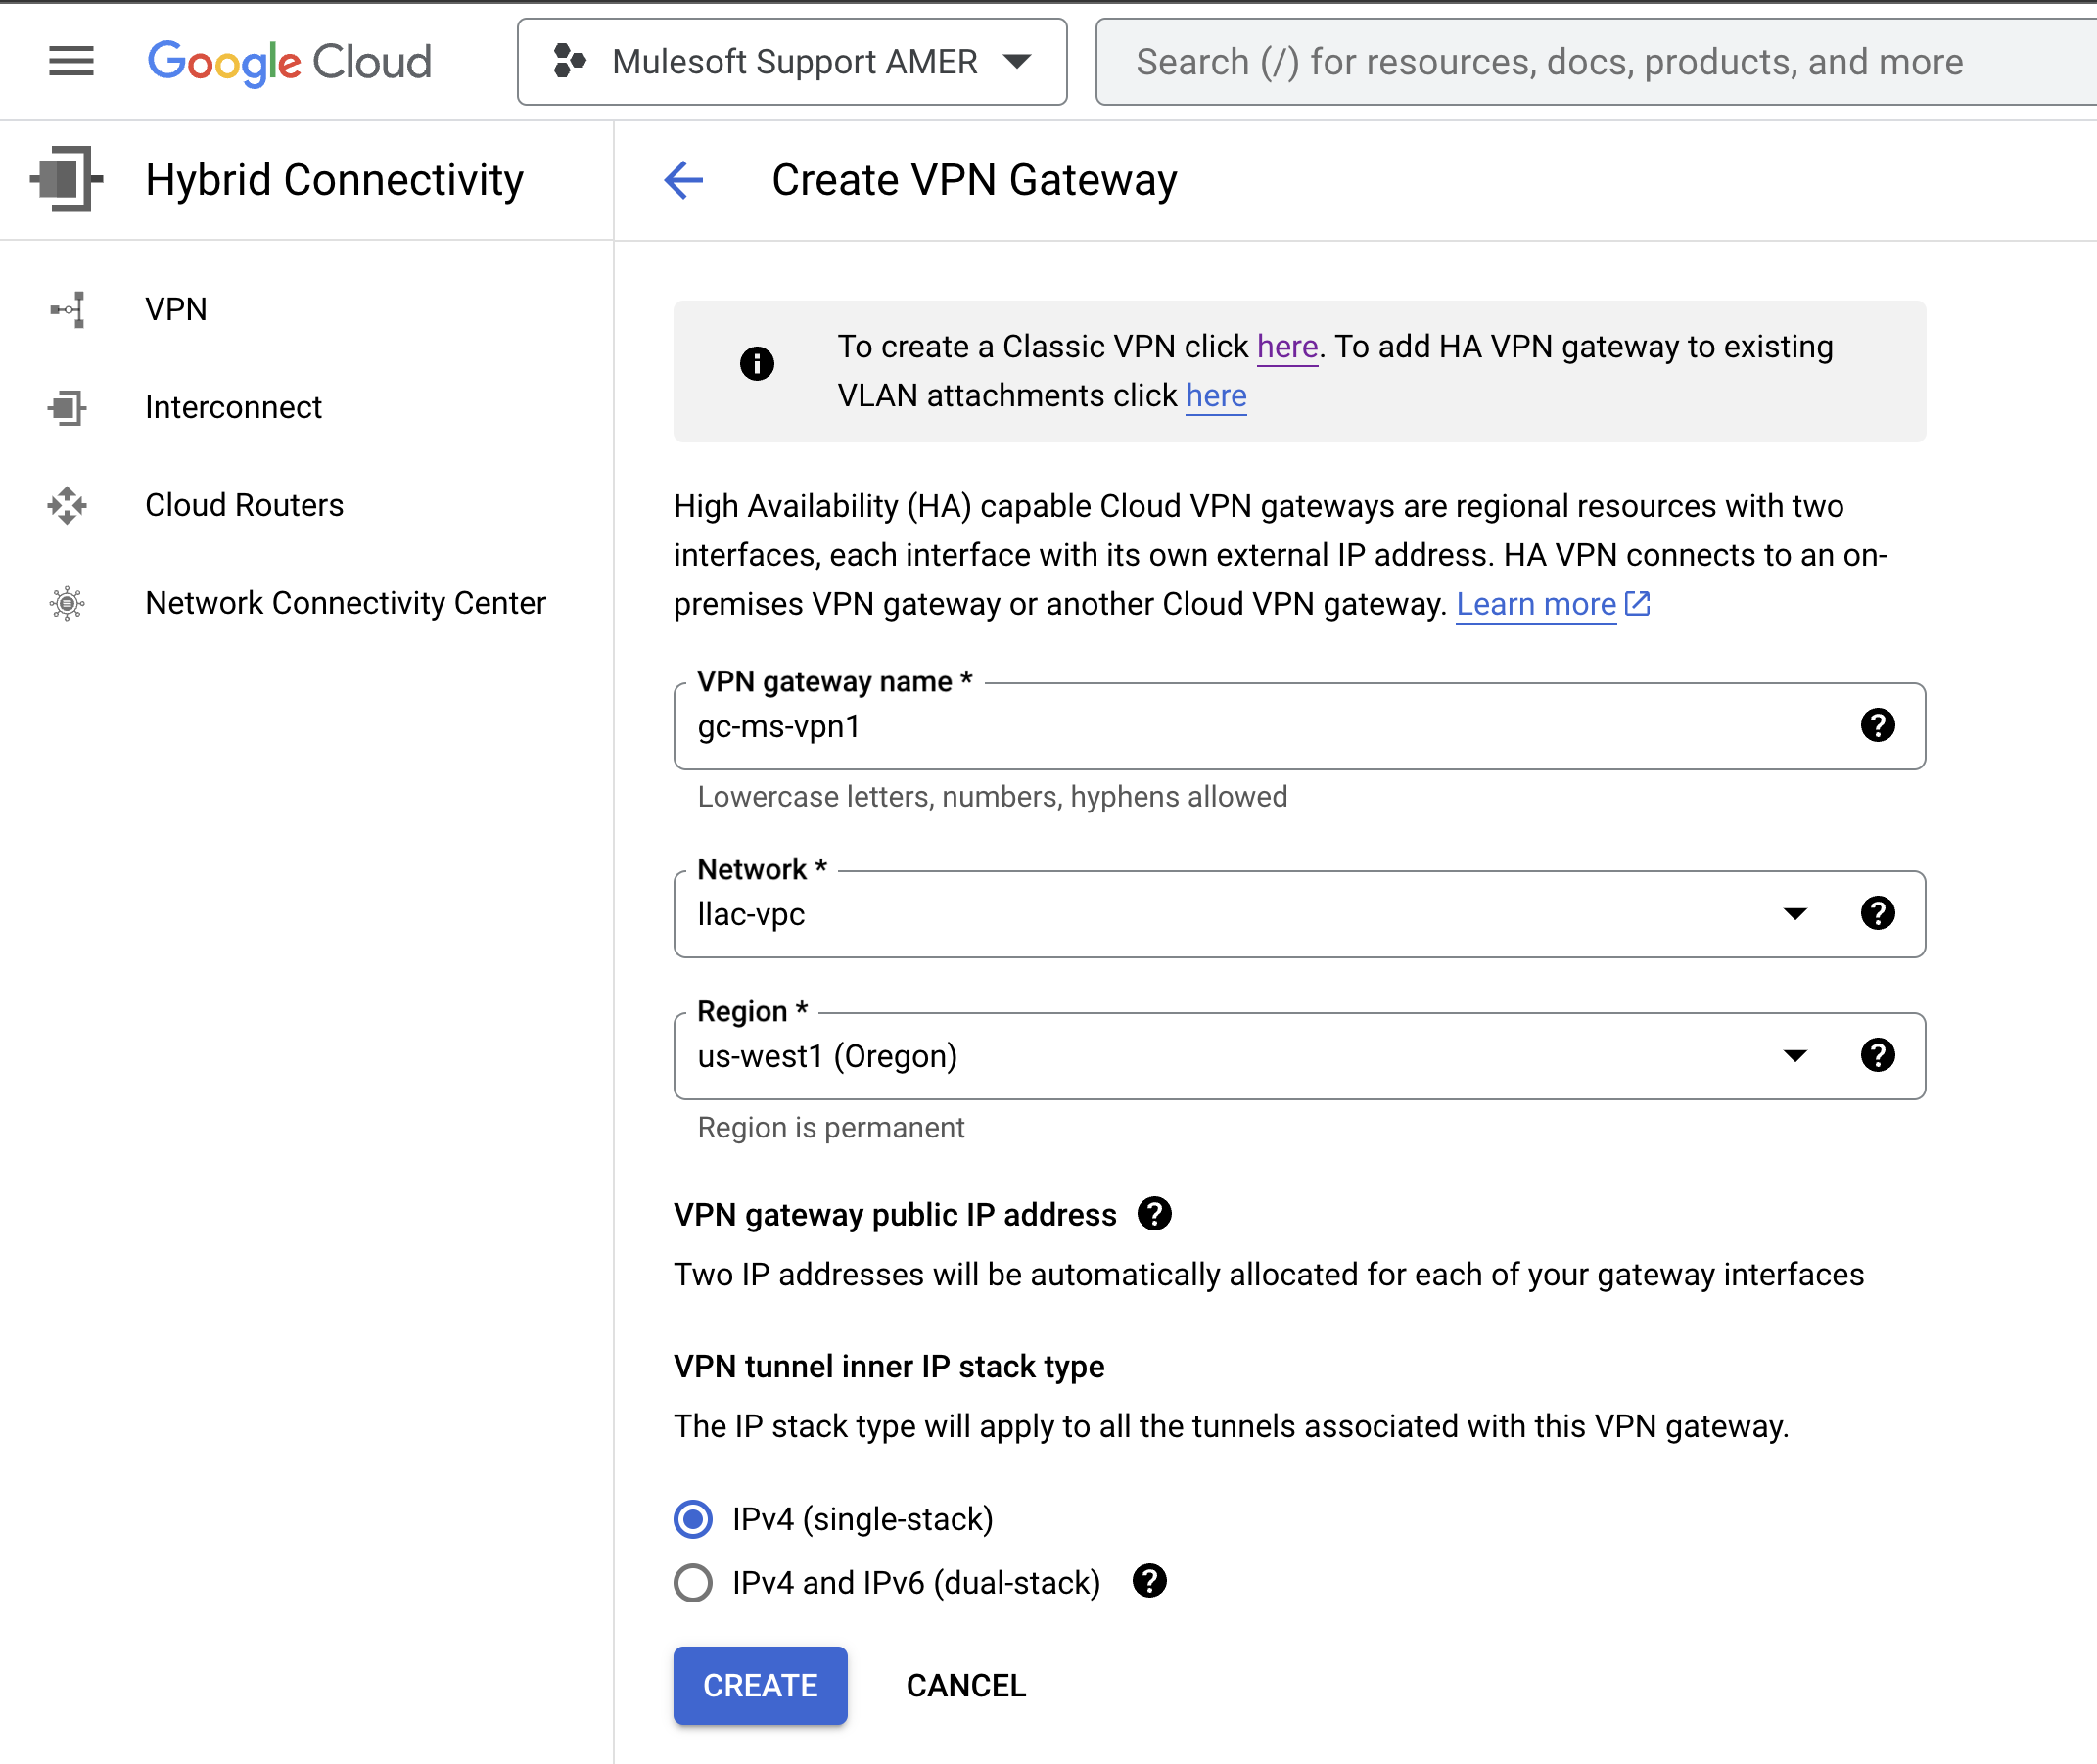
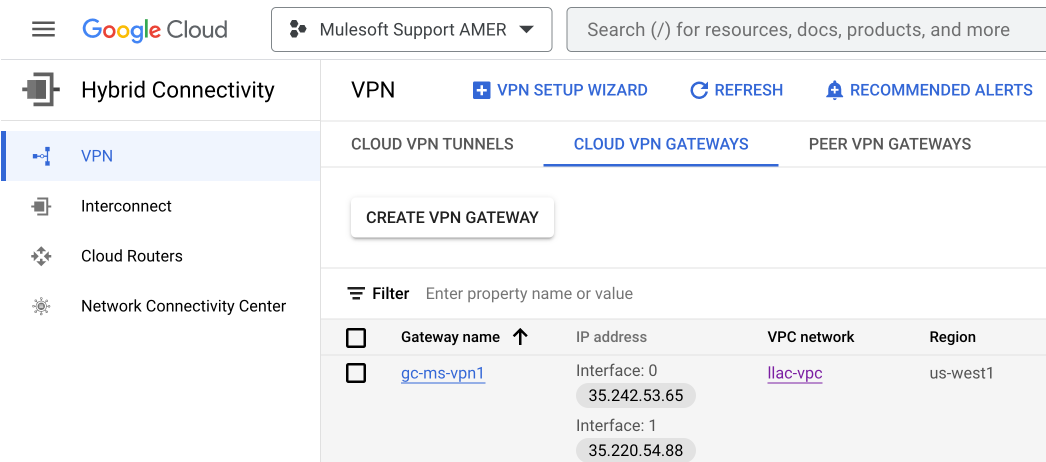
GCP has provided two IPs. We will configure Anypoint VPN to GCP's first peer IP in this example (2 tunnels to GCP's first VPN Peer IP). If you would like to configure another set of VPN to the second Peer IP then please note that it will use an additional Anypoint Network Connection license
2. Configure MuleSoft VPN
a) Grab this 35.242.53.65 IP and go to MuleSoft - Runtime Manager - VPN - Create VPN - paste it in "Remote IP Address".
- Enter any name
- Select your VPC
- Select BGP
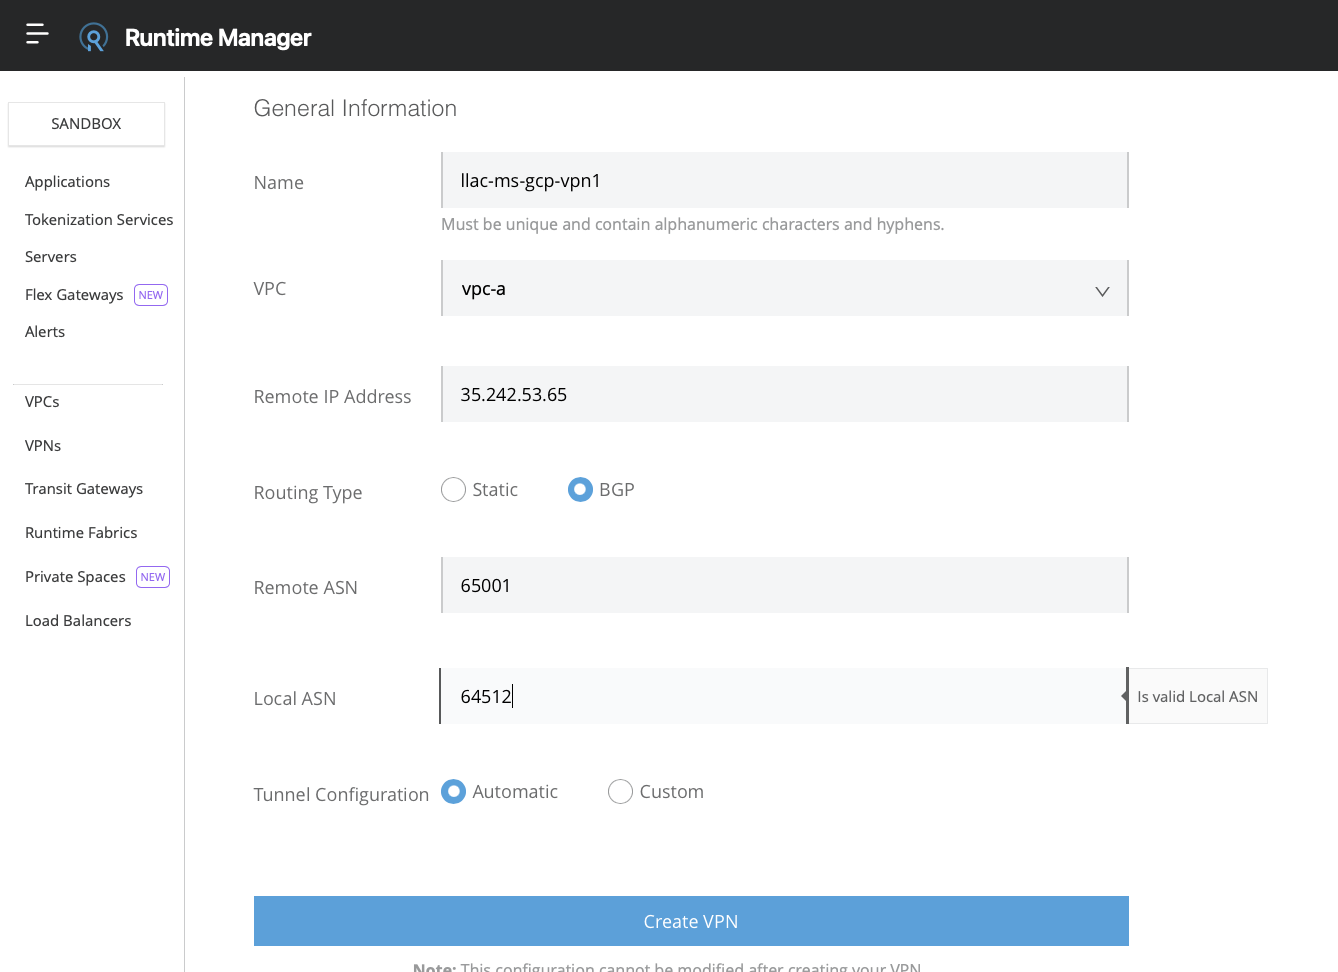
b) Fill in the VPN. You may use the default ASNs number unless your network admin has a specific set to assign. Please do check with your network admin.
Create the VPN. You should see all the info after a couple of minutes.
3. Configure GCP VPN 1 tunnel 1
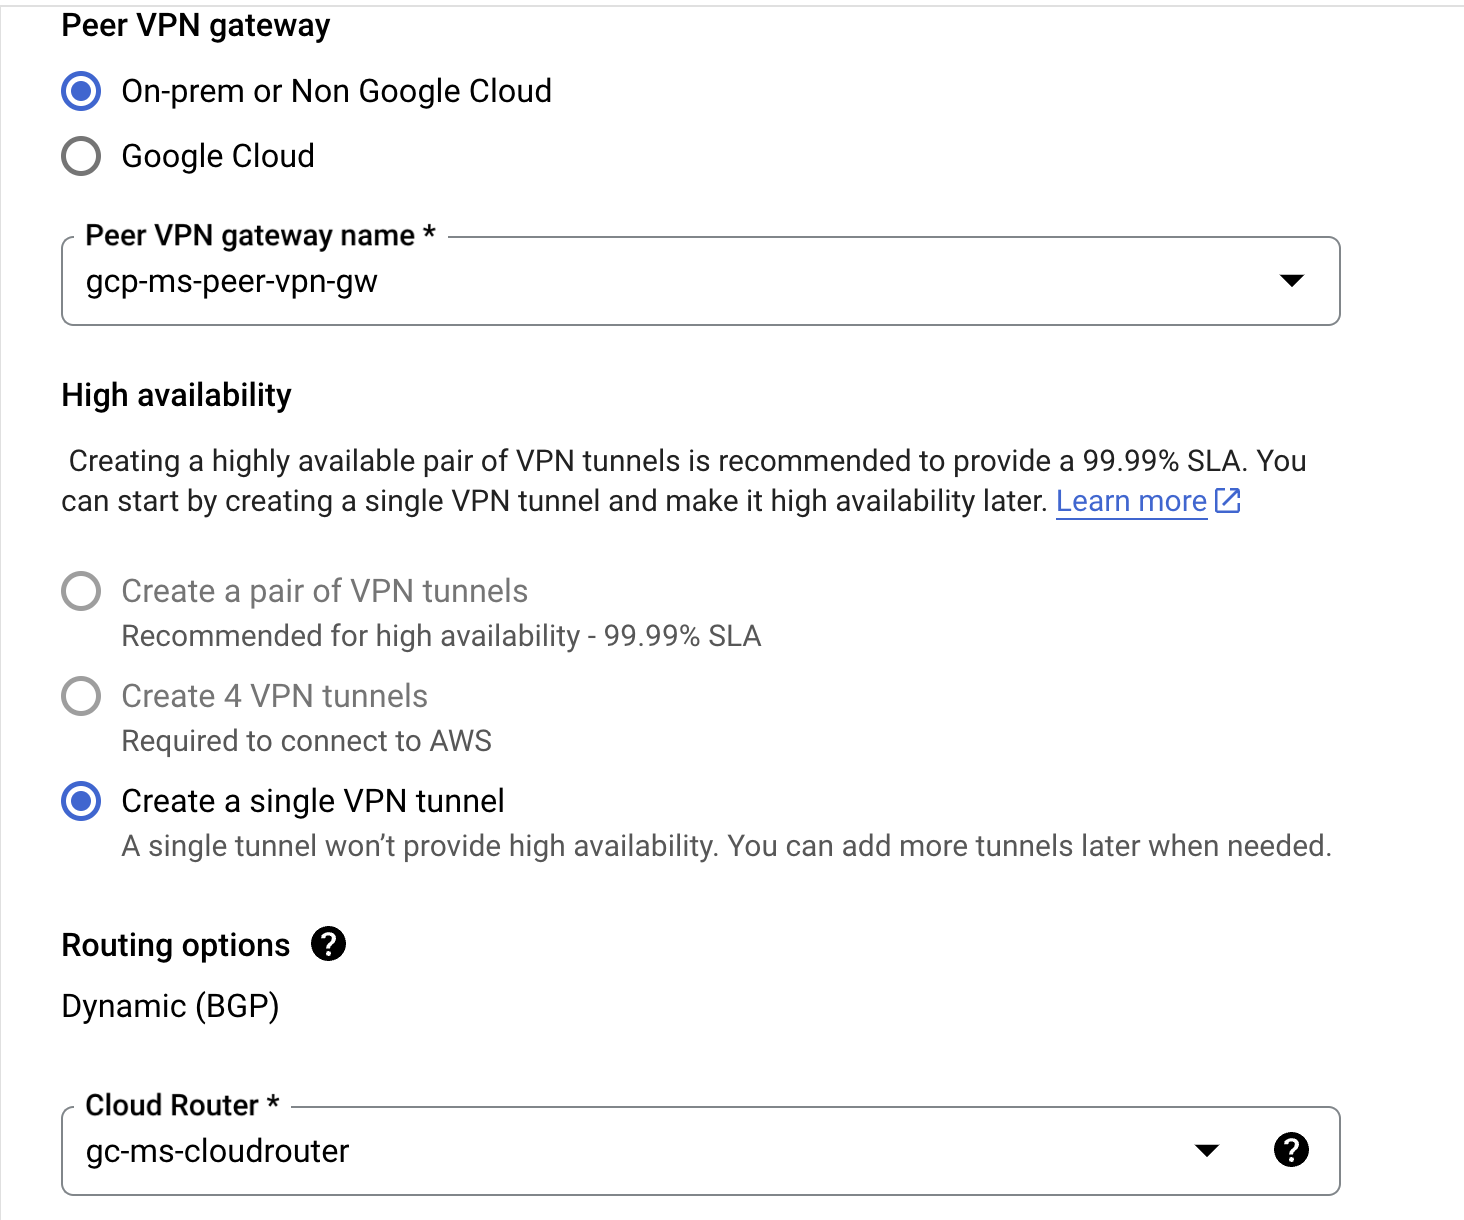
a) On GCP click on Add VPN Tunnel. click the drop-down box and click on Create New Peer VPN Gateway
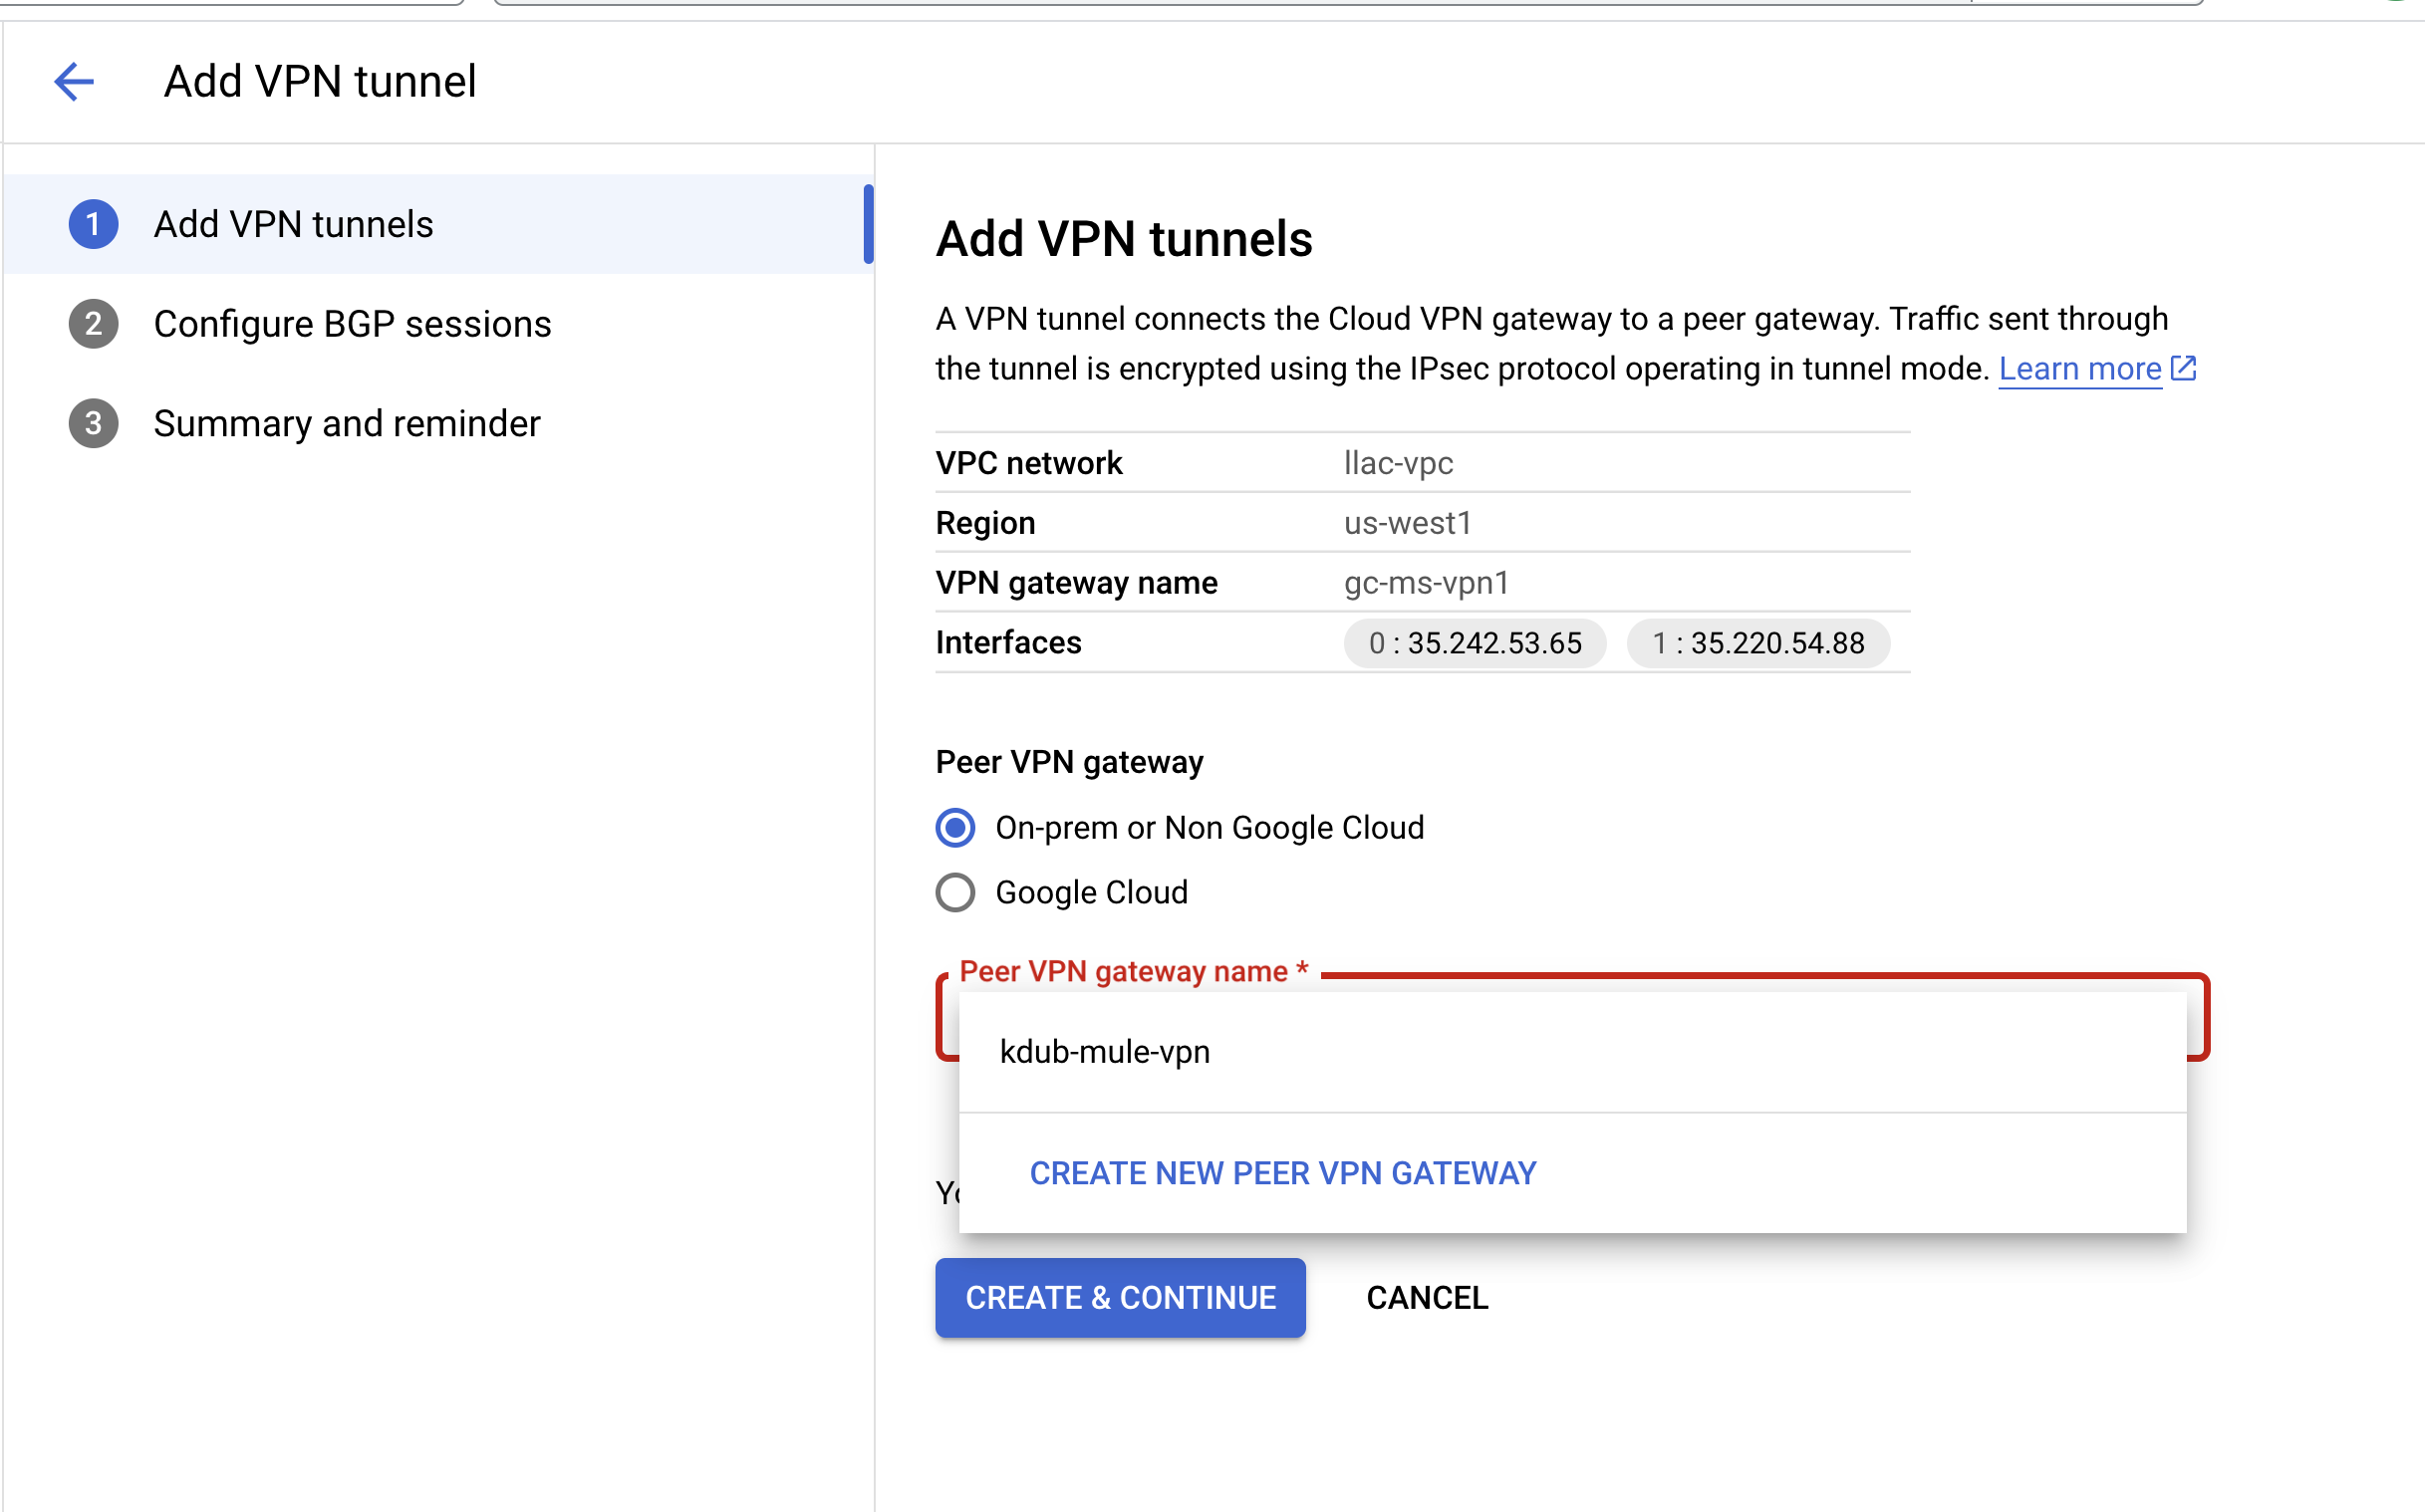
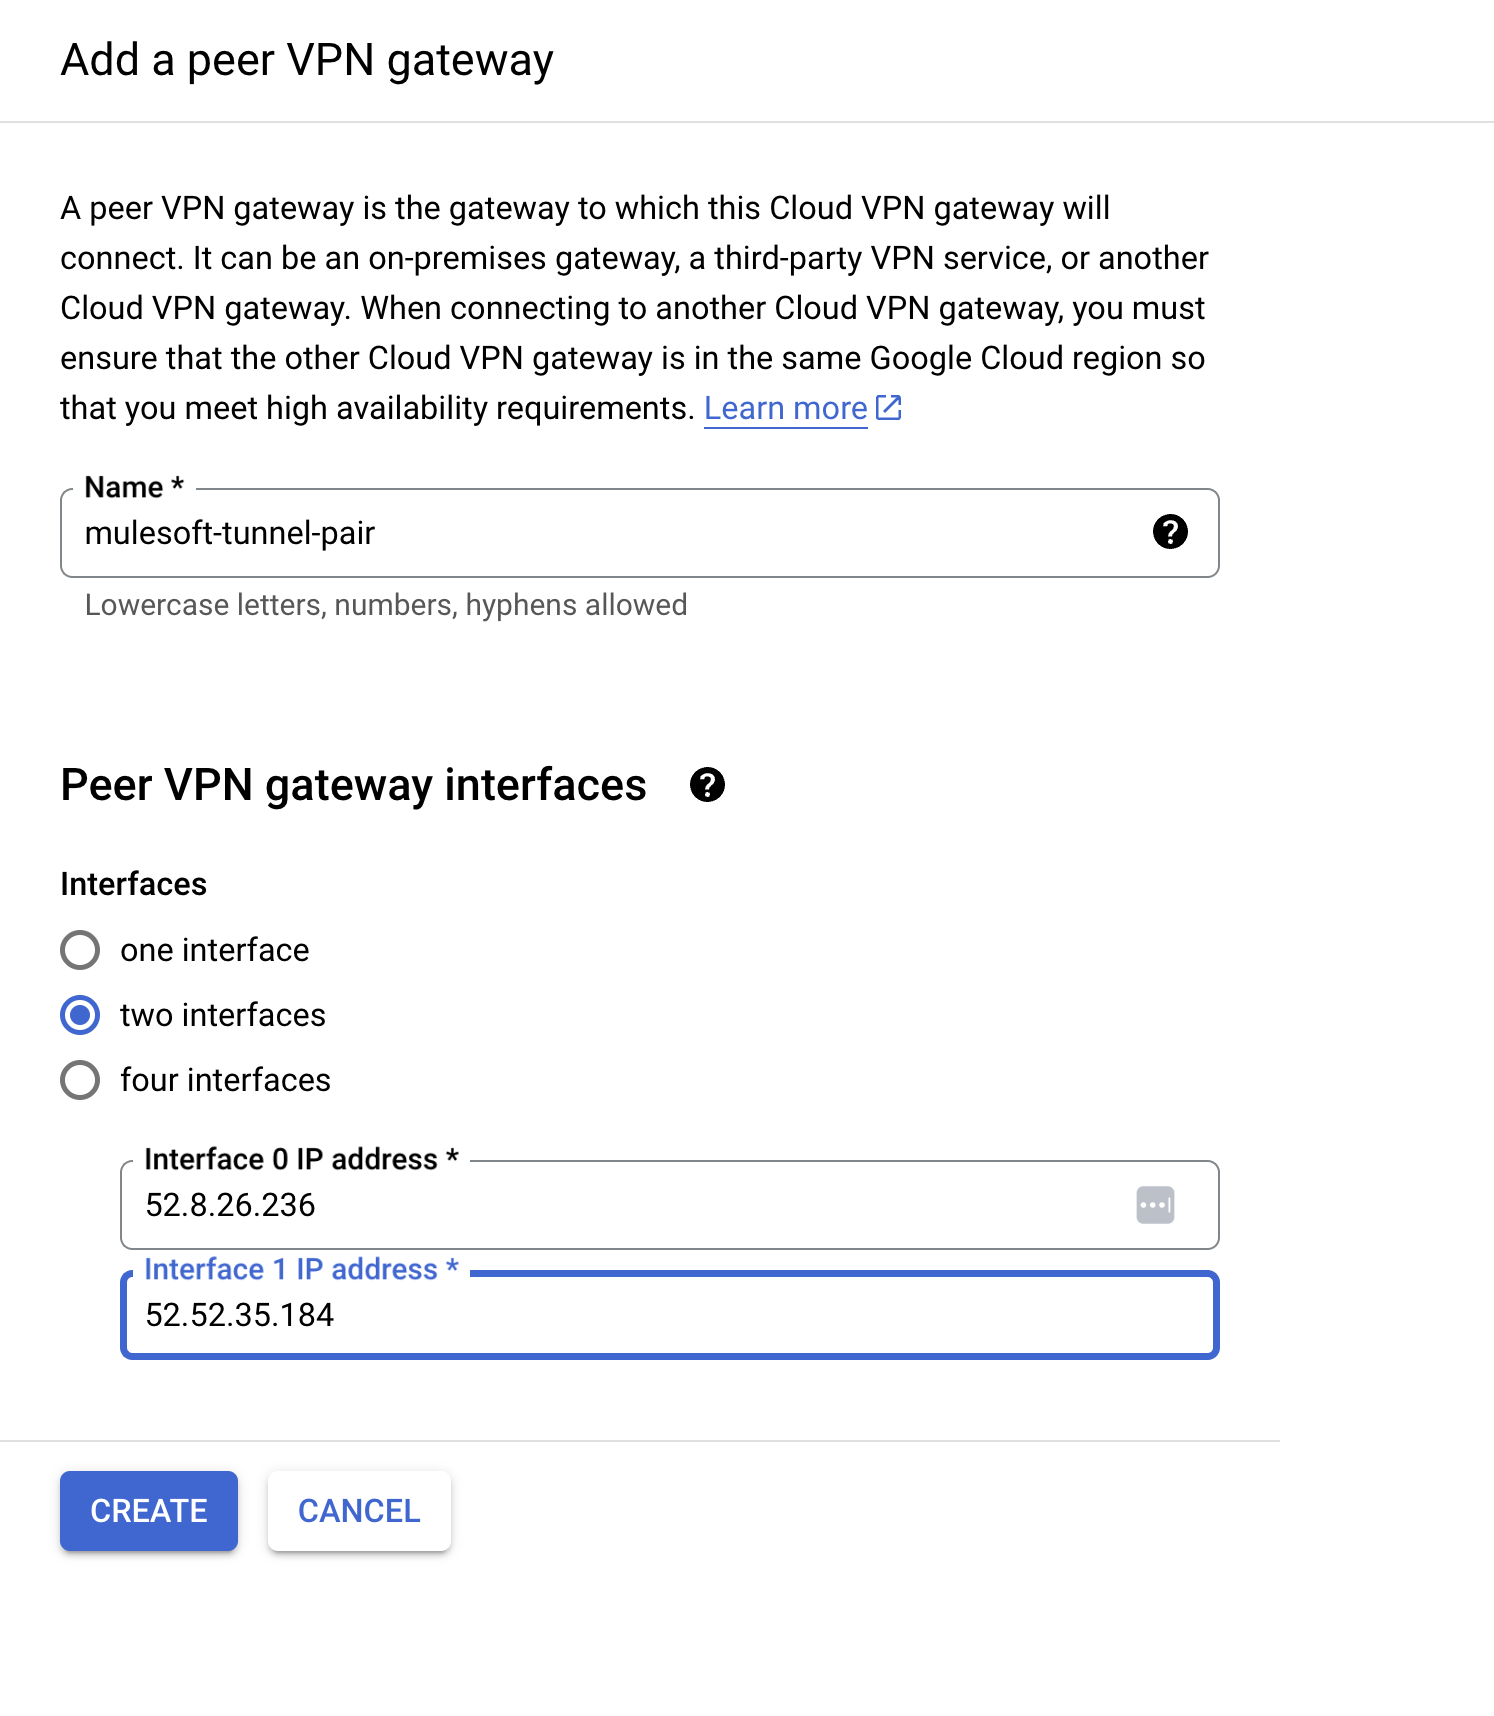
b) Enter a Peer VPN Gateway Name and enter both MuleSoft Local External IP address - Create
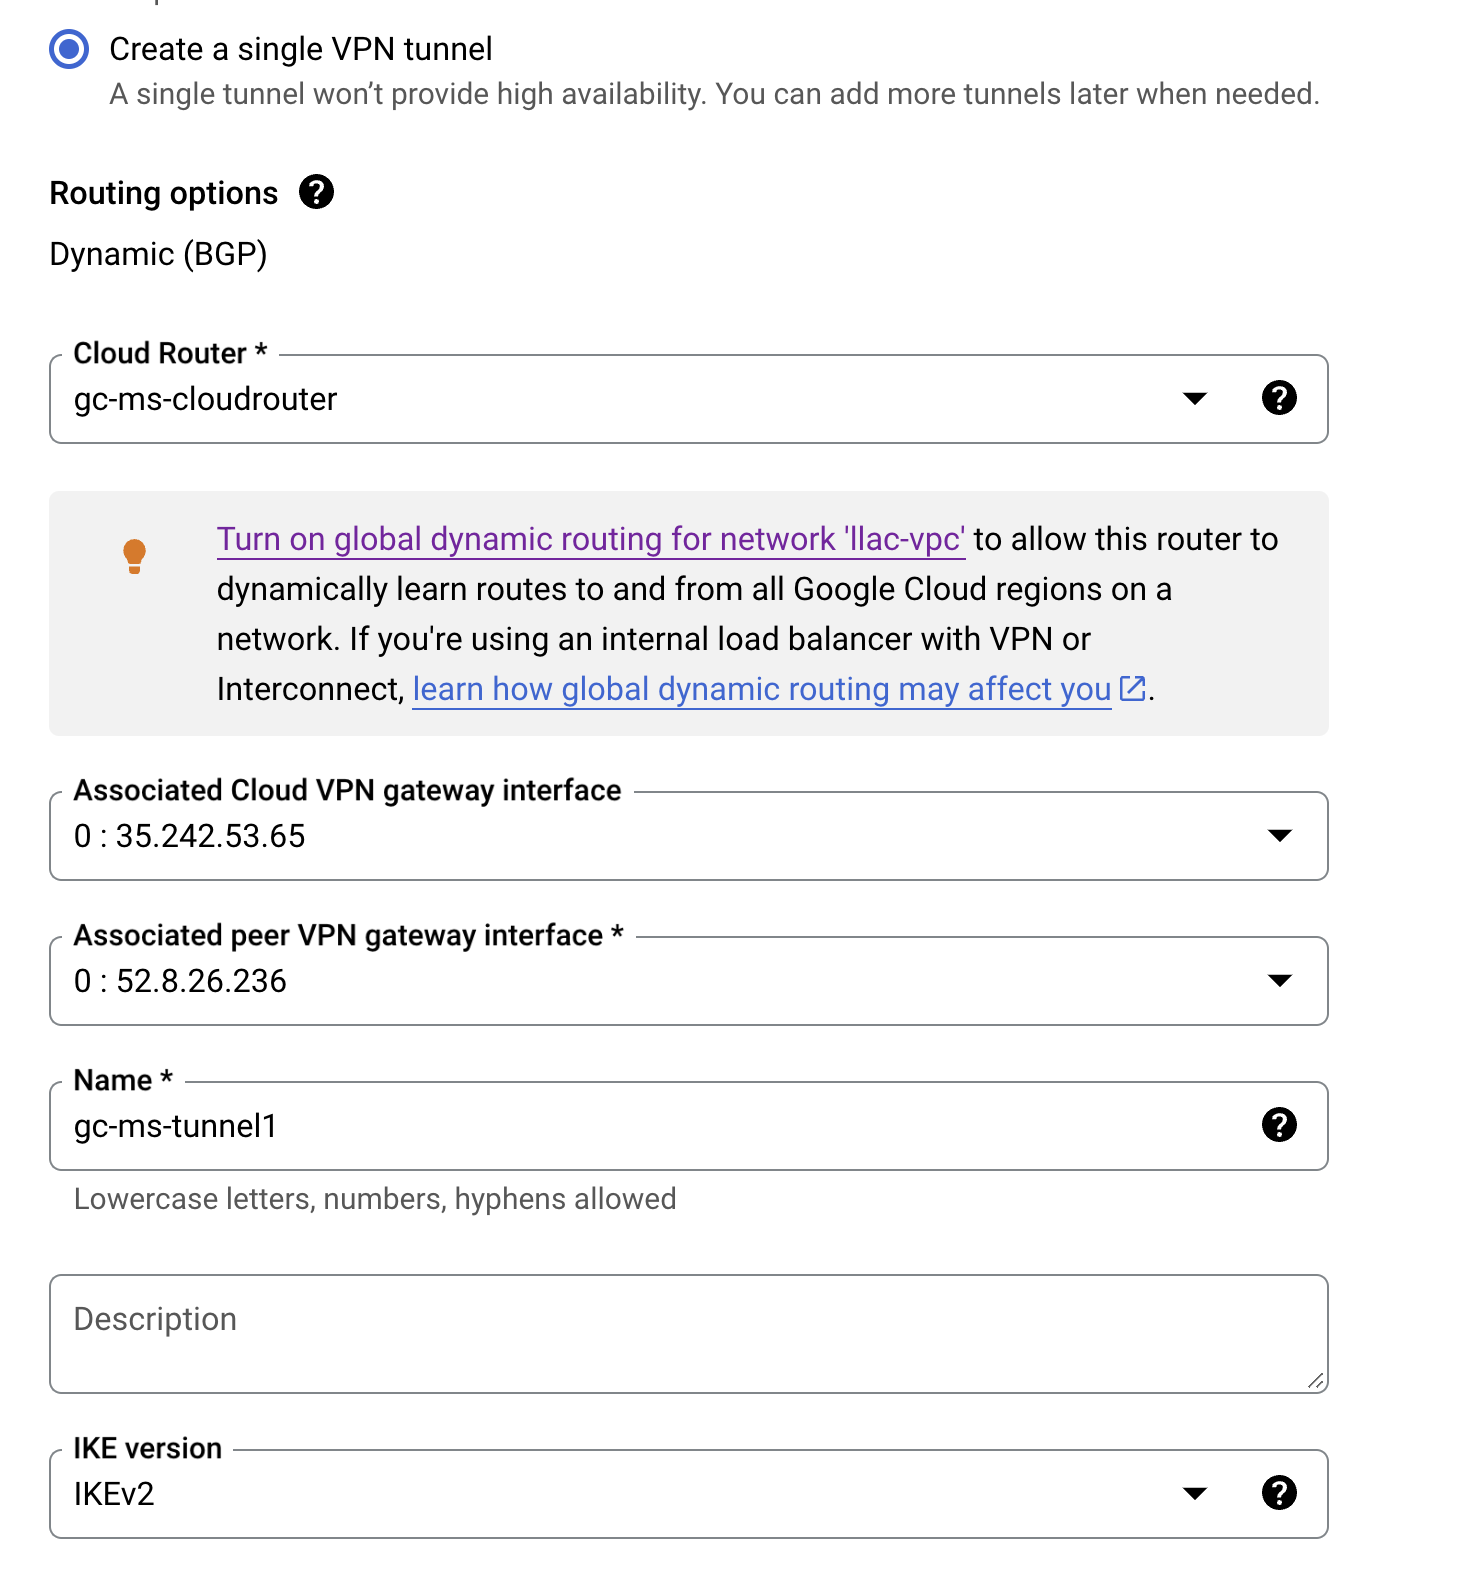
c) Scroll down to create new Cloud Router and Select "Create a single VPN tunnel"
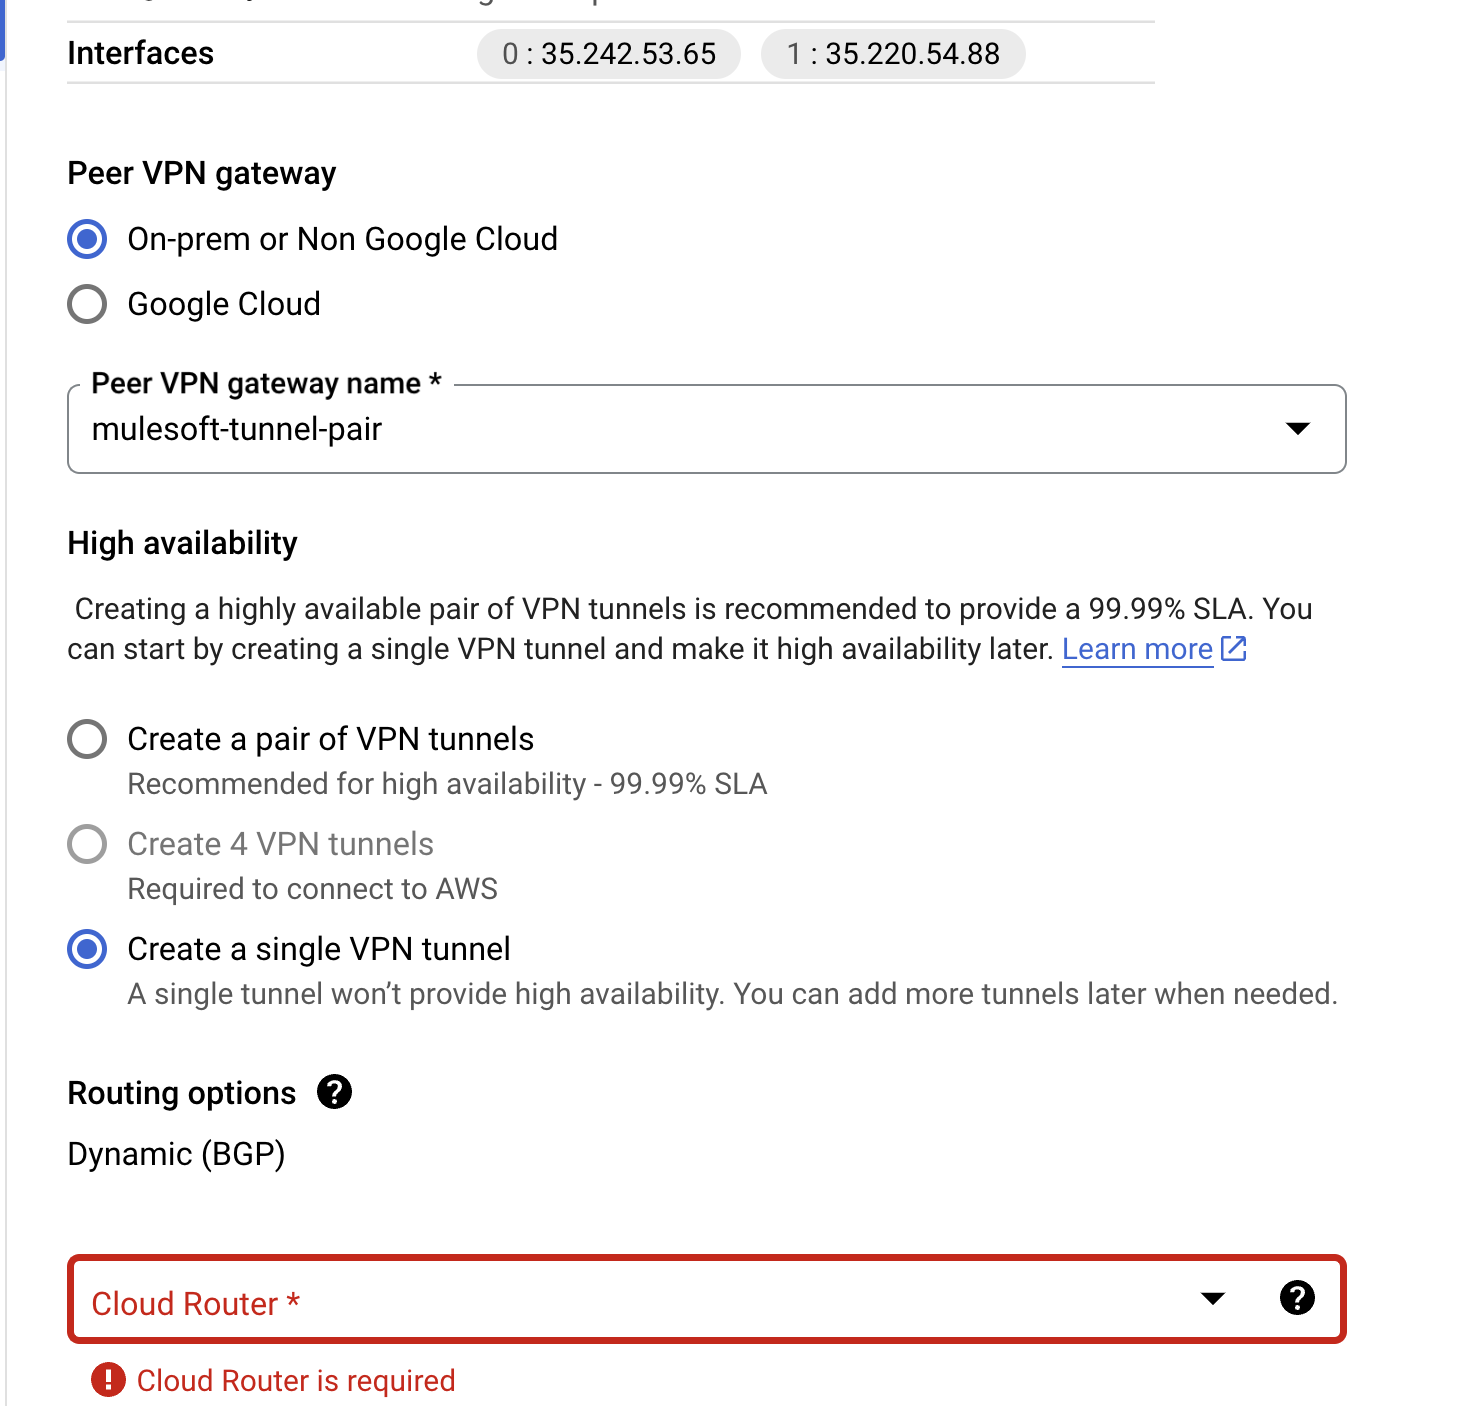
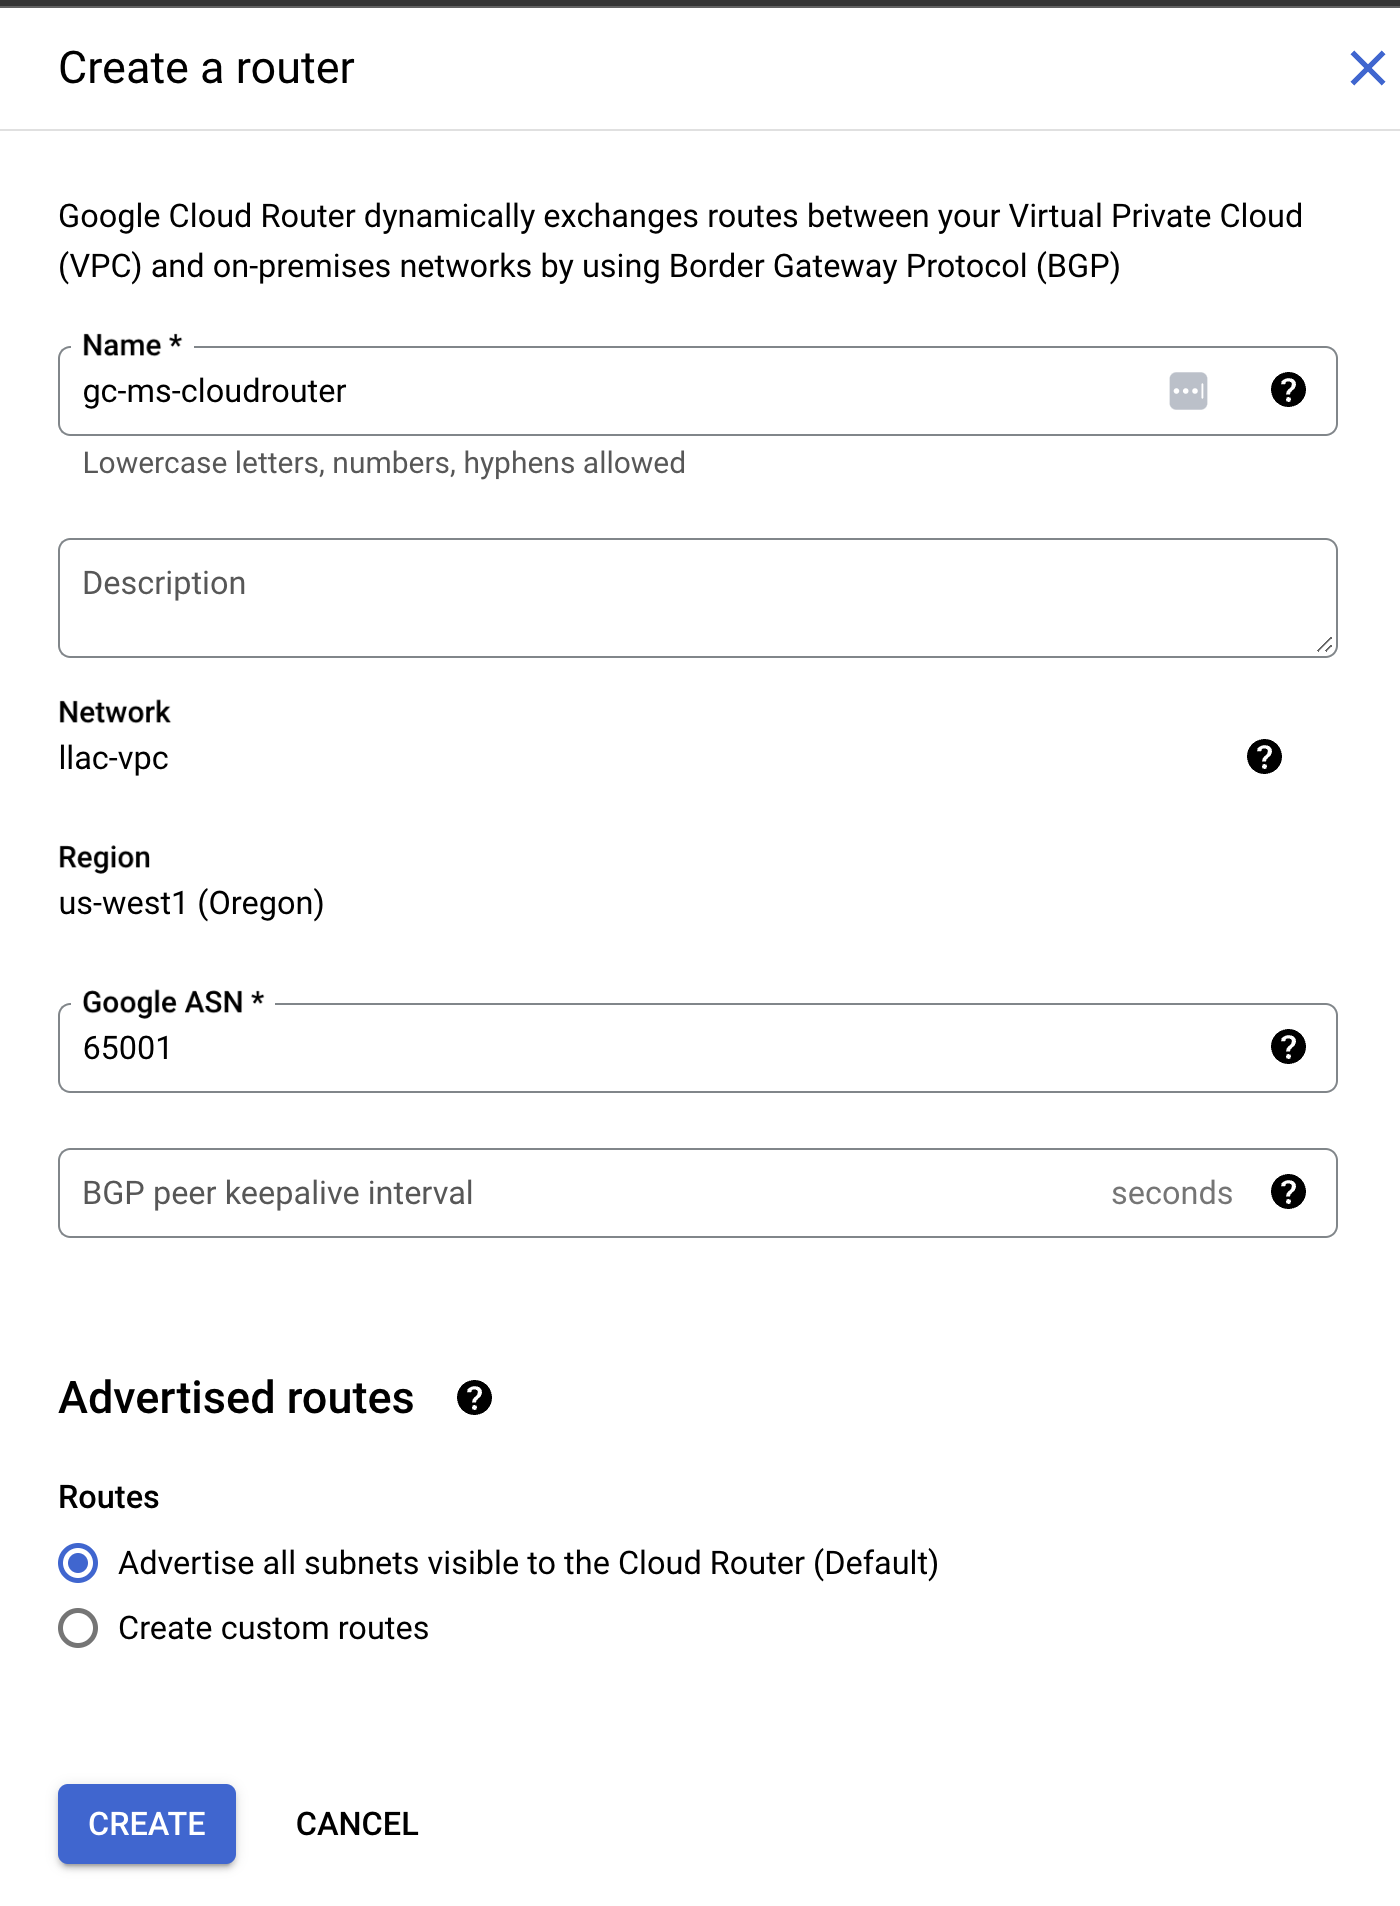
d) Click on Cloud Router drop down
- Create New Router
- Enter any name
- Enter Google's ASN that you chose earlier from Anypoint VPN
- Leave Routes as Advertise all subnet unless you have a specific subnet that you want to advertise to Anypoint
d) Create the first tunnel with the following info.
- Enter any name
- Copy PSK from Anypoint to the IKE pre-shared Key field
- Save and Continue
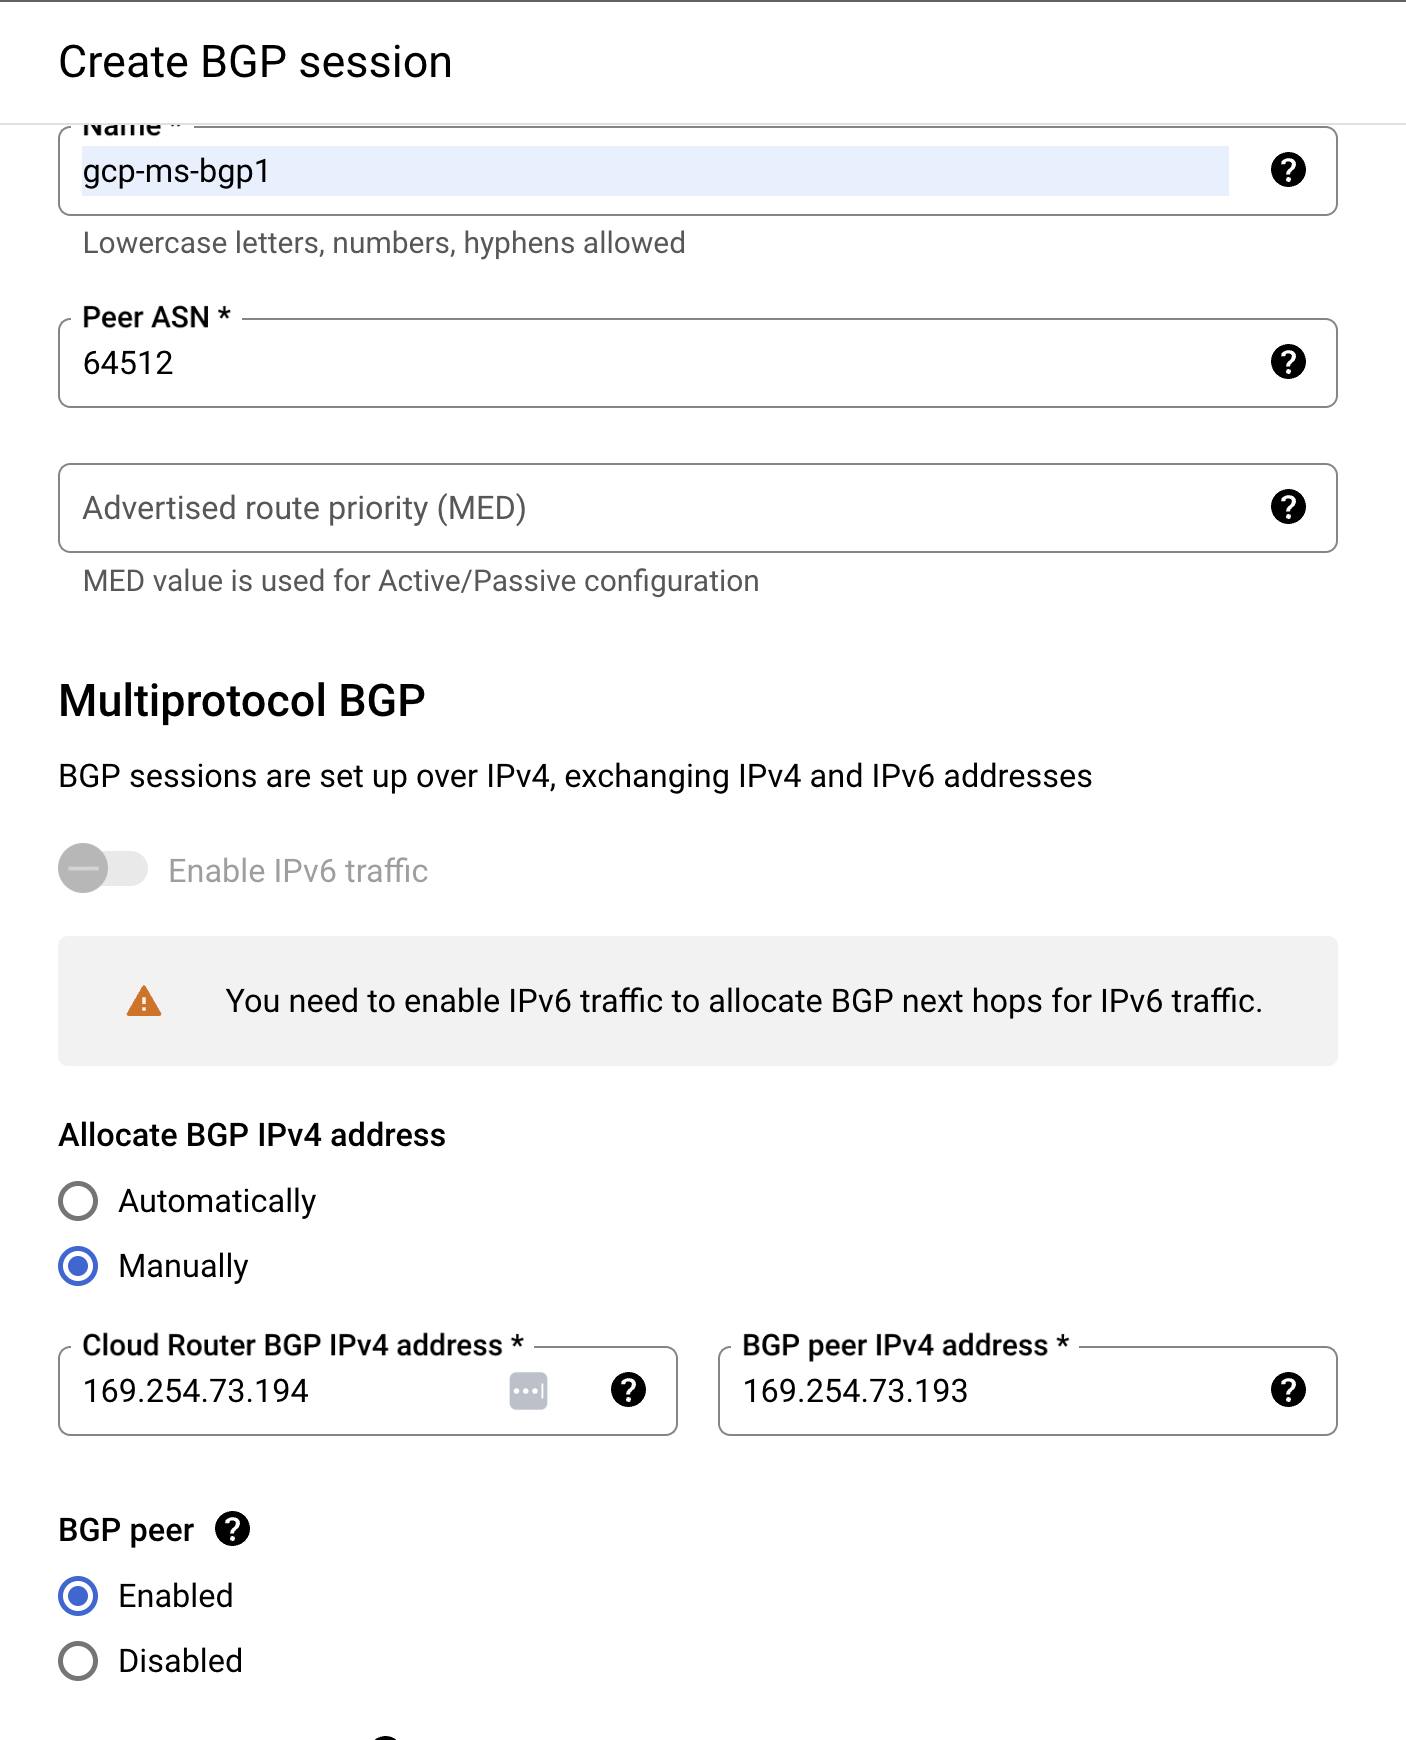
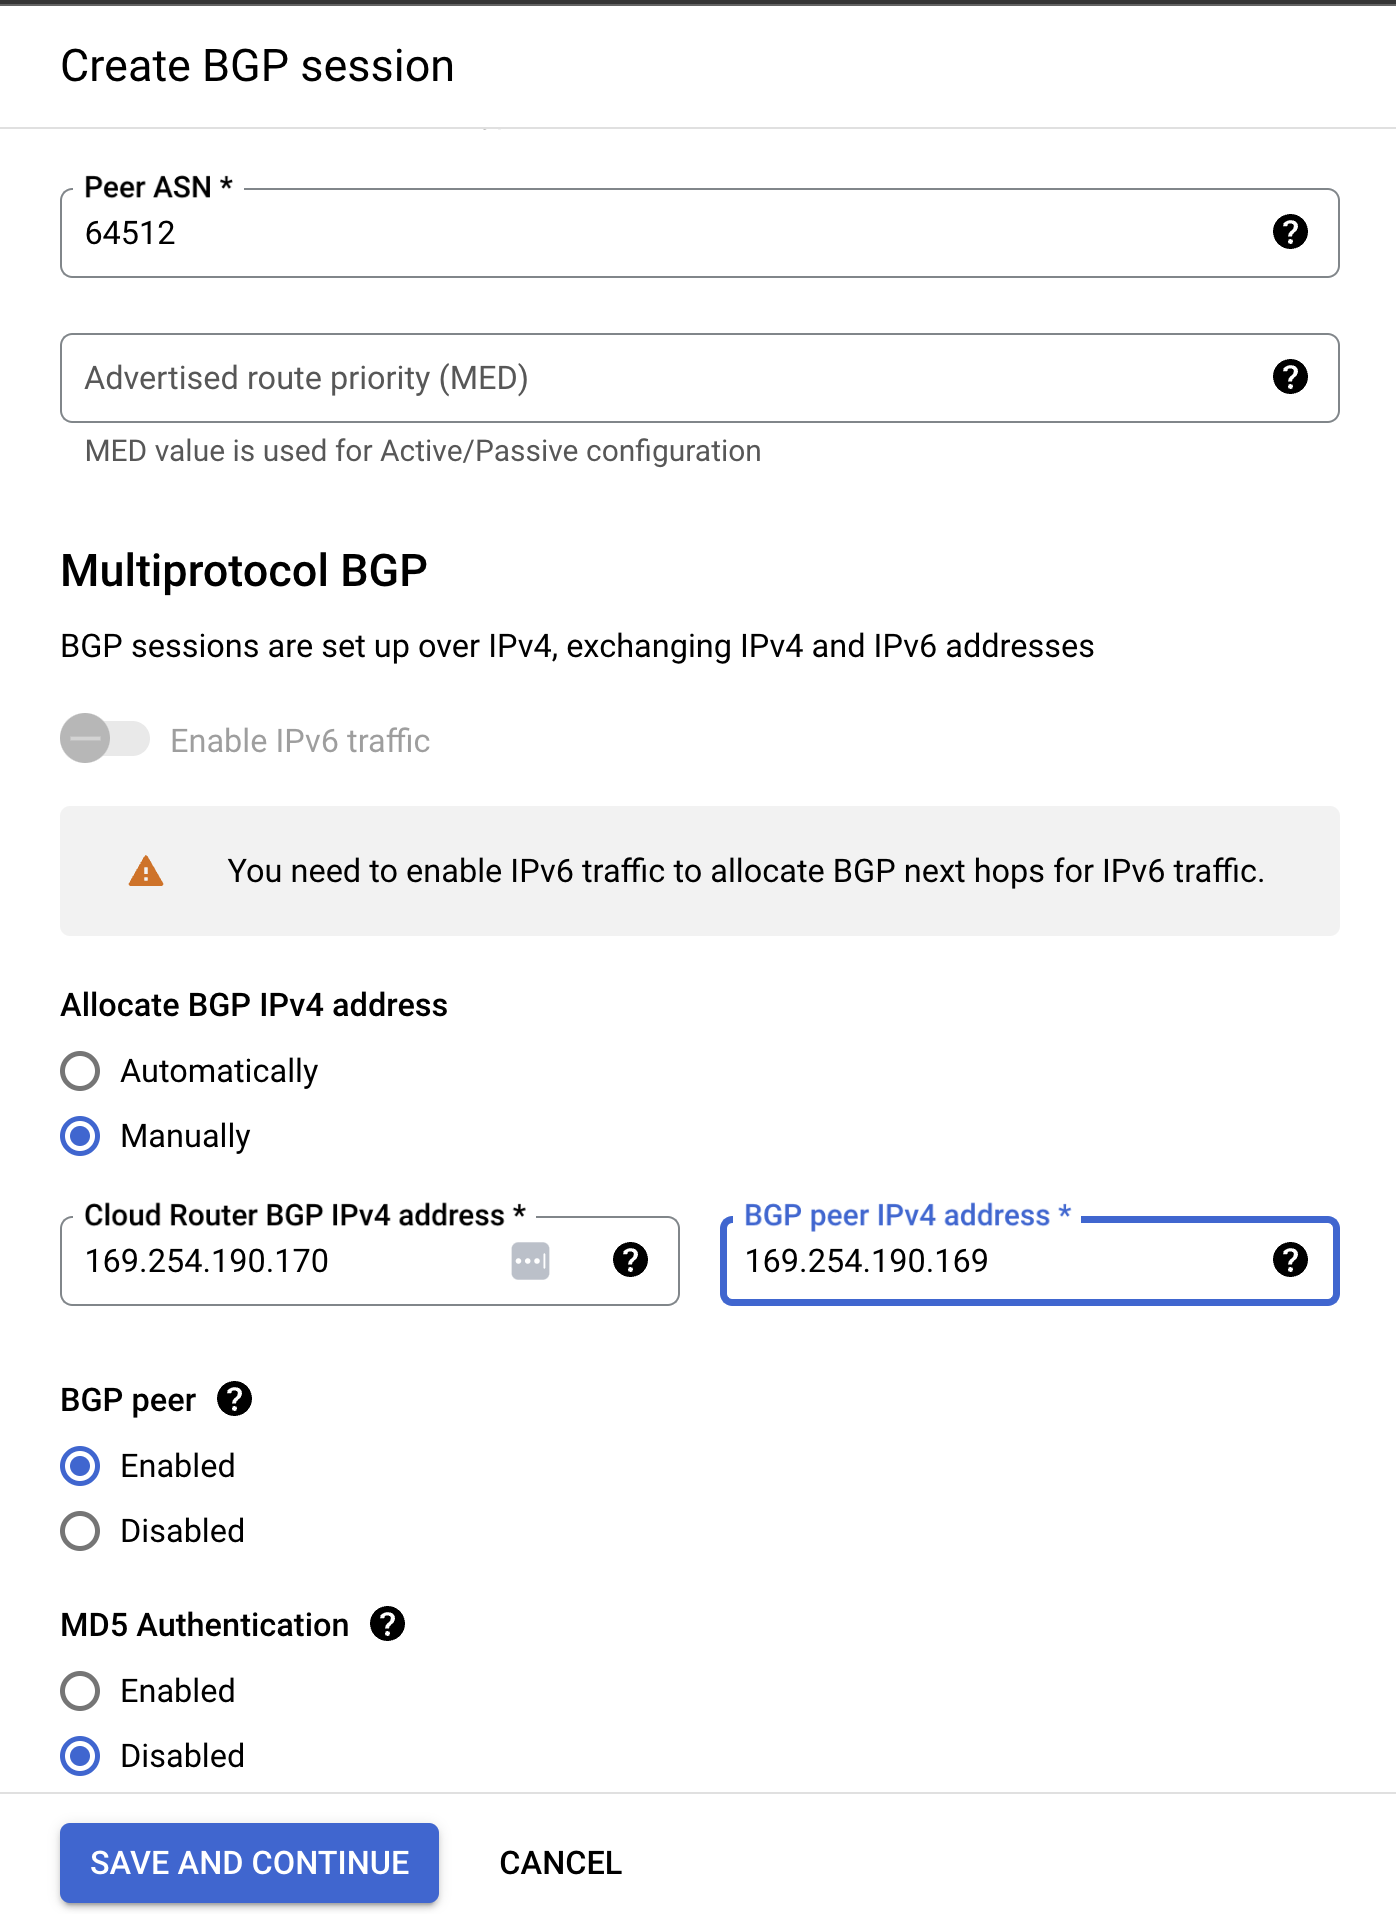
e) Edit/Configure BGP Session.
- Enter a name and MuleSoft's ASN.
IMPORTANT: For Allocate BGP IPv4 address - select Manually
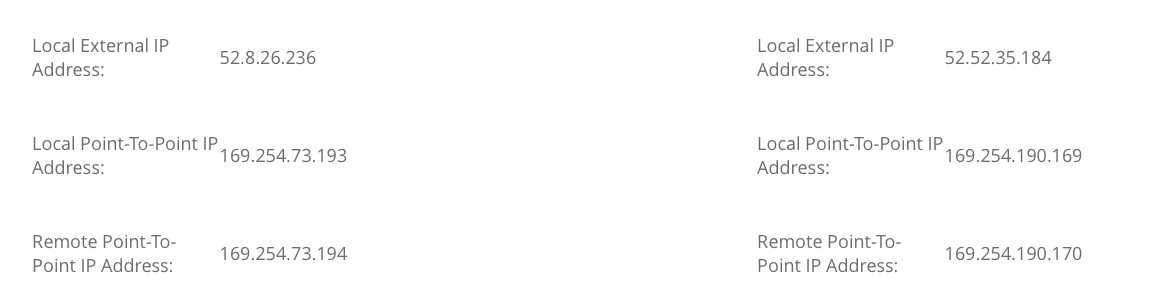
- Copy MuleSoft's first tunnel "Remote Point-To-Point IP Address" and enter it into "Cloud Router BGP IPv4"
- Copy MuleSoft's first tunnel "Local Point-To-Point IP Address" and enter it into "BGP peer IPv4"
- ensure that BGP peer is enabled
- ensure that MD5 Authentication is disabled
- save and continue
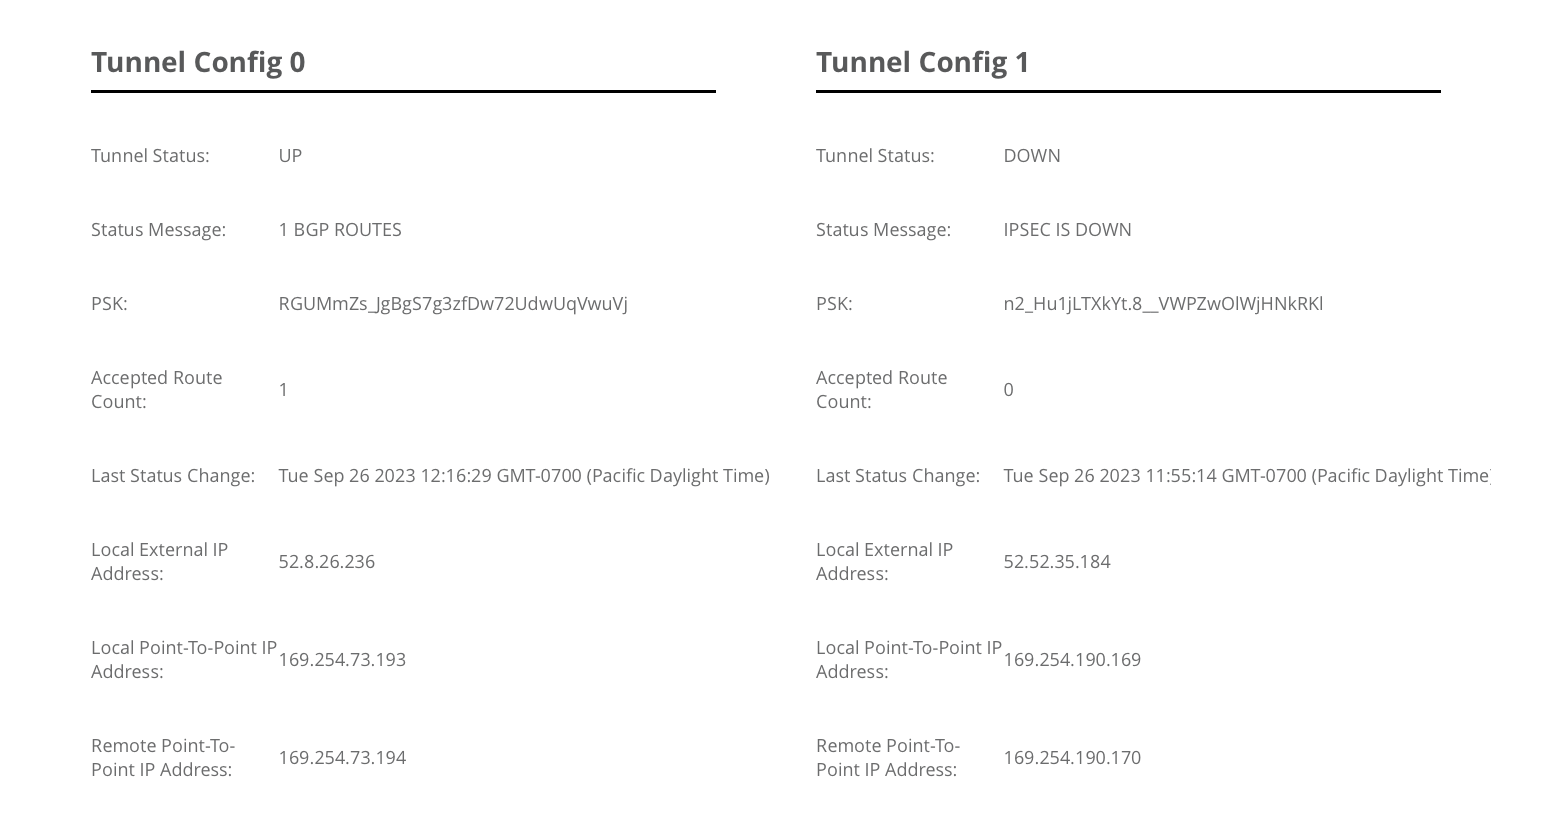
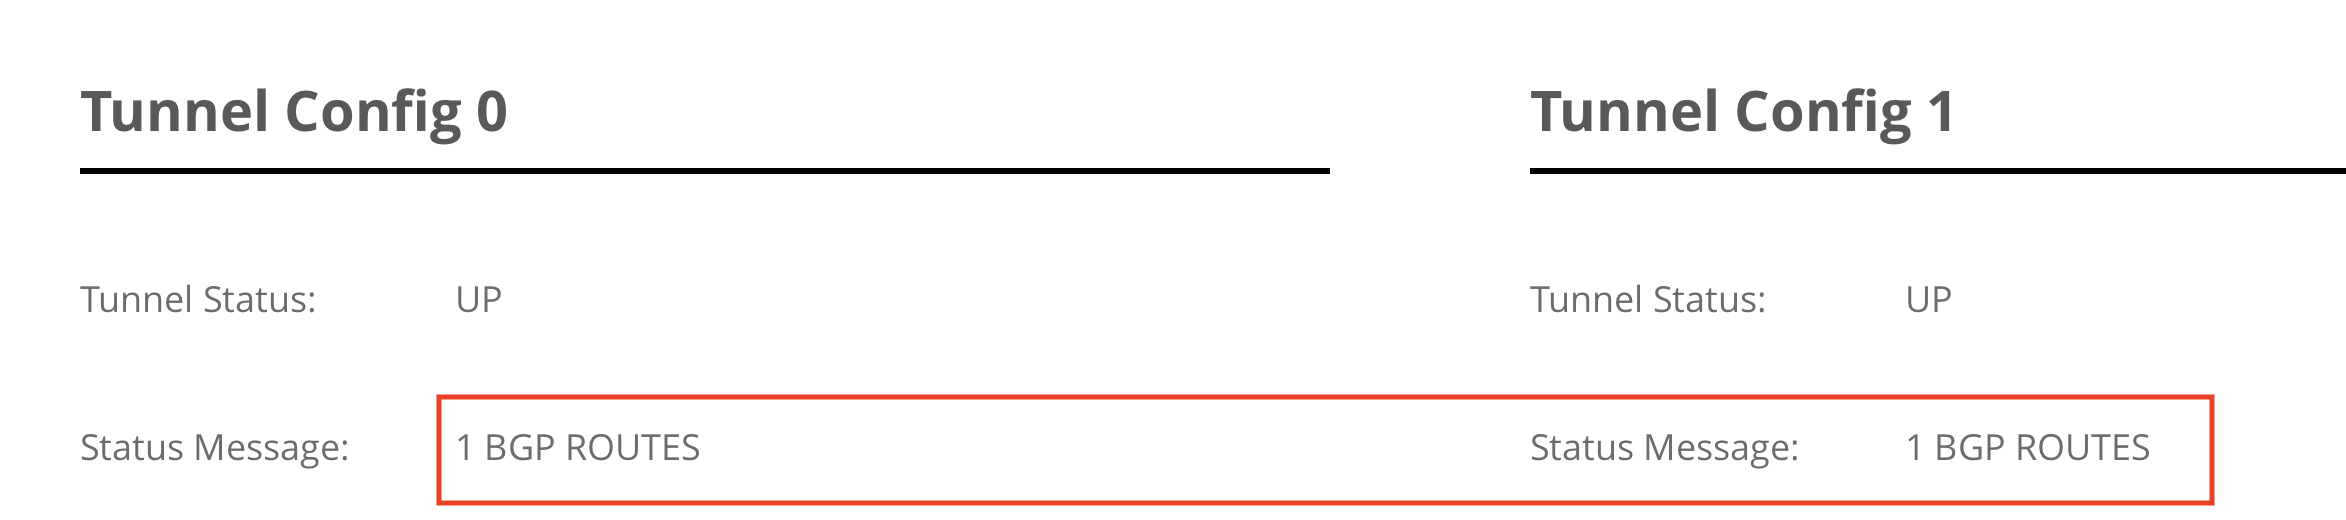
f) Check any Anypoint Tunnel 1 is after a couple of minutes. Make sure first tunnel is up and that you can see 1 BGP ROUTES. If you do not see any BGP routes please check the BGP peer IP again (169.254.x.x)
4. Configure GCP VPN 1 tunnel 2
a) Check the VPN to make sure you have a green check mark labeled Established. Once the first tunnel is configure we can now configure tunnel 2. click on Add VPN Tunnel
b) Select Peer VPN gateway and Cloud Router (these should already be created from previous steps)
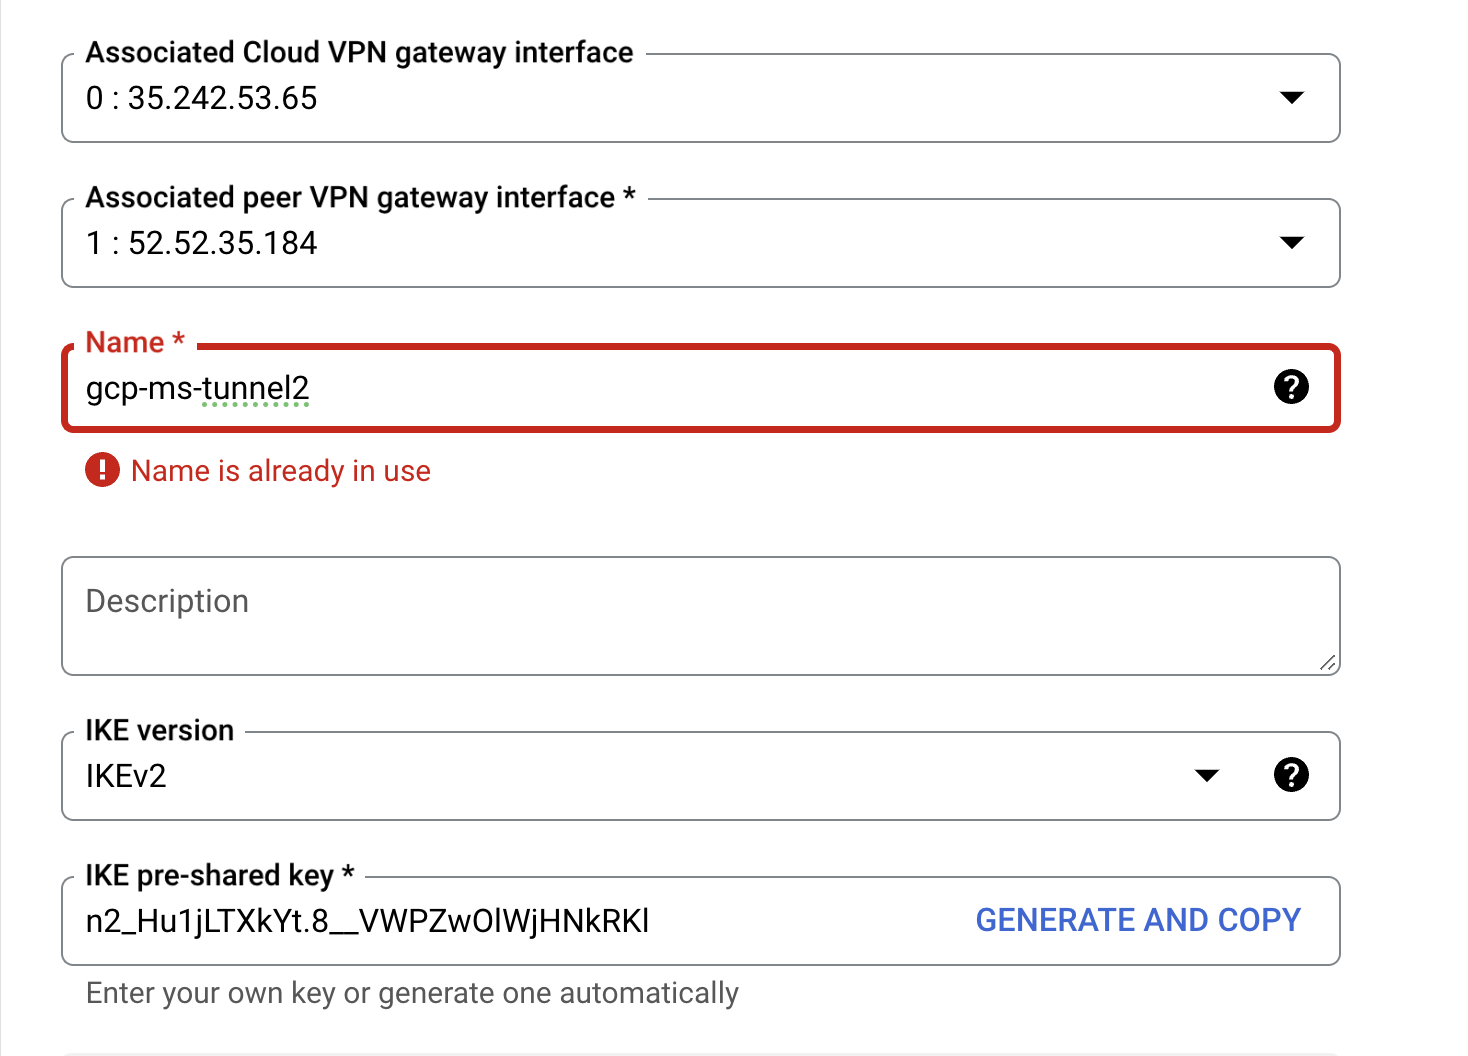
c) Select the second tunnel in "Associated peer VPN gateway interface".
- Enter a name for the second tunnel
- copy PSK from Anypoint VPN
- Create and Continue
d) Edit/Configure BGP Session
IMPORTANT: For Allocate BGP IPv4 address - select Manually
- Copy MuleSoft's second tunnel "Remote Point-To-Point IP Address" and enter it into "Cloud Router BGP IPv4"
- Copy MuleSoft's second tunnel "Local Point-To-Point IP Address" and enter it into "BGP peer IPv4"
- ensure that BGP peer is enabled
- ensure that MD5 Authentication is disabled
- save and continue
e) check Anypoint to make sure both tunnels are up and that you can see 1 BGP route from each tunnel. If you do not see any BGP routes please check the BGP peer IP again (169.254.x.x)
5. Create Firewall to allow MuleSoft Traffic
a) GCP - select VPC network - Firewall
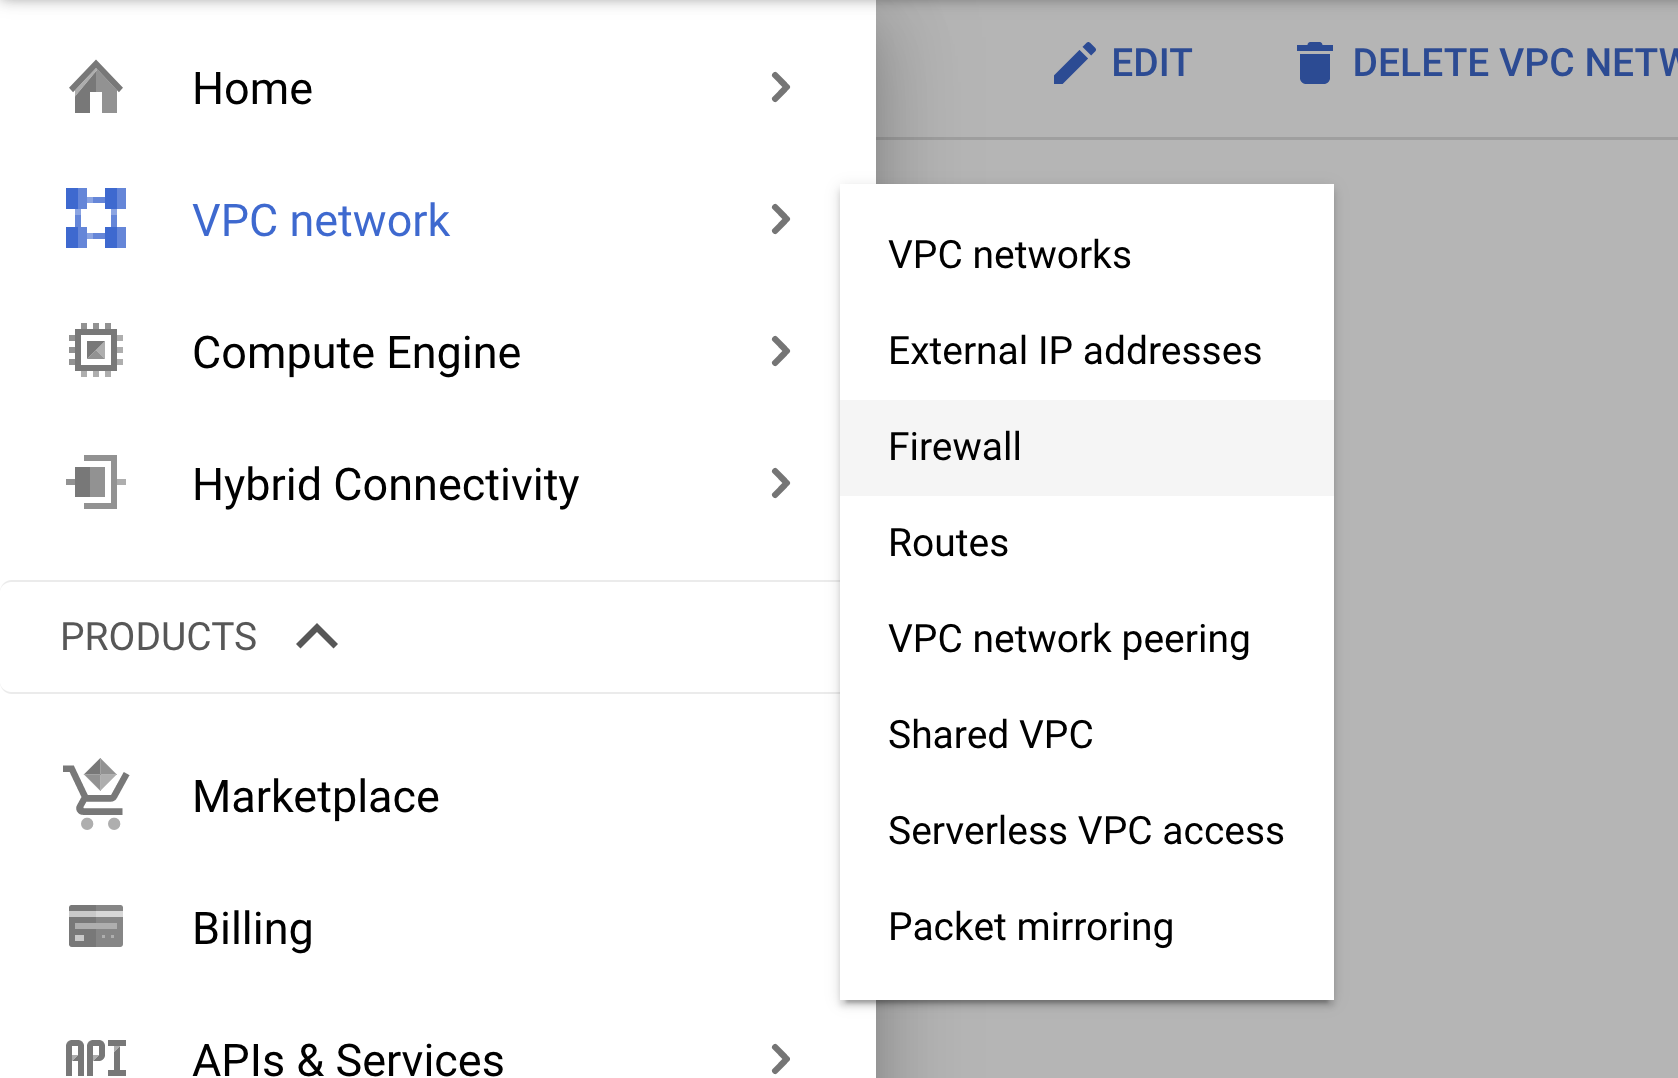
b) Create Firewall Rule
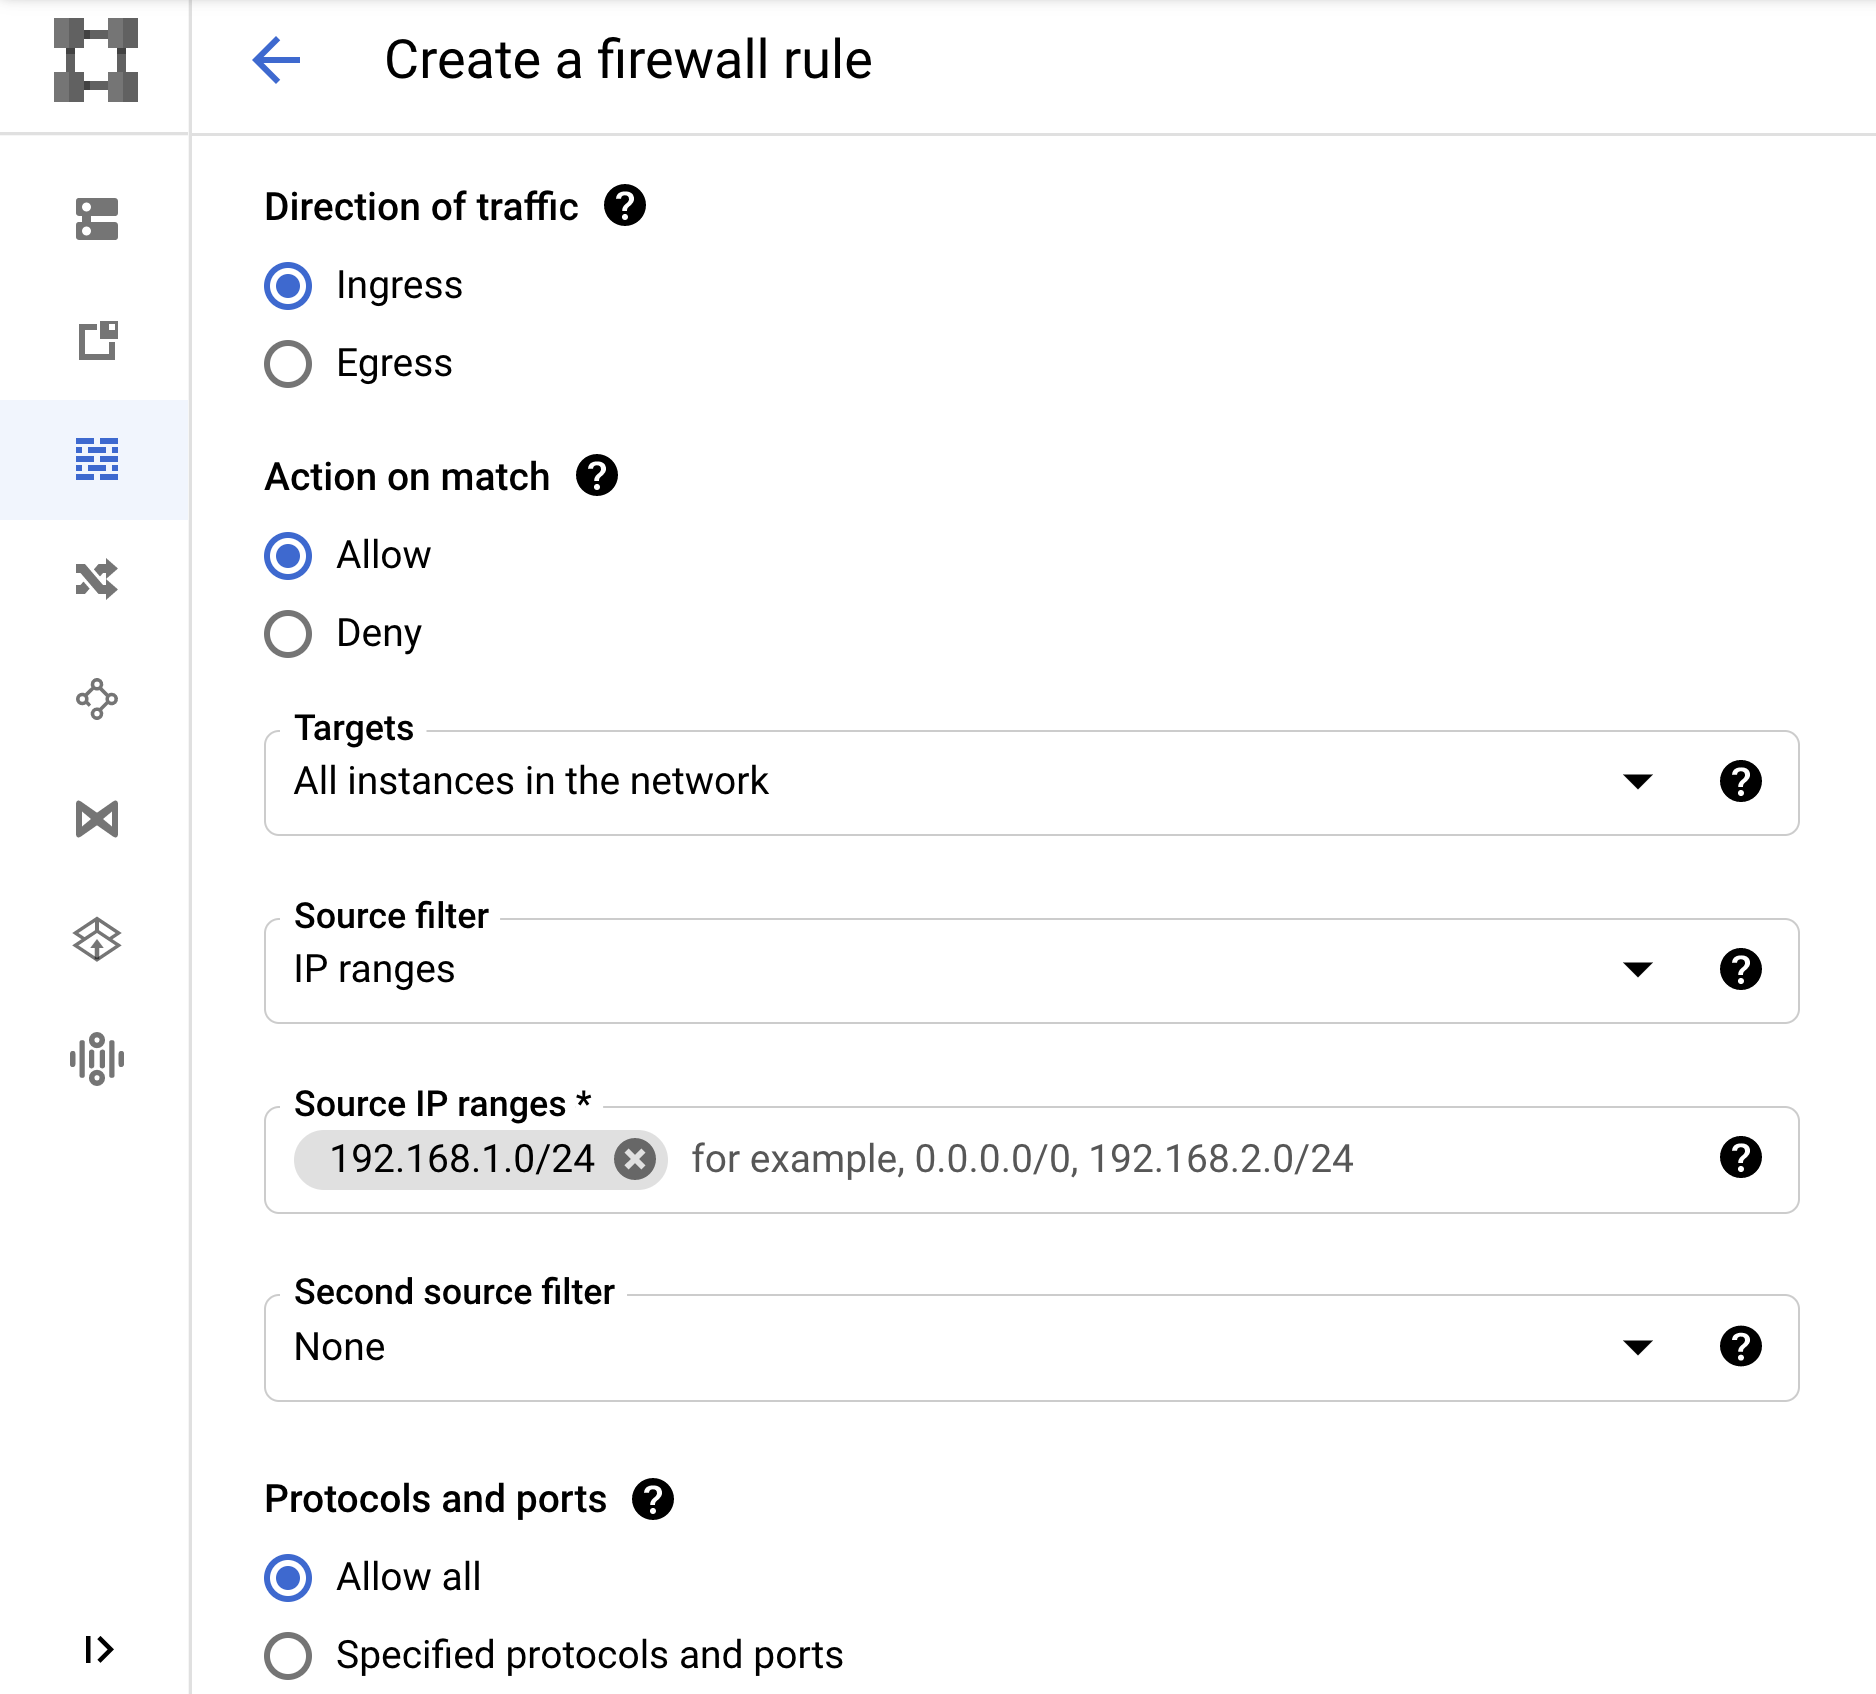
c) Select your GCP network. Source IP range should be your MuleSoft VPC CIDR. Create rule.
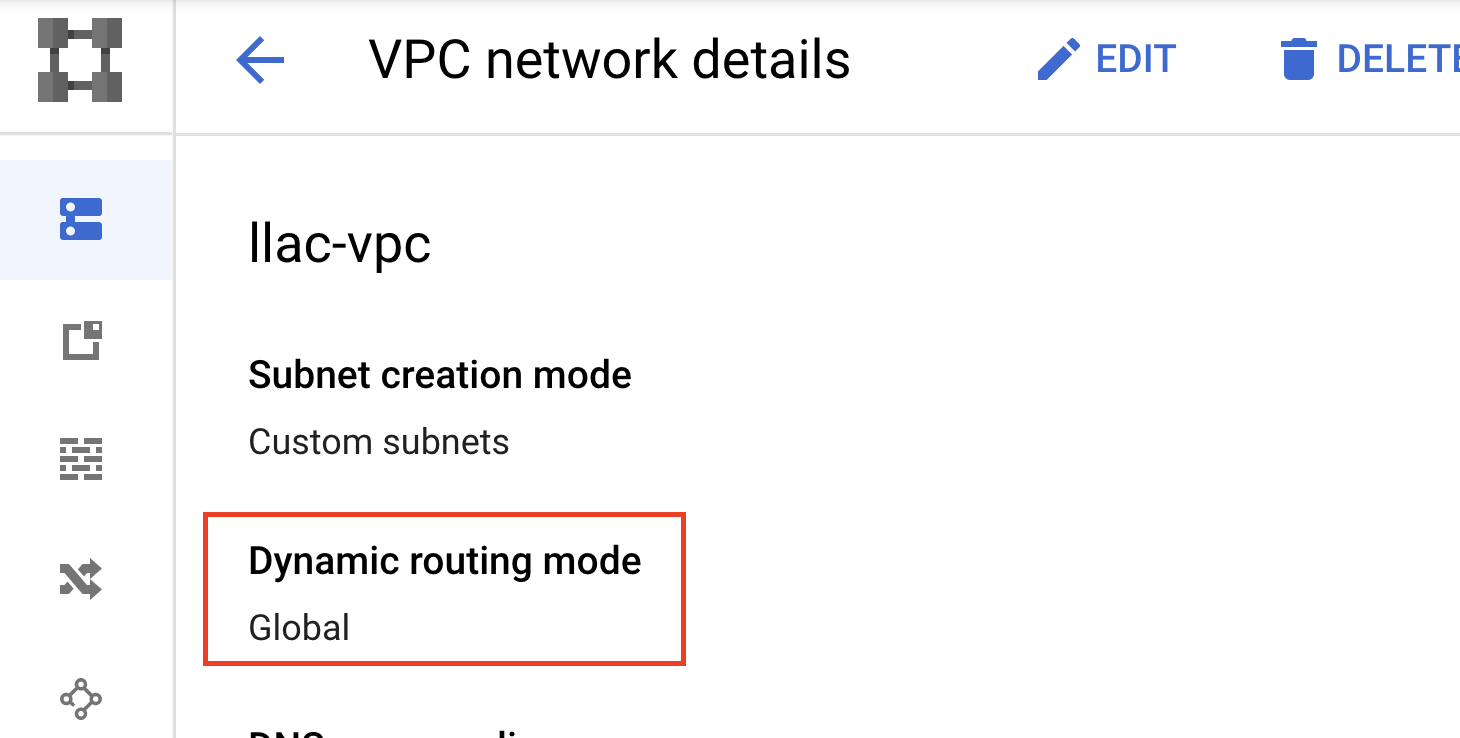
6. Check routes are advertised to MuleSoft
a) Check MuleSoft VPN page to make sure routes are advertise to MuleSoft
b) If no routes are advertise check the VPC. You may need to enable Global
7. High Availability (optional)
If you would like to enable HA, you will need to repeat this process again and create another VPN in MuleSoft. HA requires 2 MuleSoft VPN (4 tunnels) to GCP. You would not need to create GCP VPN gateway again since the second set of VPN IP are already configured. Please continue from step 2 and enter the second set of IP from GCP's CLOUD VPN GATEWAYS. ASN should stay the same. Cloudrouter should be the same.
8. Validation
a) Follow How to Generate Interesting Traffic for Anypoint VPN to deploy a CloudHub application.
b) Generate traffic to verify that connectivity is working as expected.
c) Test traffic from MuleSoft Cloudhub to GCP
https://help.mulesoft.com/s/article/How-To-Use-Network-Tools-Application
9. Failover Testing
It is highly recommended that you perform a failover test. These steps cover simple failover testing
- Deploy an app to Cloudhub
- Obtain internal IP by running "nslookup mule-worker-internal-<fullURLofapp.cloudhub.io> from any terminal
- Run a constant ping and wait 5 minutes since GCP VPN Monitor takes some time to update
- GCP - Cloud VPN Gateway - select your first tunnel
- Since there is no easy way to temporary the tunnel we will the BGP
- Edit BGP Session
- Disable BGP
- Save and Continue
- You will see that the constant pings remain running
- Run for another 5 min and re-enable BGP
- Review the GCP monitor in each tunnel
Knowledge-artikkelin numero
001114365
Ratkaisiko tämä artikkeli ongelmasi?
Anna palautetta, jotta voimme kehittyä!