Seleziona un'organizzazione
Mule 4 OAuth 2.0 Provider and Client Application Guide
Data pubblicazione: Jul 14, 2025
Operazione
GOAL
The goal of this article is to learn how to build a Mule 4 OAuth 2.0 provider and client application from scratch. It will cover everything you need to know from start to finish and will help strengthen your working knowledge of Anypoint Studio, Anypoint Platform, and how the two interact. This walkthrough is specifically for MuleSoft's OAuth2 module and will be useful for anyone trying to implement their own custom OAuth 2.0 provider.Fasi
Step 1: Create an Anypoint Studio application using Mule OAuth 2.0 Provider
A sample Anypoint Studio application is attached at the bottom of this article. oauth-2-provider.jar shows what you should have at the end of Step 1.
A. Configuring your application
- In Anypoint Studio, select File>New>Mule Project and give it a relevant name. For this walkthrough, we will be working with an application named oauth-test.
- In the Message Flow view of your new application, look for the Mule Palette on the right side and select Add Modules. Drag the ObjectStore module into your Mule Palette
- Next, in your <application_name>.xml Mule Configuration file, select the Global Elements view.
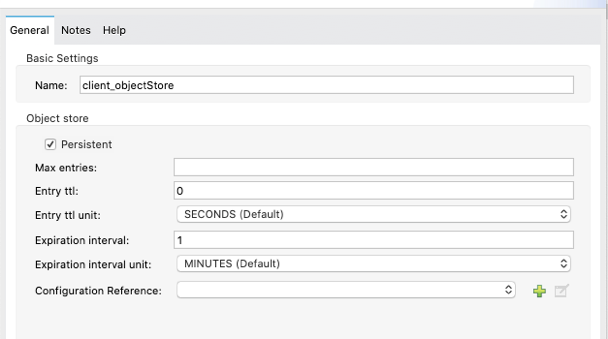
- In the top right, select Create and under Component Configuration, select Object store. We will be creating two Object Store configurations. Look at the two screenshots below for configuration details and enter the same details in your own Object Store configurations.
Client Object Store:
Token Object Store:

- Now, create a basic HTTP Listener Configuration in Global Elements. This can be done by clicking Create, then Connector Configuration>HTTP Listener Config. In the window that pops up, you can leave everything as default and select OK. This will have a basic HTTP listener running on http://localhost:8081 and will be used for the next step.
- Next, we need to install the OAuth 2.0 Provider module from Anypoint Exchange. In your Mule Palette click Search in Exchange... and, with your Anypoint Platform account linked and signed in, search for OAuth2. Select OAuth2 Provider Module and click Add >.
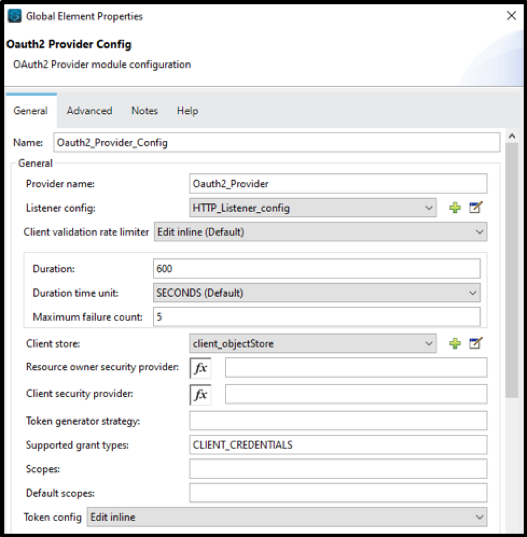
- With the OAuth2 Provider Module now installed, click on the Global Elements view and click Create then Connector Configuration>OAuth2 Provider Config. Now configure the OAuth2 Provider Config by either copying and pasting the below XML to your Configuration XML or by following the below steps/screenshot.
- For Listener config, select the HTTP Listener config you just created in the previous step.
- For Client Store, select the Client Object Store you configured earlier.
- For Token Store, select the Token Object Store you configured earlier.
OAuth2 Provider Config XML:
<oauth2-provider:config name=”Oauth2_Provider_Config” doc:name=”Oauth2 Provider  Config” doc:id=”adcc2165-73cd-4c0e-8d79-4fedd5704714″ providerName=”Oauth2_Provider”
            listenerConfig=”HTTP_Listener_config” clientStore=”client_objectStore” supportedGrantTypes=”CLIENT_CREDENTIALS”>
            <oauth2-provider:token-config tokenStore=”token_objetStore” />
</oauth2-provider:config>
OAuth2 Provider Config UI:
B. Client creation flow
- Next, we need to create a basic flow to create an OAuth2 client depicted in the screenshot below.
OAuth2 Client Creation Flow:
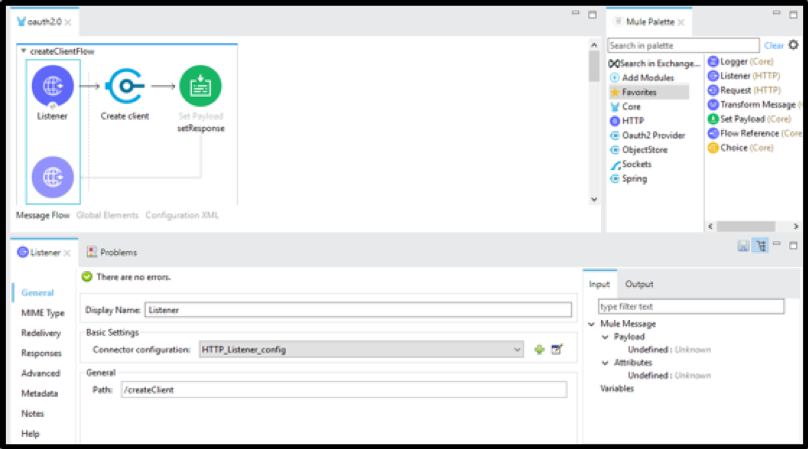
- For the HTTP Listener, select the HTTP Listener config you created earlier, and add the path /createClient (as seen above).
- From the OAuth2 module, drag in the Create client operation. Configure it as seen in the screenshot below.
Create client Configuration:
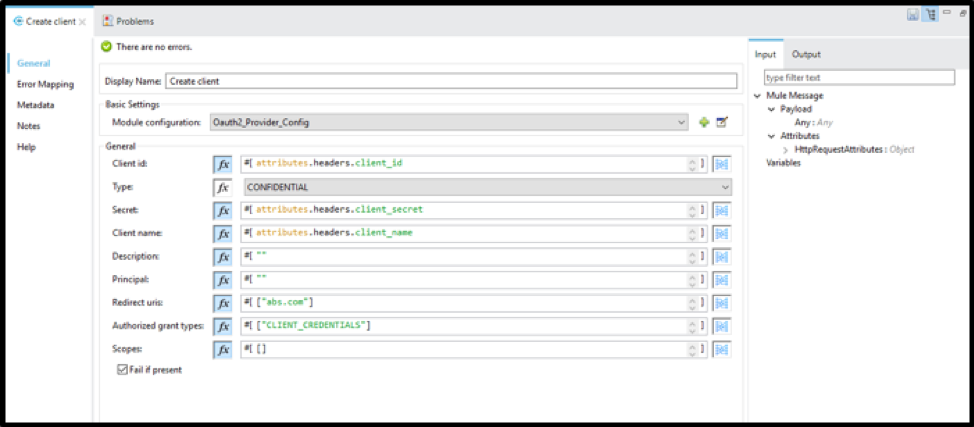
- Explanation of Create client configuration:
- Client Id, Client Secret, and Client Name will be passed in from the client as headers.
- Type is set to CONFIDENTIAL to ensure the credentials remain secure.
- Description, Principal, and Redirect URIs are hard coded. These values could be passed in from the client if needed, but for our purposes, they are hardcoded.
- CLIENT_CREDENTIALS are used as the Grant Type to provide you with the appropriate response which includes your credentials.
- For this walkthrough, we do not need to specify any scope.
- We will have Fail if present selected to not allow duplicate clients to be created.
- Add a Set Payload component and set the Value to #["Client created successfully"]
C. How to retrieve a new client's token (locally)
- The OAuth2 module does not have a specific operation to generate a token. Once the client is created from the flow we just created, you can make a call to your listner by using the /token path to generate the token.
- NOTE: If you did not yet create a client, you can do so by running your Studio application (Right click on canvas>Run project <your_project_name>). Then go to Postman or ARC and make a POST request with the following setup:
- URL: http://localhost:8081/createClient
- Headers:
- client_id = <any client_id you want> e.g., testClient
- client_secret = <any client_secret you want> e.g., testSecret
- client_name = <any client_name you want> e.g., testName
- If you look back at your OAuth2 Provider config, you will notice we configured everything we need to get the token all within the configuration. To get your token, use Postman or ARC and make a POST request with the following setup:
- URL: http://localhost:8081/token
- Headers:
- client_id = <value of client_id specified when creating a client>
- client_secret = <value of client_secret specified when creating client>
- grant_type = CLIENT_CREDENTIALS
D. Client validation flow
- Now we will create a basic flow to validate our newly created client and token as depicted below.
Client Validation Flow:
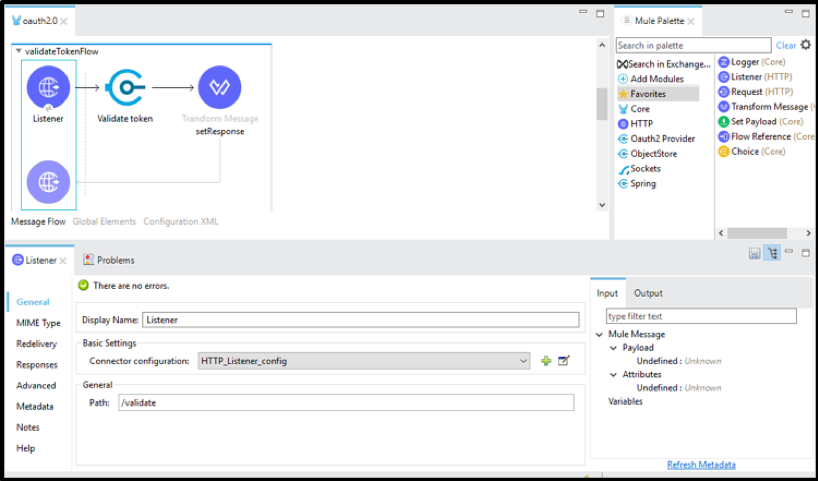
- For the HTTP Listener, select the HTTP Listener config you created earlier, and add the path /validate (as seen above).
- From the OAuth2 module, drag in the Validate token operation. Configure it as seen in the screenshot below.
Validate token Configuration:
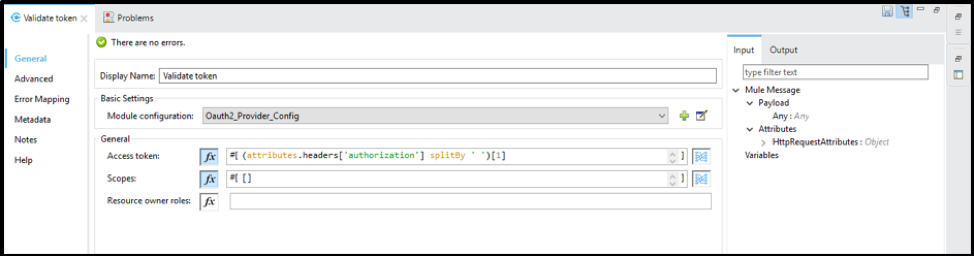
- Explanation of Validate token configuration:
- The access token is passed in as the authorization header with the format Bearer <token_value>. Since we only need the token's value, we are grabbing only the token value and ignoring Bearer.
- Scope does not need to be defined for this walkthrough
- Resource owner roles do not need to be defined for this walkthrough.
- Finally, drag a Transform Message component into your flow. We will return the payload as JSON for this walkthrough, so set the Dataweave script as such:
%dw 2.0
output application/json
---
payload
- If you want, you can test out the Validate token operation by running the application and making a GET request in Postman or ARC with the following setup:
- URL: http://localhost:8081/validate
- Headers:
- authorization = Bearer <your_token>
Step 2: Deploy the OAuth 2.0 provider application to CloudHub
A. Deploying the application to CloudHub from Anypoint Studio
- Once you have tested your OAuth2 flows locally, the next step is to deploy this application to CloudHub. In the File Explorer in Anypoint Studio, right-click on your project name (e.g., oauth-test), navigate to Anypoint Platform>Deploy to CloudHub.
- In the pop-up window, give your application a unique and relevant name such as oauth2-provider-<your_last_name>.
- If you want to share data between workers use OSV2 object-store
- Click Deploy Application.
- Once your deployment has finished, you should be able to see your OAuth 2.0 provider application in Runtime Manager on Anypoint Platform.
Step 3: Create a basic API Specification as an OAuth 2.0 Client application
A sample Anypoint Studio application is attached at the bottom of this article. oauth-2-client.jar shows what you should have at the end of Step 3.
A. Creating the API Specification in Design Center
- In a web browser, go to anypoint.mulesoft.com and login using the same credentials you used to deploy your Anypoint Studio application in the previous step.
- Navigate to Design Center and select Create new in the top right of the UI.
- In the pop-up window, select Create API specification and give it any name you wish (e.g., oauth2-client-api).
- For this walkthrough, we will just create a very simple API and implement OAuth 2.0 for it. In your Root file, add the following RAML code:
#%RAML 1.0
title: YOUR_SPEC_NAME
securitySchemes:
 oauth_2_0:
       description: |
           Mule OAuth 2.0.
       type: OAuth 2.0
       describedBy:
           headers:
              Authorization:
                  type: string
                  required: true
           responses:
               401:
                  description: |
                      Bad or expired token.
               403:
                  description: |
                      Bad OAuth request.
       settings:
        authorizationUri: http://<CLOUDHUB_URL_OF_STUDIO_APP>.cloudhub.io/validate
        accessTokenUri: http:// <CLOUDHUB_URL_OF_STUDIO_APP>.cloudhub.io/token
        authorizationGrants: [client_credentials]
/test:
  get:
    securedBy: [oauth_2_0]
    responses:
      200:
        body:
          application/json:
            examples: {"test":"success"}
- The above API Specification simply creates a /test resource that can be hit with a GET request and will return a JSON success message to confirm our OAuth 2.0 is implemented correctly.
- The last thing we need to do in Design Center is to click the blue Publish button in the top right of the UI and click Publish to Exchange. Give it a version number of 1.0.0 and an API version of v1. Click Publish to Exchange.
B. Using your API Specification to create a OAuth 2.0 Client application in Anypoint Studio
- With your API successfully published to your Exchange, we can now create the Client application that will implement our OAuth 2.0 provider.
- In Anypoint Studio, click File>New>Mule Project. Give it a project name such as oauth2-client-implementation.
- Next, under the API Implementation section, select Download RAML from Design Center and select the API Specification we just created in the last step.
- Click OK and then Finish to finish creating your application.
Download RAML from Design Center UI:

- You should now see an auto-generated flow that was generated with APIKit and your API Specification from Design Center. This application will be used as our client application which implements OAuth 2.0.
C. Deploying the client application to CloudHub from Anypoint Studio
- Right-click the client application's name in the File Explorer in Anypoint Studio and navigate to Anypoint Platform>Deploy to CloudHub
- Select your desired environment in the top left corner of the pop-up and give your application a unique name such as oauth2-client-implementation-<your_last_name>.
- Click Deploy Application and in the pop-up select Open in Browser to monitor your application's deployment status.
Step 4: Implement the OAuth 2.0 using API Manager
A. Managing your API Specification from Exchange in API Manager
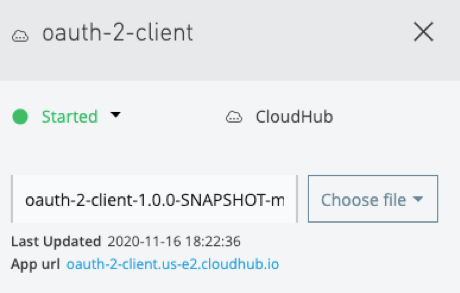
- After your client application has finished deploying, copy the App url from Runtime Manager (seen below) as we will need this shortly.
App url Location:
- Next, navigate to API Manager within Anypoint Platform
- Click Manage API>Manage API from Exchange
- For API name, start typing the name of the API Specification we used to create the client application and select that API name. Asset type, API version, and Asset version should all be auto-populated once the API name is selected.
- For Managing type, select Endpoint with Proxy and for Proxy deployment target, select CloudHub.
- For Mule version, ensure the box is checked labeled Select if you are managing this API using Mule 4 or above.
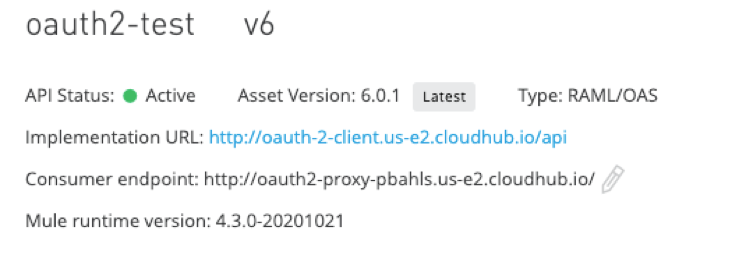
- For Implementation URI, paste the App url you copied earlier followed by /api as such:
Implementation URI Example:
- Leave the rest of the fields as default and click Save at the bottom of the screen.
- You will now see a box for Deployment Configuration. For Runtime version, select the latest runtime version (or the same one your client application deployed to Runtime Manager is using).
- For Proxy application name, provide a unique name such as oauth2-proxy-<your_last_name>.
- Check the box labeled Update application if exists and click Deploy.
- Now we will wait until the proxy application has been deployed. Make sure to copy the App url from Runtime Manager for this proxy application as we will need it later on.
B. Configuring your API implementation
- After your proxy application has been deployed, navigate to Exchange within Anypoint Platform.
- Click on your OAuth 2.0 Client API Specification (the RAML specification you published to Exchange from Design Center earlier).
- On the right side of the UI, you should see your API Manager instance under the Asset versions for X.X.X in the Instances column. If you use the console found on the left side of the screen, and expand the /test resource and select the GET method, you should only be able to use the Mocking Service to test your API out so far.
- We need to add an endpoint for your API Instance. To do this, start by clicking on API Instances found at the bottom left of the page. You will now see something like below:
API Implementation UI:

- As you can see, the URL for the API Instance is blank. To update this, return to API Manager and click on the hyperlink on the version name of your managed API.
- Click the Add consumer endpoint button and paste in your proxy application's App url you copied earlier as such:
Consumer endpoint Configuration:
- Now, if you return to Exchange and open API Instances you should see the URL populated for your API Instance managed in API Manager.
Populated URL for API Implementation:
C. Adding the OAuth 2.0 policy in API Manager

- Finally, we must add an OAuth 2.0 policy in API Manager so our token can be validated. In API Manager, select the hyperlink for the API version we are managing and on the left side of the screen, click the Policies tab.
- Under API level policies, click Apply New Policy.
- Expand the OAuth 2.0 access token enforcement using Mule OAuth provider tab and select the latest version. Then, click Configure Policy.
- Under the Access Token validation endpoint url section, we need to add our OAuth 2.0 provider's validation endpoint. If you need to find this URL, you can return to Runtime Manager and find the App url for the OAuth 2.0 provider application we deployed to CloudHub in Step 2. Paste that URL followed by /validate as such:
Access Token validation endpoint url:

- Be sure to check the box labeled Skip Client Id Validation (this is to make testing easier). Now click Apply.
- Everything is now set up, the last thing to do is test it out!
D. Testing and validating your client application
- Return to Exchange and open the API Specification we are managing with API Manager.
- In the menu on the left, expand the /test resource and click on the GET method.
- Now, in the menu on the right, under Select Server, select the API Instance we have set the URL for earlier (not the Mocking Service).
- You should now see a Credentials section which you need to enter a valid Client Id and Client Secret. You can create a new client similar to how we did it locally (before deploying to CloudHub) by creating a POST request in Postman or ARC with the following setup:
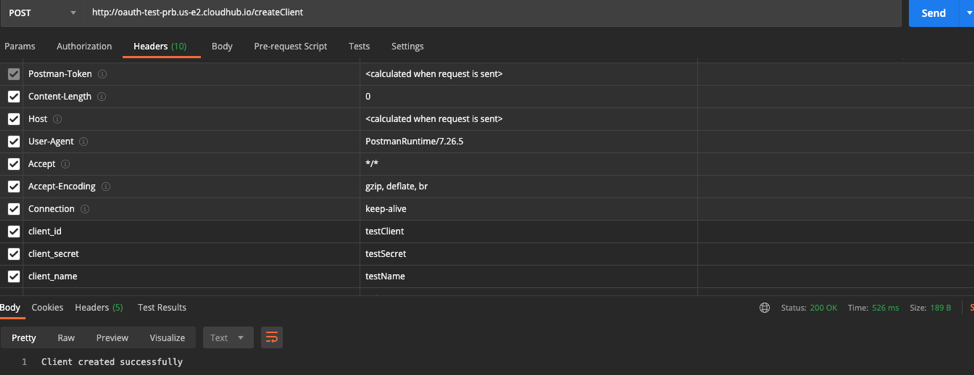
- URL: this will be your OAuth provider's App url followed by /createClient such as: http://oauth2-provider-<your_last_name>.<region>.cloudhub.io/createClient
- Headers:
- client_id = <any client_id you want> e.g., testClient
- client_secret = <any client_secret you want> e.g., testSecret
- client_name = <any client_name you want> e.g., testName
- Click Send. You now have created a new client with specified client_id and client_secret.
Sample createClient Postman Request:
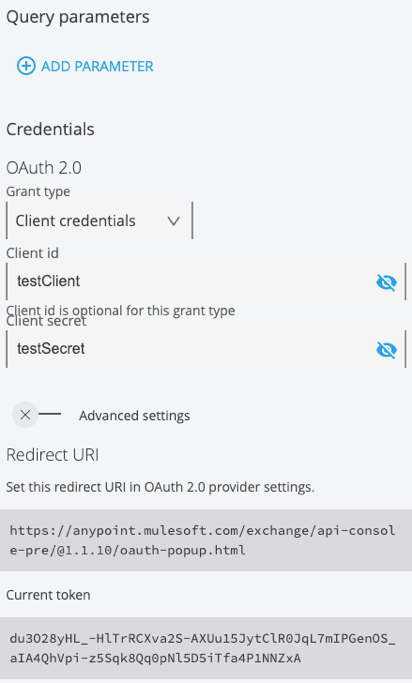
- Now, return to Exchange and enter your newly added client_id and client_secret values under the Credentials section.
- Click Request access token and you should see a response such as:
Request access token Response:
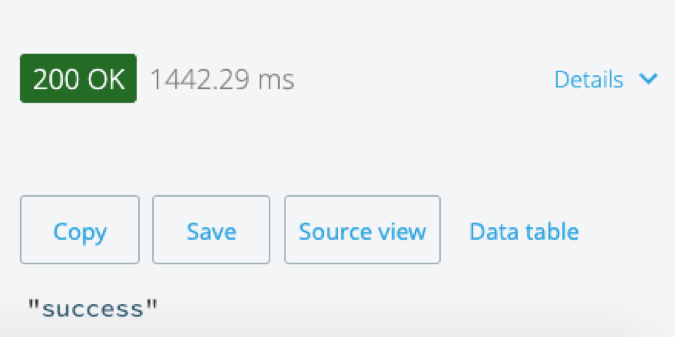
- Now that you have a valid token generated, you can click Send at the bottom of the menu on the right of the screen and should receive a 200 response with the following message:
Successful Request:
That's it! You have now implemented your own OAuth 2.0 provider and created a client application that uses it. You can continue playing around with this in Anypoint Exchange and see what happens when you use invalid client_id or client_secret, create a new client_id and client_secret, and use an invalid token, or whatever the use case you want to test is!
Additionally, if you want to see all the clients you've created and valid tokens that have been generated, you can go to Runtime Manager, open the OAuth 2.0 provider application and click on Object Store found in the menu on the left.
----
For more information on the MuleSoft provided OAuth2 module, please see our documentation here.
Risorse aggiuntive
Client application sample: oauth-2-client.jar
Numero articolo Knowledge
001115866
Questo articolo ha risolto il problema?
Facci sapere, così possiamo migliorare!