Выбрать организацию
How to Install PingFederate Client Provider with Mule for Testing
Дата публикации: Jul 18, 2025
Задача
Disclaimer update as requested by clients
Действия
CONTENT
You want to test PingFederate with Mule as a client provider. Here are instructions on installing on your own publicly-accessible server and configuring the API client applications on the Mulesoft side. This PingFederate setup will need to be hardened by your security team before going live.
This article is related to tools that are not included in the MuleSoft product suite.
Support for technical issues related to these tools is restricted to the information provided in this article.
STEPS TO FOLLOW
1. On your externally accessible server, please install Docker. It has to be public accessible since Anypoint Platform needs to be able to access it: link
- e.g., Linux 2 instructions to install docker can be found here
2. Please obtain free evaluation license and credentials from PingFederate per steps here: link
(when the license expires in 30 days you need can request new license by following same link above instead of new license option has send credentials again)
3. Notate down the user email and key. You will use it in your next step.
4. Next, run the following to setup PingFederate Docker image in 1 terminal (called Terminal 1), replacing the values for your key and user email:
Please note all docker commands have to be run as run so please do sudo su before running any command
Prerequisite
- start docker > systemctl start docker
docker run \
           --name pingfederate \
           --publish 1389:389 \
           --publish 8443:443 \
           --publish 9999:9999 \
           --publish 9031:9031 \
           -it --entrypoint /bin/sh \
           --env SERVER_PROFILE_URL=https://github.com/pingidentity/pingidentity-server-profiles.git \
           --env SERVER_PROFILE_PATH=getting-started/pingfederate \
           --env PING_IDENTITY_DEVOPS_USER=email@email.com \
           --env PING_IDENTITY_DEVOPS_KEY=your_key \
           --env PING_IDENTITY_ACCEPT_EULA=YES \
           pingidentity/pingfederate:edge
Above will take you the image prompt something like below
PingFederate:d1313434e9c:/opt
>
if this command gives error like pingdfederate is running and fails then perform below
- docker stop pingfederate
- docker rm pingfederate
- rerun above command "docker run \ --name ..."
In another terminal (we will call Terminal 2 server prommt), run the following to access PingFederate:
docker exec -it pingfederate sh
5. Run the following command in new terminal(server prompt) to monitor the logs:
docker logs -f pingfederate
6. Install MySQL on your same server from Terminal. Run the following commands:
- docker run --name the-mysql -p 3306:3306 -e MYSQL_ROOT_PASSWORD=my-secret-pw -d mysql:5.7.29
Output something like...
[ec2-user@ip-172-31-18-78 ~]$ docker run --name the-mysql -p 3306:3306 -e MYSQL_ROOT_PASSWORD=my-secret-pw -d mysql:5.7.29
Unable to find image 'mysql:5.7.29' locally
5.7.29: Pulling from library/mysql
54fec2fa59d0: Pull complete
bcc6c6145912: Pull complete
..
..
Digest: sha256:95b4bc7c1b111906fdb7a39cd990dd99f21c594722735d059769b80312eb57a7
Status: Downloaded newer image for mysql:5.7.29
5aa89170d9c73cf18fc89767cd33787e3c14e780fea87f1bc453284f4f8ddab6
- connect to SQL and do require db stuff
docker exec -it the-mysql sh
mysql -u root -p

#When prompted, enter "my-secret-pw"

CREATE DATABASE pf;
CREATE USER 'DatabaseUser' IDENTIFIED BY 'DatabasePass';
CREATE USER 'DatabaseUser'@'localhost' IDENTIFIED BY 'DatabasePass';
GRANT ALL  PRIVILEGES ON *.* TO 'DatabaseUser';
GRANT ALL  PRIVILEGES ON *.* TO 'DatabaseUser'@'localhost';
exit
Run the following commands on pingfederate server:
on your ec2 instance run docker exec -it pingfederate sh
cd /opt/server/lib/;
wget https://dev.mysql.com/get/archives/mysql-connector-java-8.0/mysql-connector-java-8.0.17.tar.gz
tar xvf mysql-connector-java-8.0.17.tar.gz
rm mysql-connector-java-8.0.17.tar.gz
cp mysql-connector-java-8.0.17/mysql-connector-java-8.0.17.jar .
rm -rf mysql-connector-java-8.0.17
cp mysql-connector-java-8.0.17.jar /opt/server/server/default/lib;
Then run the following commands:
vi /opt/server/server/default/conf/META-INF/hivemodule.xml
Find this block:
<!-- Service for storing OAuth client configuration. -->
<service-point id="ClientManager" interface="org.sourceid.oauth20.domain.ClientManager">    <invoke-factory> <!-- Supported classes are org.sourceid.oauth20.domain.ClientManagerXmlFileImpl ... org.sourceid.oauth20.domain.ClientManagerJdbcImpl ... org.sourceid.oauth20.domain.ClientManagerLdapImpl ... org.sourceid.oauth20.domain.ClientManagerGenericImpl ... --> <construct class="org.sourceid.oauth20.domain.ClientManagerXmlFileImpl"/> </invoke-factory> </service-point>
Change it to: (basically from "<construct class="org.sourceid.oauth20.domain.ClientManagerXmlFileImpl" to "
<construct class="org.sourceid.oauth20.domain.ClientManagerJdbcImpl"/>
<!-- Service for storing OAuth client configuration. -->
<service-point id="ClientManager" interface="org.sourceid.oauth20.domain.ClientManager">    <invoke-factory> <!-- Supported classes are org.sourceid.oauth20.domain.ClientManagerXmlFileImpl ... org.sourceid.oauth20.domain.ClientManagerJdbcImpl ... org.sourceid.oauth20.domain.ClientManagerLdapImpl ... org.sourceid.oauth20.domain.ClientManagerGenericImpl ... --> <construct class="org.sourceid.oauth20.domain.ClientManagerJdbcImpl"/> </invoke-factory> </service-point>
7. Finally, let's startup PingFederate:
/opt/entrypoint.sh
8. In your browser, please go to:
https://<IP or FQDN of your server>:9999/pingfederate/app
9. You should use the following credentials to login:
Username: Administrator
Password: 2FederateM0re
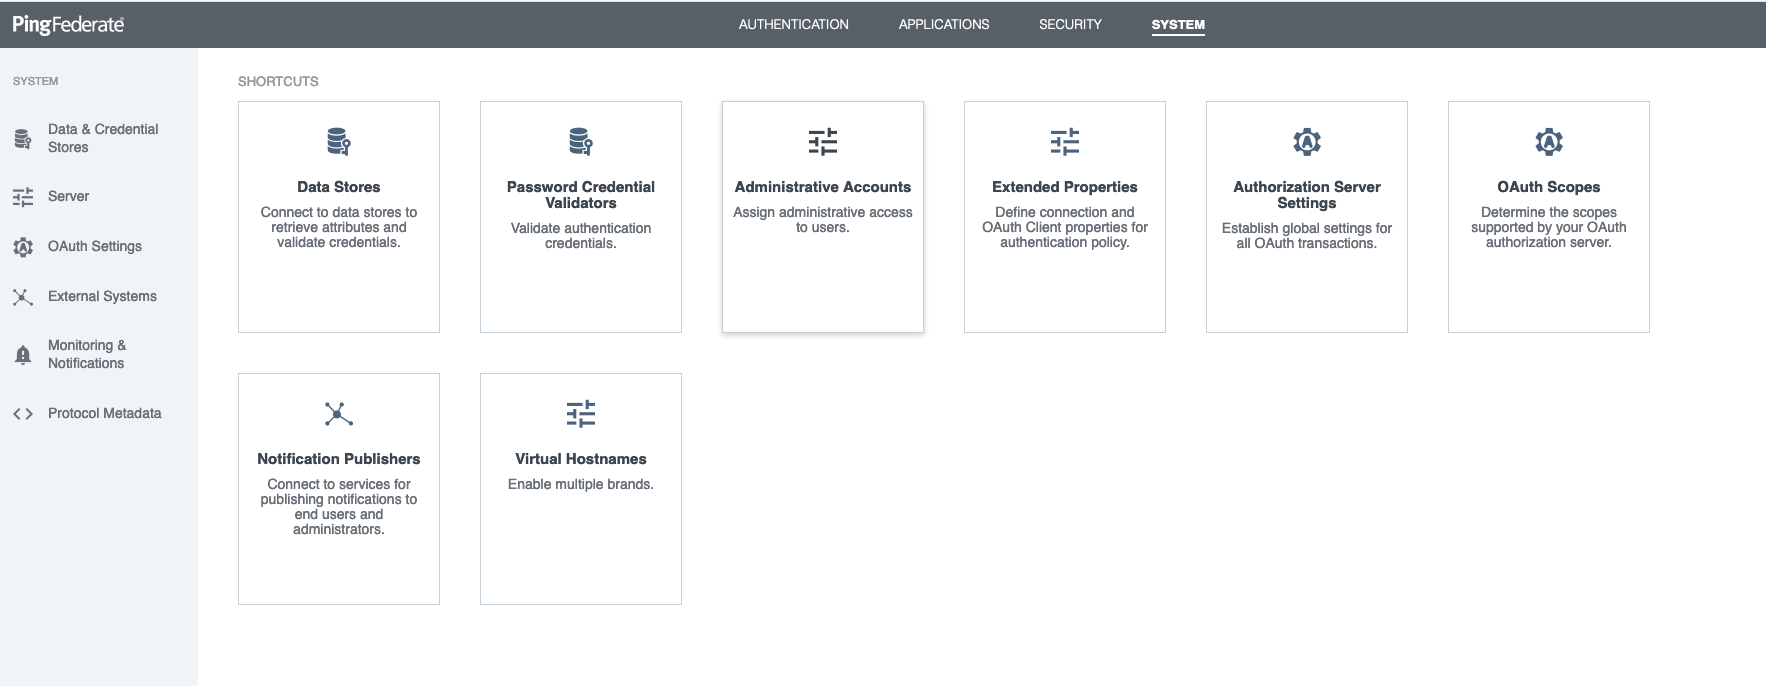
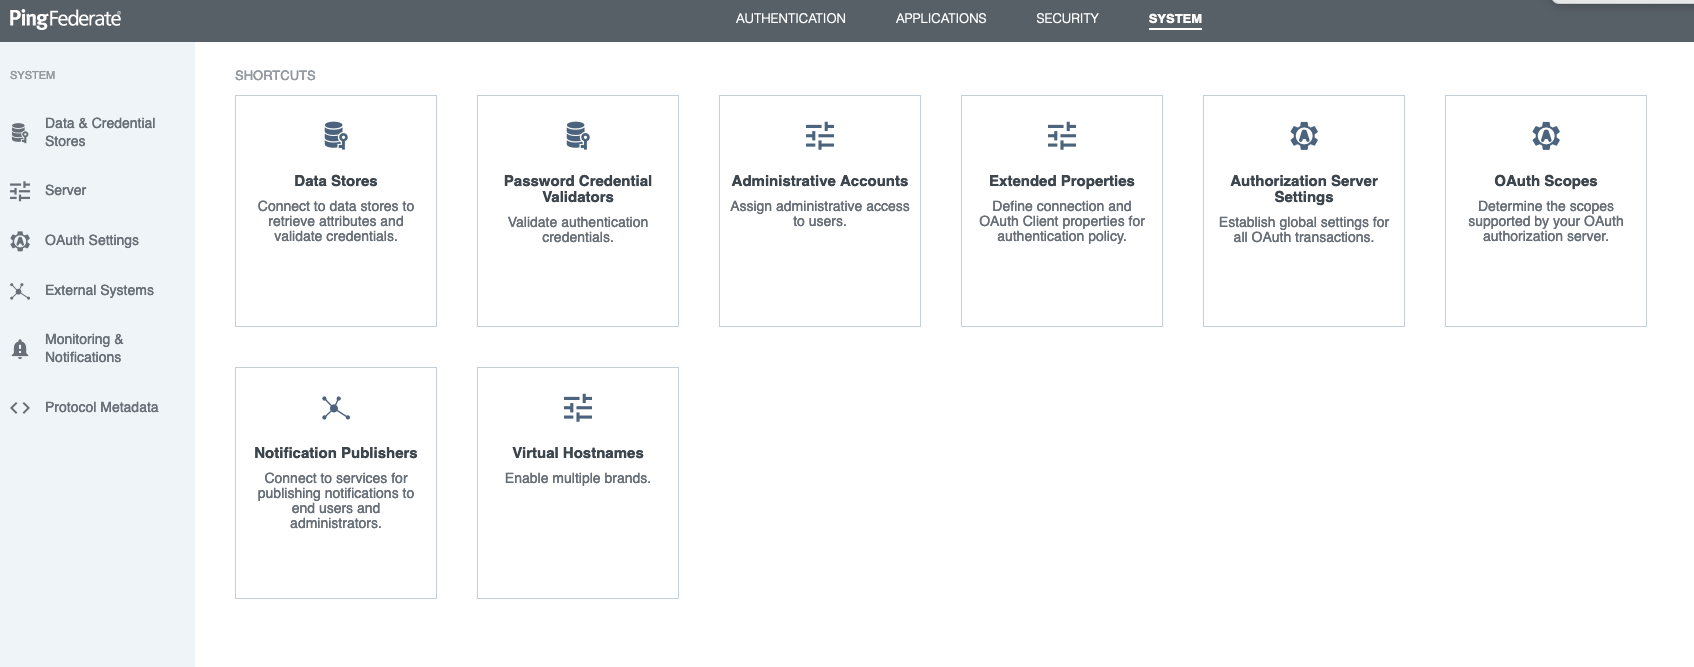
10. Go to "System" -> "Data Store":
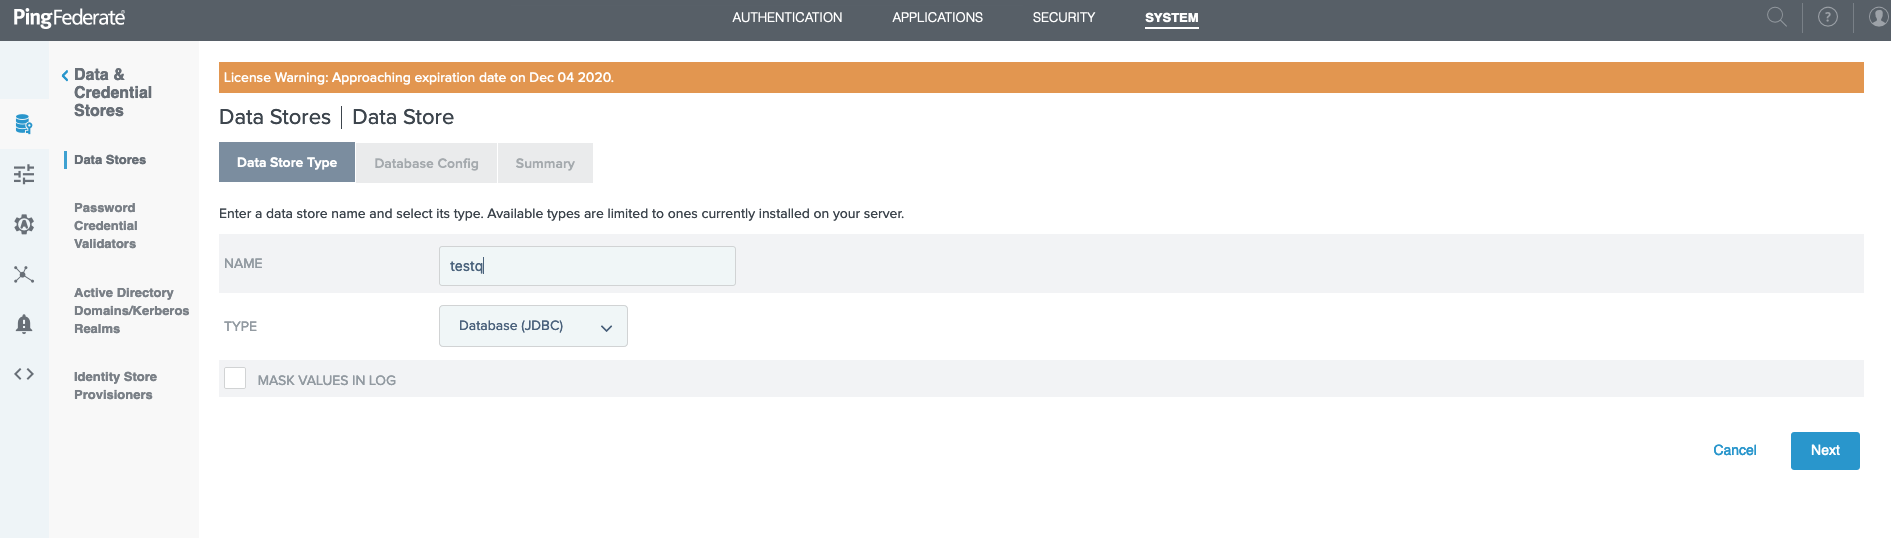
11. Then, "Add New Data Store" and choose JDBC:
12. Then fill in the info with your hostname of your server and use these credentials created earlier. Then "Save".
Hostname field should look like this. Then click on "Add".
jdbc:mysql://my-website.com:3306/pf
Driver class should be:
com.mysql.jdbc.Driver
Username:
DatabaseUser
Password:
DatabasePass
Hit "Test Connection" to confirm connection and click "Next" and then "Save" on the next screen.
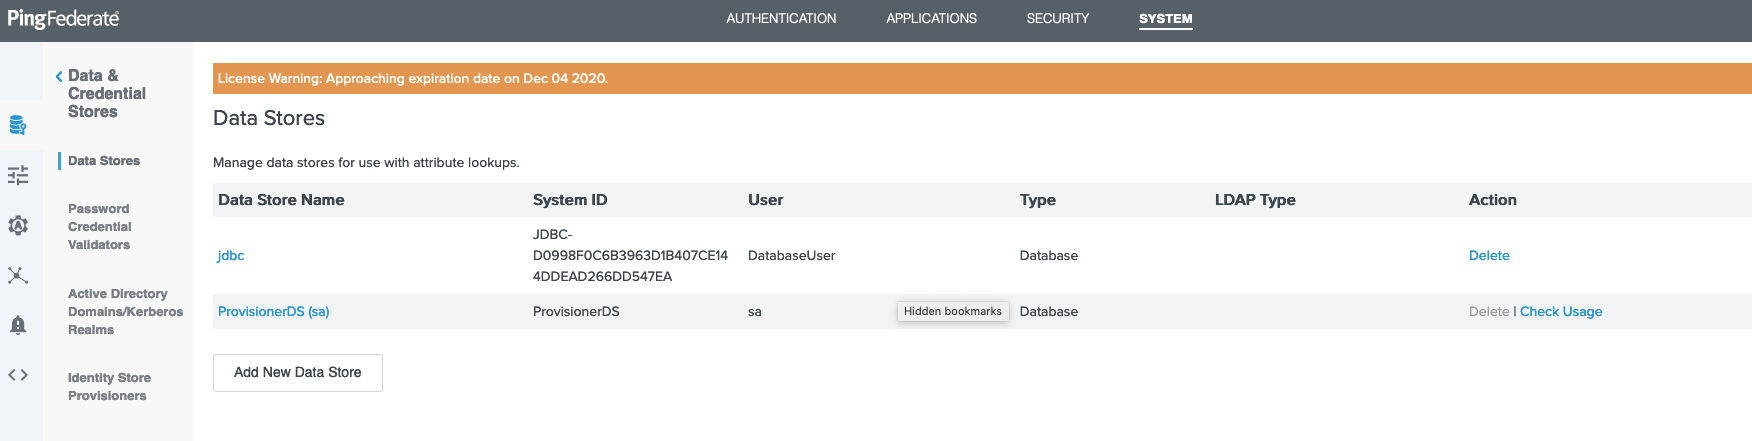
13. Now, go back to the Data Stores main screen. Write down the System ID that PingFederate assigned to your JDBC connection:
In my screenshot, my ID is "JDBC-D0998F0C6B3963D1B407CE144DDEAD266DD547EA"
14. Go back to terminal 1 from step 4. Hit "Control-C" to end the process.
15. Now, please run this command:
vi /opt/server/server/default/data/config-store/org.sourceid.oauth20.domain.ClientManagerJdbcImpl.xml
Please replace the string "JDBC-123456789ABCDEF123456789ABCDEF123456A0AC" with your string from step #13.
<?xml version="1.0" encoding="UTF-8"?> <c:config xmlns:c="http://www.sourceid.org/2004/05/config"> <c:item name="PingFederateDSJNDIName">JDBC-123456789ABCDEF123456789ABCDEF123456A0AC</c:item> </c:config>
Then exit out of vim.
16. Run the following command again in terminal 1. This is done to restart the PingFederate server.
./bootstrap.sh
17. Now go back and repeat step 8 and 9.
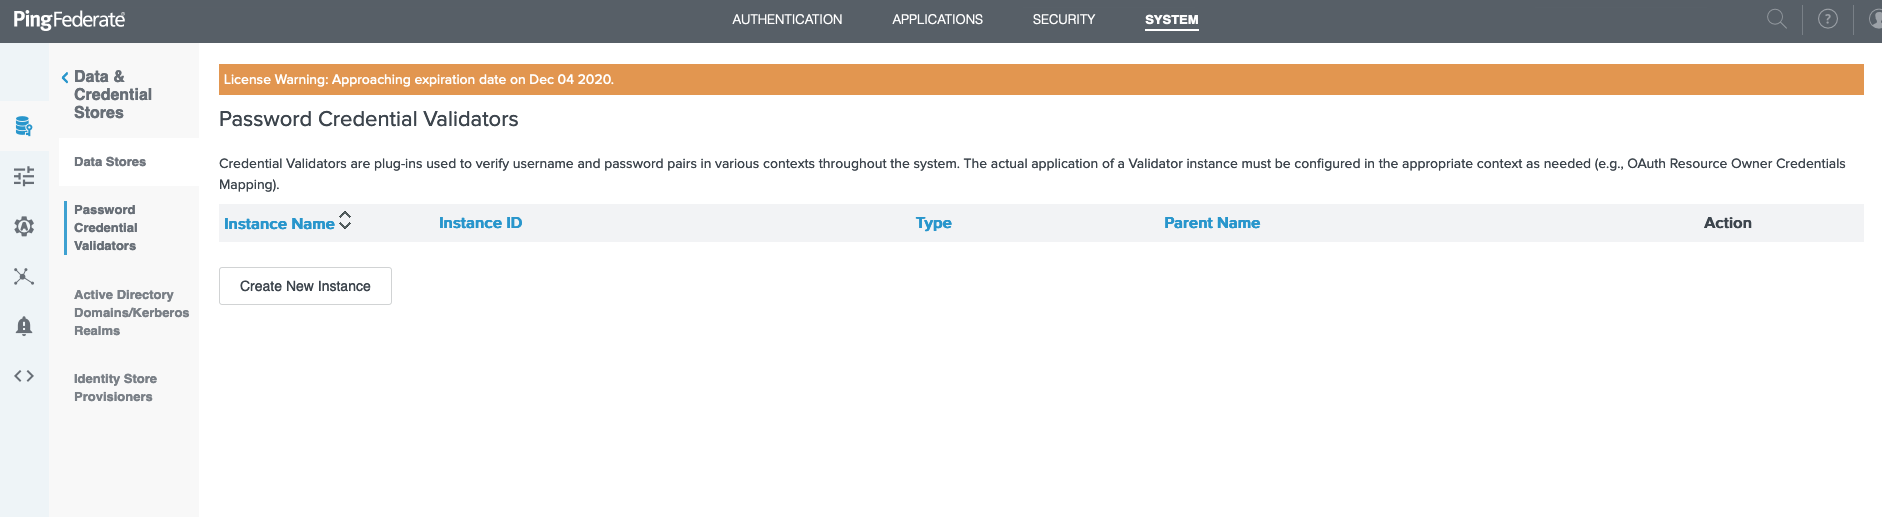
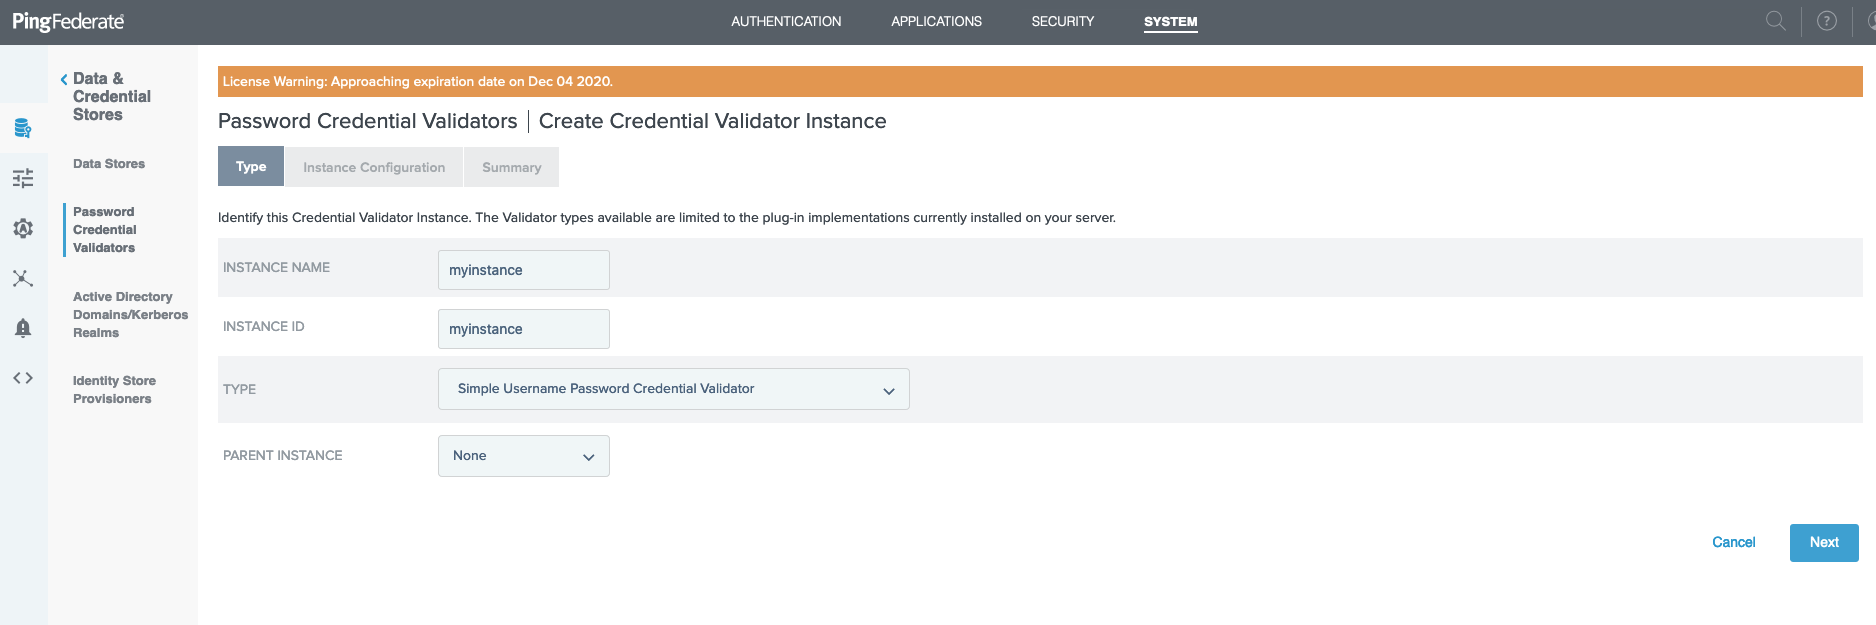
18. Go to "System" -> "Password Credential Validators":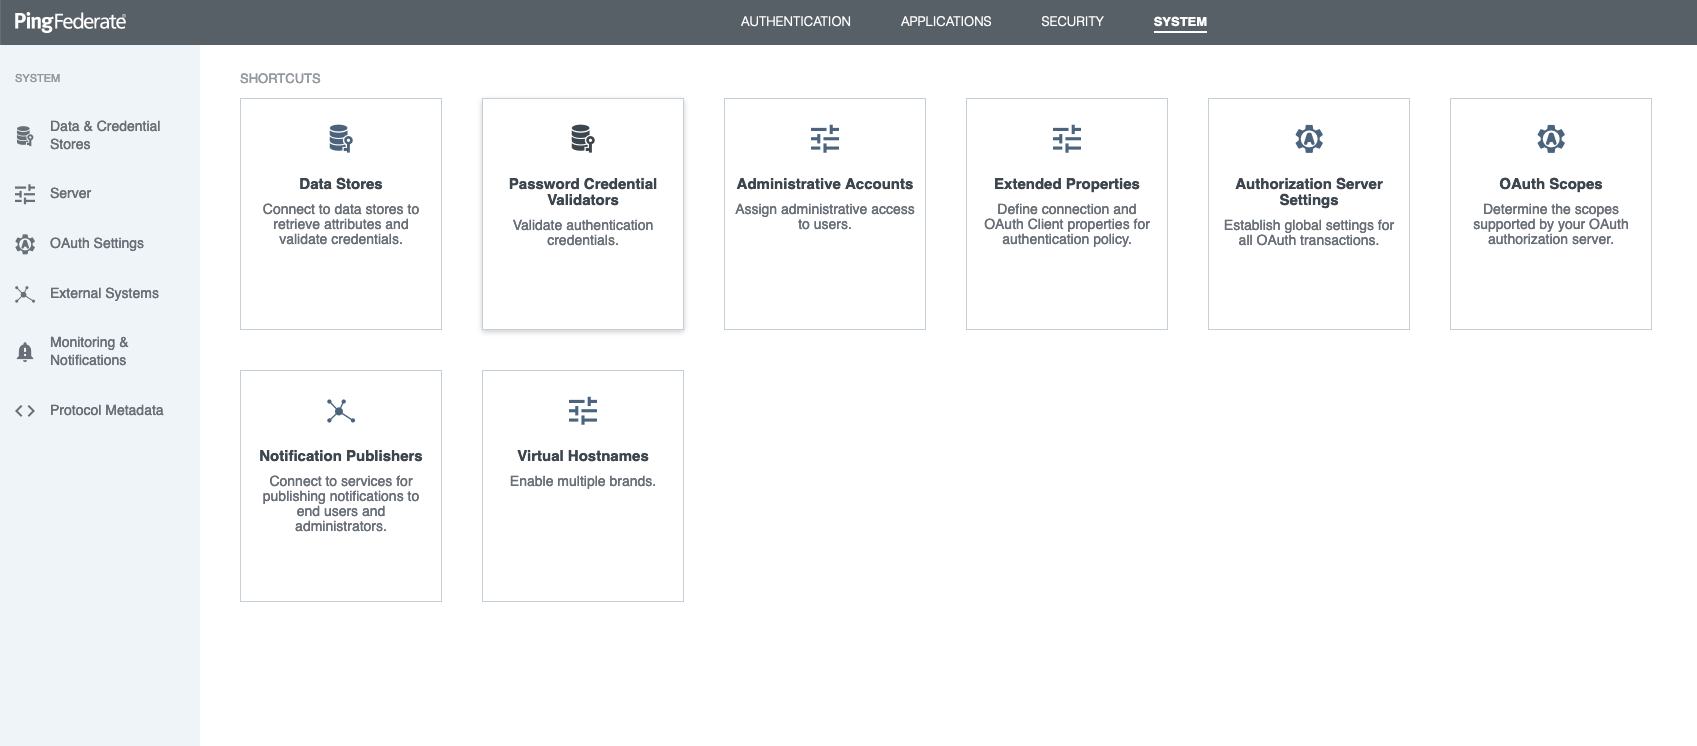
Create a new instance:
Choose any name, but use "Simple Username Password Credential Validator" as type:
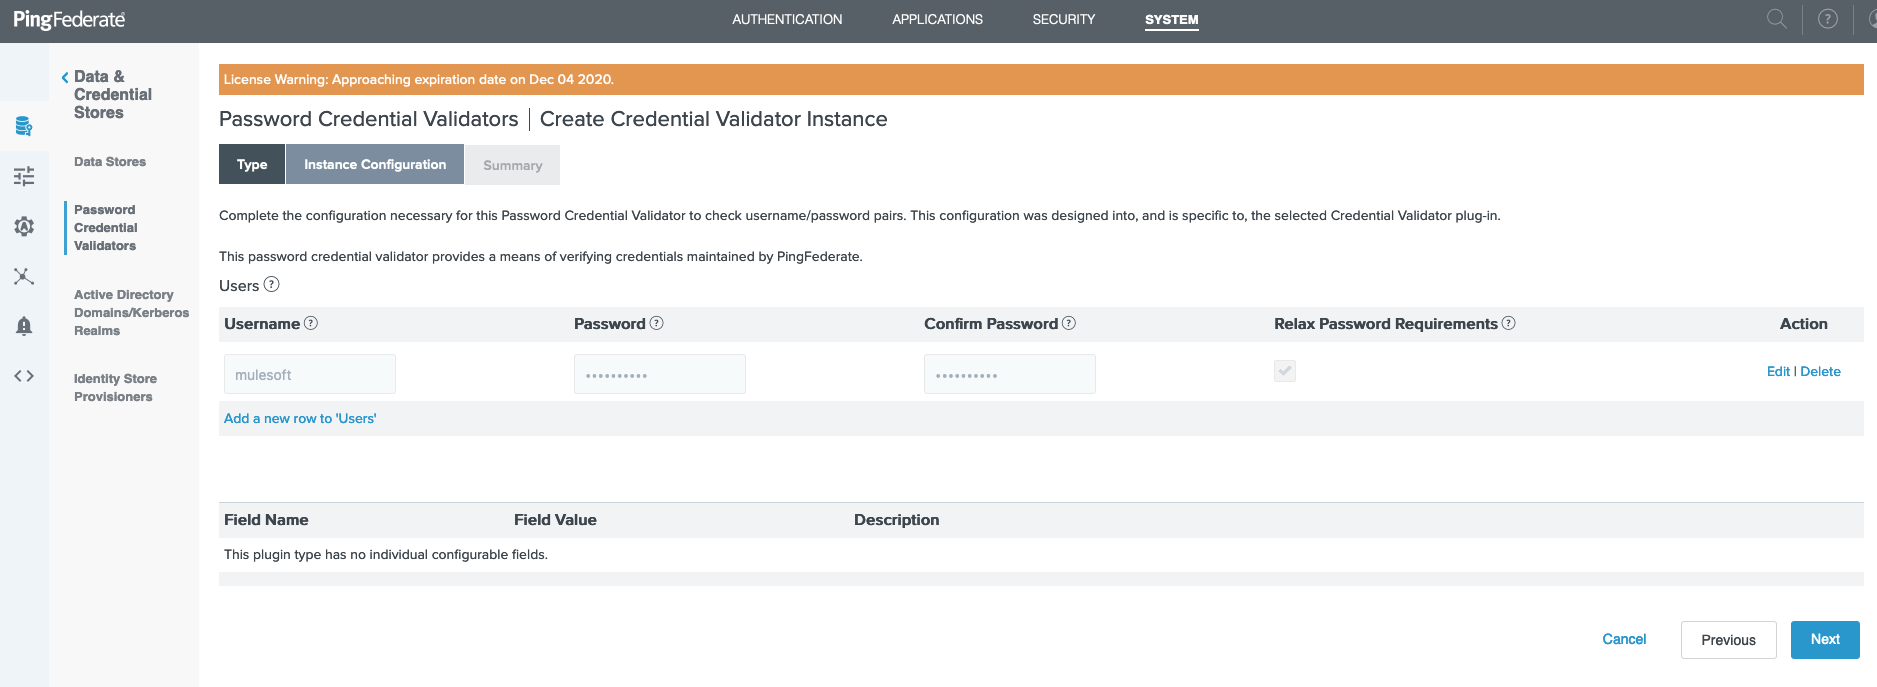
19. Add a user. I made mine username = mulesoft password = mulesoft for ease of testing purposes:
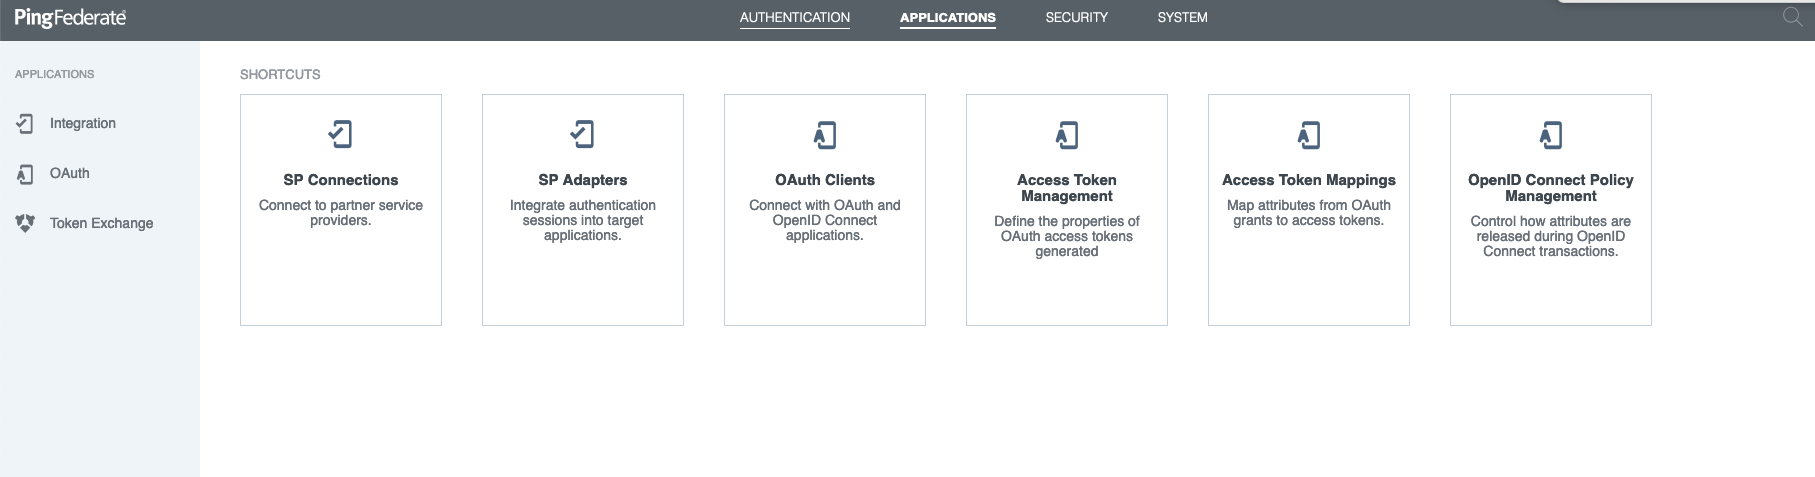
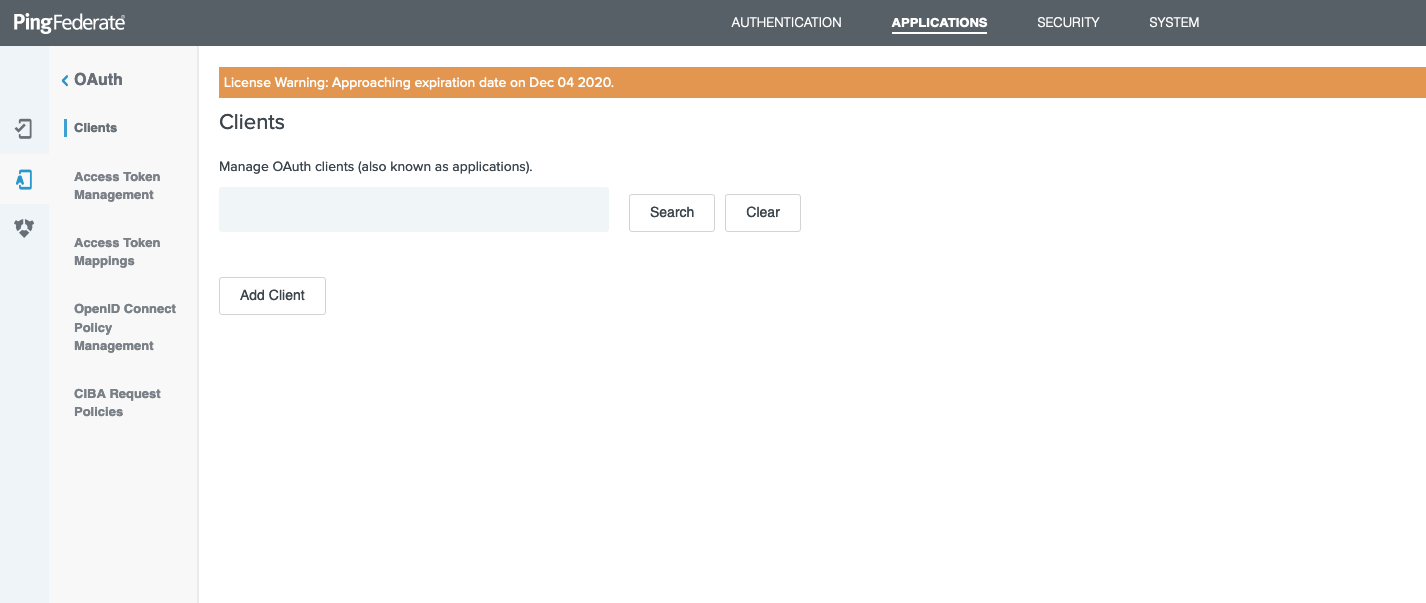
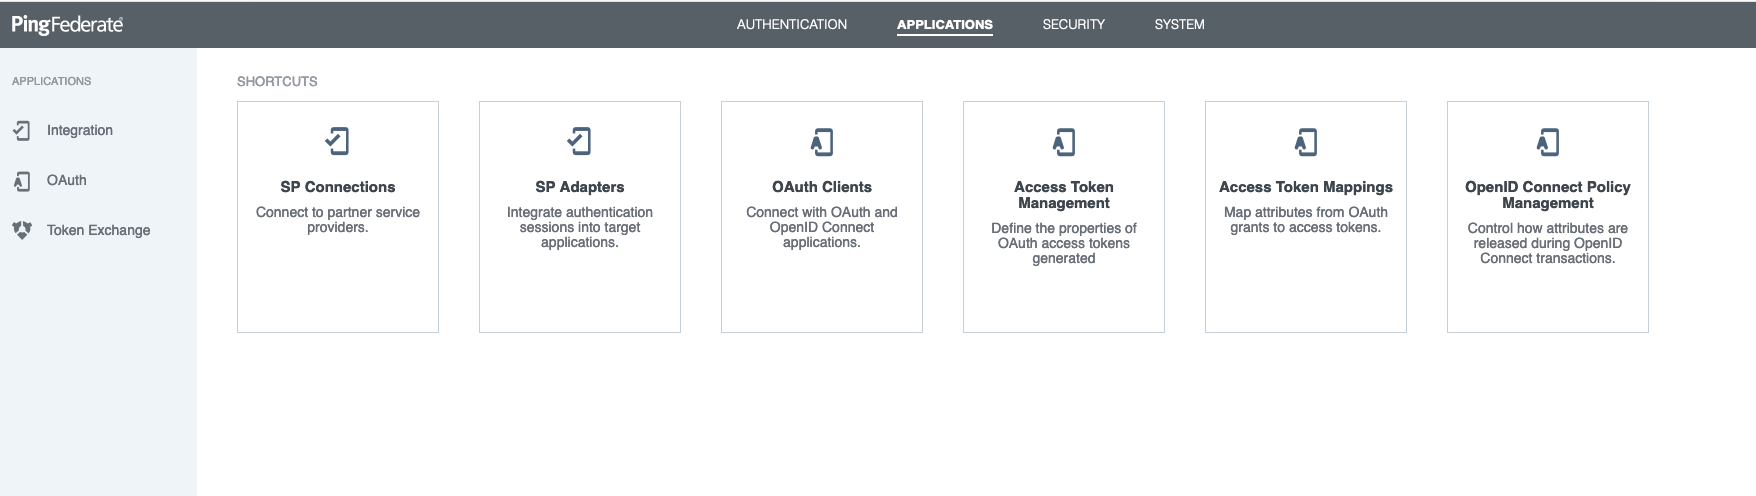
20. In the main menu, click on "Applications" and "OAuth Clients":
21. Then, choose to add an oauth client:
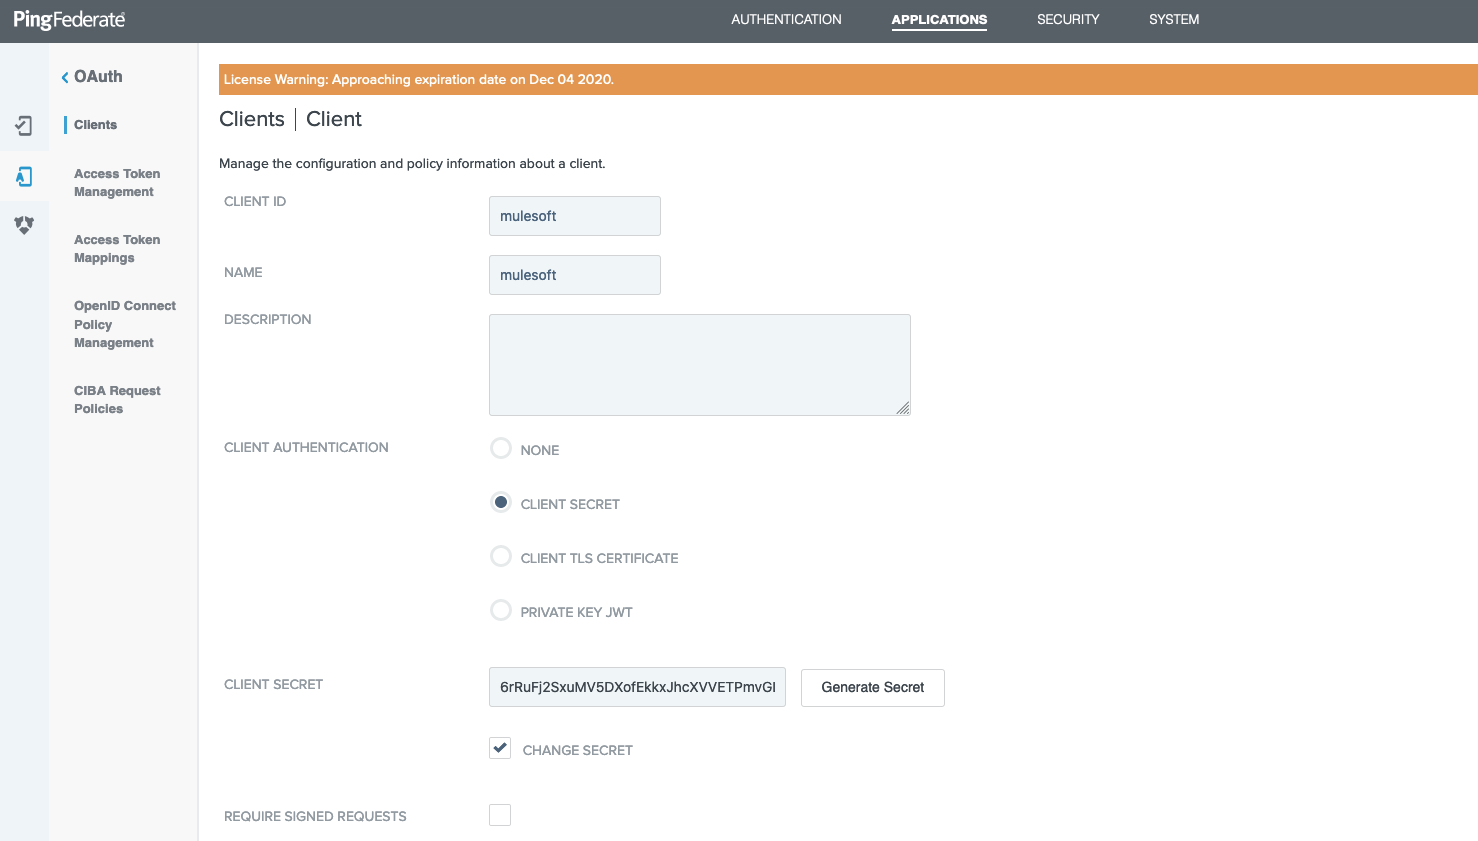
22. In the add screen, give it a name (here I used "mulesoft") and choose "Client Secret", and re-generate the secret by clicking on "Change Secret" and then "Generate Secret" button:
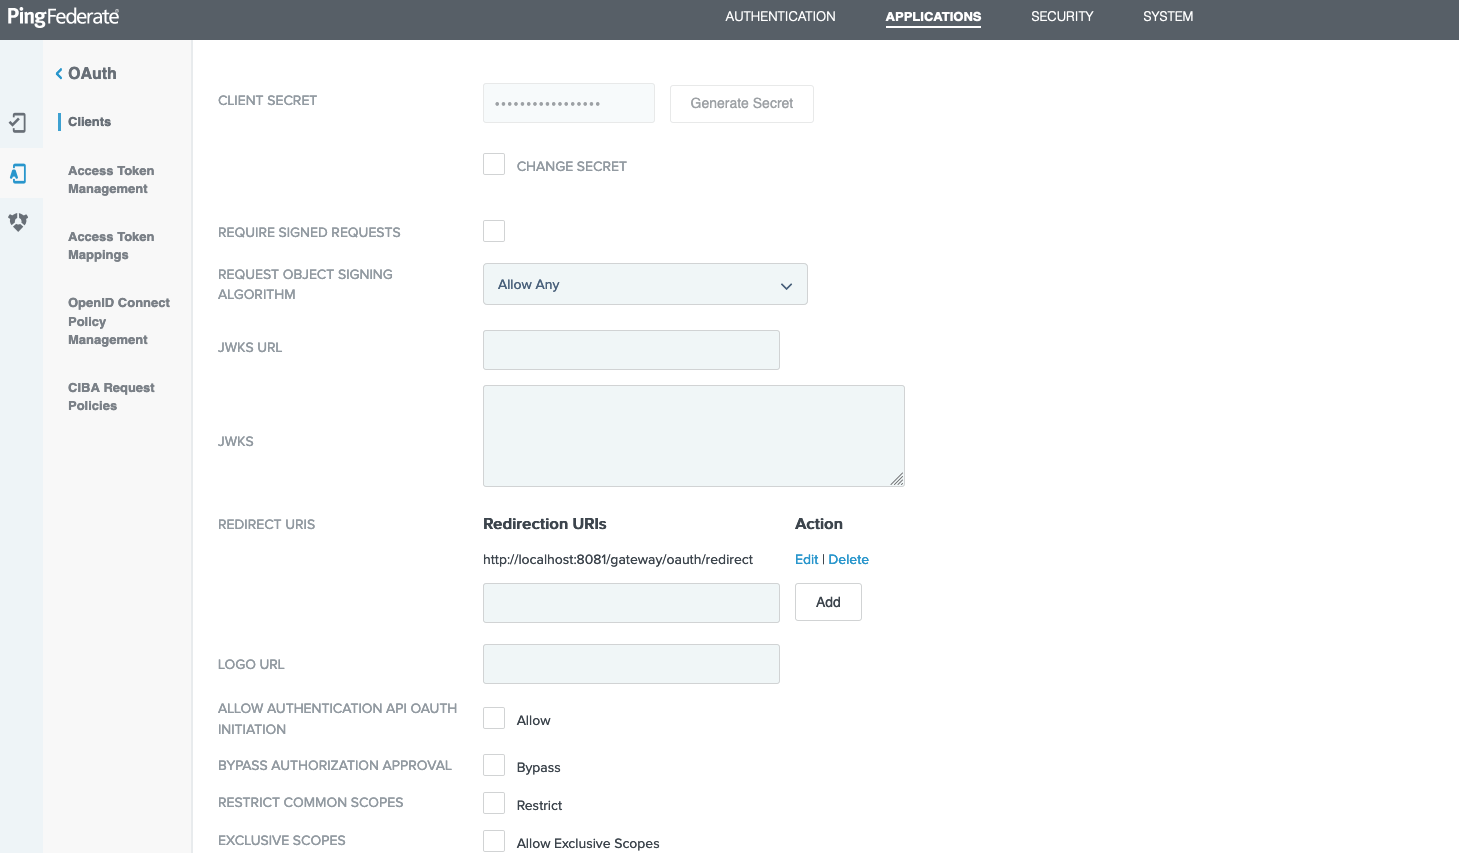
Then add a redirect URI to your localhost (http://localhost:8081/gateway/oauth/redirect ). You may not use it right now for our article, but it will be a placeholder:
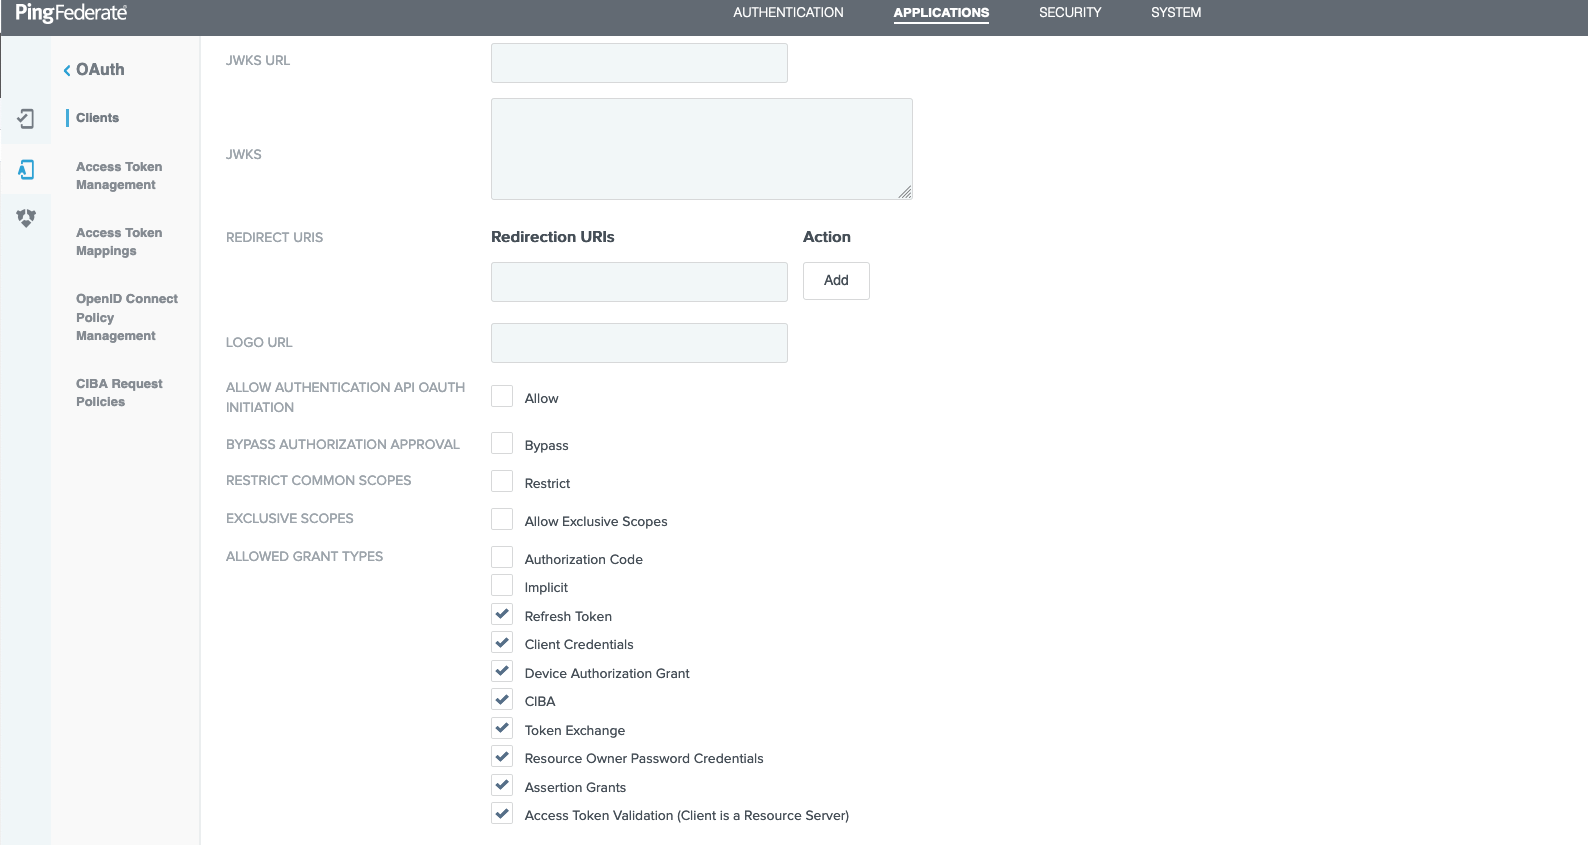
23. Then, scroll down and select the following choices and then save.
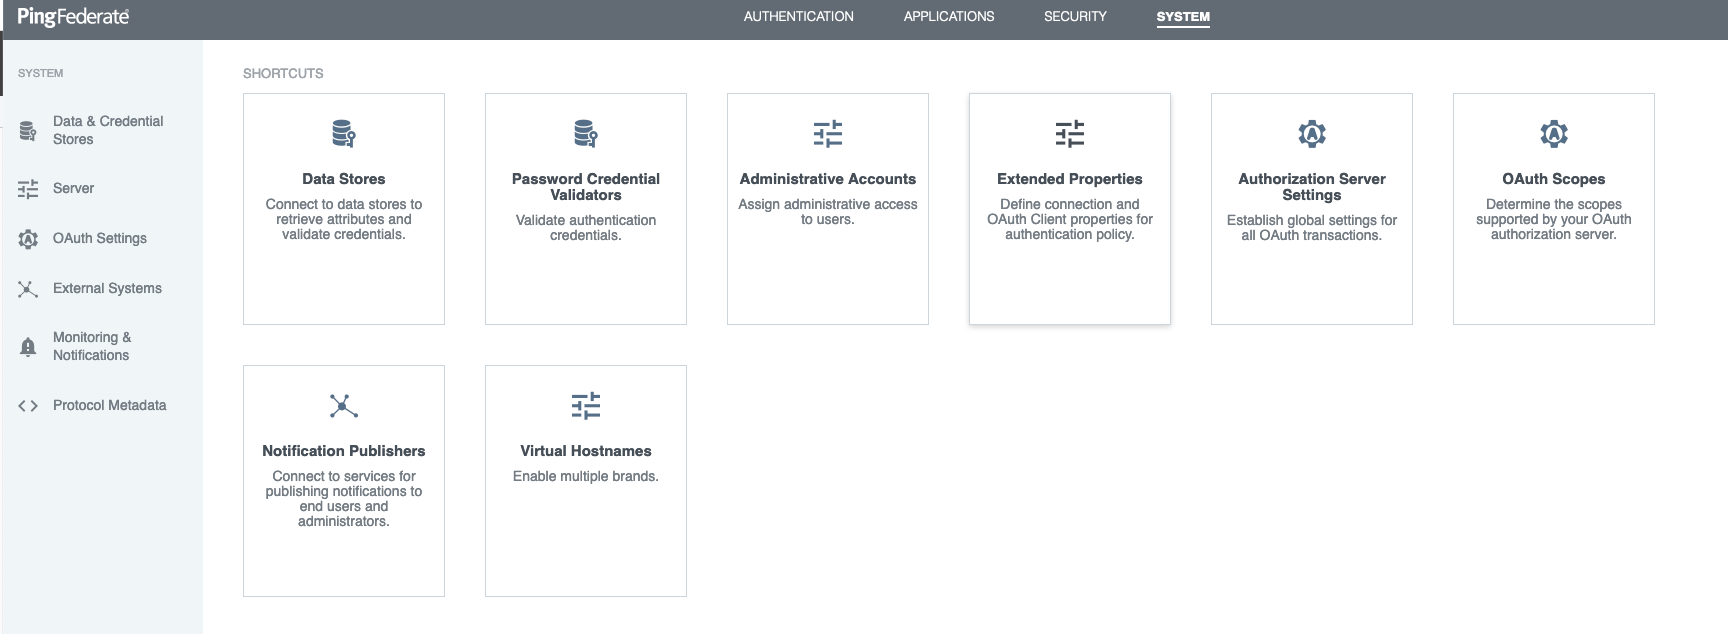
24. Go to "System" -> "Authorization Server Settings":
25. Ensure to choose the "Password Credential Validator" we made in step 19 and click Save:
26. Go To "System" -> "OAuth Scopes":
27. Add a scope called "full" and save:
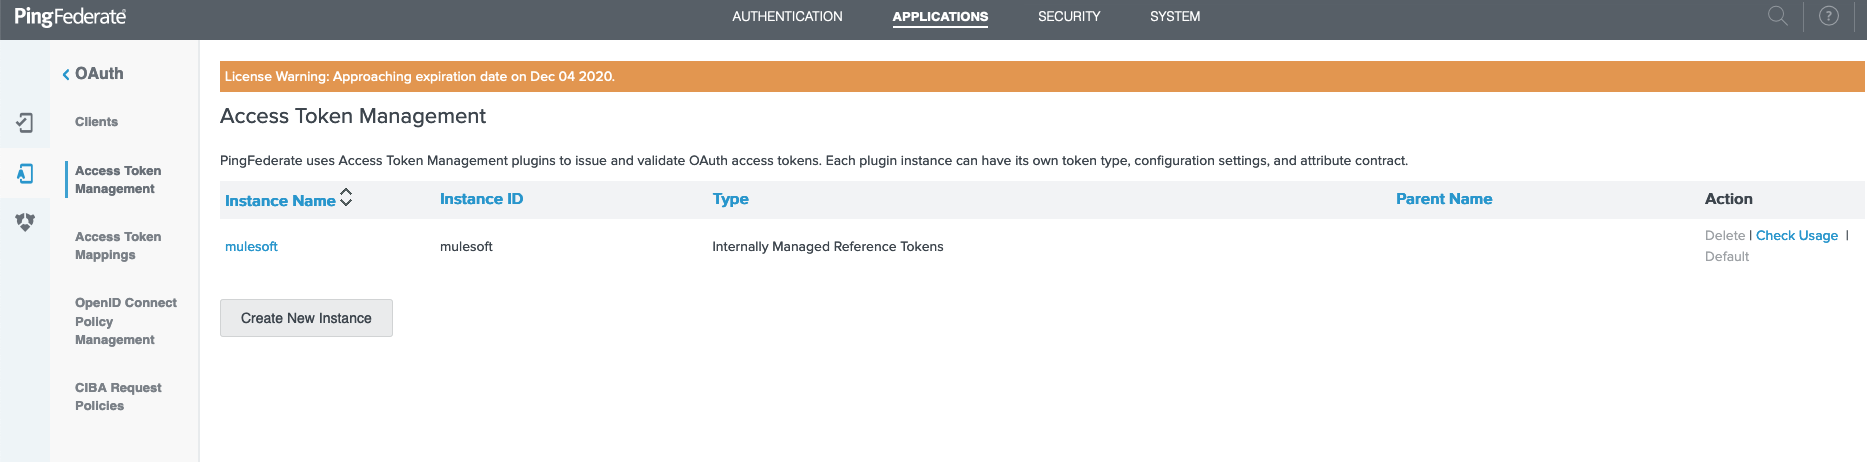
28. Go to "Applications" -> "Access Token Management":
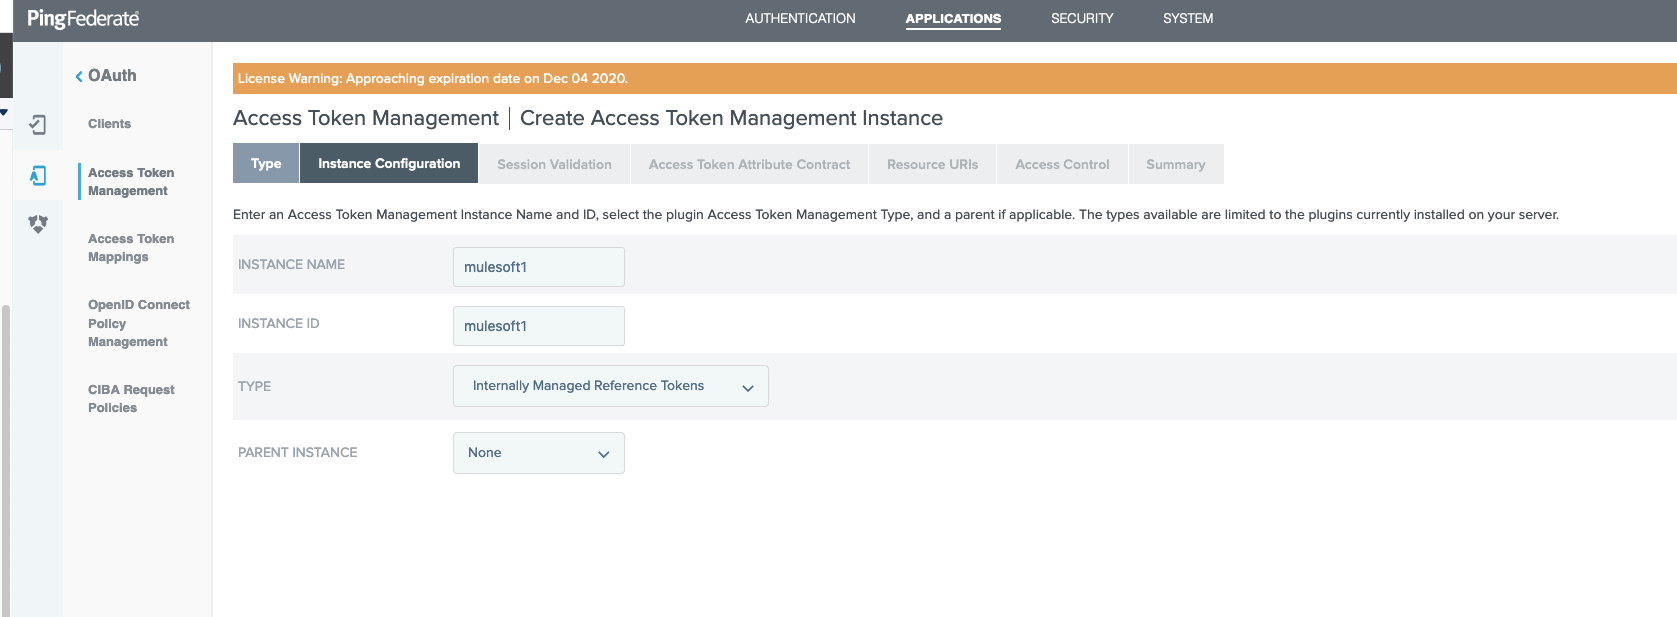
29. Click on "Create New Instance"
30. Use any name and ID. For Type, select "Internally Managed Reference Tokens".
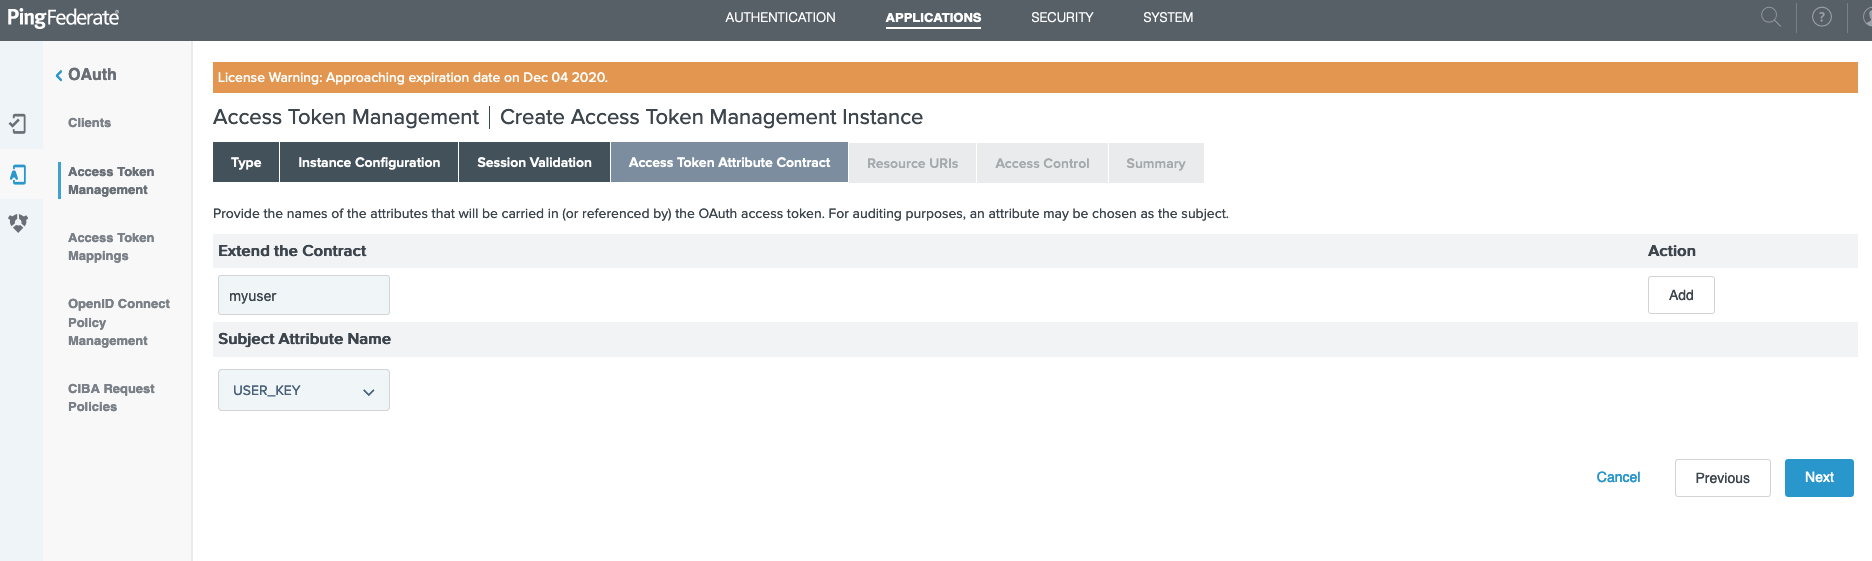
31. You can keep clicking next until you hit the "Access Token Attribute Contract" screen. Add "myuser":
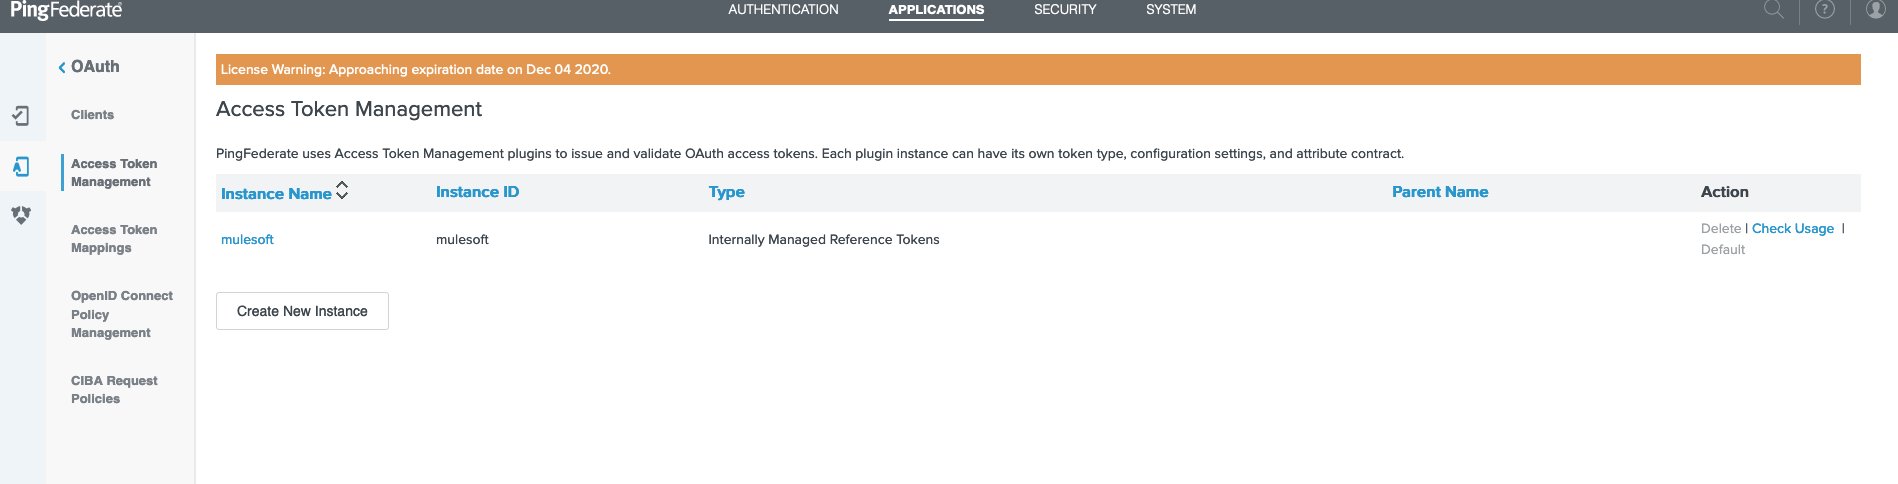
32. Select everything as-is until you Save at the last screen. Then, you will go back to main screen and see your token management system:
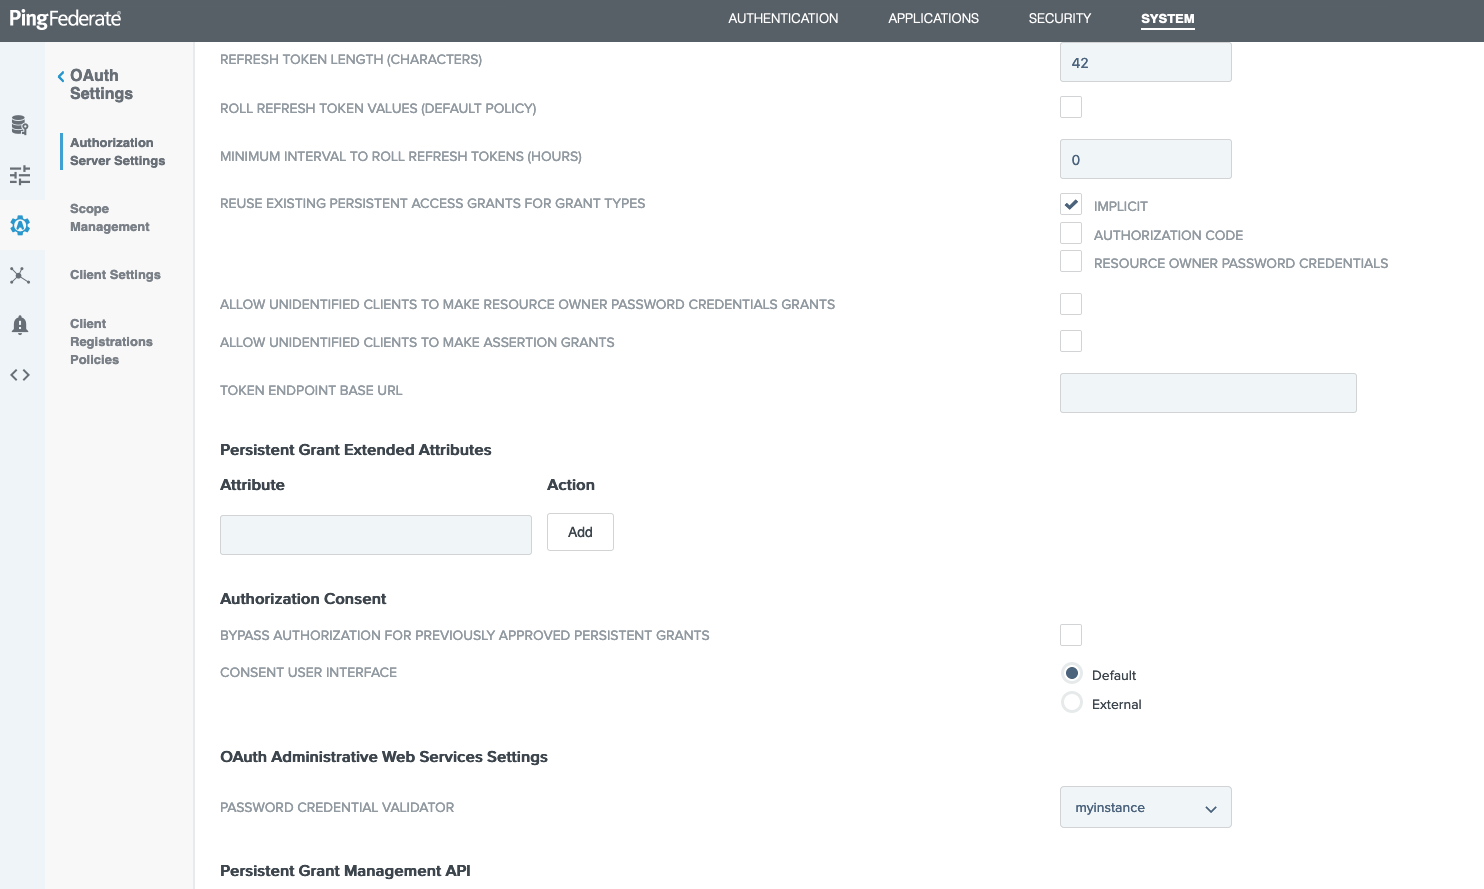
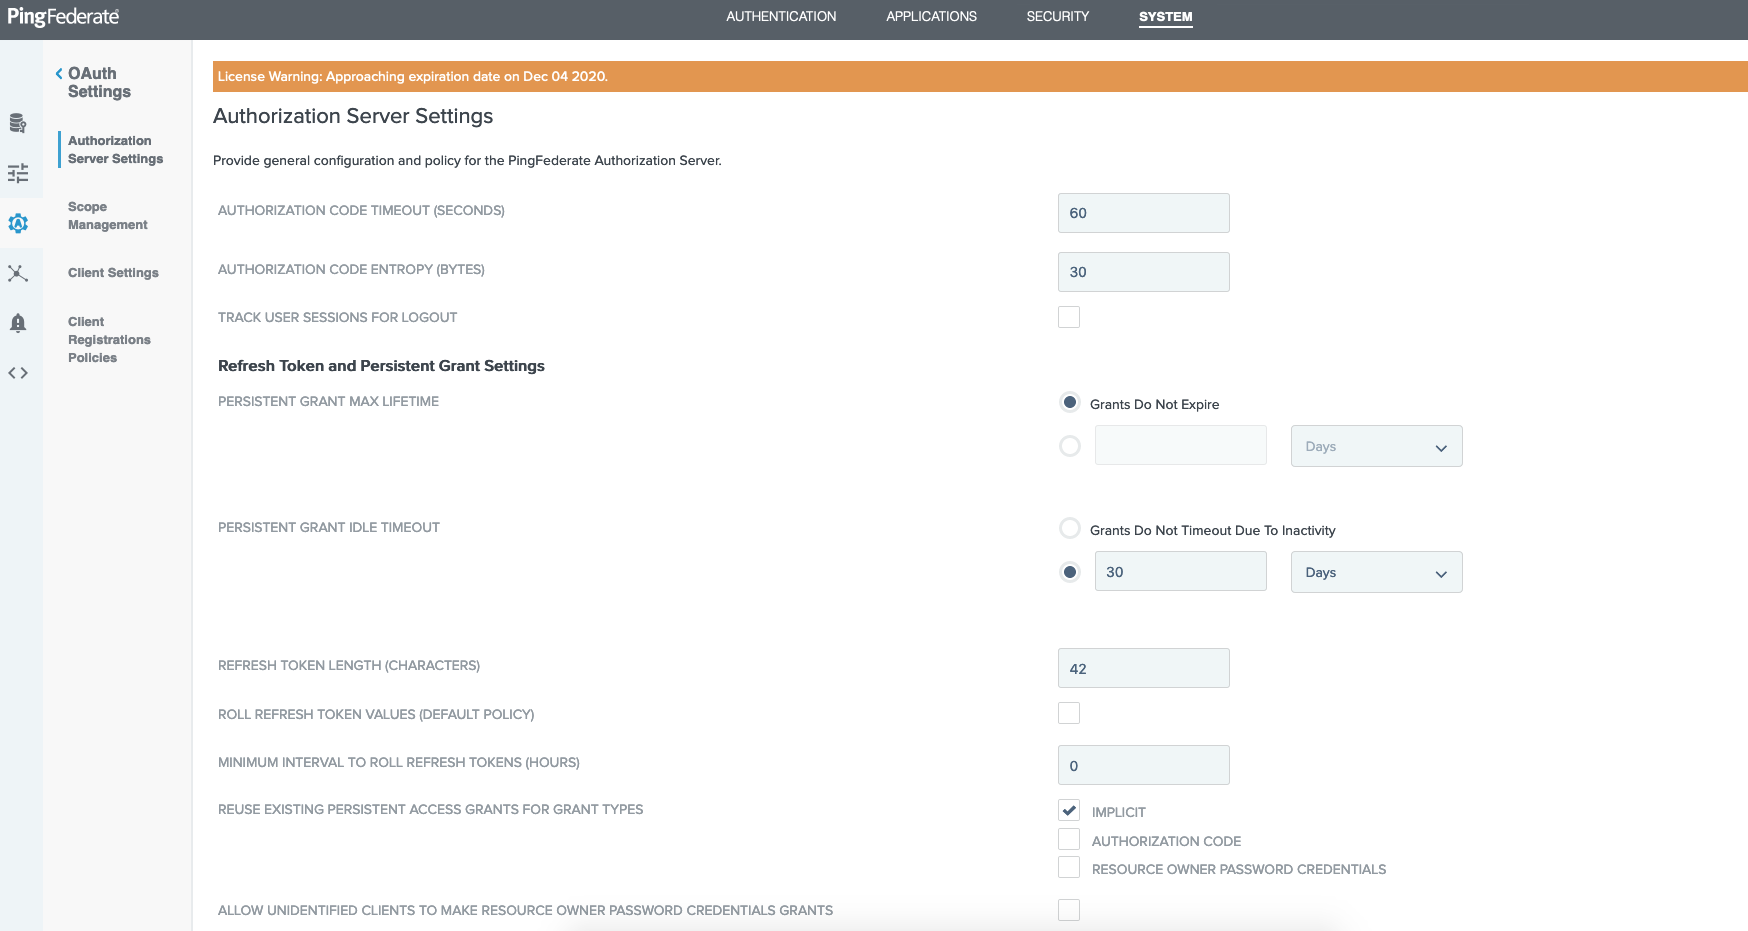
33. Now go to "System" -> "OAuth Settings" -> "Authorization Server Settings":
34. Scroll down to the "OAuth Administrative Web Services Settings" and "Persistent Grant Management API" section. Ensure you select the Password Validator from step 19, the Access Token Manager from step 32, and scope from step 27. Then save everything.
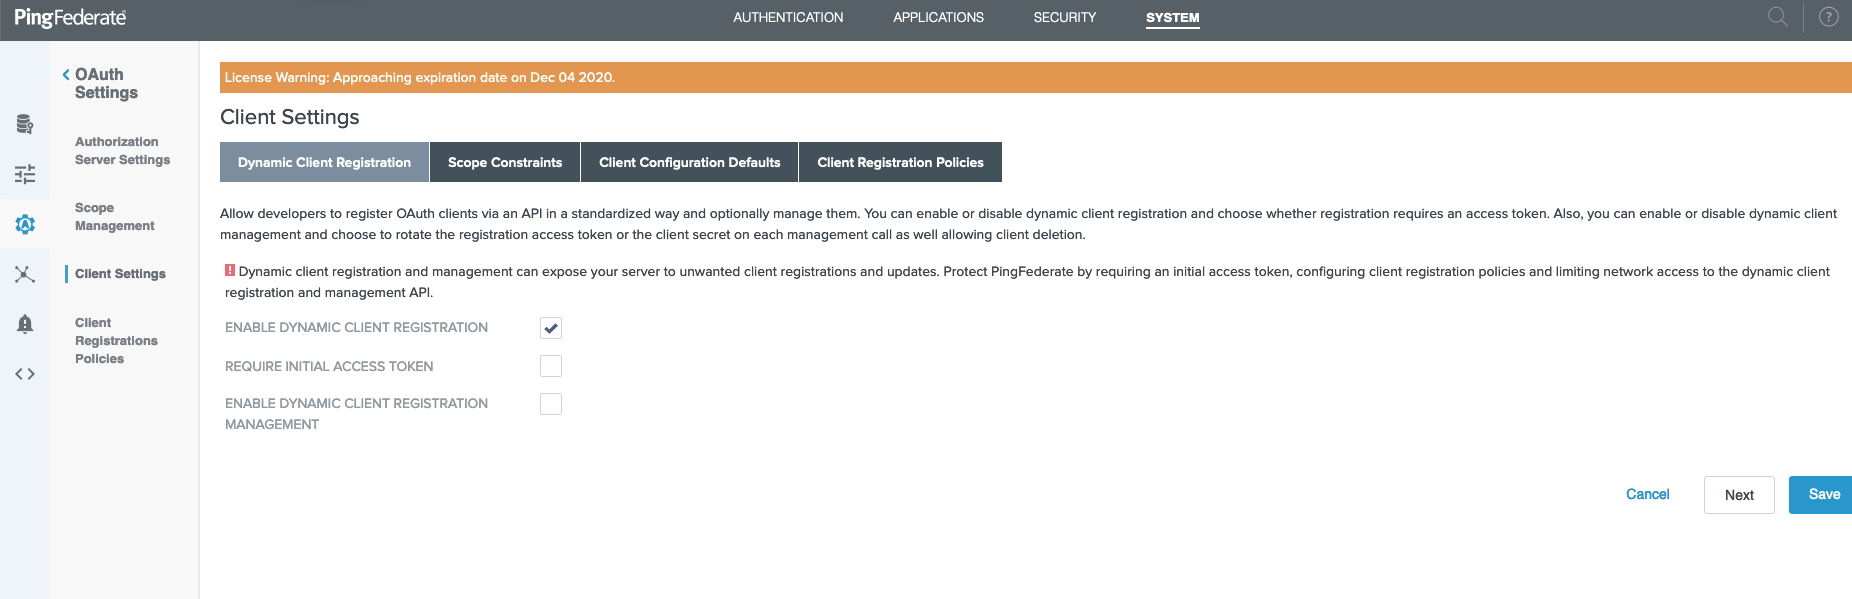
35. Now go to "System" -> "OAuth Settings" -> "Client Settings". Ensure only "Enable Dynamic Client Registration" is checked and click save:
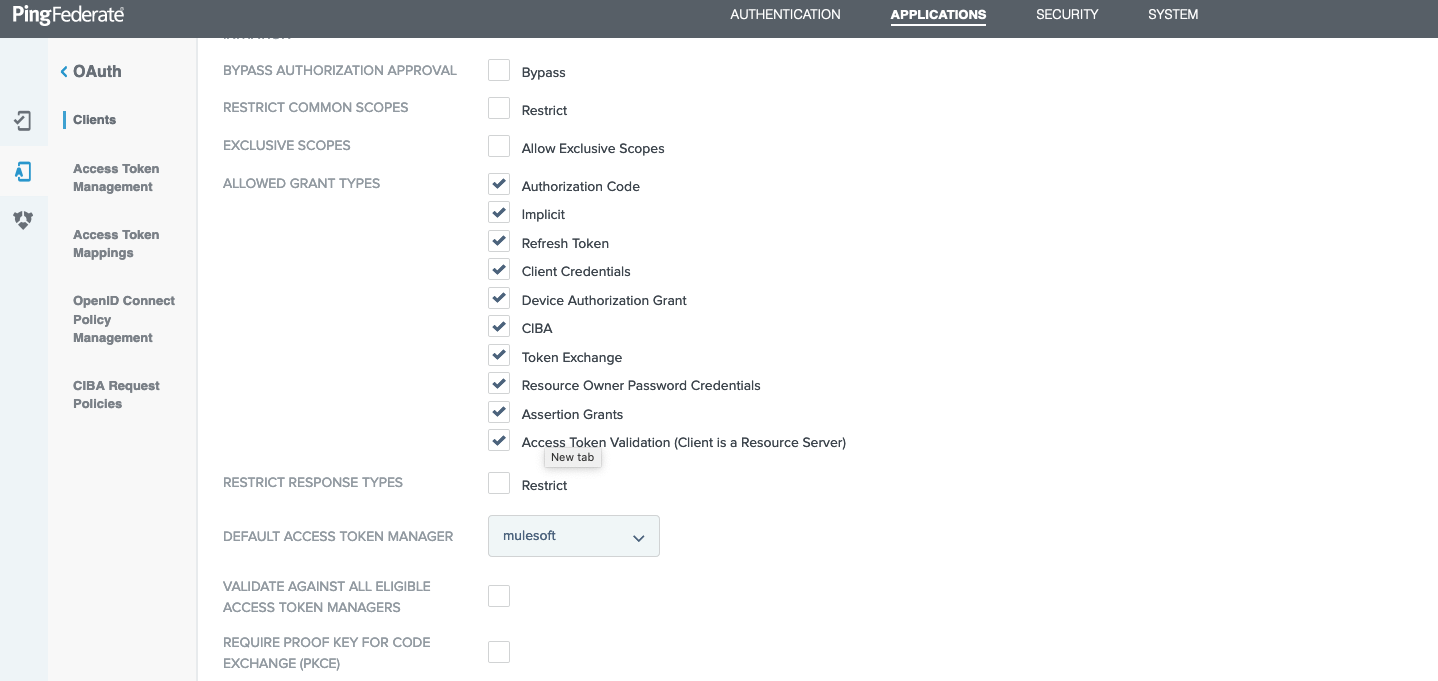
36. Go back to the screen in step 21.
37. Under "Default Access Token Manager", please select what you created in step 32:
38. Now go back to Access Management page of your Anypoint Platform instance. Here is how to access it: link
Fill out the info per this guide below and click Save:


#BaseUrl in the example below should be your hostname, such as:
https://www.mygoogle.com:9031/

#or

https://123.11.22.33:9031/

#Fill out as per below

AuthorizeURL -> <BaseUrl>/as/authorization.oauth2
CreateURL -> <BaseUrl>/as/token.oauth2
ValidateURL -> <BaseUrl>/as/token.oauth2
Username Token Mapping -> uid
Client ID -> mulesoft # from step 22
Client Secret -> mulesoft # from step 22

#For the Client Provider URLs, be sure to use the endpoint /pf-ws/rest/oauth/clients and not /as/clients.oauth2 as PingFederate's Dynamic Client Registration URL is not the one used by this configuration.
Create URL -> <BaseUrl>/pf-ws/rest/oauth/clients
Delete URL -> <BaseUrl>/pf-ws/rest/oauth/clients/{{client_id}}
Username: mulesoft  #step 19
Password: mulesoft #step 19
39. Now go to Design Center and create a new project. Paste the RAML below as the mail file and publish it to Exchange. Here is more information if you are new to the process: link
#%RAML 1.0
title: Interop Testing
version: v1.0
baseUri: http://127.0.0.1:8081/api

securitySchemes:
  oauth_2_0:
        description: |
            Mule OAuth 2.0.
        type: OAuth 2.0
        describedBy:
            headers:
                Authorization:
                    description: |
                      Used to send a valid OAuth 2 access token. Do not use
                      with the "access_token" query string parameter.
                    type: string
            queryParameters:
                access_token:
                    description: |
                      Used to send a valid OAuth 2 access token. Do not use together with
                      the "Authorization" header
                    type: string
            responses:
                401:
                    description: |
                        Bad or expired token.
                403:
                    description: |
                        Bad OAuth request.
        settings:
          authorizationUri: http://0.0.0.0:8081/authorize
          accessTokenUri: http://0.0.0.0:8081/access-token
          authorizationGrants: [authorization_code, password, client_credentials, implicit]

/users:
  get:
    securedBy: [oauth_2_0]
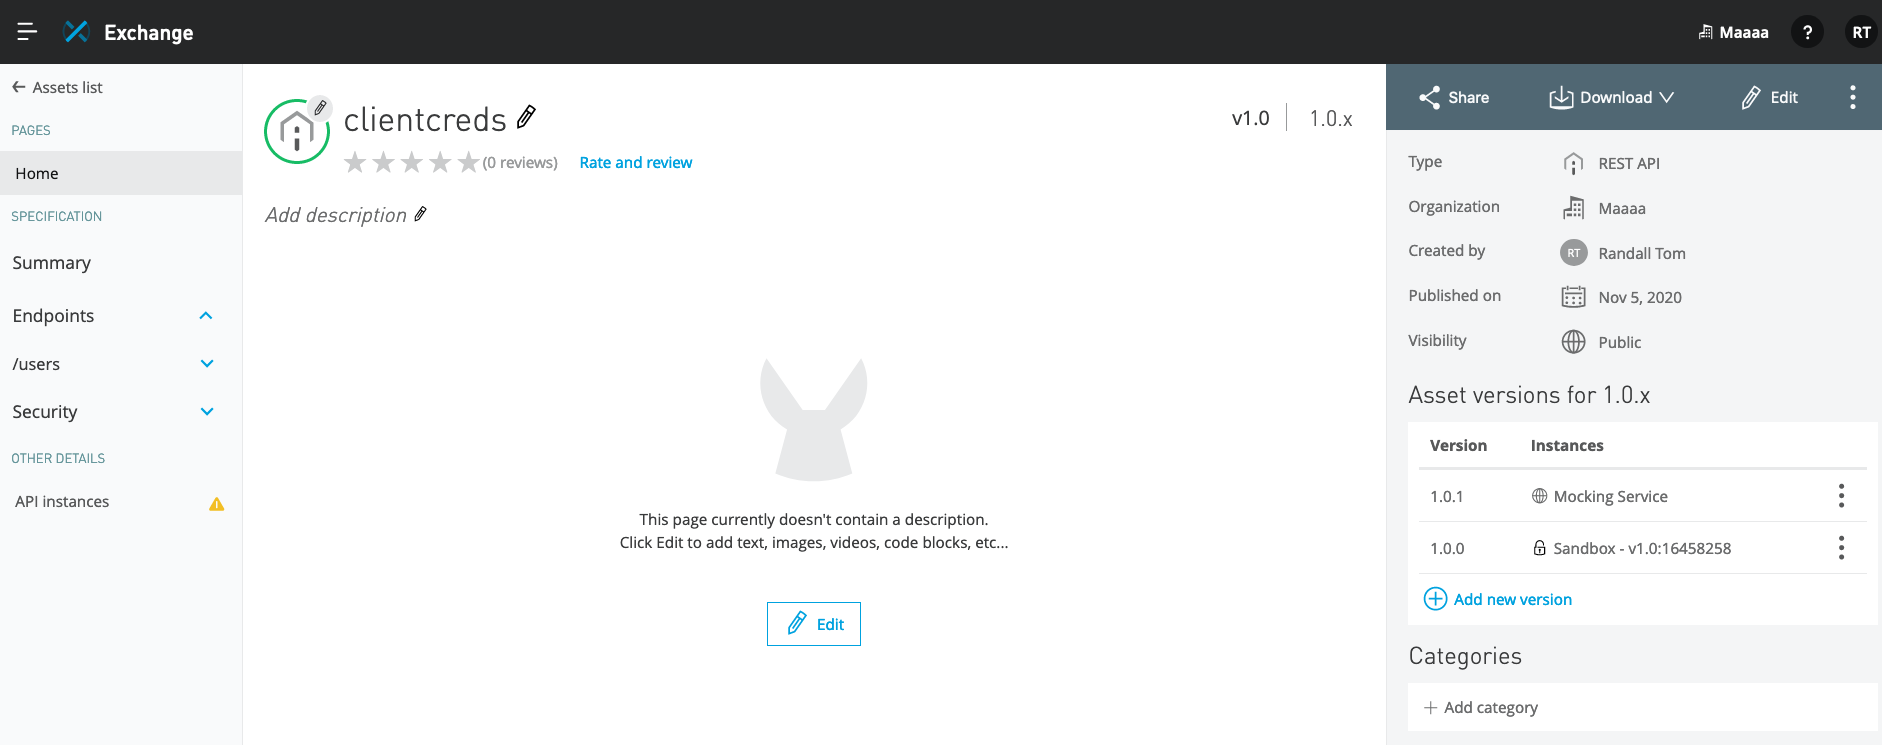
40. Go to the API that you just published inside Exchange and view it to confirm it was created:
41. Go to API Manager and and create a proxy by Managing an API from Exchange. Please choose for a proxy in Cloudhub: link
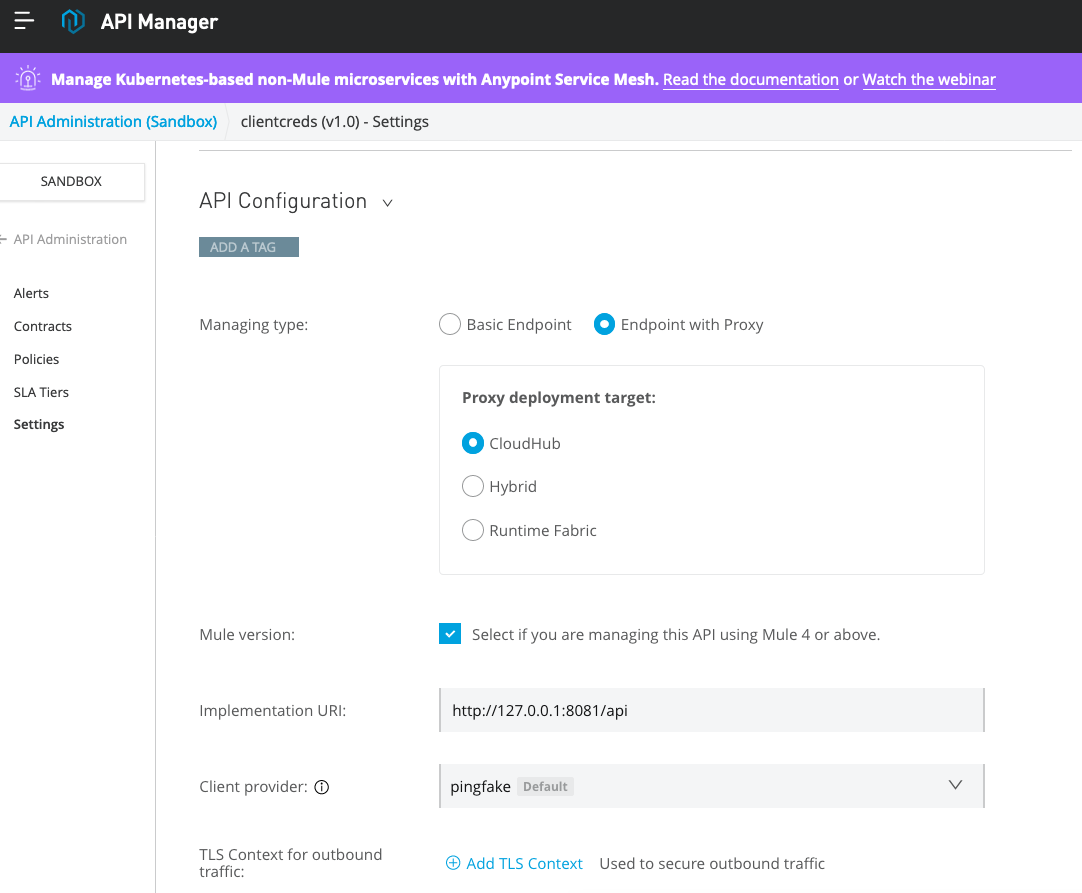
Please be aware of the options chosen below in screenshot for Mule 4 as well. Also, ensure the client provider that you created in step 38 is selected here:
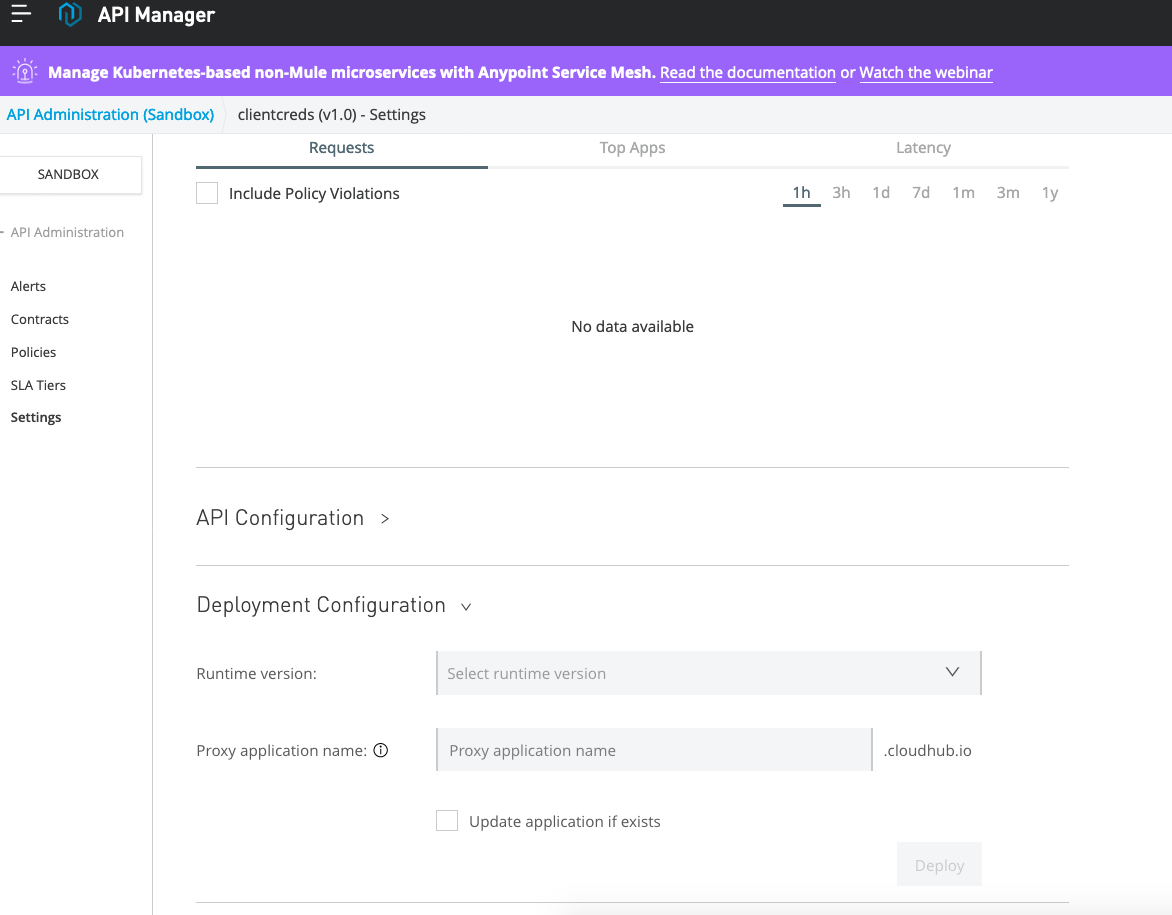
42. In the next screen, your API is created. Now, deploy your API proxy to Cloudhub by selecting the Runtime version and choosing a proxy name and "Deploy":
43.Step below of creating policies need not be done even without policies the grant types will show. But when you want to enforce it you need to apply a policy.
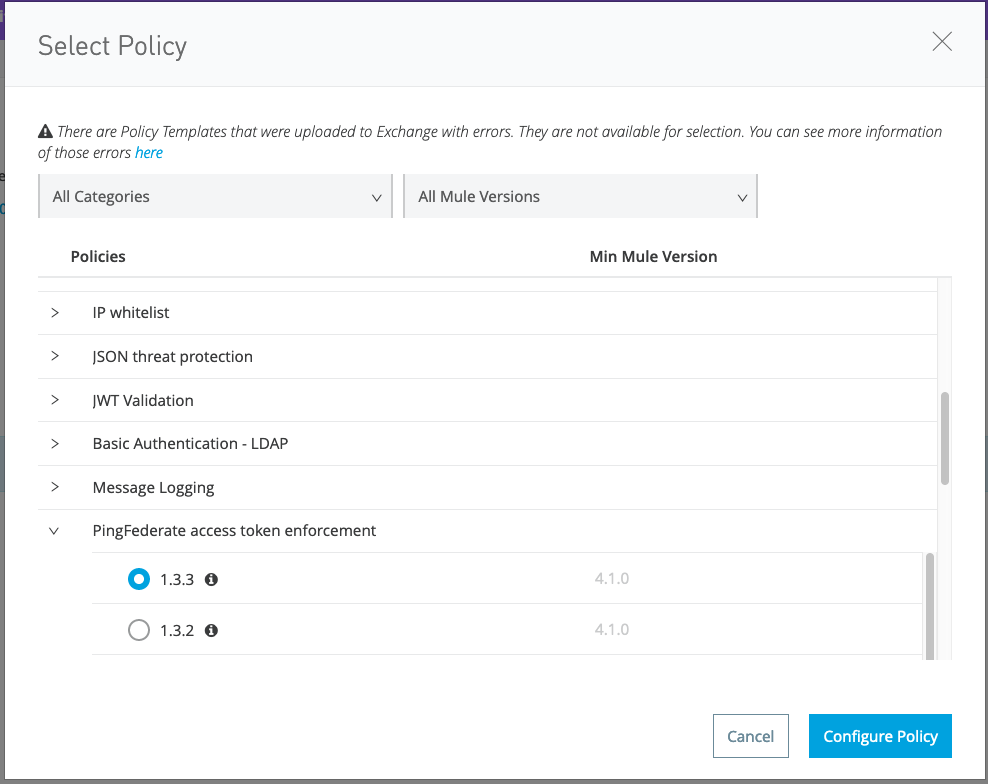
Then, click on "Policies" on the left hand side and "Apply New Policy" in the subsequent screen.
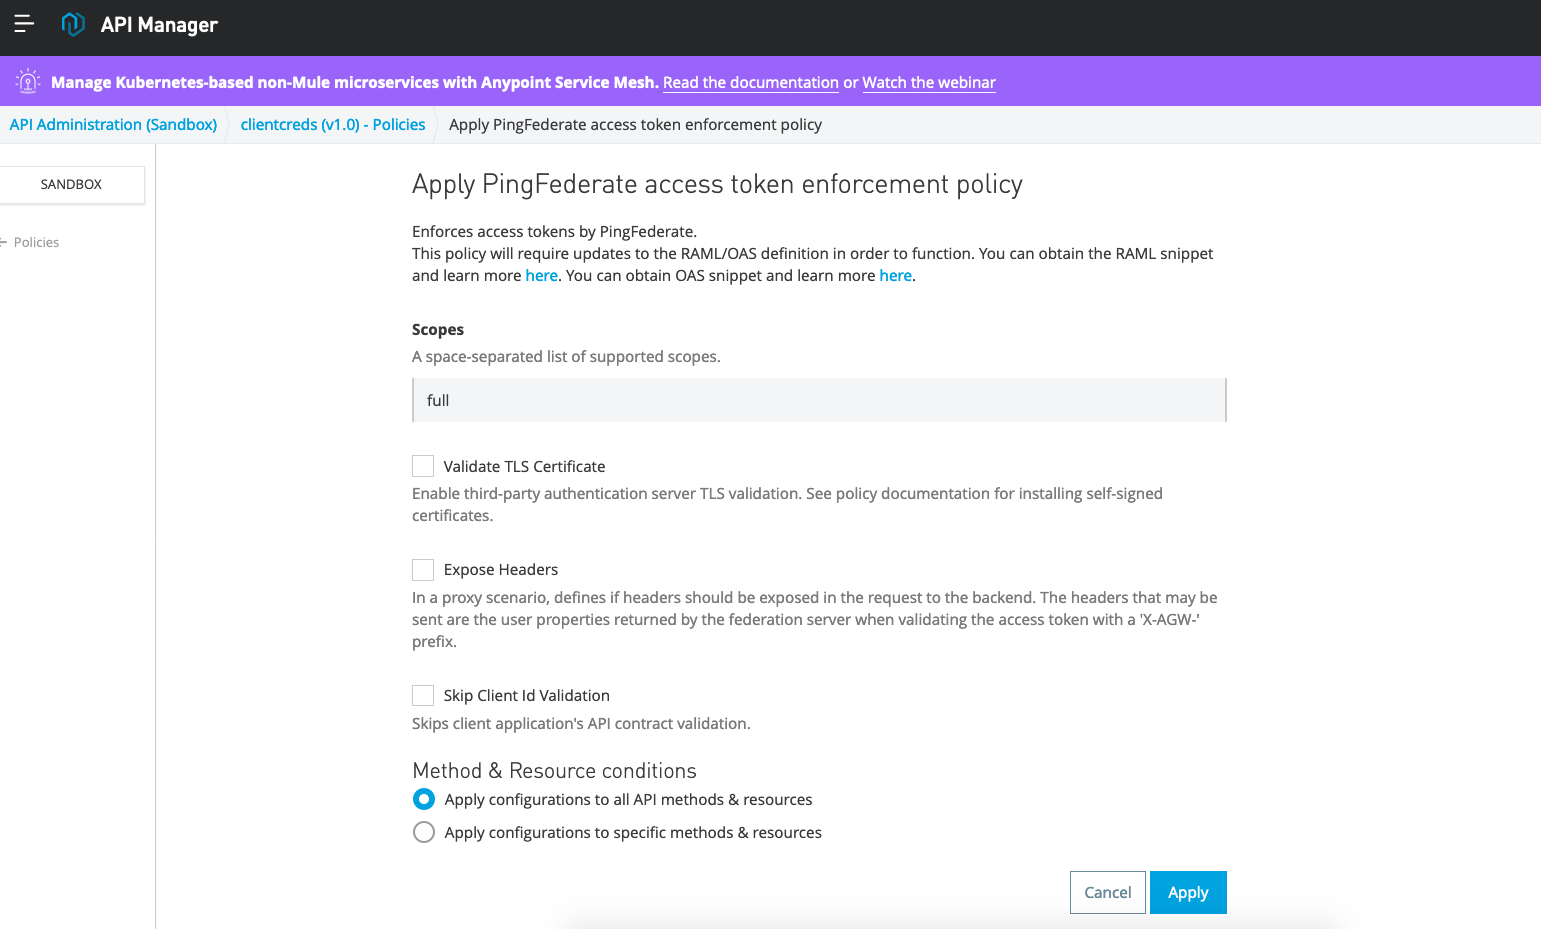
44. Choose to apply "PingFederate access token enforcement":
45. You only need to pull the scope "full" (or other value chosen in step 27. Then click Apply.
46. Now go back to Exchange and look for the API created in step 40.
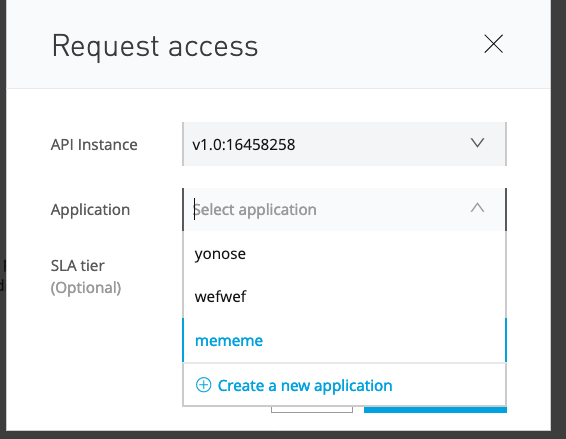
47. It should now have a Request Access link selectable. Choose that.
48. Choose the only selection in your API Instance dropdown. Then, on Application dropdown, choose "Create New Application":
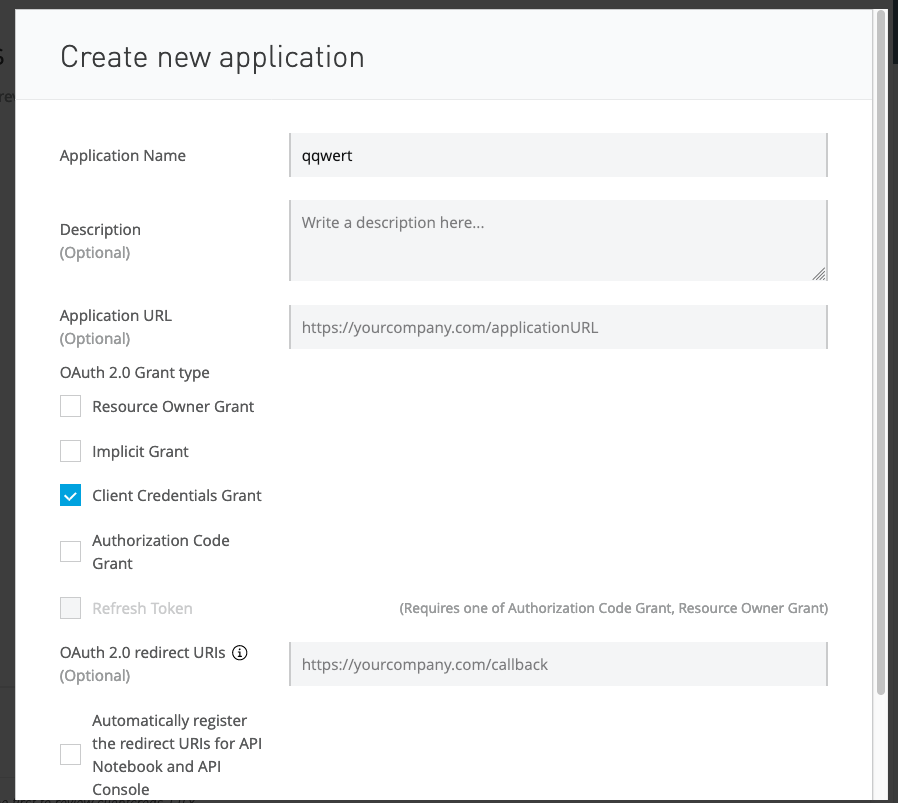
49. Please give it an Application Name and only check "Client Credentials Grant":
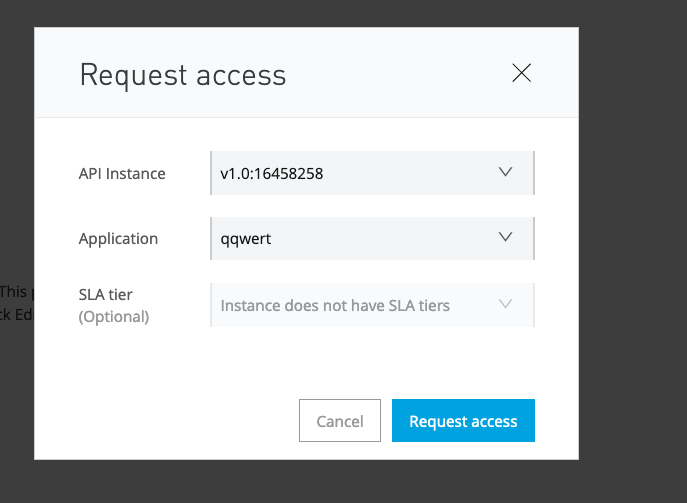
50. Click on Create and then click on "Request Access":
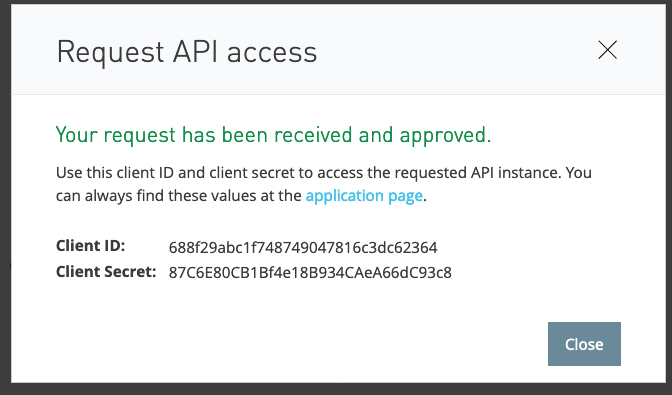
51. You should get a screen like the below with your client ID and client secret. Please note these values down.
52. Now, for a test call, please make a curl request to PingFederate server with client ID and client secret to get a bearer token in return:


curl -XPOST https://<FQDN>:9031/as/token.oauth2 -d "grant_type=client_credentials&client_id=<client ID>&client_secret=<client secret>&response_type=token&scope=full" -vvv -ik
53. I got the following response:
{"access_token":"h0b2TKFYfbWej1QyguOtgy1daz4444","token_type":"Bearer","expires_in":7200}
54. Then, I made the following call to my test API proxy that I created in Cloudhub for step 42 and was allowed to hit the backend. Note that we use "/users" since the RAML called for that in step 39. This proves that our setup works.
curl -XGET http://<your proxy name>.us-e2.cloudhub.io/users -H "Authorization: Bearer h0b2TKFYfbWej1QyguOtgy1daz4444"
55. Now I purposely put a bad bearer token:
curl -XGET http://clientcreds.us-e2.cloudhub.io/users -H "Authorization: Bearer h0b2TKFYfbWejezQyguOtgy1da"
I get a bad result, which is expected:
{ "error" : {"error_description":"token not found, expired or invalid","error":"invalid_grant"}
Useful URLs
- You need can view your configuration by going to url like https://<host>:9031/.well-known/openid-configuration.
https://docs.pingidentity.com/bundle/pingfederate-102/page/bwm1564003025542.html
- To enable logging (no restart of pingfederate is needed)
https://docs.pingidentity.com/bundle/pingfederate-92/page/adminGuide/pf_c_log4j2LoggingServiceAndConfiguration.html
below in pingfederate container
> log configuration file <pf_install>/pingfederate/server/default/conf. eg. /opt/server/server/default/conf/log4j2.xml in this file find section <Loggers>
> logs location <pf_install>/pingfederate/log eg. your location of server file might be here tail -f /opt/out/instance/log/server.log
- better to do a find on file name and find location of log directory in above case it is /opt/out/log
- better to do a find on file name and find location of log directory in above case it is /opt/out/log
Troubleshooting
- Without using MuleSoft UI one can test in postman the endpoints configured in the client provider.
-
If you getting 503 when you hit wellknown configuration url check your docker logs by running docker logs -f pingfederate and logs show
2021-01-15 02:22:30,992 WARN [org.sourceid.websso.servlet.IntegrationControllerServlet] Your PingFederate server is in violation of the license terms. No more transactions will be processed.
Expired License
Номер статьи базы знаний
001115890
Эта статья решила вашу проблему?
Оставьте свой отзыв, чтобы мы могли стать лучше!