Seleccionar una organización
How to Configure TLS Context in Flex Gateway - Connected Mode
Fecha de publicación: Mar 2, 2024
Tarea
GOAL
To configure TLS Context in Secrets Manager and reference it in Flex Gateway - Connected Mode.
TLS context was introduced in Connected Mode as part of Flex Gateway Version 1.4
You can configure TLS Context to support regular TLS and mTLS in both the inbound and outbound directions. In the article, we discuss TLS only.
Pasos
Please read this article in conjunction with the official documentation.
Let's start by creating a self-signed Public and Private PEM certificate. As per our documentation, Flex Gateway only accepts PEM (Privacy Enhanced Mail) format certificates.
1) Create Public and Private PEM format certificates
Step #1: Generate a private key using AES256 and a passphrase; store the results in a file named "key.pem"
OpenSSL tool [LibreSSL 3.3.6] was used to generate the certificate for this article
Command:
openssl genrsa -aes256 -out key.pem
Output (Sample):
Generating RSA private key, 2048 bit long modulus
.................+++++
...+++++
e is 65537 (0x10001)
Enter pass phrase for key.pem:
Verifying - Enter pass phrase for key.pem:
Step #2: Verify the private key generated in Step #1.
Command:
cat key.pem
Output (Sample):
-----BEGIN RSA PRIVATE KEY-----
Proc-Type: 4,ENCRYPTED
DEK-Info: AES-256-CBC,7387154F31DA820FC1F2D9D9A73E2D77
jE0wO5VusbQycWPLbfecu/vHG3eJSViI6Yj98Cje8/vY4m/GQwKdHsM9RNRa+saE
xxxxx
-----END RSA PRIVATE KEY-----
Step #3: Generate a self-signed SSL x509 certificate in PEM format using the private key.
Command:
openssl req -new -x509 -key key.pem -out cert.pem -days 3065 -addext "subjectAltName = DNS:localhost, DNS:127.0.0.1"
Note: in the above command we added SAN (Subject Alternative Name). Reason for this because Flex requires upstream services to use SAN in their certificates.
If no SAN is added to the certificate then the below error is thrown during the execution
* Mark bundle as not supporting multiuse
< HTTP/1.1 503 Service Unavailable
< content-length: 195
< content-type: text/plain
< date: Wed, 17 May 2023 00:31:39 GMT
< server: Anypoint Flex Gateway
<
* Connection #0 to host localhost left intact
upstream connect error or disconnect/reset before headers. reset reason: connection failure, transport failure reason: TLS error: 268435581:SSL routines:OPENSSL_internal:CERTIFICATE_VERIFY_FAILED%
Output (Sample):
Enter pass phrase for key.pem:
You are about to be asked to enter information that will be incorporated
into your certificate request.
What you are about to enter is what is called a Distinguished Name or a DN.
There are quite a few fields but you can leave some blank
For some fields there will be a default value,
If you enter '.', the field will be left blank.

Country Name (2 letter code) []:AU
State or Province Name (full name) []:NSW
Locality Name (eg, city) []:Sydney
Organization Name (eg, company) []:MS
Organizational Unit Name (eg, section) []:Support
Common Name (eg, fully qualified host name) []:localhost
Email Address []:xxx.yyyy@mulesoft.com
Step #4: Files generated so far as below
-rw-r—r--@ 1 john.doe staff 1354 17 May 10:48 cert.pem
-rw-r—r--@ 1 john.doe staff 1766 17 May 10:44 key.pem
Step #5: View the certificate generated in Step #3
Command:
openssl x509 -in cert.pem -text -noout
Output (Sample):
Certificate:
    Data:
        Version: 3 (0x2)
        Serial Number:
            8d:14:9b:3f:d3:3c:b4:19
    Signature Algorithm: sha256WithRSAEncryption
        Issuer: C=AU, ST=NSW, L=Sydney, O=MS, OU=Support, CN=localhost/emailAddress=john.doe@mulesoft.com
        Validity
            Not Before: May 24 22:26:54 2023 GMT
            Not After : Oct 14 22:26:54 2031 GMT
        Subject: C=AU, ST=NSW, L=Sydney, O=MS, OU=Support, CN=localhost/emailAddress=john.doe@mulesoft.com
        Subject Public Key Info:
            Public Key Algorithm: rsaEncryption
                RSA Public-Key: (2048 bit)
                Modulus:
                    00:ca:f8:3e:8c:ae:32:94:da:5d:f1:25:11:11:81:
                    e4:47:38:4a:c9:f9:38:e8:5f:18:8c:5e:7e:cd:a2:
                      <REDACTED>
                Exponent: 65537 (0x10001)
        X509v3 extensions:
            X509v3 Subject Alternative Name:
                DNS:localhost, DNS:127.0.0.1
    Signature Algorithm: sha256WithRSAEncryption
         b9:52:f2:ff:09:83:f5:82:81:1a:95:68:24:2c:0d:cf:93:25:
         57:e9:7a:e6:a9:73:b2:00:91:5d:b1:a6:ab:c2:95:17:dd:58:
         <REDACTED>
Now that we have the Public certificate and the Private key created in a temp folder <PATH_TO_PEM>, let’s configure the keystore, trust store, Inbound, and outbound TLS contexts in Secrets Manager.
2) Create a Secret Group in Secrets Manager to configure TLS Context
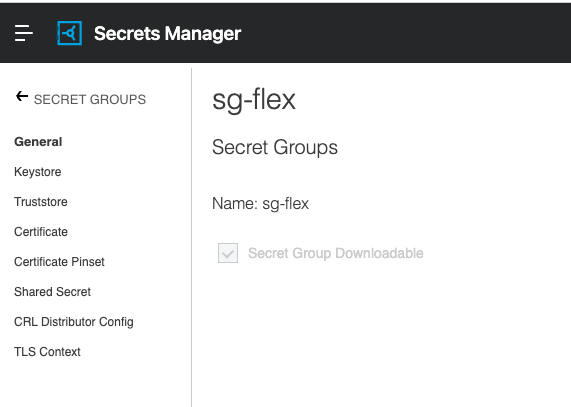
Step #1: Create a Secret Group if not already have one (making sure the checkbox is selected for Secret Group Downloadable)
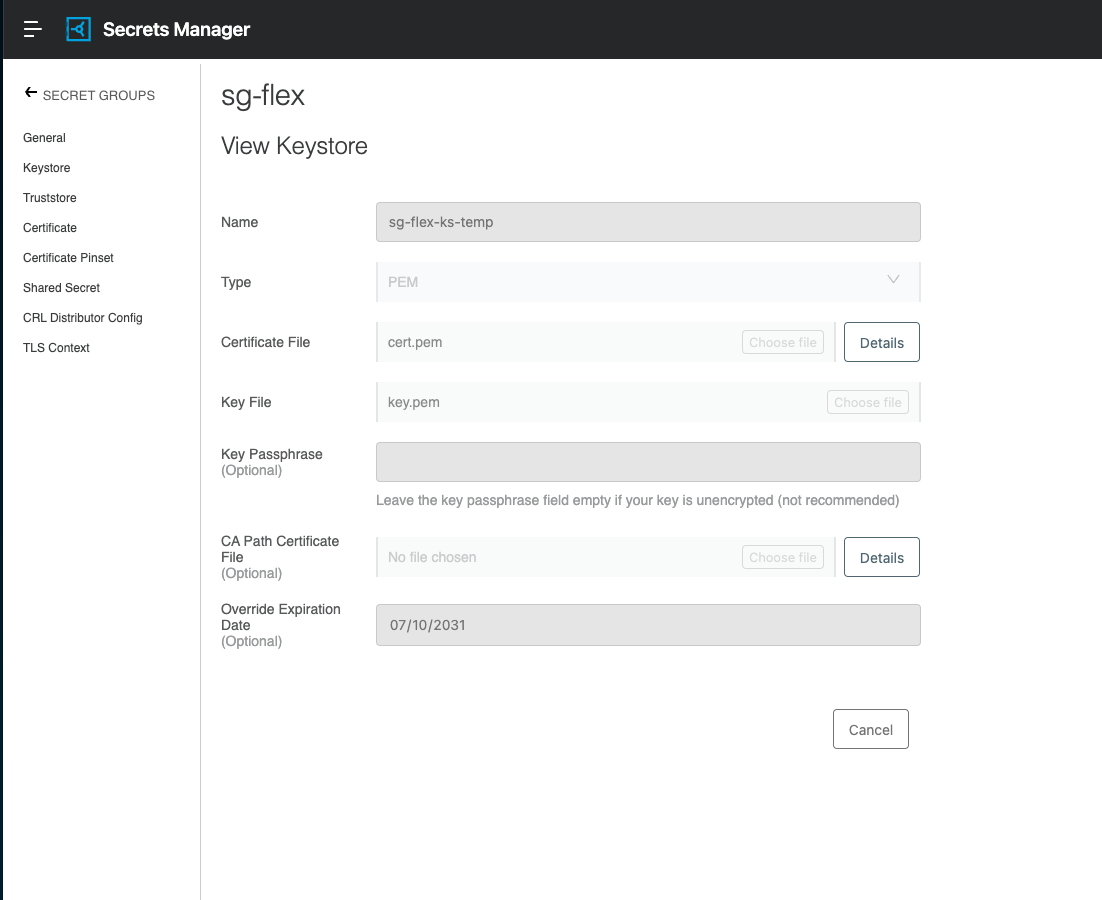
Step #2: Create a Keystore by providing the “cert.pem” and “key.pem” generated earlier, as below.
Step #3: Create a Truststore by providing the “cert.pem” generated earlier, as below.
Step #4: Create Inbound TLS Context
Note: Regular TLS between a client and the API Instance (HTTPS), referred to as inbound TLS
Note: Please refer to the docs to understand when to enable "Validate Client certificate" and "Skip server certificate validation" based on whether you want to configure TLS or mTLS.
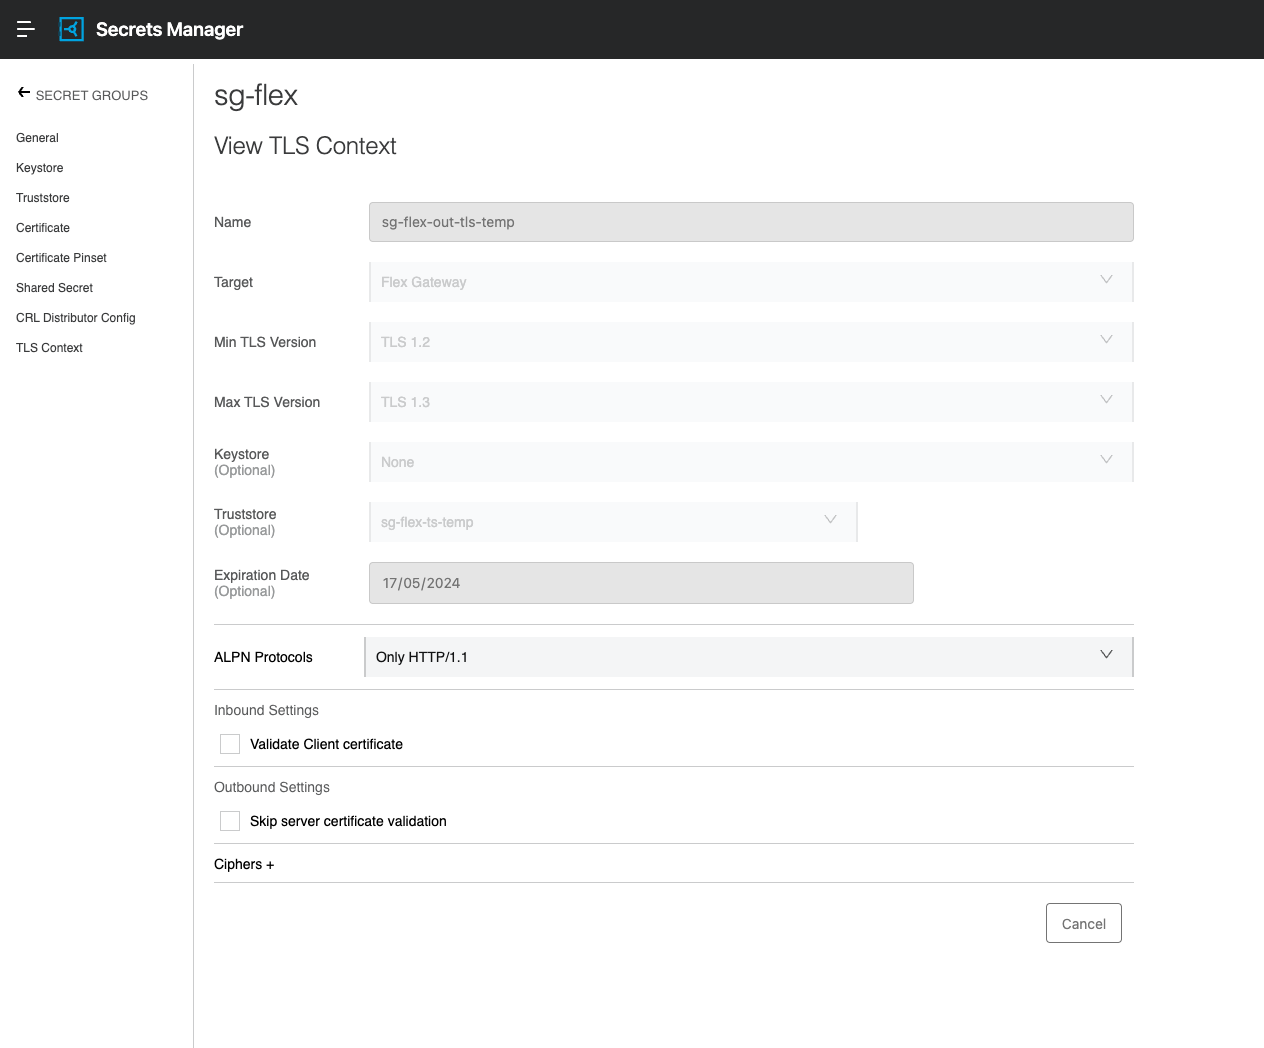
Step #5: Create Outbound TLS Context
Note: Regular TLS between an API Instance and an upstream service, referred to as outbound TLS
This concludes the configuration of TLS Context in Secrets Manager.
3) Start Flex Gateway


This article assumes you have installed Flex Gateway version 1.4.x and above in Connected Mode as per https://docs.mulesoft.com/gateway/latest/flex-conn-reg-run
Now start your Flex Gateway Instance.
4) Create API Instance in API Manager
To validate both Inbound and Outbound TLS context let’s create 2 API Instances. (Say Backend and Frontend)
Flow: Client → (HTTP) → Frontend API -> (HTTPS)→ Backend API
- Client calling Frontend API using HTTP protocol.
- Frontend API using HTTPS protocol with Outbound TLS context invokes Backend API
- Backend API listening on HTTPS protocol with Inbound TLS context to validate incoming requests
Note: you can create HTTPS on both to call Frontend and Backend APIs. In this, we keep it simple Flow as above.
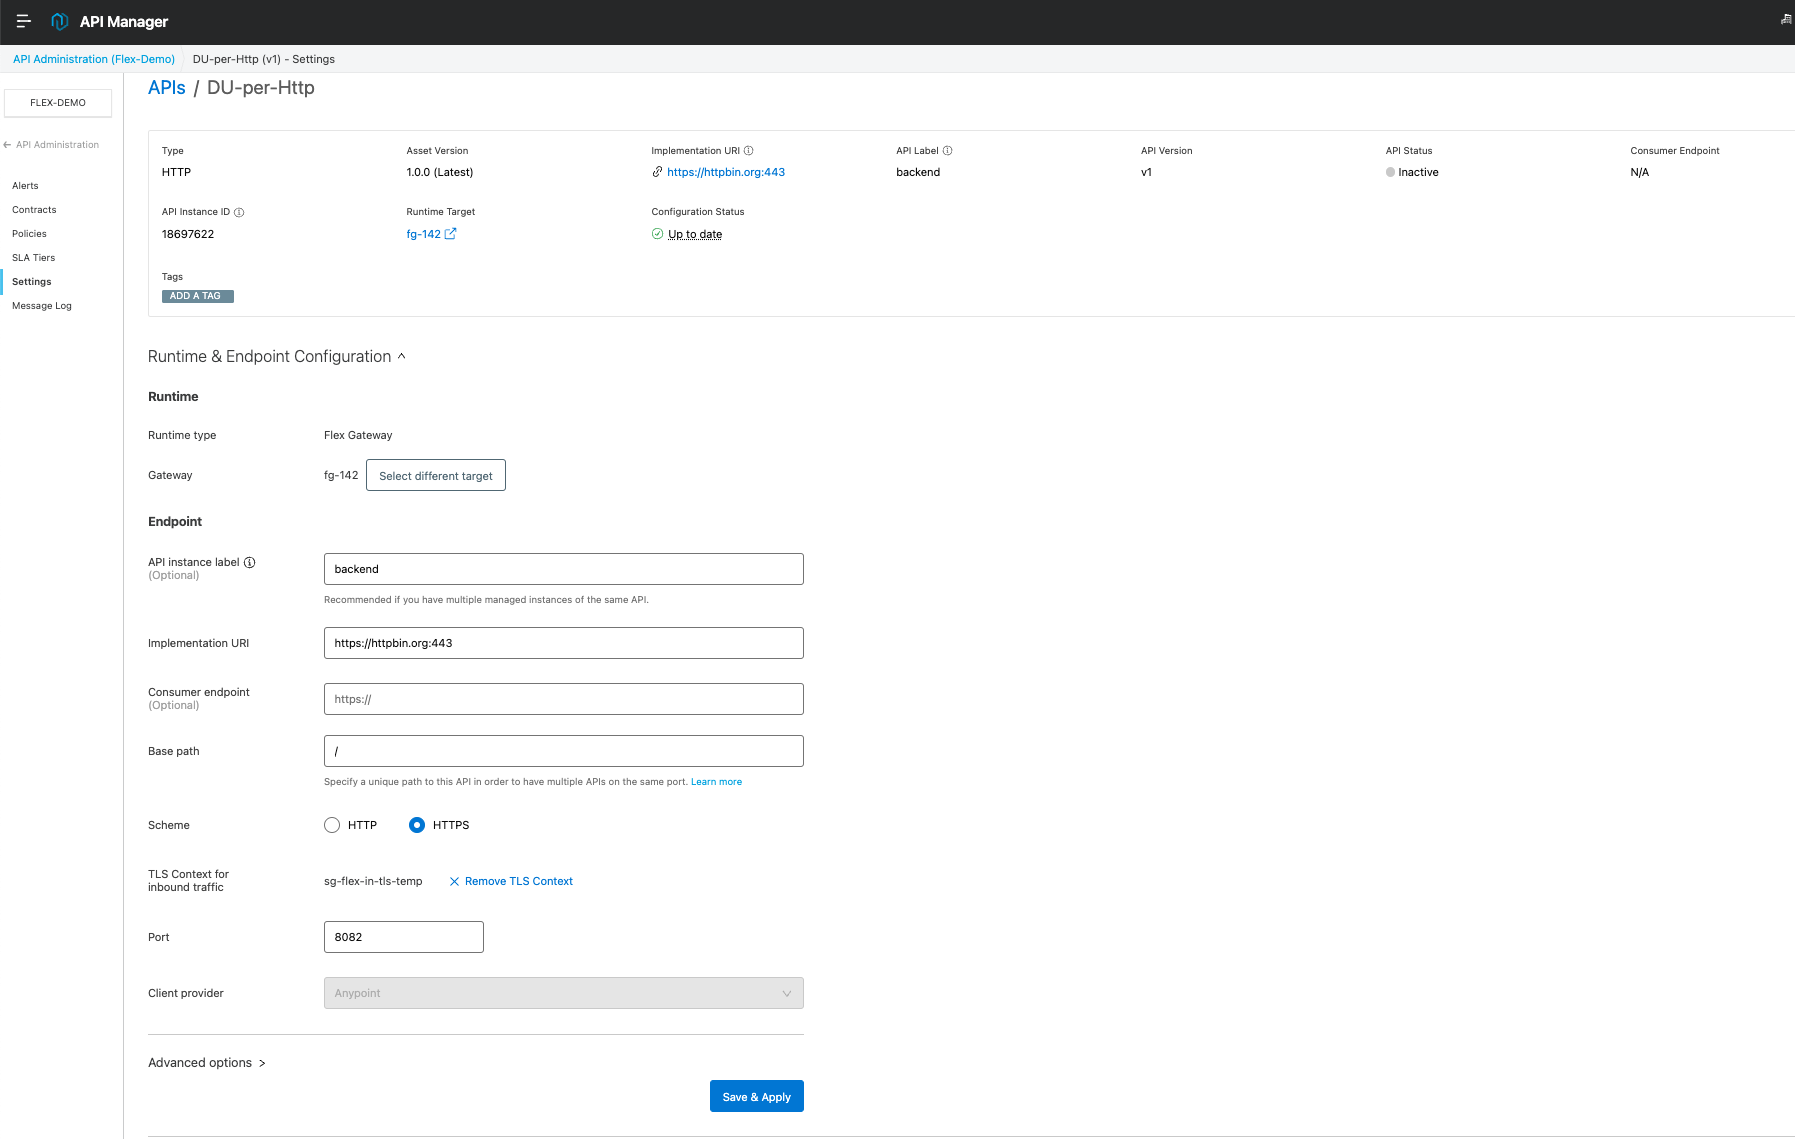
Backend API
Create an API Instance by following the docs.
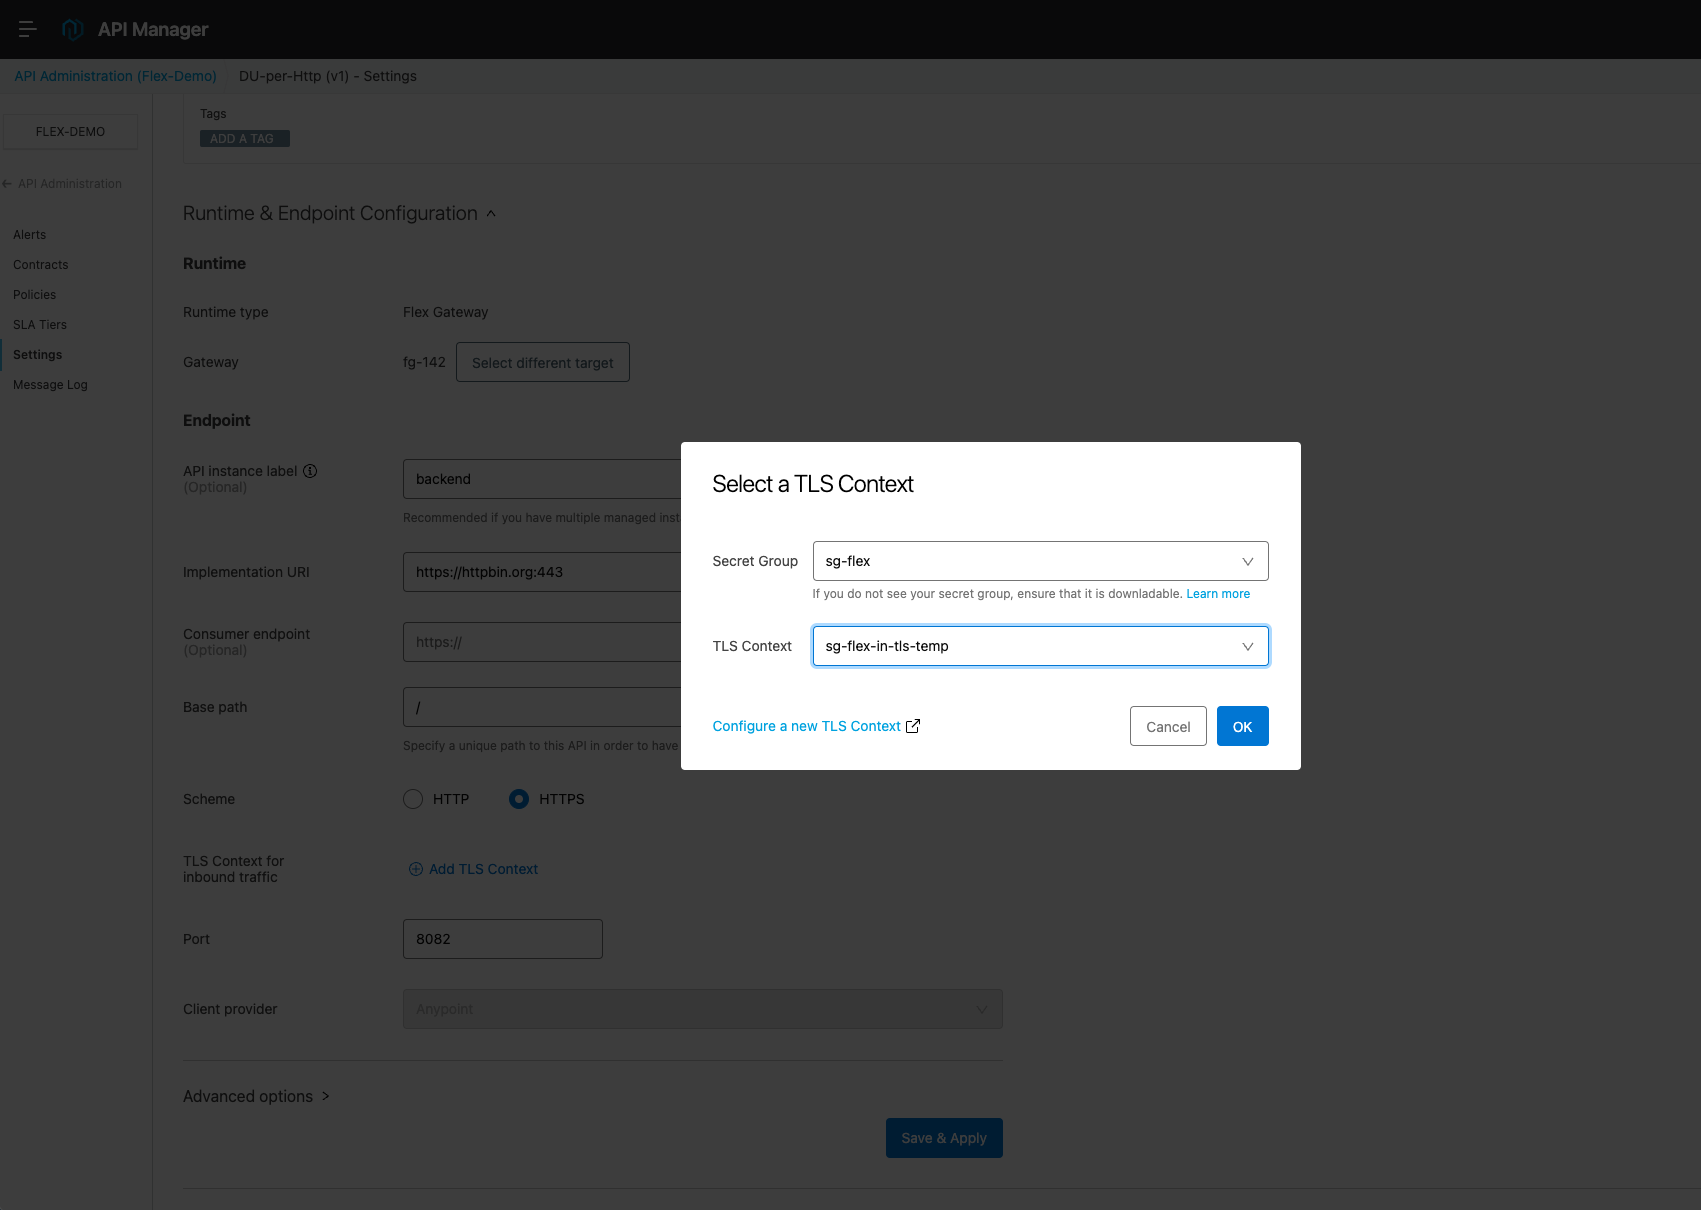
Here you notice the Inbound TLS Context has been referred from Secrets Manager. The backend API is listening on port 8082 (as example)
Deploy the Backend API to the Flex Gateway.
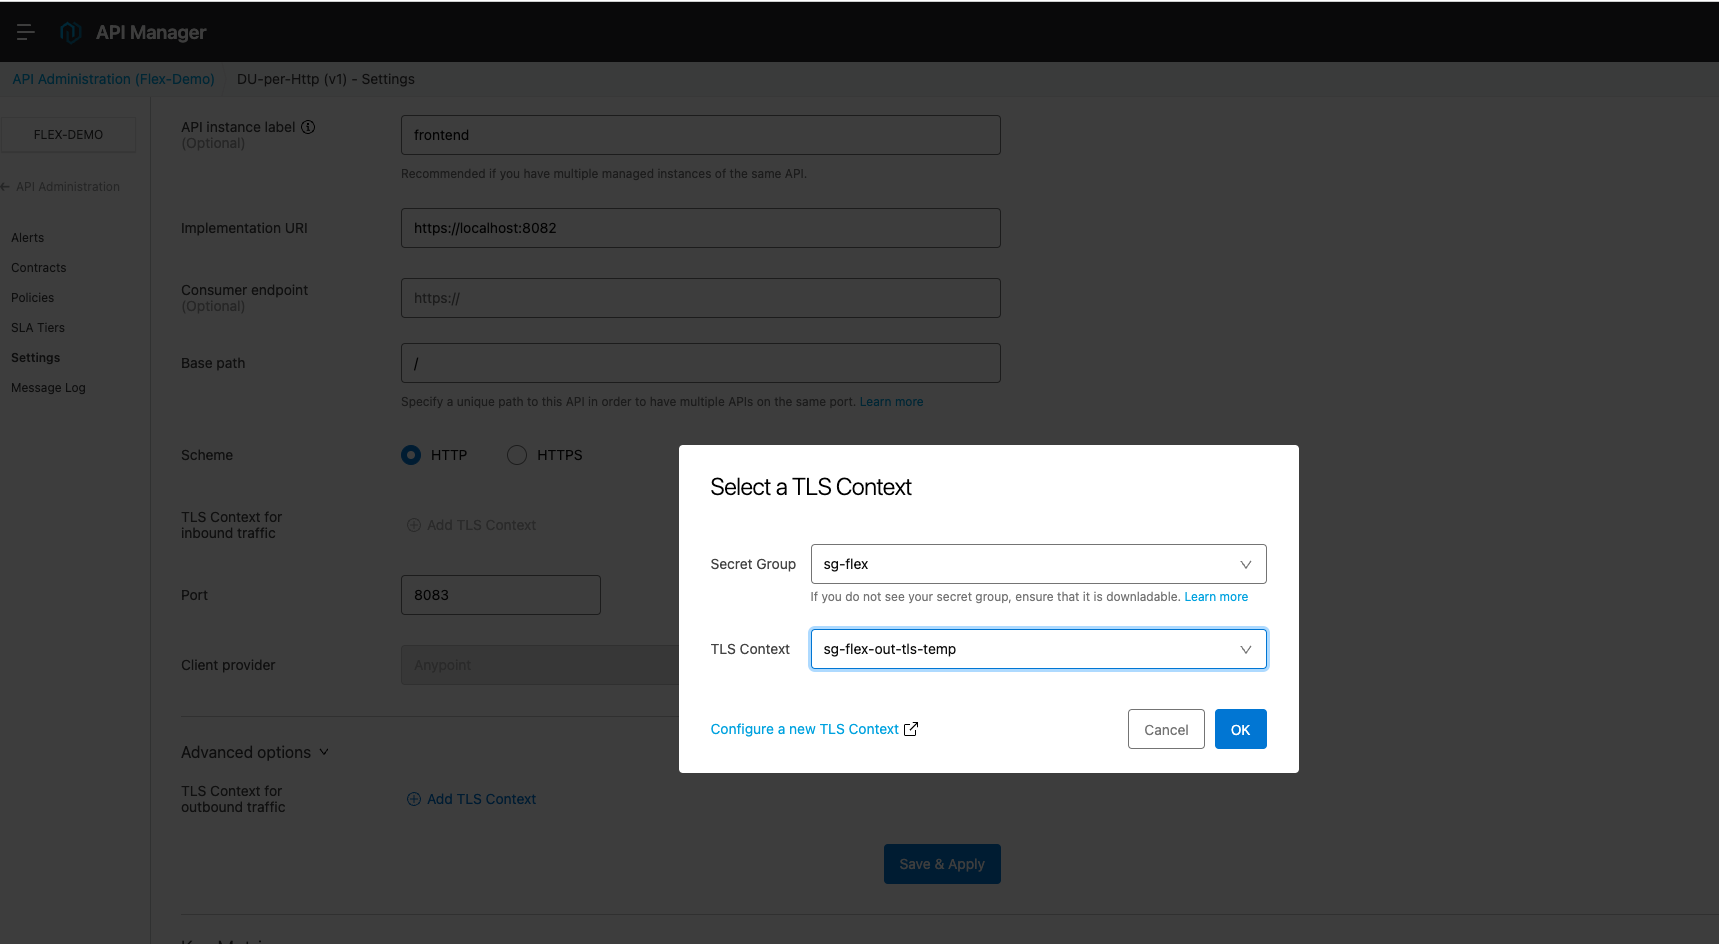
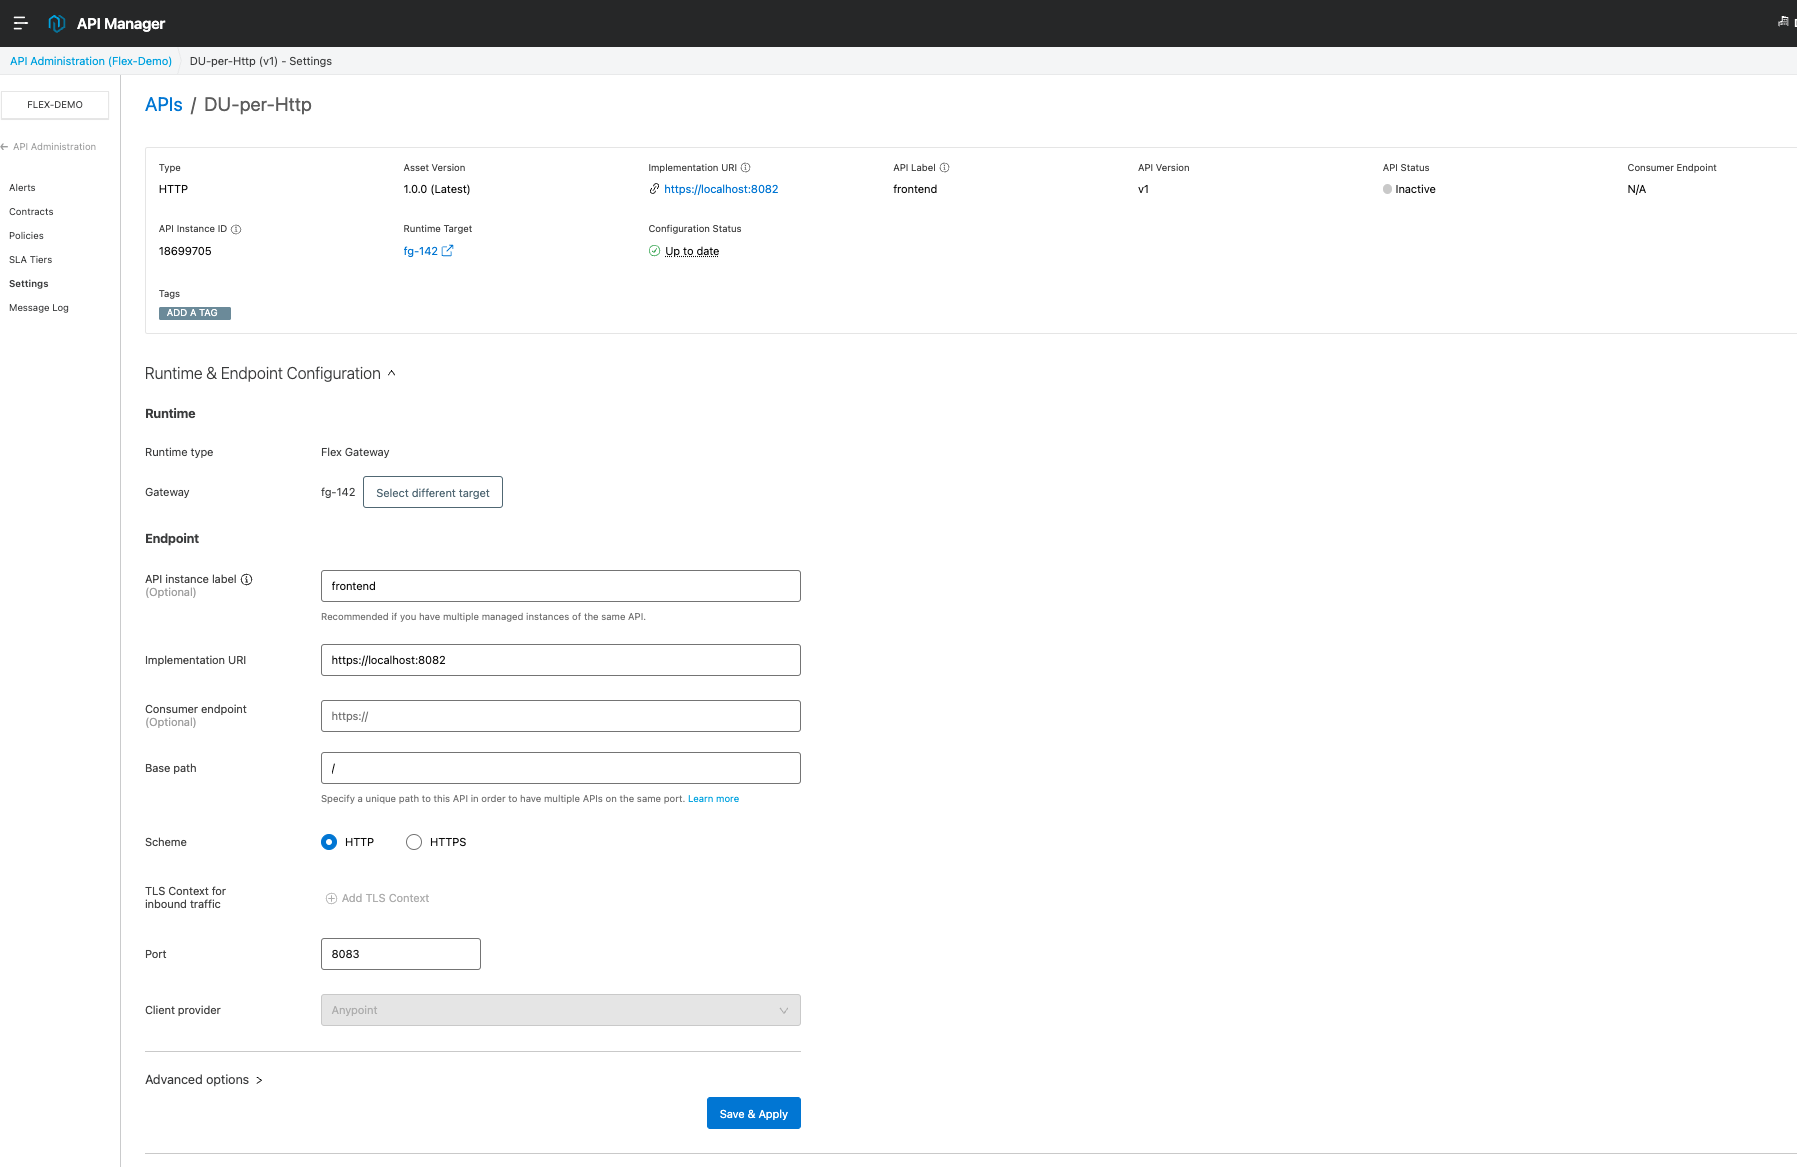
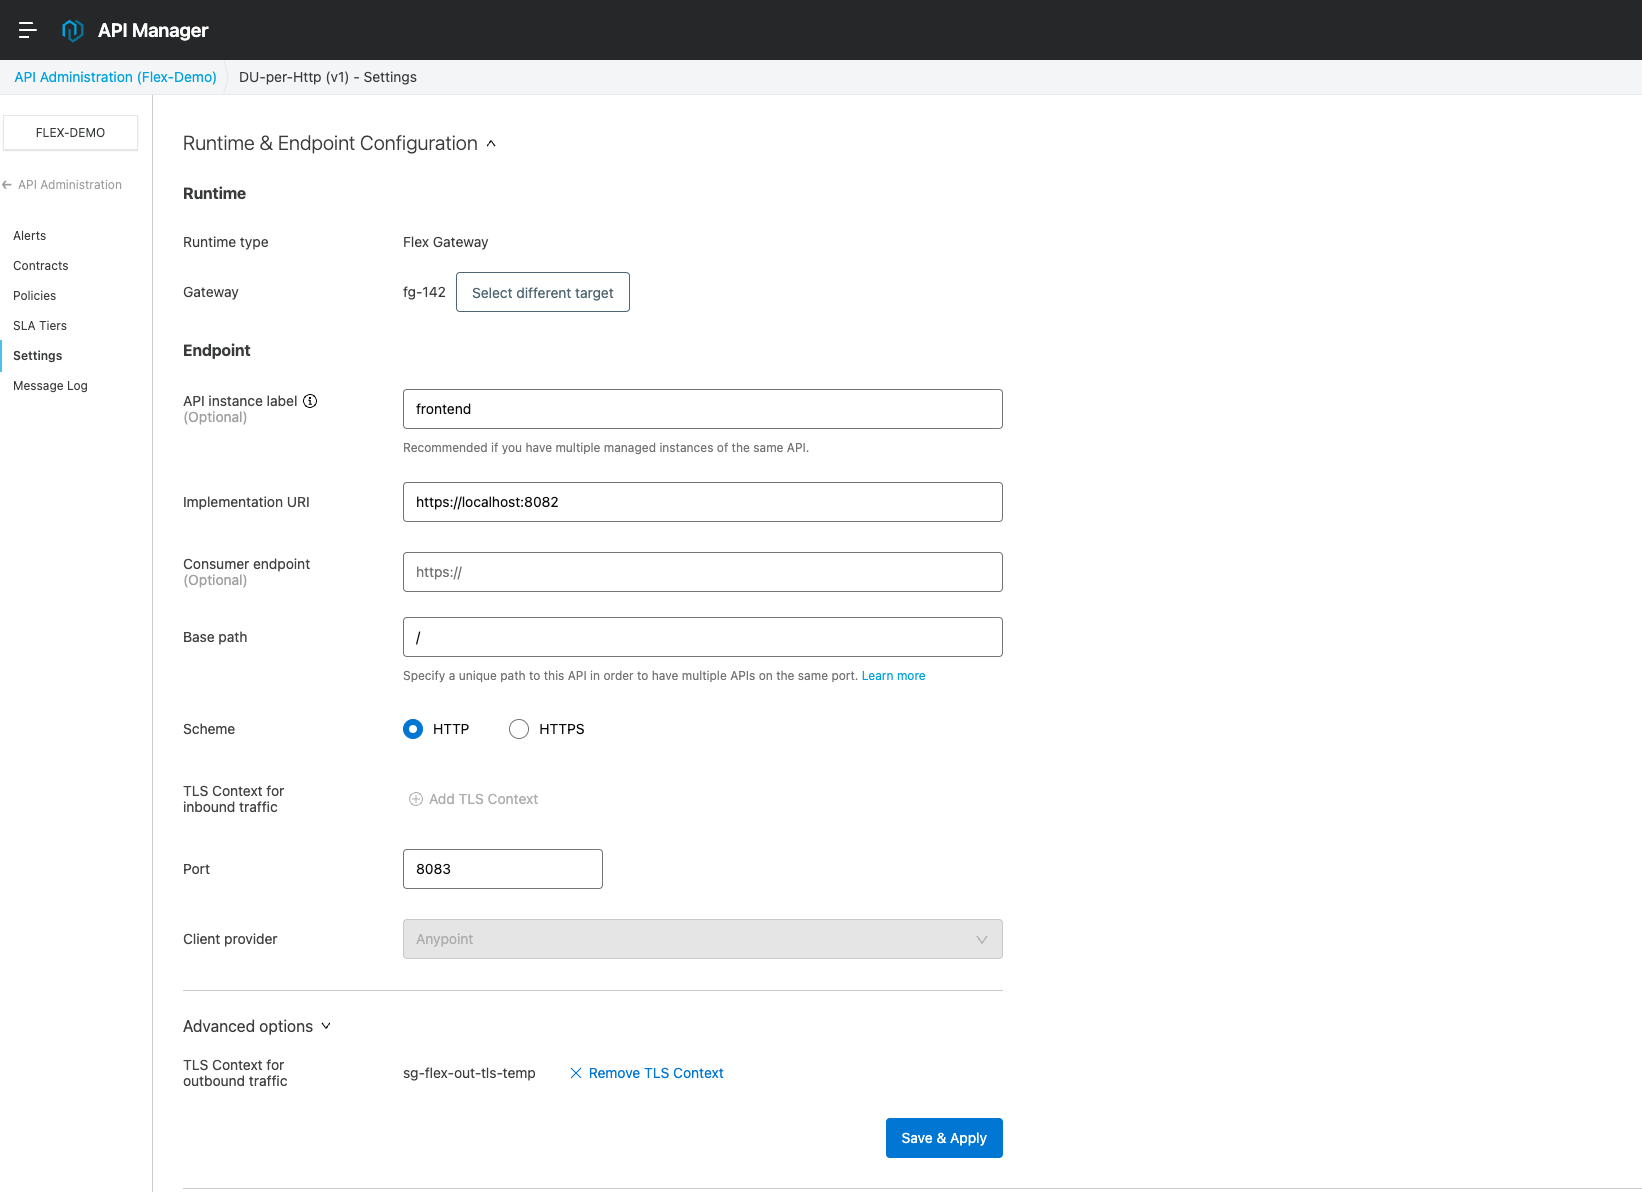
Frontend API
Create another API Instance by following the docs.
Here you notice the Outbound TLS Context has been referred from Secrets Manager.
Frontend API is listening on port 8083 and it is using the Backend API as the implementation URI (https://localhost:8083/).
Deploy the Frontend API to Flex Gateway.
5) Validation
Now that we have
- configured TLS Context in Secrets Manager
- created a couple of API Instances referring to the TLS Context in Secrets Manager
Let's do some tests to validate if this is actually working
Testing Backend API
Execute the below curl command to invoke “Backend API” as it is listening on port 8082 in the localhost using HTTPS protocol.
curl -v "https://localhost:8082/get“
Output:
% curl -v "https://localhost:8082/get“
Trying 127.0.0.1:8082...
Connected to localhost (127.0.0.1) port 8082 (#0)
ALPN: offers h2
ALPN: offers http/1.1
CAfile: /etc/ssl/cert.pem
CApath: none
[CONN-0-0][CF-SSL] (304) (OUT), TLS handshake, Client hello (1):
[CONN-0-0][CF-SSL] (304) (IN), TLS handshake, Server hello (2):
[CONN-0-0][CF-SSL] (304) (IN), TLS handshake, Unknown (8):
[CONN-0-0][CF-SSL] (304) (IN), TLS handshake, Request CERT (13):
[CONN-0-0][CF-SSL] (304) (IN), TLS handshake, Certificate (11):
SSL certificate problem: self signed certificate
Closing connection 0
curl: (60) SSL certificate problem: self signed certificate
More details here: https://curl.se/docs/sslcerts.html


curl failed to verify the legitimacy of the server and therefore could not
establish a secure connection to it. To learn more about this situation and
how to fix it, please visit the web page mentioned above.
The above response failed due to the self-signed certificate is not part of the trust store in the Flex Gateway CA file.
To resolve this we need to pass the public PEM certificate to the curl command as below
curl -v "https://localhost:8082/get" —cacert ~/<PATH_TO_PEM>/cert.pem
Output:
% curl -v "https://localhost:8082/get" —cacert ~/Documents/PEM/temp/cert.pem

    *   Trying 127.0.0.1:8082...
    * Connected to localhost (127.0.0.1) port 8082 (#0)
    * ALPN: offers h2
    * ALPN: offers http/1.1
    *  CAfile: /Users/dhilip.uppili/Documents/PEM/temp/cert.pem
    *  CApath: none
    * [CONN-0-0][CF-SSL] (304) (OUT), TLS handshake, Client hello (1):
    * [CONN-0-0][CF-SSL] (304) (IN), TLS handshake, Server hello (2):
    * [CONN-0-0][CF-SSL] (304) (IN), TLS handshake, Unknown (8):
    * [CONN-0-0][CF-SSL] (304) (IN), TLS handshake, Request CERT (13):
    * [CONN-0-0][CF-SSL] (304) (IN), TLS handshake, Certificate (11):
    * [CONN-0-0][CF-SSL] (304) (IN), TLS handshake, CERT verify (15):
    * [CONN-0-0][CF-SSL] (304) (IN), TLS handshake, Finished (20):
    * [CONN-0-0][CF-SSL] (304) (OUT), TLS handshake, Certificate (11):
    * [CONN-0-0][CF-SSL] (304) (OUT), TLS handshake, Finished (20):
    * SSL connection using TLSv1.3 / AEAD-CHACHA20-POLY1305-SHA256
    * ALPN: server accepted http/1.1
    * Server certificate:
    *  subject: C=AU; ST=NSW; L=Sydney; O=MS; OU=Support; CN=localhost; emailAddress=john.doe@mulesoft.com
    *  start date: May 17 00:48:51 2023 GMT
    *  expire date: Oct  7 00:48:51 2031 GMT
    *  subjectAltName: host "localhost" matched cert's "localhost"
    *  issuer: C=AU; ST=NSW; L=Sydney; O=MS; OU=Support; CN=localhost; emailAddress=john.doe@mulesoft.com
    *  SSL certificate verify ok.

> GET /get HTTP/1.1
> Host: localhost:8082
> User-Agent: curl/7.87.0
> Accept: /
>

    * Mark bundle as not supporting multiuse

< HTTP/1.1 200 OK
< date: Wed, 17 May 2023 00:54:31 GMT
< content-type: application/json
< content-length: 343
< server: Anypoint Flex Gateway
< access-control-allow-origin: *
< access-control-allow-credentials: true
< x-envoy-upstream-service-time: 691
<
{
  "args": {},
  "headers": {
    "Accept": "/",
    "Host": "httpbin.org",
    "User-Agent": "curl/7.87.0",
    "X-Amzn-Trace-Id": "Root=1-646425c7-31be850771b8ab937eb309e8",
    "X-Envoy-Expected-Rq-Timeout-Ms": "15000",
    "X-Envoy-Original-Path": "/get"
  },
  "origin": "165.225.232.245",
  "url": "https://httpbin.org/get“
}

    * Connection #0 to host localhost left intact
This proves that the configured Inbound TLS is working
Testing Frontend API
Since the Frontend API is listening on port 8083 in localhost using HTTP protocol
Execute the curl command below
curl -v "http://localhost:8083/get"
Output:
% curl -v "http://localhost:8083/get“
* Trying 127.0.0.1:8083...
* Connected to localhost (127.0.0.1) port 8083 (#0)
> GET /get HTTP/1.1
> Host: localhost:8083
> User-Agent: curl/7.87.0
> Accept: /
>
* Mark bundle as not supporting multiuse
< HTTP/1.1 200 OK
< date: Wed, 17 May 2023 00:54:05 GMT
< content-type: application/json
< content-length: 343
< server: Anypoint Flex Gateway
< access-control-allow-origin: *
< access-control-allow-credentials: true
< x-envoy-upstream-service-time: 1041
<
{
"args": {},
"headers": {
"Accept": "*/*",
"Host": "httpbin.org",
"User-Agent": "curl/7.87.0",
"X-Amzn-Trace-Id": "Root=1-646425ad-534f583a7d6a844231f8f5a3",
"X-Envoy-Expected-Rq-Timeout-Ms": "15000",
"X-Envoy-Original-Path": "/get"
},
"origin": "165.225.232.245",
"url": "https://httpbin.org/get“
}
* Connection #0 to host localhost left intact
You can see it has successfully invoked the Backend API using the Outbound TLS context and got the response.
Related Articles:
Número del artículo de conocimiento
001116100
¿Resolvió este artículo su problema?
¡Háganos saber cómo podemos mejorar!