조직 선택
How to transform the content of a flat file into a readable format using CopyBook and FFD schema
게시 일자: Jul 29, 2025
과업
How to transform the content of a flat-file into a readable format using xsd/ fsd/ffd schema
단계
QUESTION
How to transform the content of a flat-file into a readable format using xsd/ fsd/ffd schemaANSWER
The XSD schema or fsd schema can't be used directly in MuleSoft to transform the flat file data. We need to first use the schema to parse the FlatFile to canonical and then use DW to transform it to the specific format you want.Something like this:
output application/json
---
read(payload,'application/flatfile',{schema:theSchema.ffd})
Another way to do it is via a set-payload and the DW transformation
Currently, there is no way to convert directly from FF to Json/CSV without the FFD
Please find the below use case where a flat file is converted into a readable format using copybook and FFD schema
FlatFile: A flat file is data in a plain text format. Usually, we get this kind of Data from either Mainframe systems or SFTP or Files, etc.
CopyBook: A copybook is a selection of code that defines data structures. If a particular data structure is used in many programs, then instead of writing the same data structure again, we can use copybooks. In general, terms, to define the fields Data Types/Length and their structure, we define them in a copybook which in turn helps us in generating ffd file using Transform Message.
Let's follow Step-By-Step:
Step 1: Creating Copy Book
First of all, have the flat-file Data in Handy. as previously said, it's a plain text string and the rows are separated by a new line.
Eg:
1234SRAVAN    27-09-1992TELANGANA HYDERABAD 11111
5678LINGAM    07-02-1996USA       CHICAGO   77777
The above flat-file data contains 98 characters with spaces (will discuss why spaces are considered later below). each row has 49 characters defined and they are divided by new line
In my example, the data I am getting from SFTP or Mainframe basically contains information of :
-'BIRTHID' 'BIRTHNAME' 'BIRTHDATE', 'BIRTHSTATE','BIRTHCITY', 'BIRTHZIP',
Remember The flat-file always has FIXED length!
If you have a Birthname defined for the length of 10 characters. And if at all your name has only 6 characters, then the remaining 4 characters MUST be of empty string or 4 spaces
Below is the Copy Book that I have created to define my incoming fields:
000000 01 BIRTH-DETAILS.
000100 05 BIRTHID PIC X(4).
000200 05 BIRTHNAME PIC X(10).
000300 05 BIRTHDATE PIC X(10).
000400 05 BIRTHSTATE PIC X(10).
000500 05 BIRTHCITY PIC X(10).
000600 05 BIRTHZIP PIC X(5).
Please follow the indentation in Copy Book. type is nothing but your datatype of that particular field, length is the fixed length allocated to that field.
Save this file with extension .cpy Eg: BirthDetails.copy
Step 2: Auto-generation of ffd file using DataWeave.
We need basically an ffd file to convert the flat-file to Json / csv. For that, you have to do the below step
- Drag and Drop the transforming message in an empty flow
- Go to Input Face and click on Define MetaData.
- Click on Add and give some Type Id.
- Dropdown Type and select Copy Book
- Click Import and select the Copybook that you have created in Step 1 and finally click select
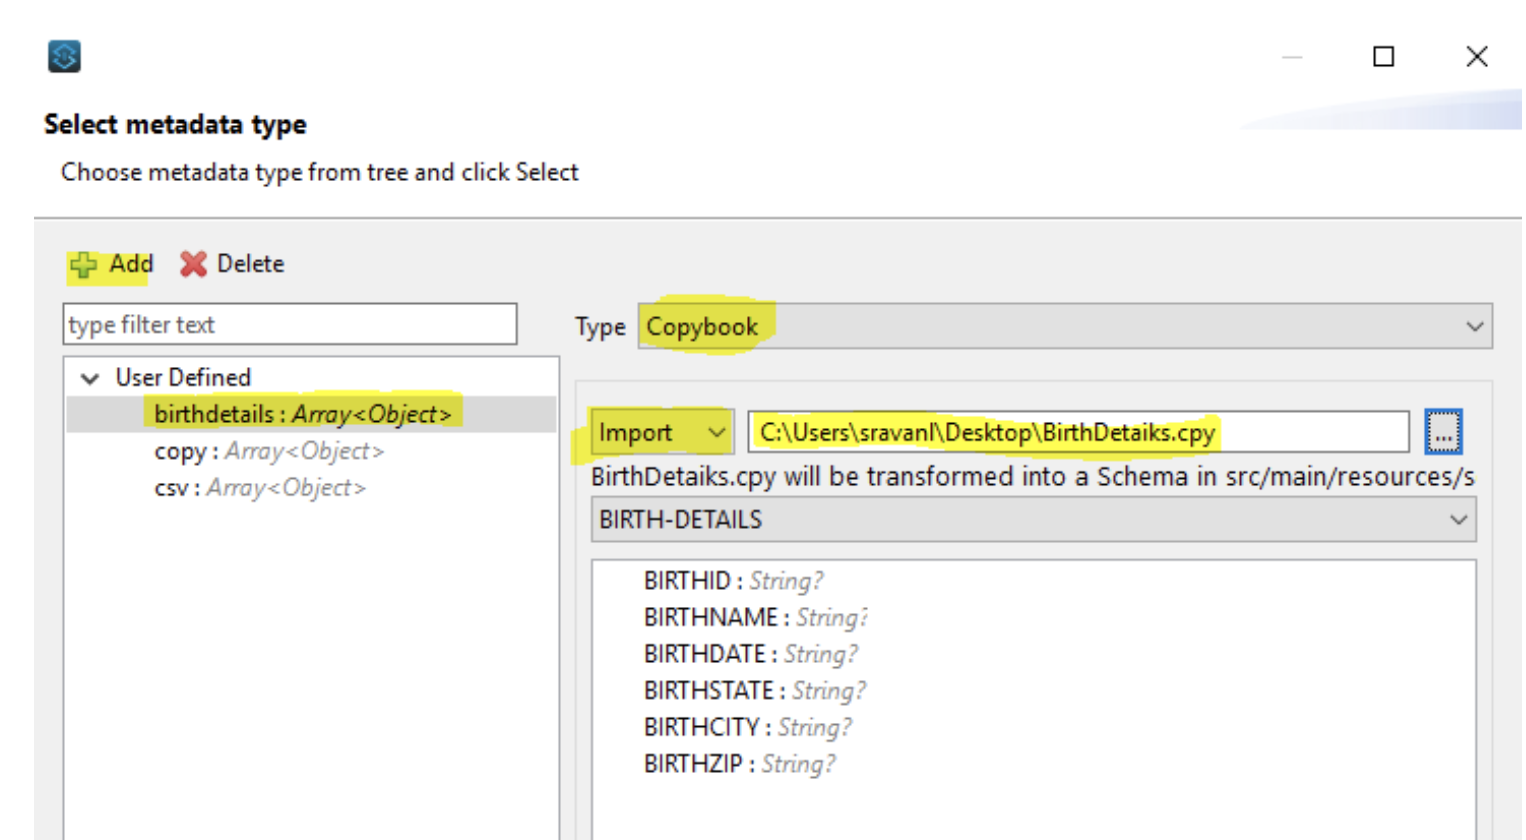
-
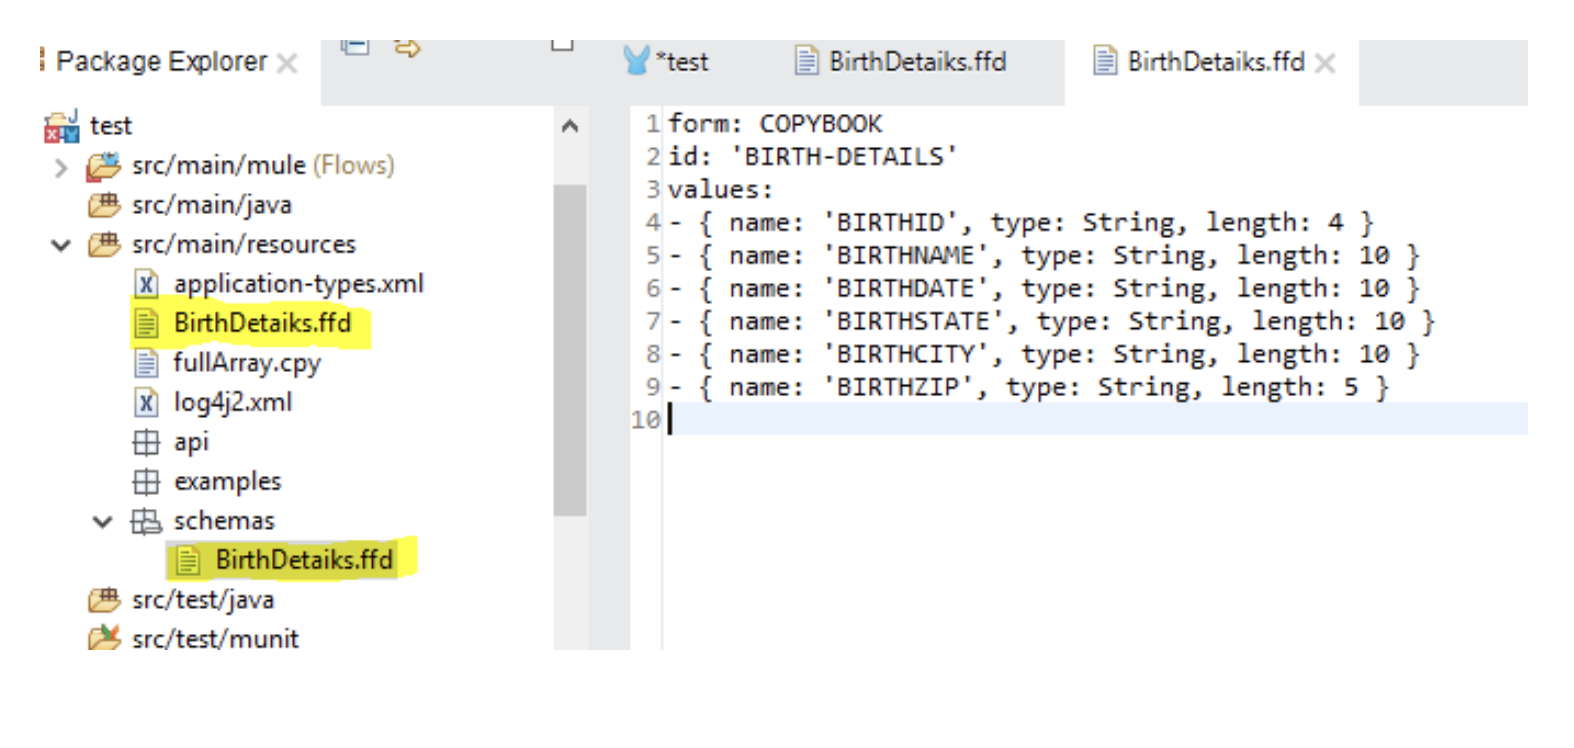
After clicking on Select , an ffd file will be created automatically and placed under : src/main/resources --> schemas--> BirthDetails.ffd
Please copy the ffd from the schemas folder and paste it in the root of src/main/resources as shown below screenshot:
FFD file generated:form: COPYBOOK id: 'BIRTH-DETAILS' values: - { name: 'BIRTHID', type: String, length: 4 } - { name: 'BIRTHNAME', type: String, length: 10 } - { name: 'BIRTHDATE', type: String, length: 10 } - { name: 'BIRTHSTATE', type: String, length: 10 } - { name: 'BIRTHCITY', type: String, length: 10 } - { name: 'BIRTHZIP', type: String, length: 5 }
Step 3: Final Transformation
It's a pretty simple transformation. The only thing to remember is don't forget to give the schema path in set Payload.
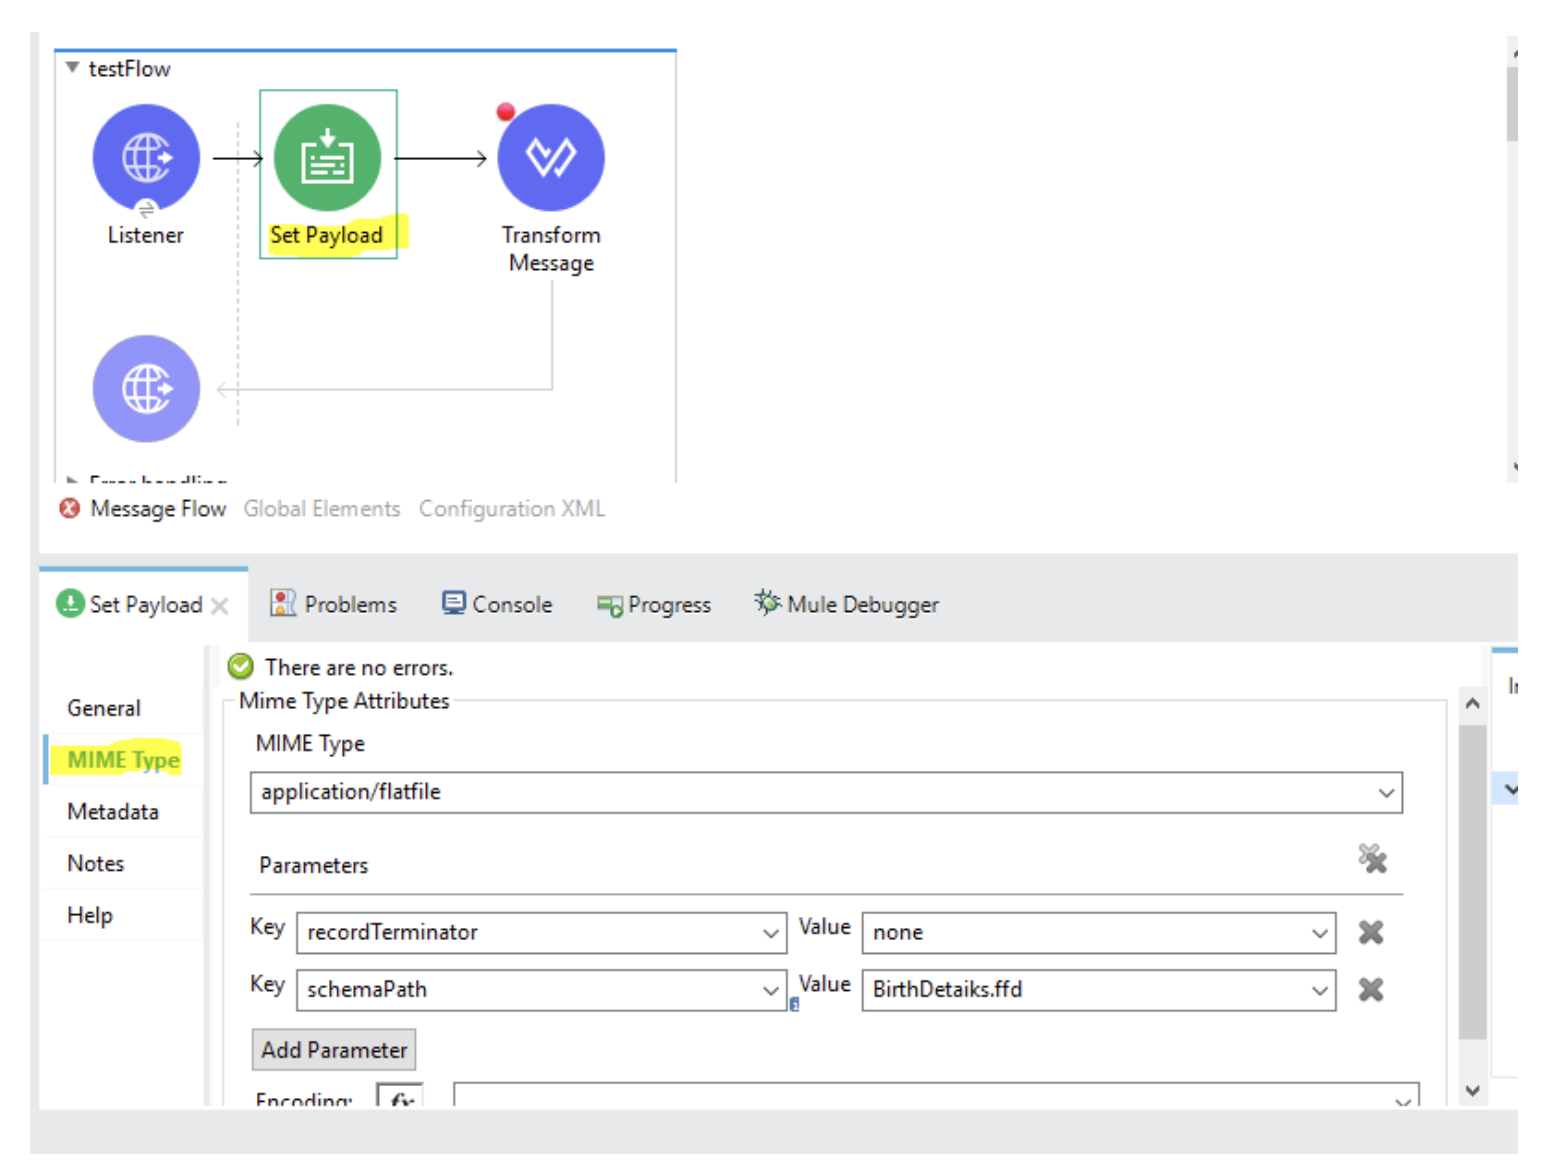
No matter what is your source of Data, whether it be a File Read connector or Whether its Http Listener where you send plain text data or any other form, The fisrst thing that yo need to place after the source is Set Payload
Drag and Drop a Set Payload and configure as below. It needs value as #[payload]
Now goto MimeType Tab and configure the record terminator and schema path as below:
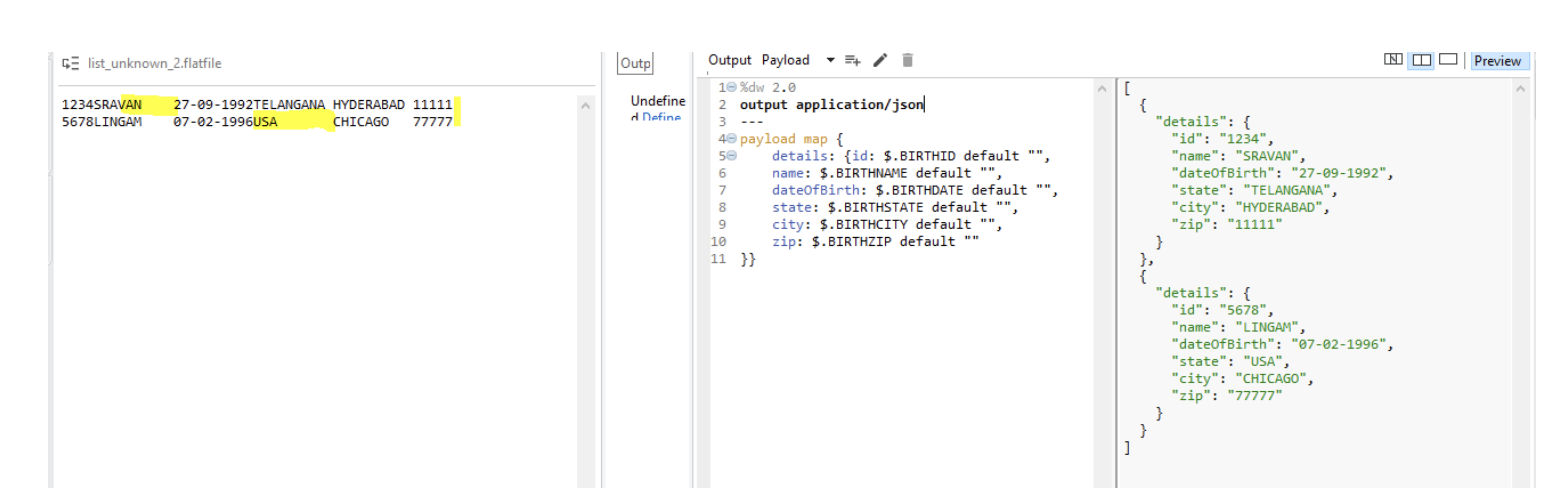
Now Place a Transform Message just after Set Payload and code it as below. :

If you want your output in CSV format, just replace application/json with application/csv
If you want output in XML format , we need another transform message after application/json output because this doesn't have a root tag. If you try to map directly to application/xml , it will throw an error!
Things to Remember :
From the below image, you can see that the name is defined as 10 characters in your ffd . But "sravan' has only 6 characters. So input name must have 10 characters. i.e, "sravan "
We have to have 4 spaces appended and that too after continuation of name. Because
for each row, we defined ffd as
1st 4 characters belong to Birth ID
Next 10 characters belong to Birth Name
Next 10 characters belong to Birth Name
Next 10 characters belong to Date Of Birth and likewise ..
Each special character is treated as 1 character. And the rows must be divided using new line
break (highlighted in yellow). If you can see input, State name for the 2nd row is US(3 characters). So we have appended 7 spaces to it to make it a perfect and valid flat-file.
So one of the validations mentioned above failed in input, we will get Transformation errors!
Knowledge 기사 번호
001116128
이 기사를 통해 문제를 해결했습니까?
개선을 위한 의견을 보내주세요.