조직 선택
How to create a Custom Policy in Flex Gateway running in Local Mode
게시 일자: Mar 2, 2024
과업
GOAL
Anypoint Flex Gateway is an ultrafast API gateway designed to manage and secure APIs running anywhere. You can implement custom policies via WebAssembly (WASM) extensions that run on Envoy as custom filters. This article will show you how to enforce custom policies in a Flex Gateway running in Local Mode. An example custom policy is provided.
REQUIREMENTS
단계
-
BUILD CUSTOM POLICY
Switch to terminal window and create a Rust project via the following command:cargo new flex_custom_policy_example --lib
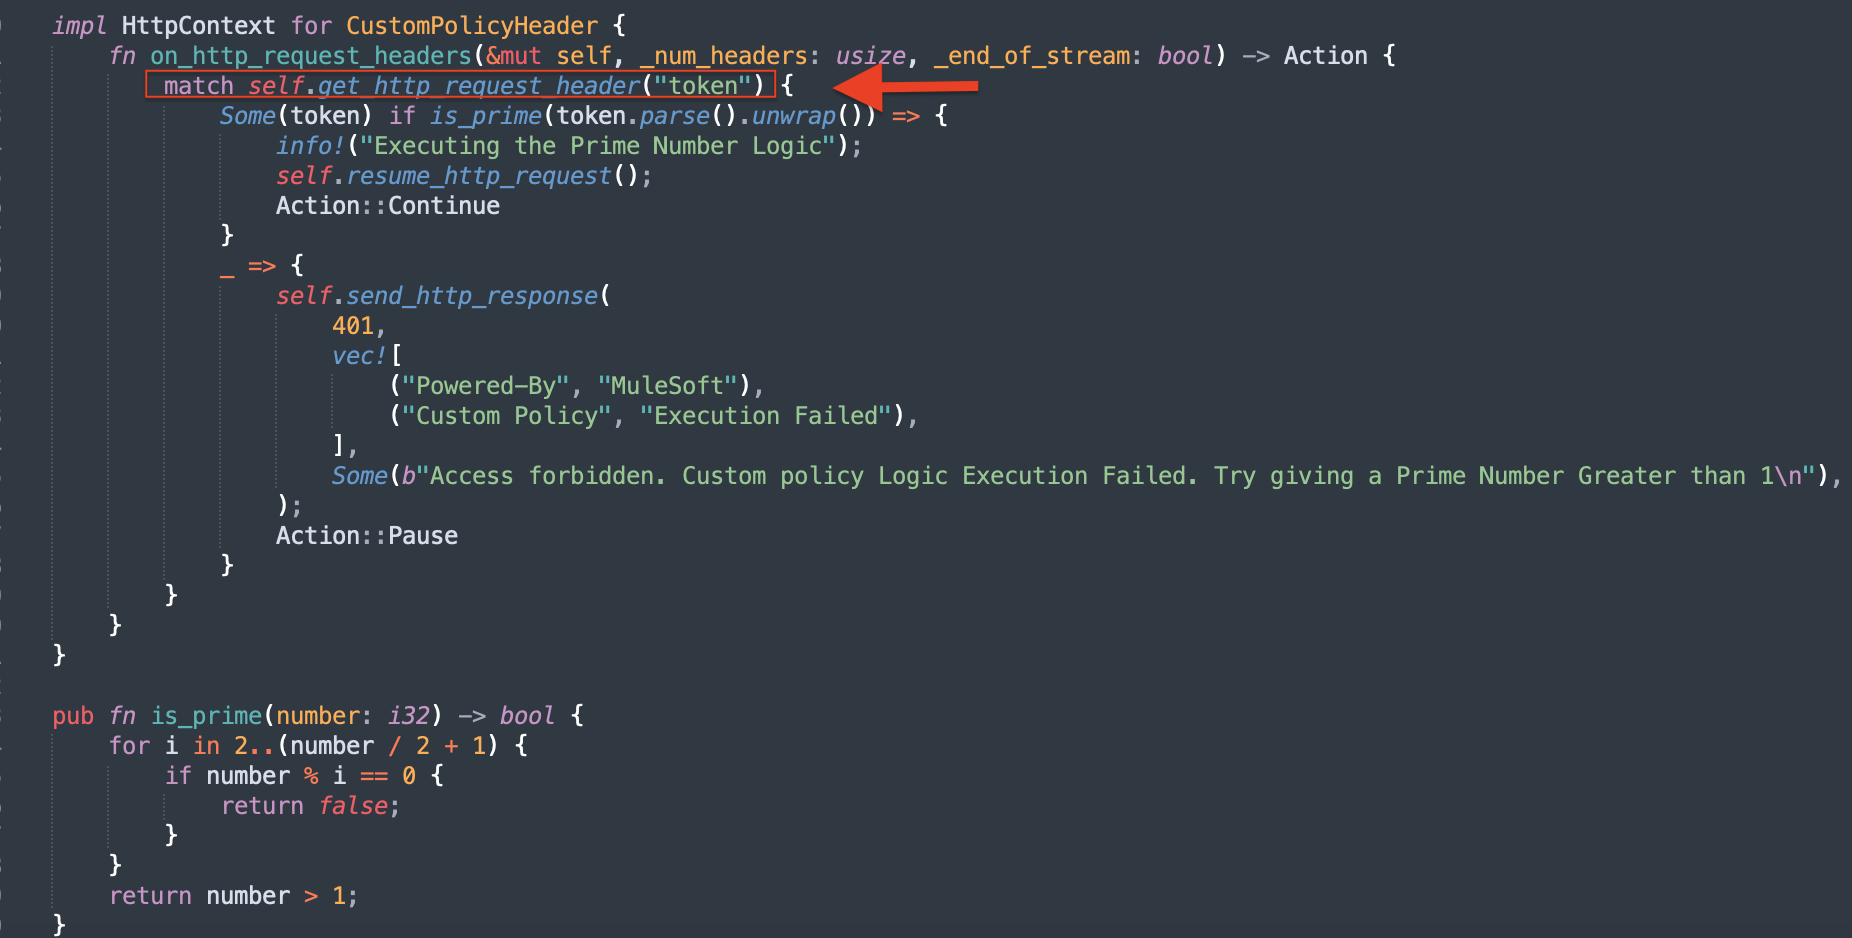
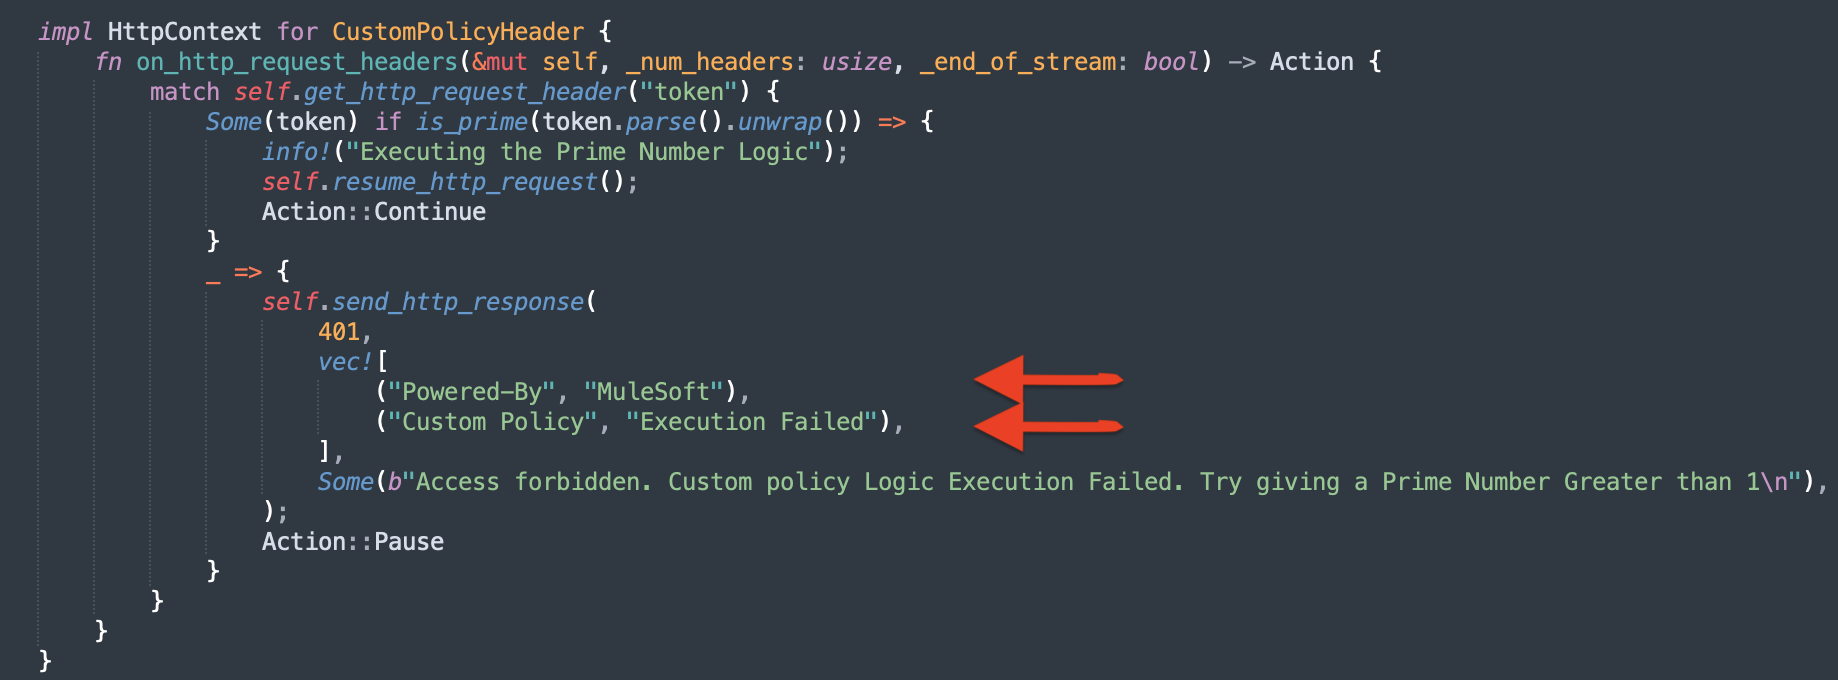
If you already have a custom policy built, skip to the next step. Otherwise, use the below custom policy implementation code. Code goes in flex_custom_policy_example/src/lib.rsuse log::info; use proxy_wasm::traits::*; use proxy_wasm::types::*; use serde::Deserialize; proxy_wasm::main! {{ proxy_wasm::set_log_level(LogLevel::Trace); proxy_wasm::set_root_context(|_| -> Box<dyn RootContext> { Box::new(CustomPolicyHeaderRoot { config: CustomPolicyConfig::default() }) }); }} // ---- CustomPolicyConfig ---- #[derive(Default, Clone, Deserialize)] struct CustomPolicyConfig { #[serde(alias = "username")] username: String, } // ---- CustomPolicyHeaderRoot ---- struct CustomPolicyHeaderRoot { config: CustomPolicyConfig, } impl Context for CustomPolicyHeaderRoot {} impl RootContext for CustomPolicyHeaderRoot { fn on_configure(&mut self, _: usize) -> bool { if let Some(config_bytes) = self.get_plugin_configuration() { self.config = serde_json::from_slice(config_bytes.as_slice()).unwrap() } true } fn create_http_context(&self, _: u32) -> Option<Box<dyn HttpContext>> { Some(Box::new(CustomPolicyHeader { config: self.config.clone() })) } fn get_type(&self) -> Option<ContextType> { Some(ContextType::HttpContext) } } // ---- CustomPolicyHeader ---- struct CustomPolicyHeader { config: CustomPolicyConfig, } impl Context for CustomPolicyHeader {} impl HttpContext for CustomPolicyHeader { fn on_http_request_headers(&mut self, _num_headers: usize, _end_of_stream: bool) -> Action { match self.get_http_request_header("token") { Some(token) if is_prime(token.parse().unwrap()) => { info!("Executing the Prime Number Logic"); self.resume_http_request(); Action::Continue } _ => { self.send_http_response( 401, vec![ ("Powered-By", "MuleSoft"), ("Custom Policy", "Execution Failed"), ], Some(b"Access forbidden. Custom policy Logic Execution Failed. Try giving a Prime Number Greater than 1\n"), ); Action::Pause } } } } pub fn is_prime(number: i32) -> bool { for i in 2..(number / 2 + 1) { if number % i == 0 { return false; } } return number > 1; }
We also need to define the manifest file for the Rust project. This goes in Cargo.tom file. The below should be the content for our example:[package] name = "flex_custom_policy_example" version = "0.1.0" edition = "2021" description = "Example custom policy for MuleSoft Flex Gateway" [lib] crate-type = ["cdylib"] name="flex_custom_policy_example" path="src/lib.rs" [dependencies] proxy-wasm = { git = "https://github.com/proxy-wasm/proxy-wasm-rust-sdk.git", tag = "v0.2.0" } serde = { version = "1.0", features = ["derive"] } serde_json = "1.0" log = "0.4"
Add wasm32 as a compilation target by running the following command.rustup target add wasm32-wasi
Compile the custom policy with this command:cargo build --target wasm32-wasi --release
Install wasm-gc if you don't already have it installed. wasm-gc removes unneeded exports, imports, and functions to reduce the size of the final binary file.cargo install wasm-gc
Run the optimization by executing the following command. This is the file that you need to publish to Exchange.wasm-gc target/wasm32-wasi/release/flex_custom_policy.wasm -o target/flex_custom_policy-final.wasm
Move on to the next step to bind the policy to your published API running in Flex Gateway Local Mode.
-
DEFINE EXTENSION TEMPLATE
Once you have a running api in your Flex Gateway instance, local mode, an extension template for the custom policy needs to be defined. If you do not have one, please use the below one as example:apiVersion: gateway.mulesoft.com/v1alpha1 kind: ApiInstance metadata: name: users-api spec: address: http://0.0.0.0:8080 services: orders: address: https://jsonplaceholder.typicode.com:443/ routes: - rules: - path: /api(/users/.*)NOTE: Please do keep spaces with YAML files.
Definition of the extension template to have the custom policy implementation embedded in the template configuration is as follows. Here, you also need to inline the WebAssembly ( wasm ) module that defines the custom policy implementation, flex_custom_policy-final.wasm.apiVersion: gateway.mulesoft.com/v1alpha1 kind: Extension metadata: name: <POLICY_NAME_IMPLEMENTATION_TO_BE_DEFINED_HERE> spec: extends: - name: extension-authentication - name: envoy-filter - name: proxy-wasm-filter properties: rootId: type: string default: main implementation: type: string default: base64://<WASM_BASE64_ENCODED>NOTE: Please do keep spaces with YAML files.
Remember that to Base64 the wasm final file, we can run the following command:base64 -i flex_custom_policy-final.wasm -o flex_custom_policy-final-base64-encoded.txt
-
APPLY CUSTOM POLICY
Here it is defined the policy binding template against the published api ( users-api ), and which is referrenced by the underlaying policy implementation ( step 2 ):apiVersion: gateway.mulesoft.com/v1alpha1 kind: PolicyBinding metadata: name: <POLICY_NAME_TO_BE_DEFINED_HERE> spec: targetRef: name: users-api policyRef: name: <POLICY_NAME_IMPLEMENTATION_GIVEN_IN_STEP_2>NOTE: Please do keep spaces with YAML files.
-
TEST CUSTOM POLICY
Switch to Postman and navigate to the API endpoint being proxied by the Flex Gateway. In accordance to our configured policy, a 'token' header and a given number needs to be provided. This checks wether a number is prime or not.
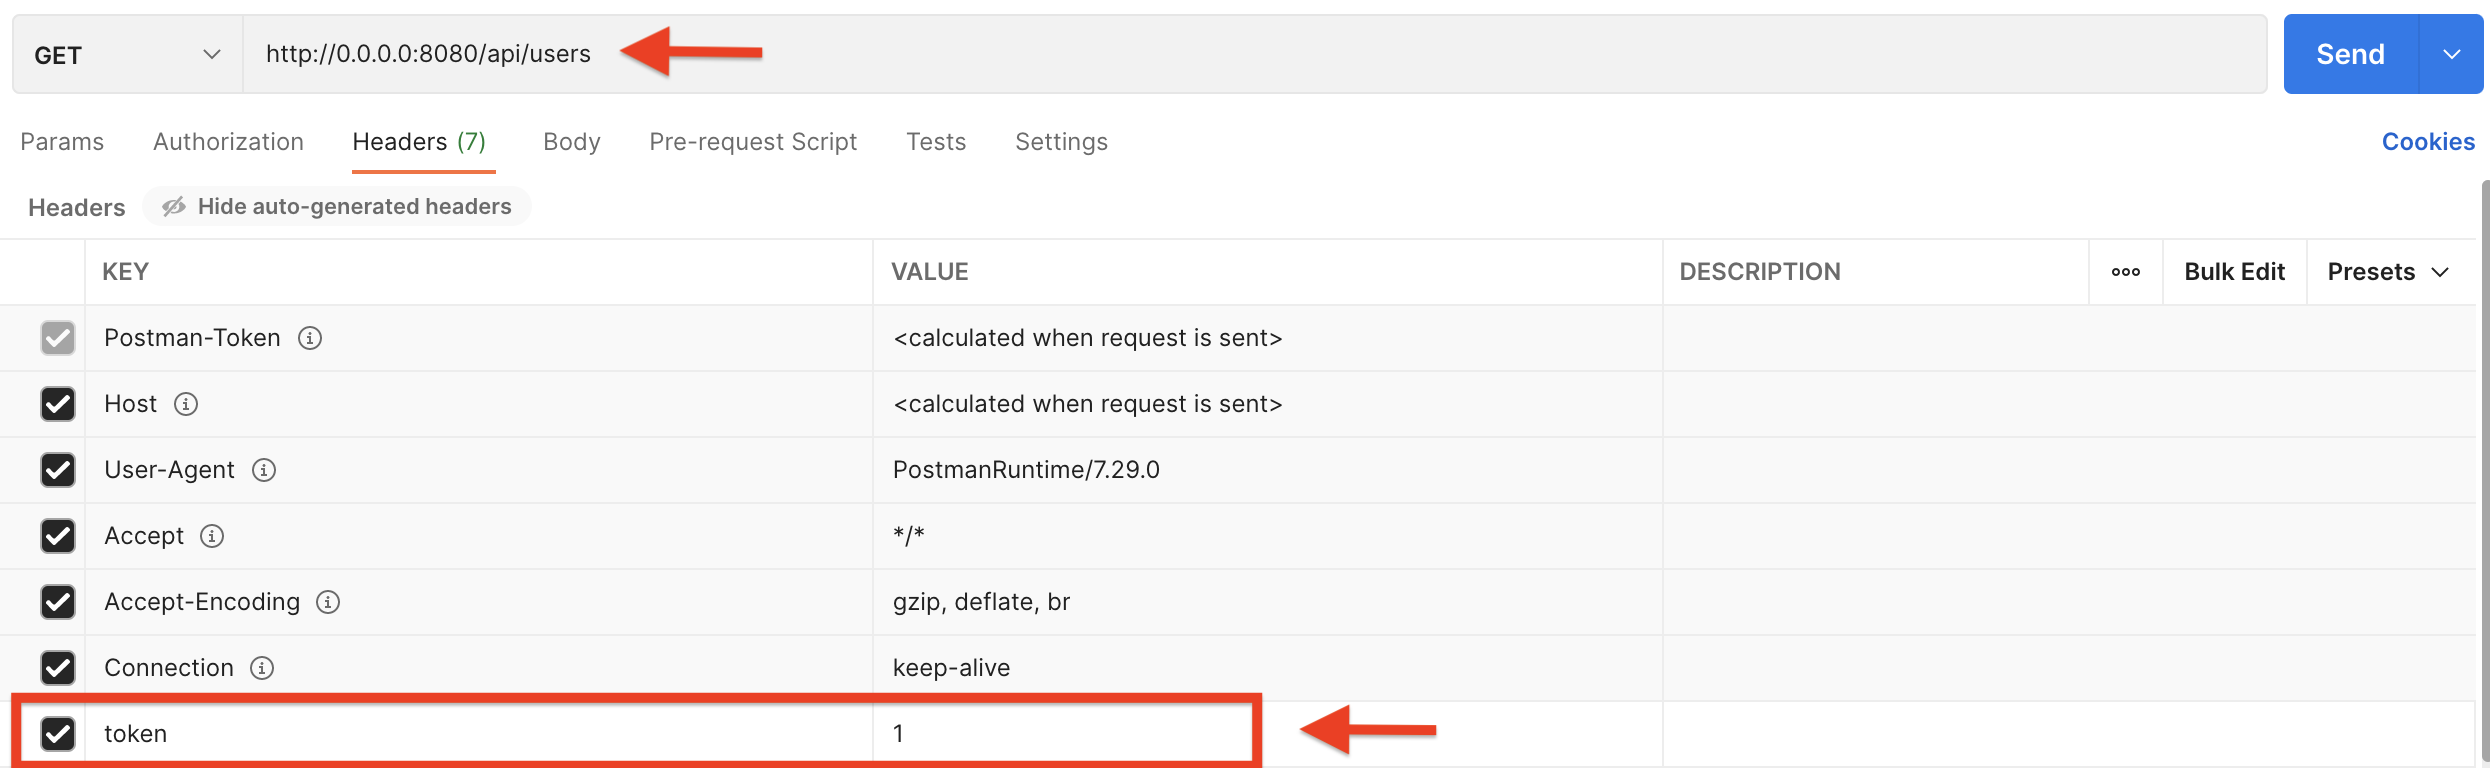
You can see where exactly the token is fed in when you configured the policy.
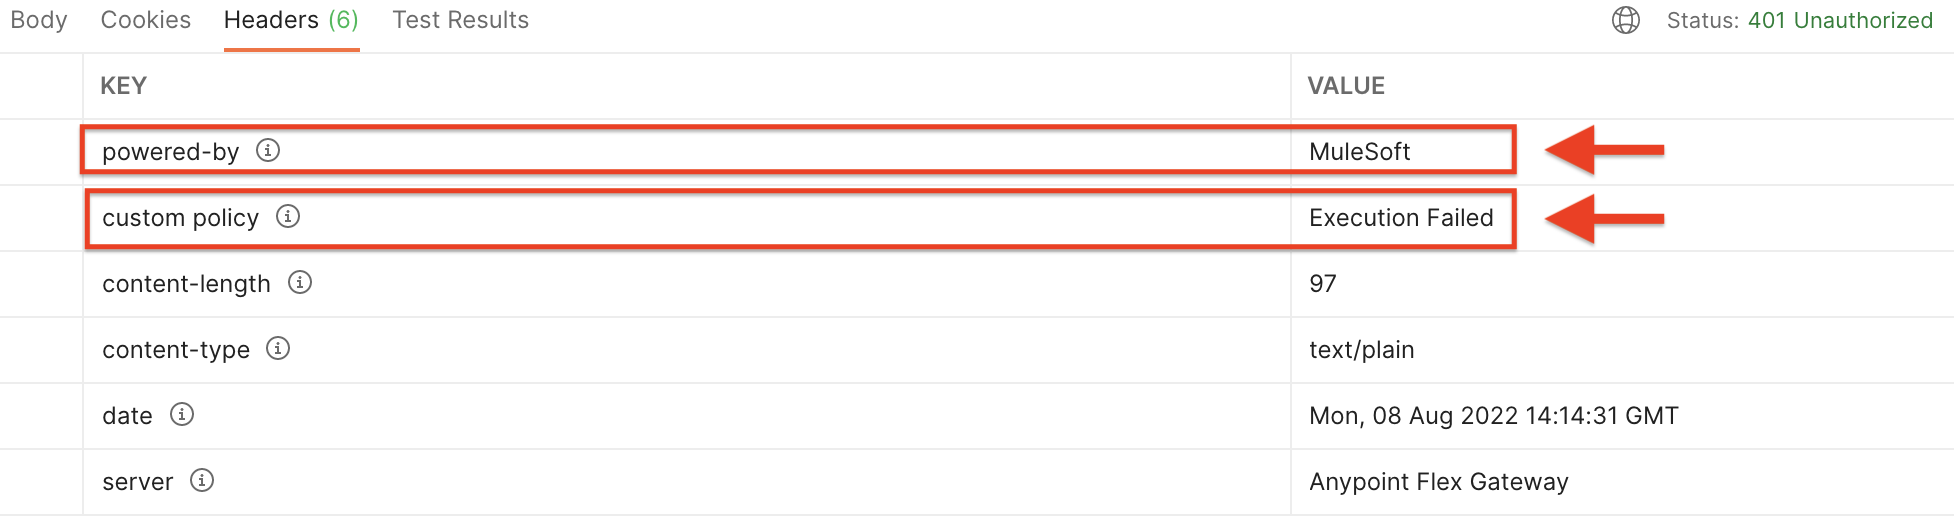
Below is the custom body that is returned by the policy when 'token' is not a prime number greater than 1.
In the Headers tab of the response, you'll see powered-by & custom policy new headers as well as the values that you plugged in when you configured the policy.

Disclaimer: This example is provided as a reference for your own usage and it's not part of the official MuleSoft product so its use will be considered as a custom implementation made by MuleSoft customers.
Knowledge 기사 번호
001116466
이 기사를 통해 문제를 해결했습니까?
개선을 위한 의견을 보내주세요.