Sélectionner une organisation
How to Migrate from legacy VPN to Anypoint VPN
Date de publication: Apr 18, 2024
Tâche
NOTE: Legacy VPN will be End-of-Life on June 30,2024, customers must migrate to Anypoint VPN before that date
GOAL
VPN connections configured after November 2018 use the Anypoint VPN solution, but VPN connections created prior to this time are eligible for migration to the new Anypoint VPN solution.The Legacy VPN migration is now a self-managed process and can be done anytime. This article explains how to migrate a legacy VPN connection to Anypoint VPN.
Étapes
1. Check the Requirements
Review the Anypoint VPN documentation and confirm that your device is suitable for use with Anypoint VPN.
Actual configuration steps, and functionality may differ based on the type of device you use. We recommend using Border Gateway Protocol (BGP) routing if it is supported on your device.
2. Verify Anypoint VPN Entitlements
Log in to Runtime Manager using an account with the required roles and permissions.
Navigate to the Business Group where your VPC resides (if not in the parent organization).
If the VPNs option is present in the left-hand menu, you have the necessary entitlements to create an Anypoint VPN connection.
When the VPNs option is not is present:
If your VPC resides in the parent organisation, reach out to your Account Executive (AE) for assistance with this request.
If your VPC resides in a child Business Group, assign the VPN entitlements.
- Log into Access Management
- Go to Organization
- Select the Business Group
- Use the sliders in the Business Group Info box to assign the required number of VPNs
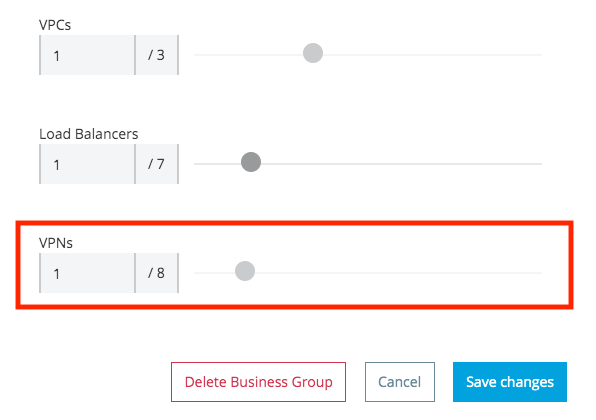
3. Create the new Anypoint VPN in Runtime Manager
VPN creation is self-service, refer to Create an Anypoint VPN for step-by-step instructions.
At this stage you only need to provision the new Anypoint VPN in Runtime Manager. Actual connection establishment is not covered in this step.
Provisioning the new VPN before decommissioning the legacy one will reduce downtime.
We recommend establishing this new VPN for a /32 encryption domain, i.e. a single host address in your network. This allows you to validate the new VPN connection without impacting connectivity via the existing VPN.
During the cutover from the old VPN to Anypoint VPN, you will Update an Anypoint VPN Connection to include all of the required encryption domains.
NOTE: If you have any questions or concerns during this provisioning phase, please raise a support case.
4. Configure your VPN device
Download the VPN configuration file from Runtime Manager, and configure your VPN device.
All configuration files represent the minimum requirement of IKEv1, AES128, SHA1, and DH Group 2, but you may adjust the configuration to make use of the other supported values.
IMPORTANT: It is not supported to run the old and new VPN, using the same encryption domains, for a single VPC. Doing this may create asymmetric routing scenarios, which will break connectivity to the VPC.
It is possible to validate connectivity via the new VPN using a single host (a /32 encryption domain). Either create a single /32 static route, or propagate this route via BGP.
To check your VPC route table, follow How to View the VPC Route Table via the UI.
Note that the VPC uses the following rules when routing traffic:
- When your VPC route table has multiple routes, use the most specific route.
- When your VPC route table has duplicate routes, use the manually configured route pointing to the old VPN.
5. Validate Connectivity via the new VPN
How to Generate Interesting Traffic for Anypoint VPN explains how to test and validate this new VPN connection.
We recommend using the network tools application for this purpose, rather than an existing application. This keeps testing separate from any existing traffic.
Once you have validated the new VPN configuration, shut down the tunnels on your VPN device until you are ready to perform the cutover.
6. Perform the Cutover
Once you have created your new Anypoint VPN:
- From Anypoint Platform, select Runtime Manager.
- From the navigation menu, select Legacy VPN.
- Select the legacy VPN you want to migrate.
- Disable a route and then test the connection going through the Anypoint VPN. Repeat this step for each route. If rollback is required, the route can be re-enabled. Do not leave the legacy VPN running for an extended period of time with all routes disabled.
- Once you disable all legacy VPN routes, select Delete VPN.
- When prompted, confirm the deletion. Click Delete. Note: Deleting a legacy VPN is irreversible.
Considerations:
- If you are using static routing, you will need to update the routes in Runtime Manager, and on your VPN device.
- If you are using dynamic routing, you will need to establish the BGP session, and propagate all of the required routes.
- Refer to Update an Anypoint VPN Connection for more information.
NOTE: A maximum of 95 route table entries is permitted per VPC, regardless of the number of VPN connections. Consolidate networks to the fewest number possible to avoid exceeding the limit.
Frequently Asked Questions
I can't find my Legacy VPN in Runtime Manager (https://anypoint.mulesoft.com)
Look in all of your Business Groups, the Legacy VPNs aren't always in your Master Organization.
Is there an additional cost for the new VPN?
There are no additional charges on the MuleSoft side. The number of VPNs you can create depends on the VPN entitlements available to your account. Contact your MuleSoft account representative if you don’t know how many VPN entitlements you have on your account.
Can we rollback to the old VPN if there is a problem?
Deleting the Legacy VPN is irreversible. If you face any problems after migrating, please raise a Support case.
Will this cause any downtime?
Following the instructions outlined in this article will ensure that downtime is kept to a minimum. The actual cutover should only take a few minutes, similar to restarting an existing VPN connection, but downtime may still occur.
We recommended scheduling a proper maintenance window for the cutover activity, to allow adequate time for testing after making the change. If possible, migrate the Non-Production environments first, and schedule the Production changes only after resolving any issues identified in Non-Production.
Numéro d’article de la base de connaissances
001116925
Cet article a-t-il résolu votre problème ?
Dites-nous ce que nous pouvons améliorer !
