Vælg en organisation
How to Create an Account and Its Contact at Once Using the Salesforce Composite Connector
Udgivelsesdato: Jul 24, 2025
Opgave
GOAL
This applies to Anypoint Studio 7.x
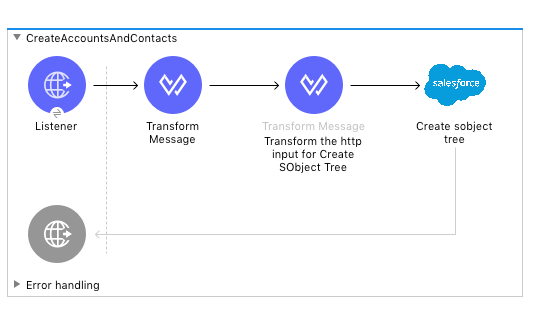
Salesforce Composite Connector can create subject tree, which means it creates multiple Salesforce records which have a relationship between them. This example will create 6 records in Salesforce as below.
- 3 Account records
- ParentAccount1
- ChildAccount1 (its parent Account is the ParentAccount1)
- Account2
- 3 Contact records for the Account records
- Contact1 (its Account is the ParentAccount1)
- Contact2 (its Account is the Account2)
- Contact3 (its Account is the Account2)
Trin
2. Import the attached project file(SalesforceCompositeConnector-CreateAccountsAndContacts.jar)
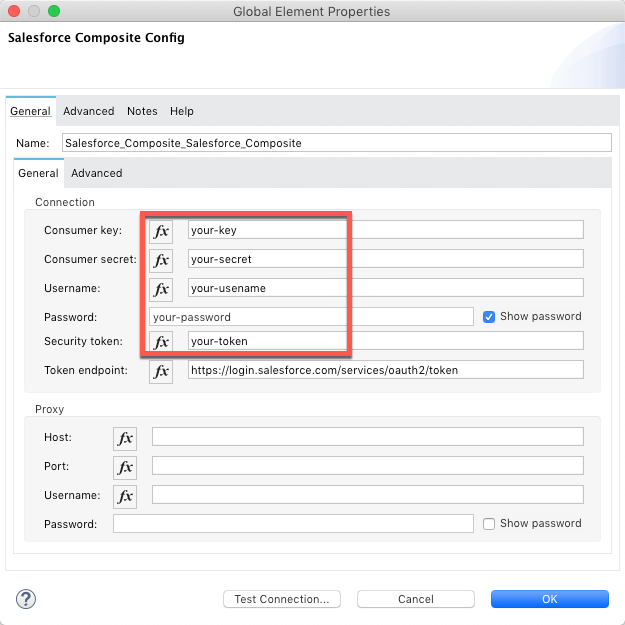
3. Adjust the values in Salesforce Composite Config to connect to your Salesforce.
4. Run the application
5. Access http://localhost:8081/test via a browser then it will create Accounts and Contacts in Salesforce
- Contents of the 1st Transform component
As shown below, this is setting the values of sObject trees to create 6 records of Account and related Contact.
Creates one or more sObject trees requires each record's type and reference ID. You can find more detail in REST API Developer Guide - SObject Tree
		<ee:transform doc:name="Transform Message" doc:id="d3d26cef-1082-4449-9d50-5584551be00c" >
			<ee:message >
				<ee:set-payload ><![CDATA[%dw 2.0
output application/json
---
{
  "sObjectTrees": {
    "records": [
      {
        "Name": "ParentAccount1",
        "attributes": {
          "objectType": "Account",
          "referenceId": "ref4"
        },
        "ChildAccounts": {
          "records": [
            {
              "Name": "ChildAccount1",
              "attributes": {
                "objectType": "Account",
                "referenceId": "ref5"
              }
            }
          ]
        },
        "Contacts": {
          "records": [
            {
              "LastName": "Contact1",
              "attributes": {
                "objectType": "Contact",
                "referenceId": "ref6"
              }
            }
          ]
        }
      },
      {
        "Name": "Account2",
        "attributes": {
          "objectType": "Account",
          "referenceId": "ref1"
        },
        "Contacts": {
          "records": [
            {
              "LastName": "Contact2",
              "attributes": {
                "objectType": "Contact",
                "referenceId": "ref2"
              }
            },
            {
              "LastName": "Contact3",
              "attributes": {
                "objectType": "Contact",
                "referenceId": "ref3"
              }
            }
          ]
        }
      }
    ]
  }
}]]></ee:set-payload>
			</ee:message>
		</ee:transform>
- Contents of the 2nd Transform component
As shown below, this is mapping the data of 6 records into payload.sObjectTrees.records which was set in the 1st Transform component.
		<ee:transform doc:name="Transform the http input for Create SObject Tree"
                      doc:id="1c05fd08-52b9-48f8-bb8a-5a75ba2cf7fe">
            <ee:message>
                <ee:set-payload><![CDATA[%dw 2.0
output application/java
---
payload.sObjectTrees.records map ((record , indexOfRecord) -> {
	"attributes": {
		"type": record.attributes.objectType,
		"referenceId": record.attributes.referenceId
	},
	"Name": record.Name,
	("ChildAccounts": {
		"records": record.ChildAccounts.records map ((record01 , indexOfRecord01) -> {
			"attributes": {
				"type": record01.attributes.objectType,
				"referenceId": record01.attributes.referenceId
			},
			"Name": record01.Name
		})
	}),
	"Contacts": {
		"records": record.Contacts.records map ((record01 , indexOfRecord01) -> {
			"attributes": {
				"type": record01.attributes.objectType,
				"referenceId": record01.attributes.referenceId
			},
			"LastName": record01.LastName
		})
	}
})
]]></ee:set-payload>
            </ee:message>
        </ee:transform>
Disclaimer: This example is provided as a reference for your own usage and is not to be considered a MuleSoft product. This example should be considered as a custom solution. The custom solution is not a Supported MuleSoft product.
Disclaimer: This solution provides a suggestion that should be considered in conjunction with your specific use-case and requirements and does not represent a complete solution for all circumstances.
Yderligere ressourcer
Vidensartikelnummer
001117021
Løste denne artikel dit problem?
Giv os besked, så vi kan forbedre os!