조직 선택
Anypoint Platform Single Sign-On (SSO) SAML Troubleshooting Guide
게시 일자: Aug 28, 2025
상세 설명
Configuring SAML in Anypoint Platform External Identity to enable SSO is well documented here. However, there are times when authentication fails with an "Unauthorized" error. This article gives some guidelines on troubleshooting this issue.
솔루션
Here are steps to troubleshoot the "Unauthorized" error with authentication using SSO.
Step 1
Capture the SAML sent from the browser to Anypoint Platform
For SAML 2 based SSO, since May 30, 2020, Anypoint Platform supports both IdP-Initiated SSO and SP-Initiated SSO. Please reference SP-Initiated SSO Using IDP-Initiated SSO URL Fails with Unauthorized Error and make sure the correct SSO URL is configured in the Anypoint Platform.
After a user is authenticated by IDP, a SAML token is generated from the IDP and will be sent (POST) to one of the below endpoints depending on where the Anypoint Platform Organization's located:
- Anypoint Platform: https://anypoint.mulesoft.com/accounts/login/<:org-domain>/providers/<:providerId>/receive-id
- Anypoint Platform EU Control Plane: https://eu1.anypoint.mulesoft.com/accounts/login/<:org-domain>/providers/<:providerId>/receive-id
- Anypoint Platform Gov Cloud: https://gov.anypoint.mulesoft.com/accounts/login/<:org-domain>/providers/<:providerId>/receive-id
Note: in the above URLs, all the values within < > need to be replaced by actual values that can be obtained by navigating to Anypoint > Access Management > Identity Provider > Identity Provider details > Assertion Consumer Service (ACS) field value
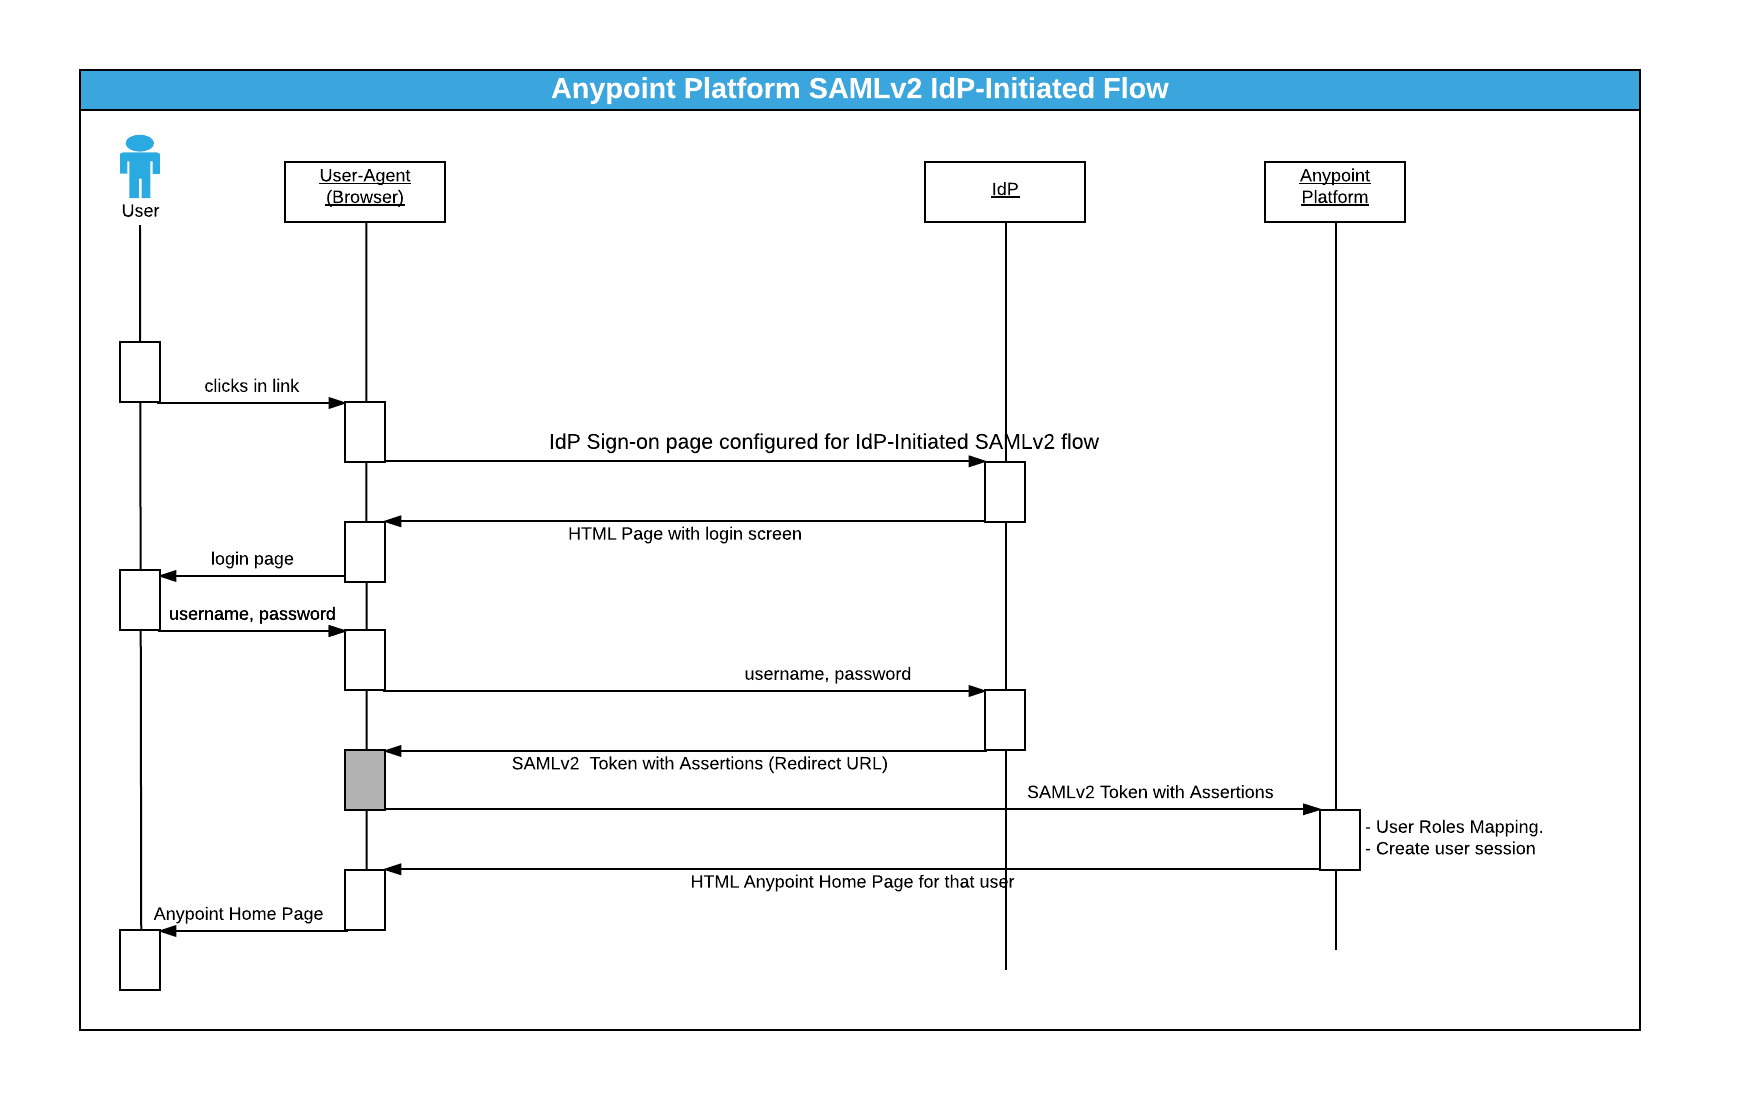
Please see the sequence diagram below(using IdP Initiated SSO as an example):
To troubleshoot the "Unauthorized" issue, we need to capture the SAML sent from the browser to the Anypoint Platform.
You can use browser plugins like "SAML tracer" for Firefox or "SAML Chrome Panel" for Chrome to capture the HTTP request/response, including SAML assertion. You can also follow the steps in How to Extract SAML Assertion XML From HAR File.
Step 2
Check the "issuer" and "audience"
Locate the "issuer" and "audience" in your SAML. It is something like:
<ns1:Issuer xmlns:ns1="urn:oasis:names:tc:SAML:2.0:assertion" Format="urn:oasis:names:tc:SAML:2.0:nameid-format:entity">ISSUER_STRING</ns1:Issuer>
...
<ns2:AudienceRestriction>
  <ns2:Audience>AUDIENCE_STRING</ns2:Audience>
</ns2:AudienceRestriction>
Please make sure the content of the "issuer" and "audience" are EXACTLY identical, respectively to what you configured in Anypoint Platform Identity Management SAML 2.0 section. Any mismatch would cause a failure, for example:
http://stgfederate.mydomain.com/mule does NOT match https://stgfederate.mydomain.com/mule
Step 3
Check the "X.509Certificate"
Locate the X.509Certificate in your SAML. It is something like:
<ds:X509Certificate>
PUBLIC_CERTIFICATE_PERM_FORMAT_STRING
</ds:X509Certificate>
Please make sure the content of "X.509Certificate" is EXACTLY identical to what you configured in Anypoint Platform Identity Management SAML 2.0 "Public Key" section.
Step 4
Check the "Username Attribute"
If "Username Attribute" mapping is not configured, Anypoint Platform will look for the "NameID" in the Subject section of the SAML assertion. However, if a "Username Attribute" mapping is configured, Anypoint Platform will look for the configured attribute name/value from SAML attributes, and fail if it's not found.
Step 5
Check the "Email Attribute"
Email is mandatory for a user to exist in the Anypoint Platform. If "Email Attribute" mapping is not configured, Anypoint Platform will look for the "email" attribute from the SAML attributes. However, if the email attribute name in the SAML assertion is different to "email", "Email Attribute" mapping needs to be configured to match the actual attribute name.
Step 6
Check the "Group Attribute"
Group is not mandatory for a user to exist in the Anypoint Platform. But if your user is assigned a group in SSO, then a group attribute is needed and needs to be configured
e.g., your SAML might have an entry like below
<Attribute Name="http://schemas.microsoft.com/ws/2008/06/identity/claims/groups">
Step 7
Contact Support
If all above are checked while "Unauthorized" is still seen, please open a Support case with the following information:
- HTTP capture from browser with SAML assertion (See: How to retrieve HTTP archive files (HAR))
- The exact time (with timezone) of the failed login attempt.
With the above information, support will be able to complete further investigations into the possible reasons for the authentication failure.
Knowledge 기사 번호
001118485
이 기사를 통해 문제를 해결했습니까?
개선을 위한 의견을 보내주세요.