Sélectionner une organisation
Anypoint Studio Error: “Valid cert chain, but no trust certificate found!” and “Unable to find valid certification path to requested target”
Date de publication: Mar 27, 2026
Description
The following are two different types of SSLHandshakeException errors that are recorded in Anypoint Studio when either connecting to Anypoint Exchange, Design Center, Studio, Connector, Munit, Runtime update or deploying an application to Cloudhub.
- javax.net.ssl.SSLHandshakeException: org.eclipse.ecf.internal.ssl.ECFCertificateException: Valid cert chain, but no trust certificate found!
- javax.net.ssl.SSLHandshakeException: sun.security.validator.ValidatorException: PKIX path building failed: sun.security.provider.certpath.SunCertPathBuilderException: unable to find valid certification path to requested target
Note that the UI might show a generic unable to access, download or access denied error. The certificate error is captured in Anypoint Studio. For more information on how to view errors in MuleSoft Anypoint Studio refer to How to Retrieve Studio Error Logs.
The URL that received the SSLHandshakeException will be part of the exception Stacktrace. Below is a sample:
Caused by: org.apache.maven.wagon.TransferFailedException: transfer failed for https://maven.anypoint.mulesoft.com/api/v3/maven/...
at org.apache.maven.wagon.shared.http.AbstractHttpClientWagon.fillInputData(AbstractHttpClientWagon.java:1250)
at org.apache.maven.wagon.shared.http.AbstractHttpClientWagon.fillInputData(AbstractHttpClientWagon.java:1140)
at org.apache.maven.wagon.StreamWagon.getInputStream(StreamWagon.java:126)
at org.apache.maven.wagon.StreamWagon.getIfNewer(StreamWagon.java:88)
at org.apache.maven.wagon.StreamWagon.get(StreamWagon.java:61)
... 17 more
Caused by: javax.net.ssl.SSLHandshakeException: PKIX path building failed: sun.security.provider.certpath.SunCertPathBuilderException: unable to find valid certification path to requested target
Résolution
When receiving a SSL handshake error (SSLHandshakeException) recorded in Anypoint Studio, the cause can be from several factors such as:
- "Valid cert chain, but no trust certificate found" error occurs when the Java truststore doesn't have Anypoint platform or Studio update host.
- "Unable to find valid certification path to requested target" error occurs when the Java truststore doesn't have the full certificate chain.
- Anypoint Studio uses JDK 11 to launch Studio because of an Eclipse update. We also bundle Studio with JDK 8 to run the embedded runtime. So Studio uses 11 and 8 for different things.
Note: If the error occurs only while you are using a VPN, ensure that you are connected to the VPN before completing all of these steps.
Perform the following to resolve the SSL handshake error.
Part 1: Download the certificates
-
Create a folder to download/store the certificates on your computer
-
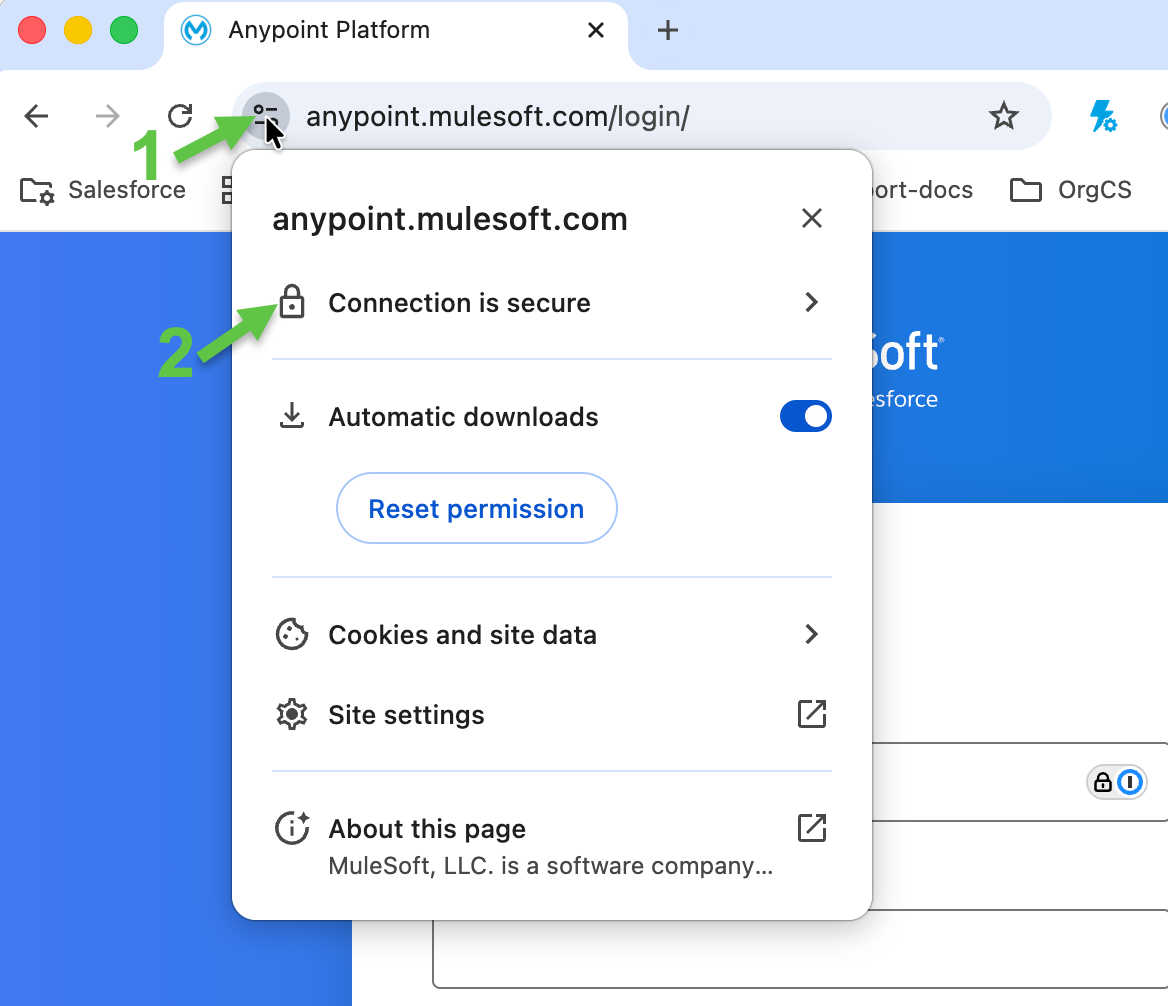
Open a browser and go to the URL that is displayed in the Caused by section in the Error Log as per above sample. For Example, https://anypoint.mulesoft.com/login or https://maven.anypoint.mulesoft.com or studio.mulesoft.org or studio-metrics-report.cloudhub.io or download.eclipse.org
If you are unsure which host is causing the error, refer to the article below to enable SSL debug logs and check the server name in the ClientHello message:
How to Collect SSL Debug Logs for Anypoint Studio Connectivity Issues. - Click the Site icon in the browser address bar then click Connection is secure
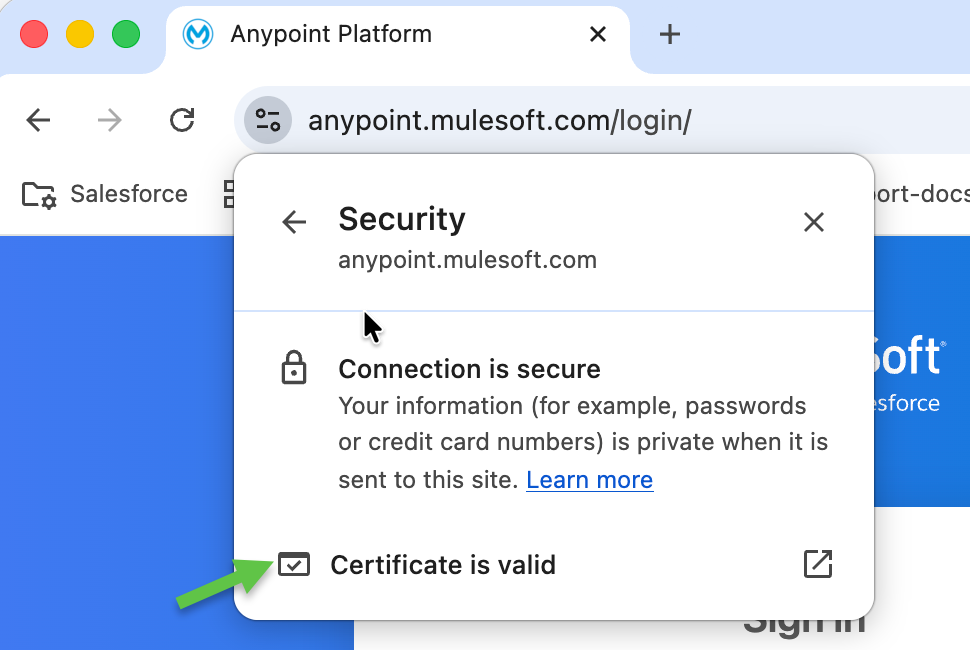
- Click the certificate is valid to view the certificates
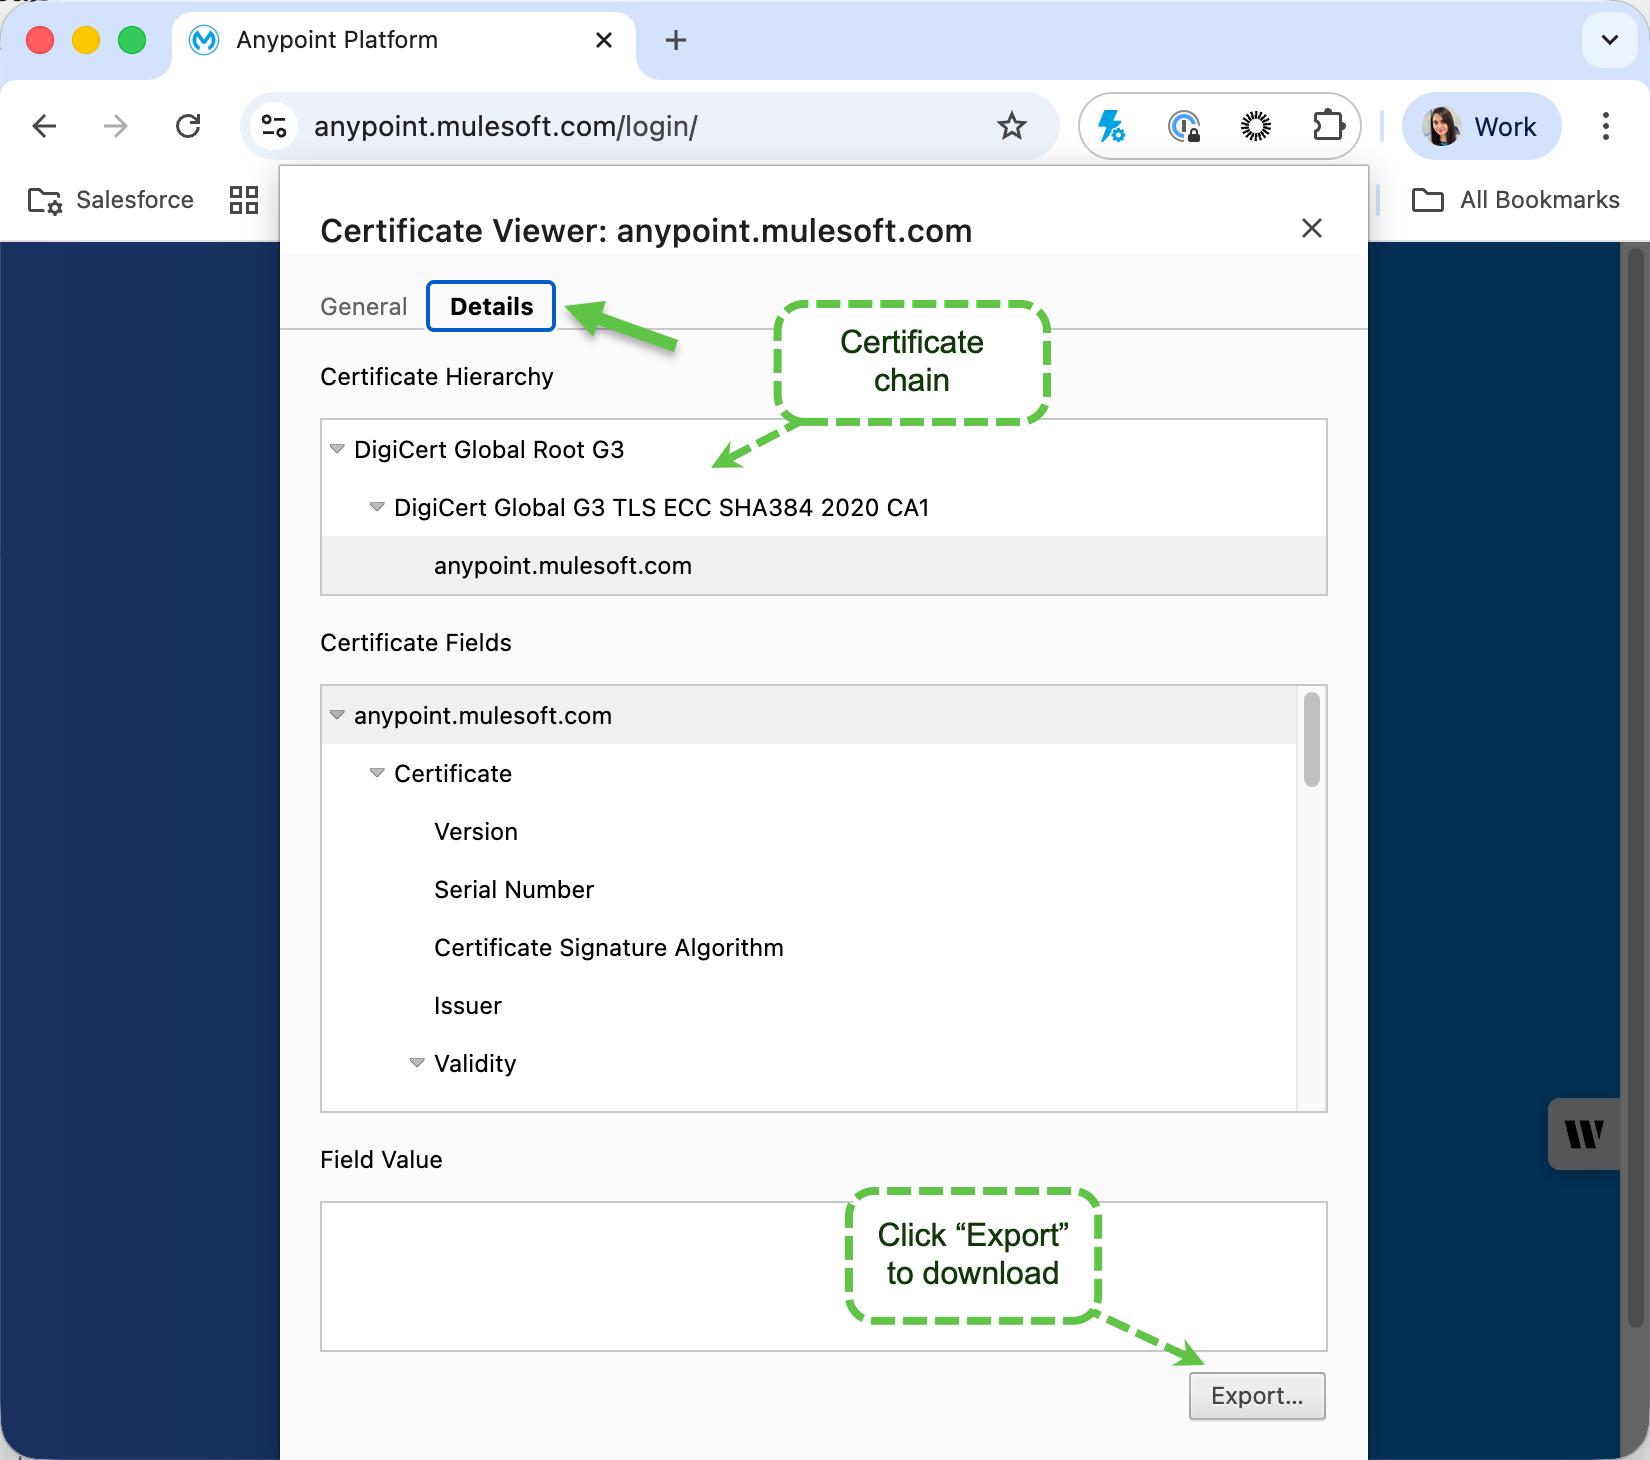
- You should see all the required certificates - here there are only three, but you might also see four. You will need to select each certificate and download all of them one by one. Below screenshots are from Chrome browser on Mac OS.
- When downloading each certificate, save the certificate in the folder you created and rename the certificate matching the original name of the certificate as much as possible. Please delete any spaces. For example, if the certificate is called, "Amazon Root CA 1", rename it to “amazon_root_ca_1.cer”.
- Open a new file in a text editor. Copy/paste the full location of each certificate in the text file. For example, for Windows, a locations could look like: C:\Users\TestUser\Downloads\Mulesoft_Certificates\Zscaler_Root_CA.crt
- For Windows: Click details and then copy to file. Download ALL the certificates using the certificate export wizard into your new folder.
- At this point, you should have 3-4 paths copied into your text file
- Now we are going to construct a keytool command

Part 2: Create the keytool commands to install the certificates to Java trust store
-
Copy the path of the folder where the certificates are saved and paste it into a text editor.
-
For Mac: To copy a path in Mac, open Finder, right-click or select Control and click the folder or file you need the path to, hold down the OPTION key, and you should see the “Copy as Pathname” option.
-
For Windows: To copy a path in Windows, open a finder, navigate to the folder or file you need the path to, click the area on the top of the finder that shows the location and it should allow you to copy the path.
-
-
In a text editor, copy/paste the following commands.
Note that you will need to create one keytool command per certificate. For example, in the example image above, you will need two keytool commands, one for Amazon and one for Amazon CA Root 1. Your number of keytool commands will vary depending on how many certificates you have (usually 2 or 3).
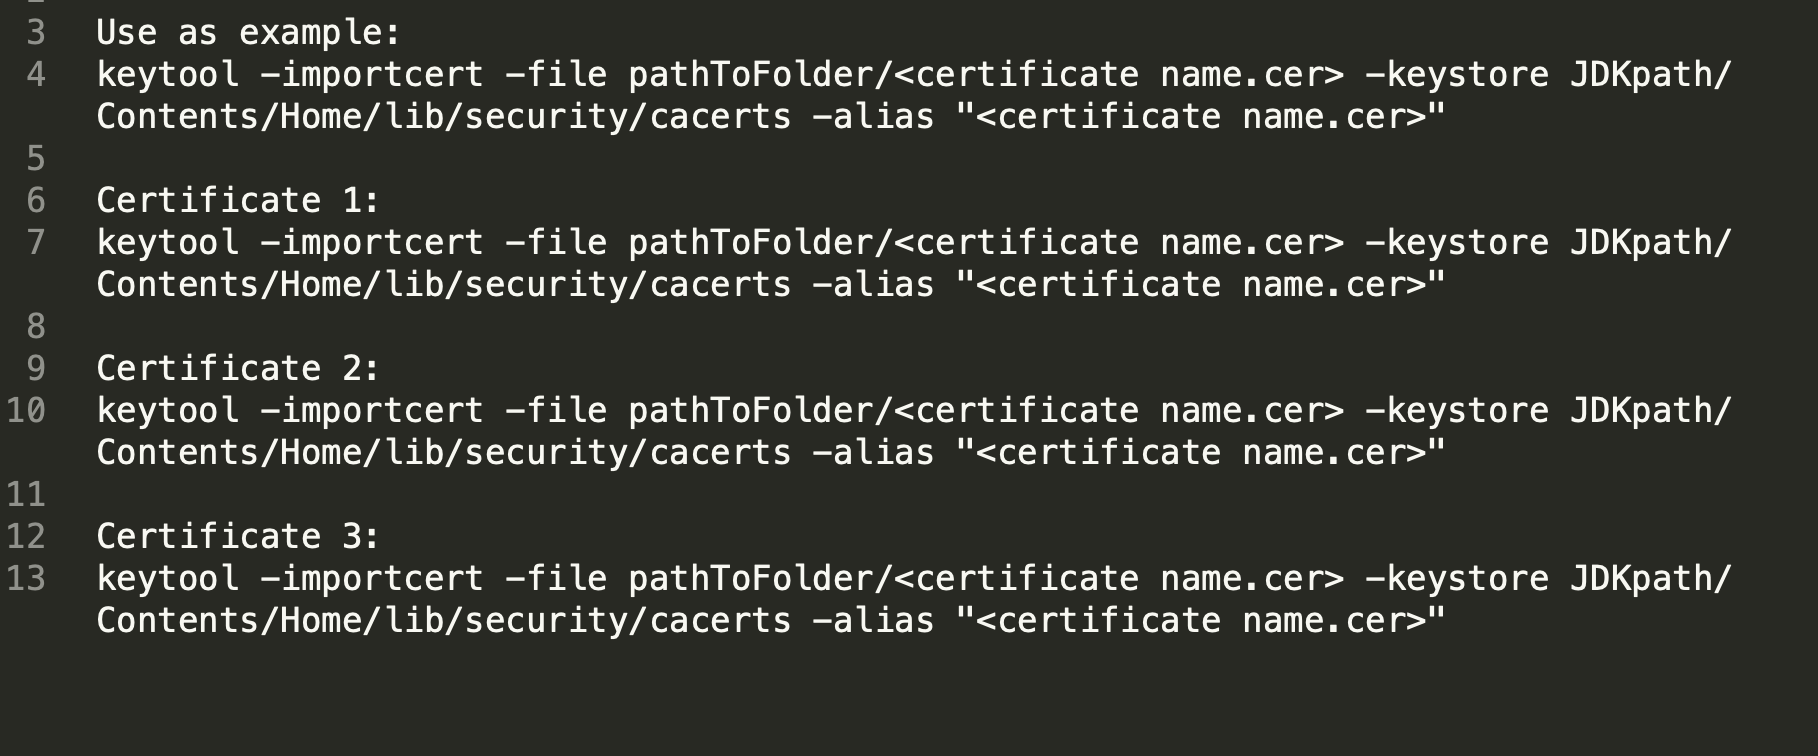
Tip: If you have three certificates, its recommended copying/pasting the below example keytool command four times into your text editor as new lines, so you can keep one line as an example and edit the other lines for each certificate. Here is an example:-
For Mac: keytool -importcert -file pathToFolder/<certificate name.cer> -keystore JDKpath/Contents/Home/lib/security/cacerts -alias "<certificate name.cer>"
-
For Windows: keytool -importcert -file C:\Users\TestUser\Downloads\Mulesoft_Certificates\Zscaler_Root_CA.crt -keystore C:\Users\TestUser\Downloads\AnypointStudio718\plugins\org.mule.tooling.jdk.win32.x86_64_1.3.1\lib\security\cacerts -alias “Zscaler_Root_CA”
-
-
Insert the path to the folder where it says pathToFolder. Add the name of the certificate where it says <certificate name.cer>.
-
For Mac: keytool -importcert -file /Users/myName/cert/amazon.cer -keystore <JDKpath>/Contents/Home/lib/security/cacerts -alias "amazon.cer"
-
For Windows: keytool -importcert -file C:\Users\TestUser\Downloads\Mulesoft_Certificates\amazon.cer -keystore <JDKpath>\lib\security\cacerts -alias "amazon.cer"
-
-
Open the Anypoint Studio .ini file. For more information on how to open this file refer to How to find the AnypointStudio ini file.
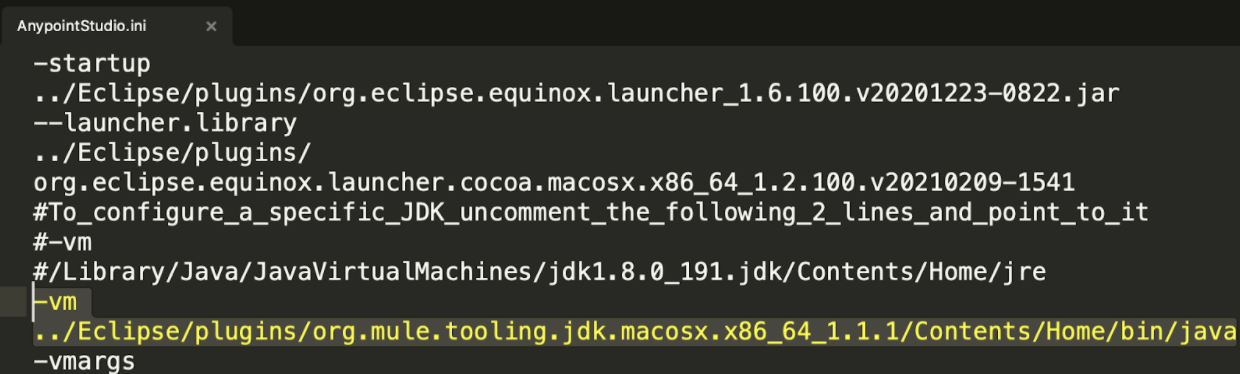
- Look at the -vm argument showing which Java installation Studio is using. V8 means JDK 8 and if there is no mention of the version then it is JDK11. This example shows JDK 11:
-
Go to the folder where Studio is installed, then navigate to plugins and now find the JDK folder listed in the .ini file. It will be a folder starting with "org.mule.tooling.jdk". In the example screenshot, "org.mule.tooling.jdk.macosx.x86_64_1.1.1" is the JDK folder, (Pick the relevant JDK version folder used in your Anypoint Studio)
- For Mac: This is what it will look like:
-
For Windows: This is what it will look like:
- For Mac: This is what it will look like:
-
Copy the path to the JDK listed in the .ini file and in the text editor, replace JDKpath with the path that was copied. This is what the completed command will look like.
-
For Mac: keytool -importcert -file /Users/myName/cert/Amazon.cer -keystore /Applications/AnypointStudio710.app/Contents/Eclipse/plugins/org.mule.tooling.jdk.macosx.x86_64_1.1.1/Contents/Home/lib/security/cacerts -alias "Amazon.cer"
-
For Windows: keytool -importcert -file C:\Users\TestUser\Downloads\Mulesoft_Certificates\amazon.cer -keystore C:\AnypointStudio710\plugins\org.mule.tooling.jdk.win32.x86_64_1.1.1\lib\security\cacerts -alias "amazon.cer"
-
-
Replicate the command for all the certificates you have downloaded. Make sure you have a unique line for each of the certificates. For example, if you are using Mac and have three certificates and a folder called “cert”, you should have three unique commands like this. Make sure "cacerts" is included:
-
keytool -importcert -file /Users/myName/cert/certificate_1.cer -keystore /Applications/AnypointStudio710.app/Contents/Eclipse/plugins/org.mule.tooling.jdk.macosx.x86_64_1.1.1/Contents/Home/lib/security/cacerts -alias "certificate_1.cer"
-
keytool -importcert -file /Users/myName/cert/certificate_2.cer -keystore /Applications/AnypointStudio710.app/Contents/Eclipse/plugins/org.mule.tooling.jdk.macosx.x86_64_1.1.1/Contents/Home/lib/security/cacerts -alias "certificate_2.cer"
-
keytool -importcert -file /Users/myName/cert/certificate_3.cer -keystore /Applications/AnypointStudio710.app/Contents/Eclipse/plugins/org.mule.tooling.jdk.macosx.x86_64_1.1.1/Contents/Home/lib/security/cacerts -alias "certificate_3.cer"
-

Part 3: Install the certificate to Java trust store
-
Open the Terminal on Mac or a command prompt on Windows as administrator. You can be in any directory. Paste in each of the keytool commands one at a time that was created in the previous section.
-
Enter password as “changeit”. The password is all lowercase with no spaces.
-
Type “y” if it asks you if you trust the certificate.
-
After running the commands, restart Studio.
-
Even after installing the certificates, if the certificate error persists on Windows, then contact your IT team to allow list Studio URLs. For more information, refer to - What URLs need to be allowed by my IT team to run Anypoint Studio?
Numéro d’article de la base de connaissances
001122500
Cet article a-t-il résolu votre problème ?
Dites-nous ce que nous pouvons améliorer !