조직 선택
오류: Anypoint Studio에서 "유효한 인증서 체인이지만 신뢰할 수 있는 인증서가 없습니다." 및 "요청된 대상에 유효한 인증서 경로를 찾을 수 없습니다."
게시 일자: Mar 27, 2026
솔루션
증상
다음은 Anypoint Exchange, Design Center, Studio, 커넥터, Munit, 런타임 업데이트에 연결하거나 Cloudhub에 응용 프로그램을 배포할 때 Anypoint Studio에 기록되는 두 가지 SSLHandshakeException 오류 유형입니다.
javax.net.ssl.SSLHandshakeException: org.eclipse.ecf.internal.ssl.ECFCertificateException: 유효한 인증서 체인이지만 신뢰할 수 있는 인증서가 없습니다.
javax.net.ssl.SSLHandshakeException: sun.security.validator.ValidatorException: PKIX path building failed: sun.security.provider.certpath.SunCertPathBuilderException: 요청된 대상에 유효한 인증서 경로를 찾을 수 없습니다
UI에 일반적인 액세스할 수 없음, 다운로드할 수 없음 또는 액세스 거부 오류가 표시될 수 있습니다. 인증서 오류는 Anypoint Studio에서 수집됩니다. Anypoint Studio를 보는 방법에 대한 자세한 내용은 Studio 오류 로그 검색 방법을 참조하십시오.
원인
- Java truststore에 Anypoint Platform 또는 Studio 업데이트 호스트가 없을 경우 "유효한 인증서 체인이지만 신뢰할 수 있는 인증서가 없습니다" 오류 발생
- Java truststore에 전체 인증서 체인이 없을 경우 "요청된 대상에 유효한 인증서 경로를 찾을 수 없습니다" 오류 발생
- 서비스 업데이트로 인해 Anypoint Studio는 JDK 11을 사용하여 Studio를 실행합니다. Studio를 JDK 8과 번들로 사용하여 내장형 런타임도 실행합니다. 따라서 Studio는 다양한 항목에 대해 11 및 8을 사용합니다.
솔루션
참고: VPN을 사용하는 동안에만 오류가 발생할 경우 다음 단계를 모두 완료하기 전에 VPN에 연결되어 있는지 확인하십시오.
방법:
파트 1: 인증서 다운로드
-
폴더를 만들어 컴퓨터에 인증서를 다운로드/저장
-
브라우저를 열고 https://anypoint.mulesoft.com/login(및/또는 액세스하면 오류가 표시되는 기타 모든 URL, 예: studio.mulesoft.org 또는 download.eclipse.org)으로 이동합니다.
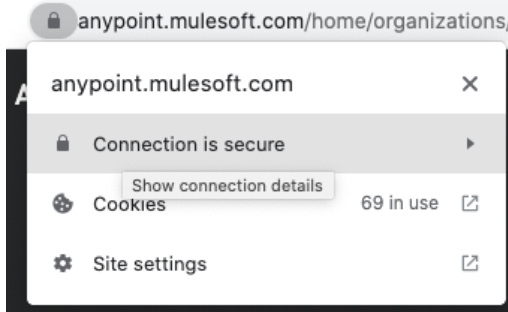
- 브라우저 주소 표시줄에서 잠금 아이콘을 클릭한 다음, 연결이 안전함을 클릭합니다
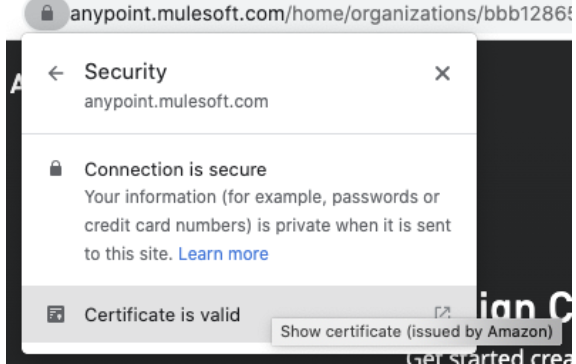
- 인증서 보기에 유효한 인증서를 클릭합니다
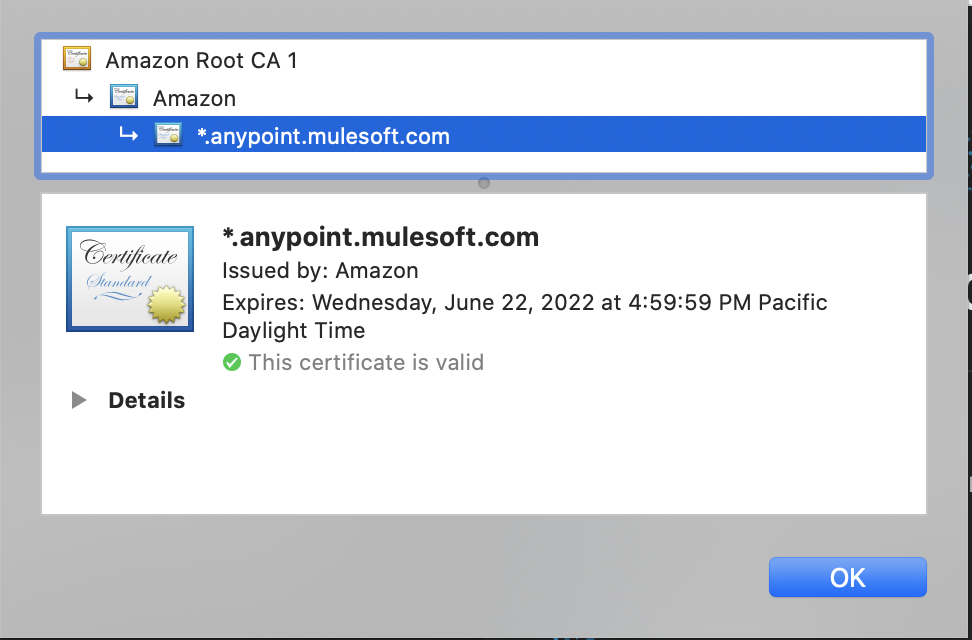
- 모든 필수 인증서가 나타나야 합니다. 여기서는 세 개만 있지만 네 개가 표시될 수도 있습니다. 모든 파일을 다운로드해야 합니다.
- 각 인증서를 다운로드할 때 생성한 폴더에 인증서를 저장하고 최대한 인증서의 원래 이름과 일치하는 인증서의 이름을 변경합니다. 공백을 모두 삭제하십시오. 예를 들어 인증서 이름이 "Amazon Root CA 1"이면 이름을 "amazon_root_ca_1.cer"으로 변경합니다.
- 텍스트 편집기에서 새 파일을 엽니다. 텍스트 파일에 각 인증서의 전체 위치를 복사하여 붙여 넣습니다. 예를 들어 Windows의 경우 위치는 다음과 같이 표시될 수 있습니다: C:\Users\TestUser\Downloads\Mulesoft_Certificates\Zscaler_Root_CA.crt
- Mac: 다음은 두 번째 Mac용 인증서를 다운로드하는 과정입니다. 세부 사항 클릭 - 아래로 스크롤하기 -.crt로 끝나는 URI 링크 찾기 - 클릭하면 다운로드되어야 합니다.
-
Windows: 세부 사항을 클릭한 다음, 파일에 복사합니다. 인증서 내보내기 마법사를 사용하여 모든 인증서를 새 폴더에 다운로드합니다.
- 현재 3~4개의 경로가 텍스트 파일에 복사되어 있어야 합니다
- 이제 keytool 명령을 구성합니다

파트 2: Keytool 명령을 만들어 인증서를 신뢰할 수 있는 Java 매장에 설치합니다
-
인증서가 저장된 폴더의 경로를 복사하여 텍스트 편집기에 붙여 넣습니다.
-
Mac: Mac에서 경로를 복사하고 검색기를 열고 제어를 마우스 오른쪽 버튼으로 클릭하거나 선택한 다음, 경로가 필오한 폴더 또는 파일을 클릭하고 OPTION 키를 길게 누르면 "경로 이름으로 복사" 옵션이 표시됩니다.
-
Windows: Windows에 경로를 복사하고 검색기를 열어 경로가 필요한 폴더 또는 파일로 이동한 다음, 위치가 표시되는 검색기 상단의 영역을 클릭하면 경로를 복사할 수 있어야 합니다.
-
-
텍스트 편집기에서 다음 명령을 복사/붙여 넣습니다.
인증서당 하나의 keytool 명령을 만들어야 합니다. 예를 들어 위의 예 이미지에서 Amazon용 및 Amazon CA Root 1용과 같은 두 개의 keytool 명령이 필요합니다. keytool 명령 수는 보유한 인증서 수(일반적으로 2개 또는 3개)에 따라 다릅니다.
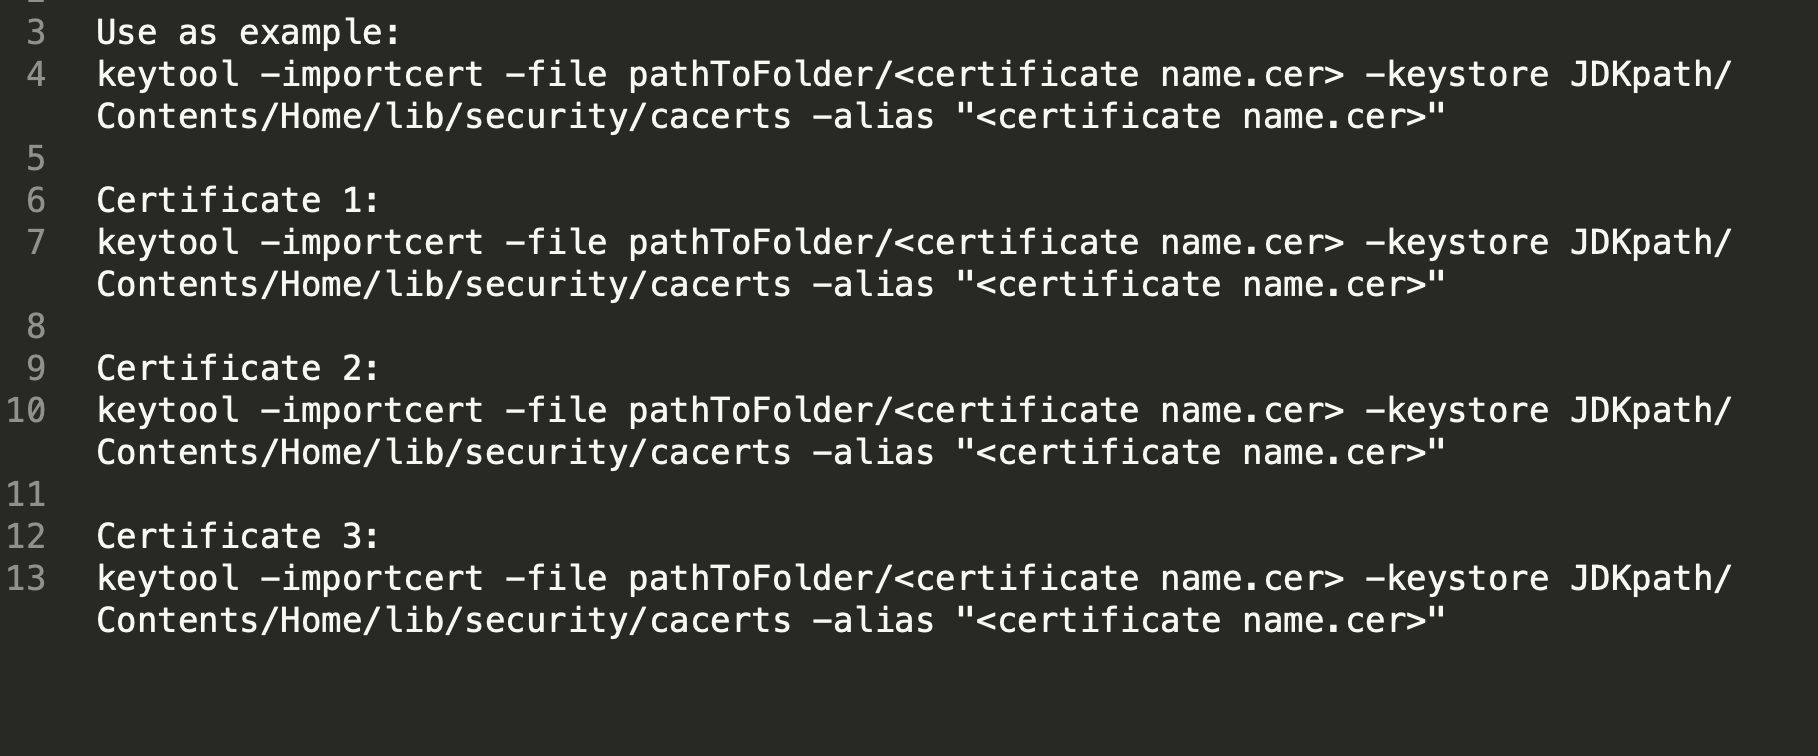
팁: 인증서가 3개일 경우 아래의 keytool 명령 예를 새 행으로 텍스트 편집기에 네 번 복사하고 붙여 넣습니다. 그러면 행 하나는 예로 유지하고 각 인증서에 대해 다른 행을 편집할 수 있습니다. 다음은 예입니다:-
Mac: keytool -importcert -file pathToFolder/ -keystore JDKpath/Contents/Home/lib/security/cacerts -alias ""
-
Windows: keytool -importcert -file C:\Users\TestUser\Downloads\Mulesoft_Certificates\Zscaler_Root_CA.crt -keystore C:\Users\TestUser\Downloads\AnypointStudio718\plugins\org.mule.tooling.jdk.win32.x86_64_1.3.1\lib\security\cacerts -alias "Zscaler_Root_CA"
-
-
폴더에 경로를 삽입합니다(pathToFolder). 인증서 이름을 추가합니다().
-
Mac: keytool -importcert -file /Users/myName/cert/amazon.cer -keystore JDKpath/Contents/Home/lib/security/cacerts -alias "amazon.cer"
-
Windows: keytool -importcert -file /Users/myName/cert/amazon.cer -keystore JDKpath\lib\security\cacerts -alias "amazon.cer"
-
-
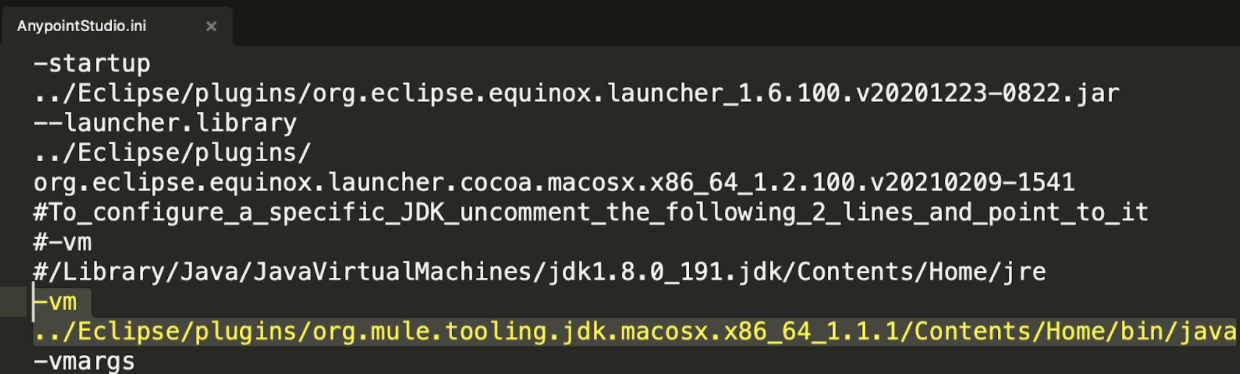
Anypoint Studio.ini 파일을 엽니다. 이 파일을 여는 방법에 대한 자세한 내용은 AnypointStudio ini 파일을 찾는 방법을 참조하십시오.
- 사용 중인 Java 설치 Studio를 알려주는 -vm 인수를 살펴봅니다. V8은 JDK 8을 의미하며 버전이 언급되지 않은 경우 JDK11입니다. 이 예는 JDK 11을 보여줍니다:
-
Studio가 설치된 폴더로 이동한 다음, 플러그인으로 이동하고 .ini 파일에 나열된 JDK 폴더를 찾습니다. "org.mule.tooling.jdk"로 시작하는 폴더입니다. 예 스크린샷에서는 "org.mule.tooling.jdk.macosx.x86_64_1.1.1"이 JDK 폴더입니다.
- Mac: 다음과 같이 표시됩니다:
-
Windows: 다음과 같이 표시됩니다:
- Mac: 다음과 같이 표시됩니다:
-
.ini 파일 및 텍스트 편집기에 나열된 JDK에 경로를 복사하고 JDKpath를 복사한 경로로 변경합니다. 다음은 완료된 명령의 레이아웃입니다.
-
Mac: keytool -importcert -file /Users/myName/cert/Amazon.cer -keystore /Applications/AnypointStudio710.app/Contents/Eclipse/plugins/org.mule.tooling.jdk.macosx.x86_64_1.1.1/Contents/Home/lib/security/cacerts -alias "Amazon.cer"
-
Windows: keytool -importcert -file /Users/myName/cert/amazon.cer -keystore /Applications/AnypointStudio710.app/Contents/Eclipse/plugins/org.mule.tooling.jdk.win32.x86_64_1.1.1\lib\security\cacerts -alias "amazon.cer"
-
-
다운로드한 모든 인증서에 대해 명령을 복제합니다. 각 인증서에 대한 고유한 행이 있는지 확인합니다. 예를 들어 Mac을 사용 중이며 인증서 3개와 "cert" 폴더가 있을 경우 다음과 같은 고유한 명령 3개가 있어야 합니다. 다음과 같이 "cacerts"이 포함되어 있는지 확인하십시오:
-
keytool -importcert -file /Users/myName/cert/certificate_1.cer -keystore /Applications/AnypointStudio710.app/Contents/Eclipse/plugins/org.mule.tooling.jdk.macosx.x86_64_1.1.1/Contents/Home/lib/security/cacerts -alias "certificate_1.cer"
-
keytool -importcert -file /Users/myName/cert/certificate_2.cer -keystore /Applications/AnypointStudio710.app/Contents/Eclipse/plugins/org.mule.tooling.jdk.macosx.x86_64_1.1.1/Contents/Home/lib/security/cacerts -alias "certificate_2.cer"
-
keytool -importcert -file /Users/myName/cert/certificate_3.cer -keystore /Applications/AnypointStudio710.app/Contents/Eclipse/plugins/org.mule.tooling.jdk.macosx.x86_64_1.1.1/Contents/Home/lib/security/cacerts -alias "certificate_3.cer"
-

3단계: 신뢰할 수 있는 Java 매장에 인증서를 설치합니다
-
관리자로 Mac에서 터미널을 열거나 Windows에서 명령 프롬프트를 엽니다. 모든 디렉터리에 있을 수 있습니다. 이전 섹션에서 생성된 각 keytool 명령을 한 번에 하나씩 붙여 넣습니다.
-
암호를 "changeit"로 입력합니다. 암호는 공백이 없는 전체 소문자로 구성됩니다.
-
인증서를 신뢰하는지 물을 경우 "y"를 입력합니다.
-
명령을 실행한 후 Studio를 다시 시작합니다.
-
Windows에서 인증서 오류가 지속될 경우 인증서를 설치한 후에도 IT 팀에 문의하여 Studio URL을 화이트리스트로 지정하십시오. 자세한 내용은 Anypoint Studio를 실행하기 위해 IT 팀에서 화이트리스트로 지정해야 하는 UR은 무엇입니까?를 참조하십시오.
추가 리소스
HTTPS 호출이 "SunCertPathBuilderException: 요청된 대상에 유효한 인증서 경로를 찾을 수 없습니다" 또는 "일반적인 SSLEngine 문제"와 함께 실패합니다
Knowledge 기사 번호
001122500
이 기사를 통해 문제를 해결했습니까?
개선을 위한 의견을 보내주세요.