Velg en organisasjon
How to Activate Events to Meta via the Data 360 Conversions API Connector
Publiseringsdato: Nov 5, 2025
Forkunnskaper
Oppgave
Getting Meta Leads Into Data 360
Before you can configure Data 360 (formerly Data Cloud) to detect and send Lead record change events to Meta, you must first establish a connection to the system where you store your Meta leads, and configure a Data Stream to ingest necessary data on those lead objects.
The following content provides instructions for retrieving instant form lead submissions from Meta and syncing lead record data between Salesforce CRM / Marketing Engagement and Data 360.
If you are already ingesting your Meta Leads into Data 360, you can skip this section and proceed to the setup steps outlined in the section titled: Activating Conversion Lead Events to Meta CAPI
Connecting Data 360 to a Non-Salesforce System of Record
If you store Meta Instant Form Leads in a third-party platform, you will need to configure a connector to that system of record to bring the lead data into Data 360.
A list of available connectors and additional guidance can be found in the following help article: Data 360: Connectors and Integrations
- Some ingest connectors are only accessible via a paid add-on license, and consequently might not be accessible in your org
- Access to additional sku-based ingest connectors are not included as part of the Ad Audience license
Connecting Data 360 to Sales Cloud and/or Marketing Cloud
If you store/manage your Meta Instant Form Leads in Sales Cloud or Marketing Cloud, and you have not yet begun ingesting those lead records into Data 360, the following articles provide step-by-step instructions on how to configure those connections to Data 360:
Retrieve Meta Leads with the Salesforce Lead Capture App (Optional)
If you are not currently pulling leads from Meta into your CRM system, Salesforce offers a Lead Capture app to automate the retrieval of Lead Ad Instant Form submissions from Meta, and then import them into the Sales Cloud and/or Marketing Cloud Lead Object.
If you plan to leverage the Salesforce app for retrieving leads from Meta, but have not yet installed and configured the app, here are a few resources to help with that setup process:
- Ingest Lead Ad Data into Data 360
Using Lead Capture App for importing Leads into Marketing Cloud
Using Lead Capture App for importing Leads into Sales Cloud
Note: If you are using Salesforce's Lead Capture App to import leads from Meta to Sales Cloud or Marketing Cloud, please follow the steps below:
Trinn
-
Create a New Field on Your Lead Data Stream
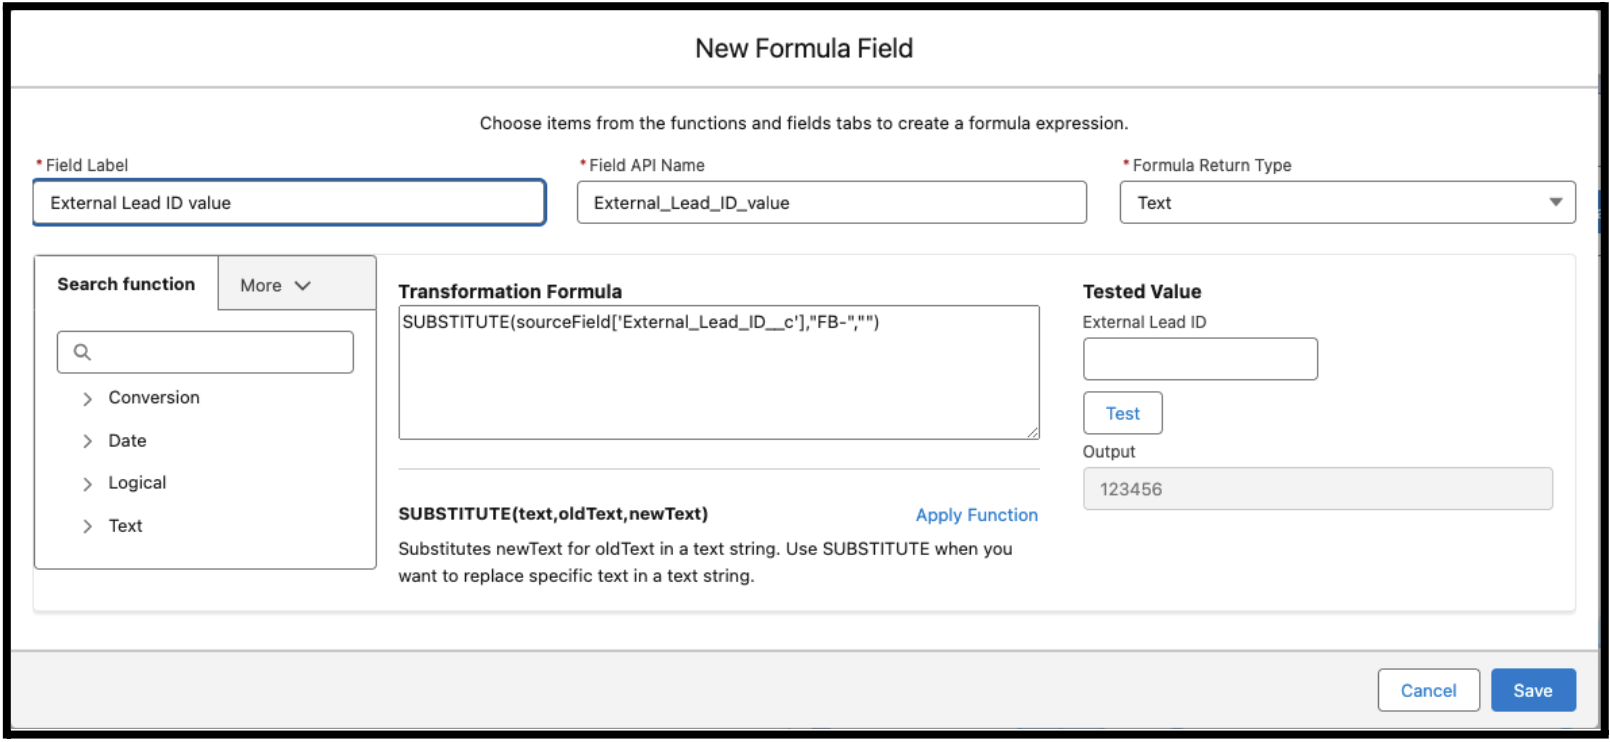
Salesforce's Lead Capture App assigns a "FB-" prefix to External Lead ID values when importing lead data from Meta. To ensure Lead ID values match a Meta user when sending back conversion event information, you must create a new Formula Field on the data stream to parse out that prefix and write it to a new custom field, which we can reference when mapping this source to the Data 360 Lead DMO.
To create the new formula field on your Lead Data Stream object:
-
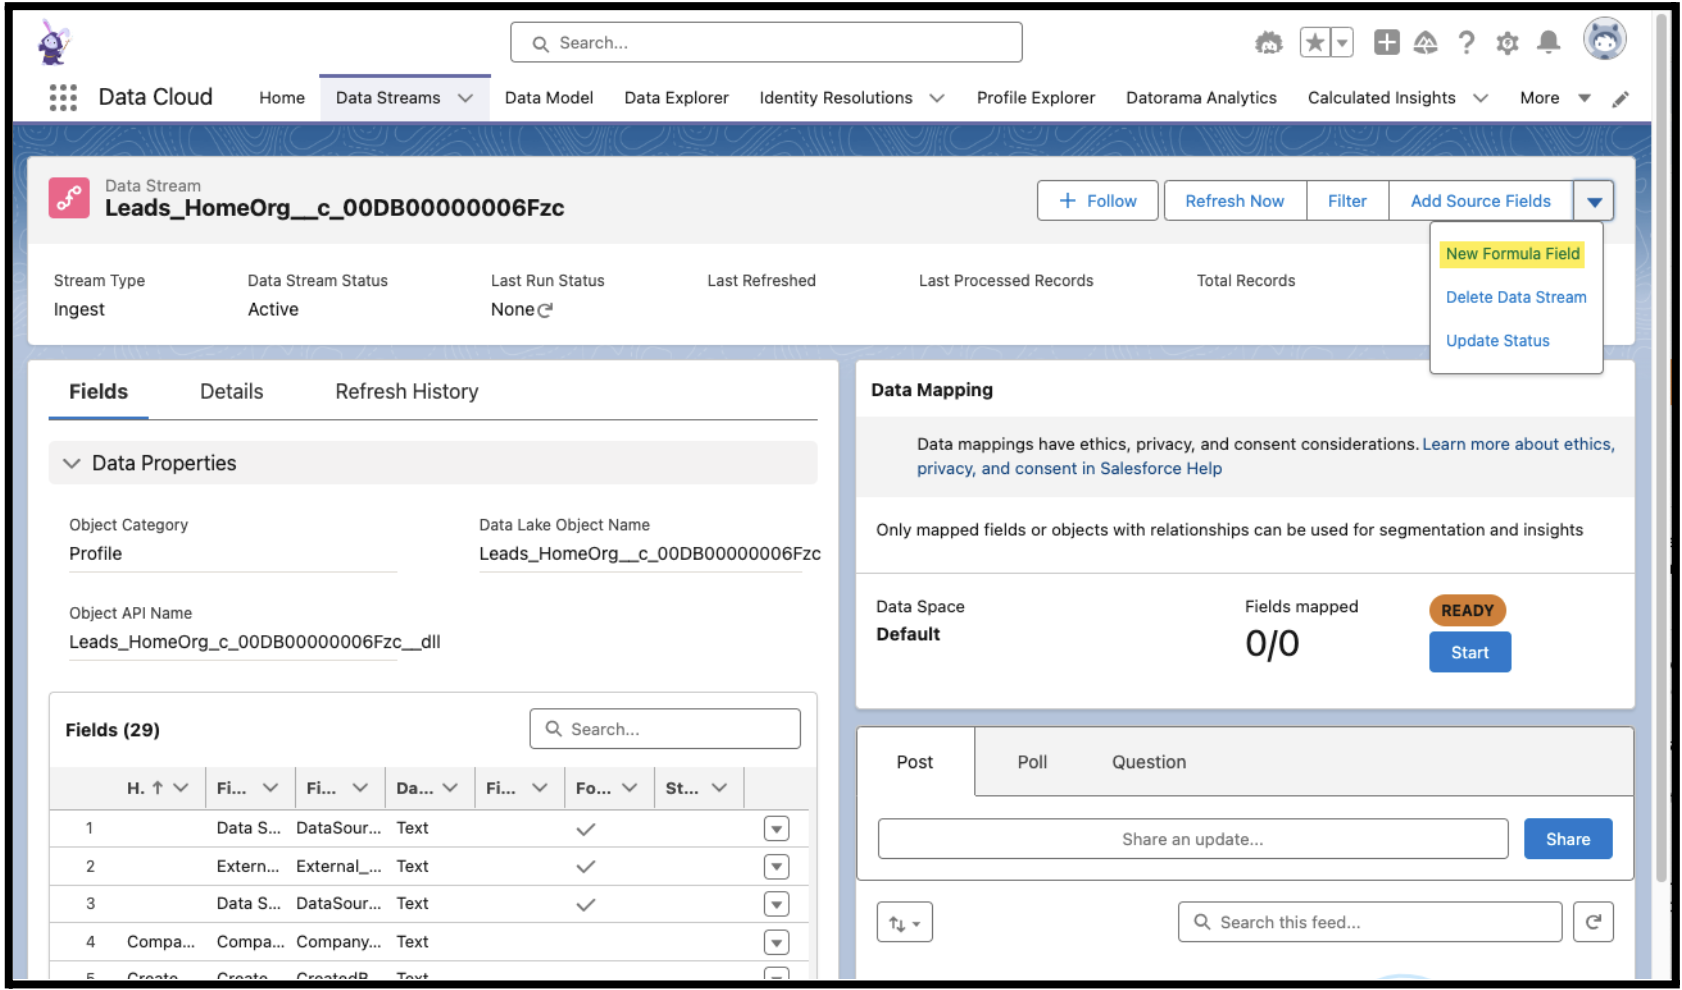
Navigate to Data Streams Tab
-
Click on the Salesforce CRM Data Stream for Lead Ingestion
-
Click the drop down menu on the Lead Data Stream home page, and select New Formula Field
4. Create a new field, with the following text transformation formula a. SUBSTITUTE(sourceField['External_Lead_ID__c'],"FB-","")
5. Assign this new DLO field a Name and click Save
Note:
If fields are Missing on CRM Lead / Opportunity Data StreamsIf you are ingesting Lead data from Sales Cloud / Salesforce CRM, and the Data 360 Data Stream is missing fields from the Lead Record (e.g. External Lead ID), it is likely due to a Read Access permission. More information on how to resolve this issue can be found in the FAQ Section of this document.
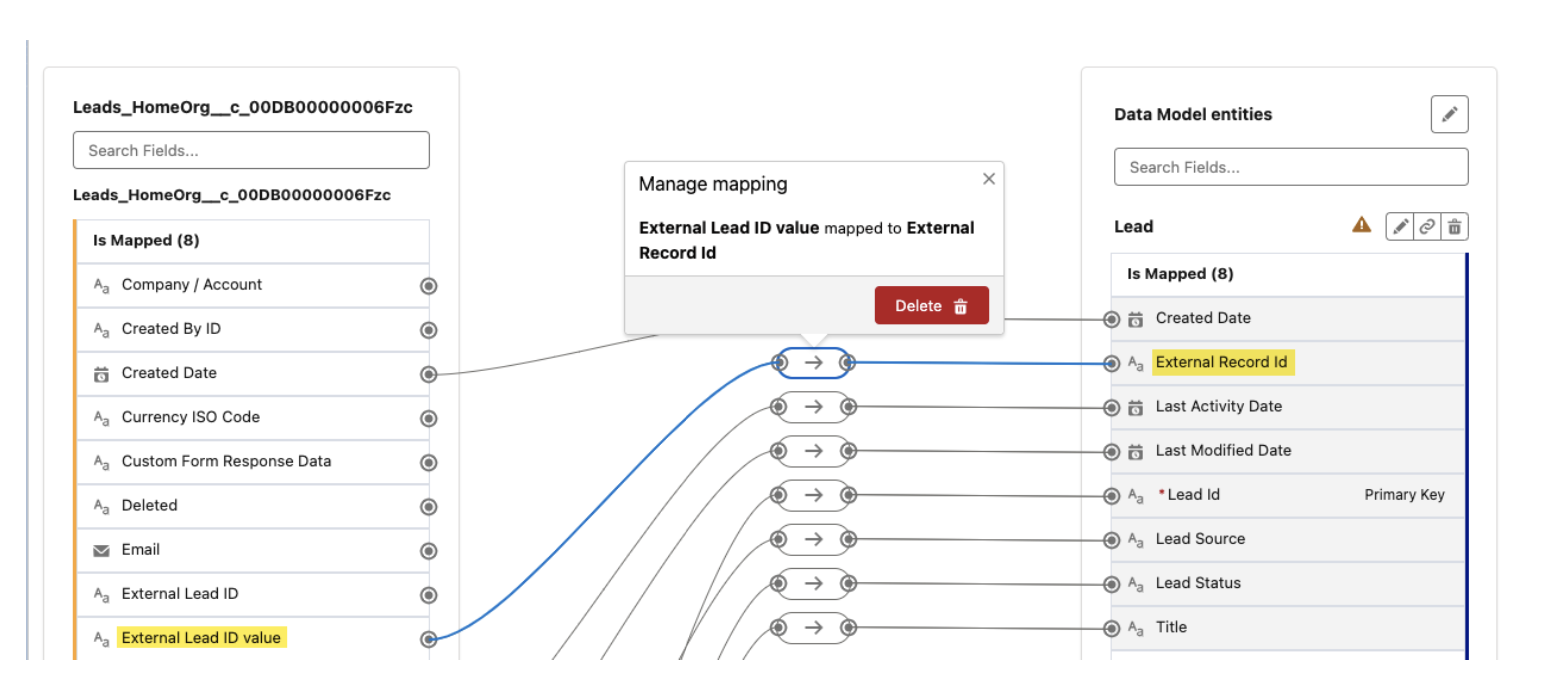
Map Your New Formula Field to the Data 360 Lead DMO
Note: Once you've created your new formula field, be sure to update the Lead Data Stream mappings to associate this newly created field to the External Record ID field on your Data 360 Lead DMO.
In a later step, when you are creating a new Conversion Lead DMO Activation for Meta CAPI, this External Record ID field is what you will map to the Facebook Lead ID attribute.
Connect Data 360 to a Meta Pixel / Dataset
Salesforce uses Activation Targets to represent a 1:1 connection between a data space within your Data 360 org, and an Ad Account or asset in your Meta Business Suite Account. Meta Conversions API is now listed as a distinct activation platform type, alongside Meta Custom Audiences.
Steps to creating a new Meta CAPI Activation Target in Data 360 are outlined in detail below.
Important: You must have the correct Role / Permission Sets to complete these steps
To create a new connection between Data 360 and your Meta Business Suite Data Set /Pixel ID, a user must have both of the following roles within each respective platforms:
-
● Data 360: The user creating the new Target must have a Data 360 Marketing
Manager or Data 360 Admin role
-
● Meta / Facebook: The same user must also be an Admin on the Meta Business Suite / Business Manager Account that owns the Data Set / Pixel ID asset being linked to Data 360
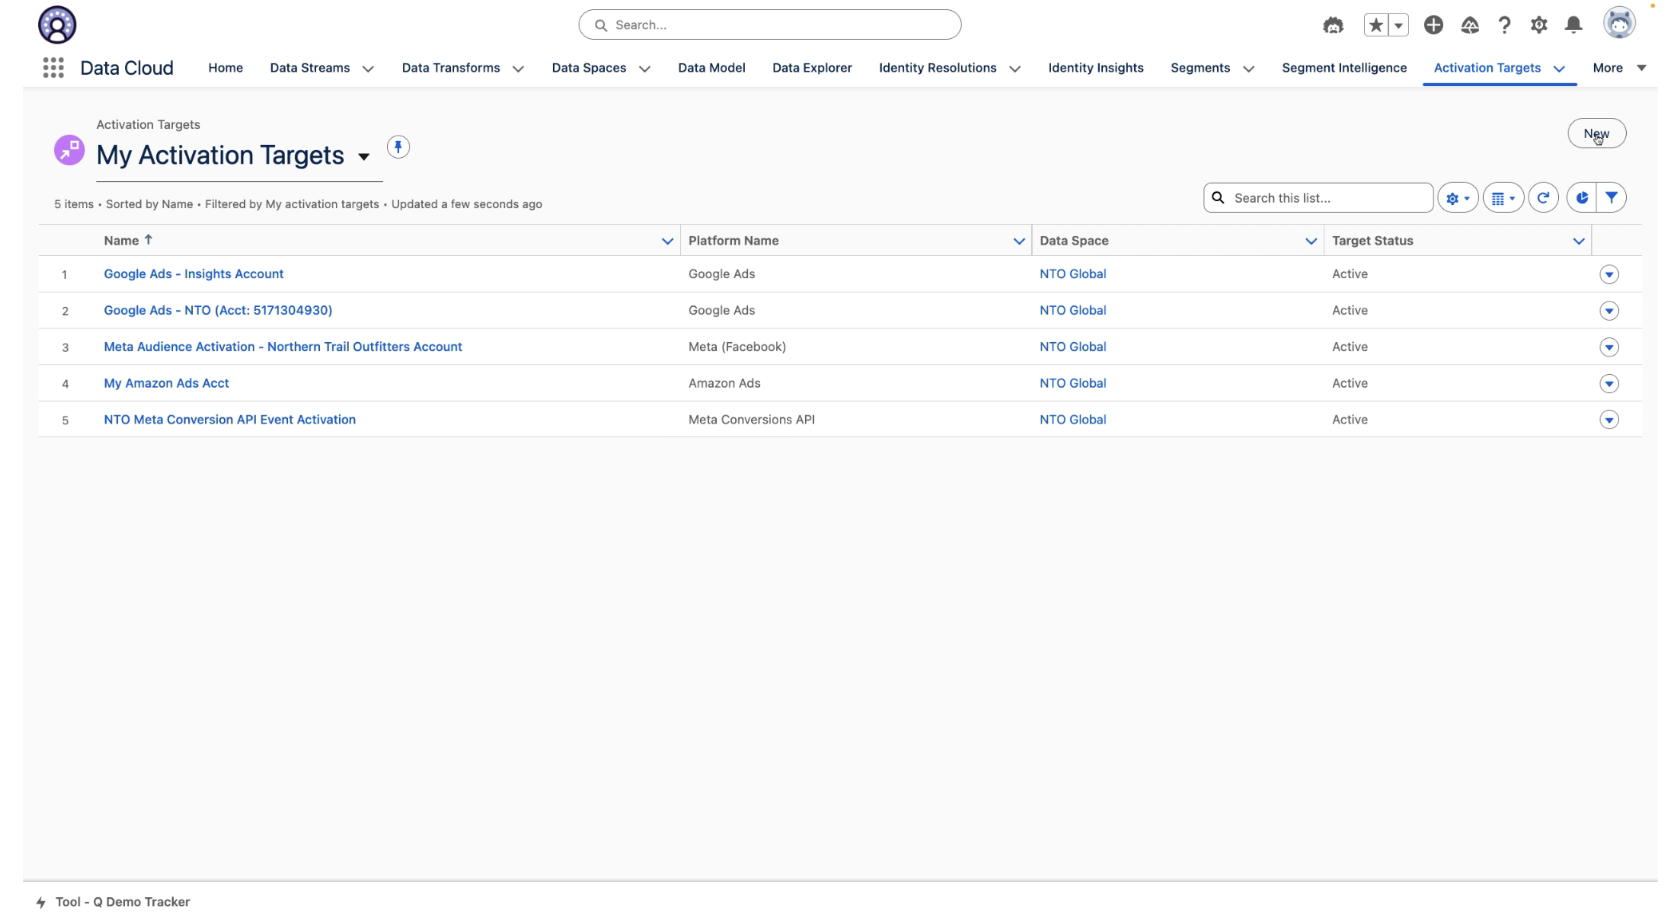
Creating a Meta Conversions API Activation Target
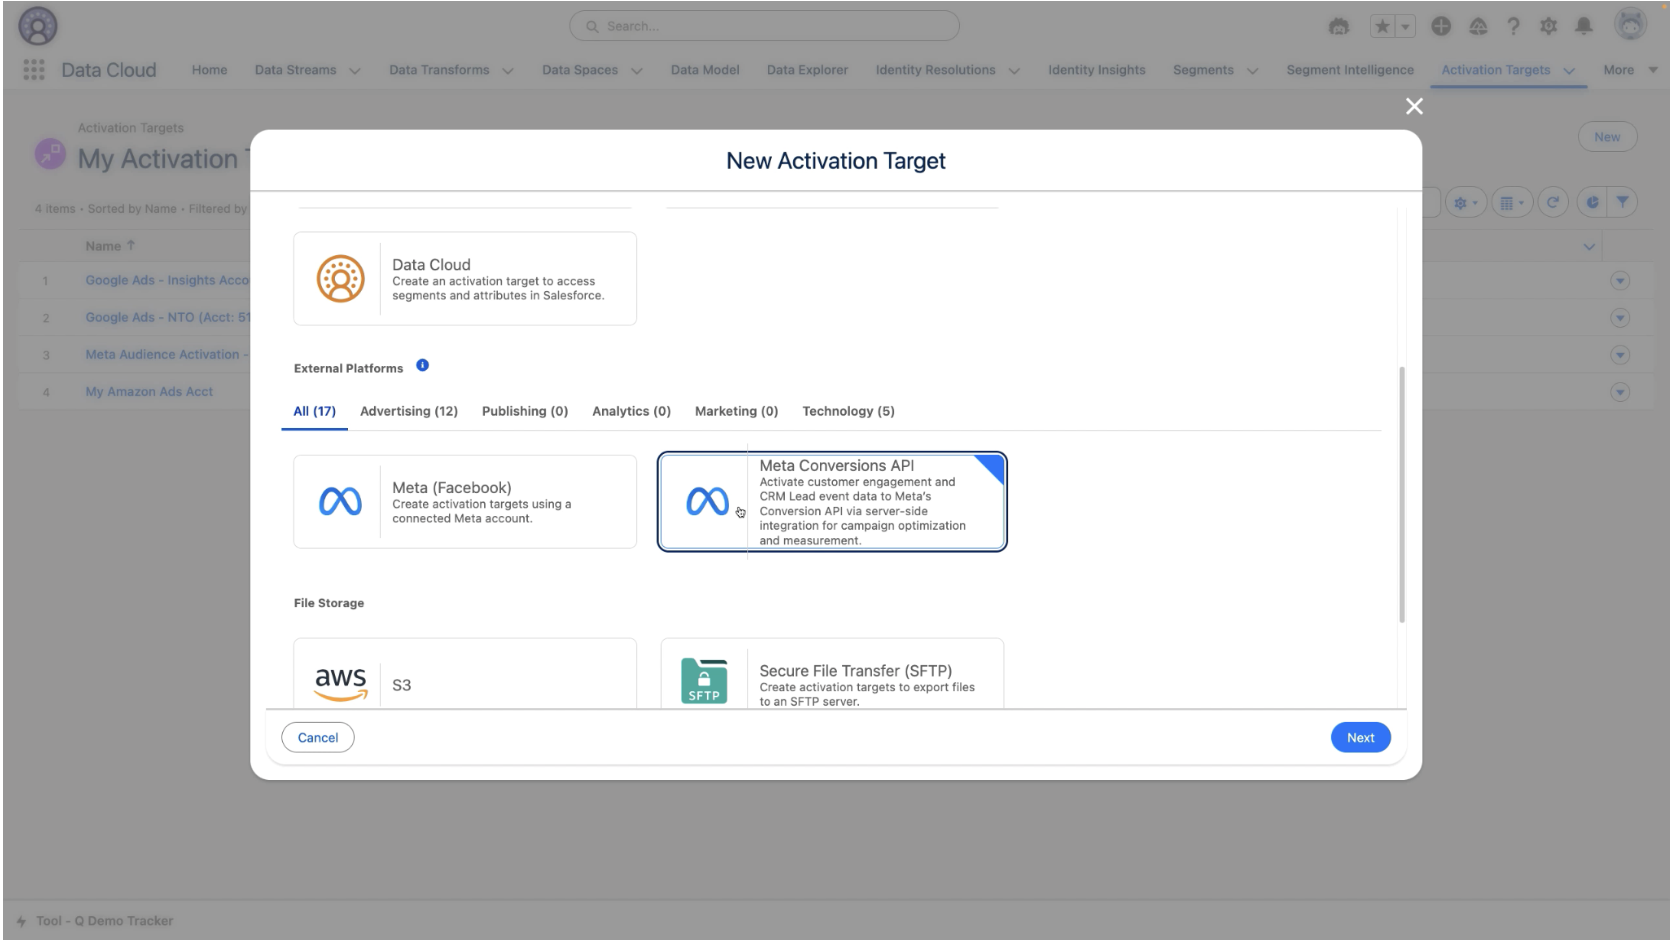
1. Log in to Data 360. Navigate to the Activation Targets Tab and click New
2. Scroll down and select the Meta Conversions API tile
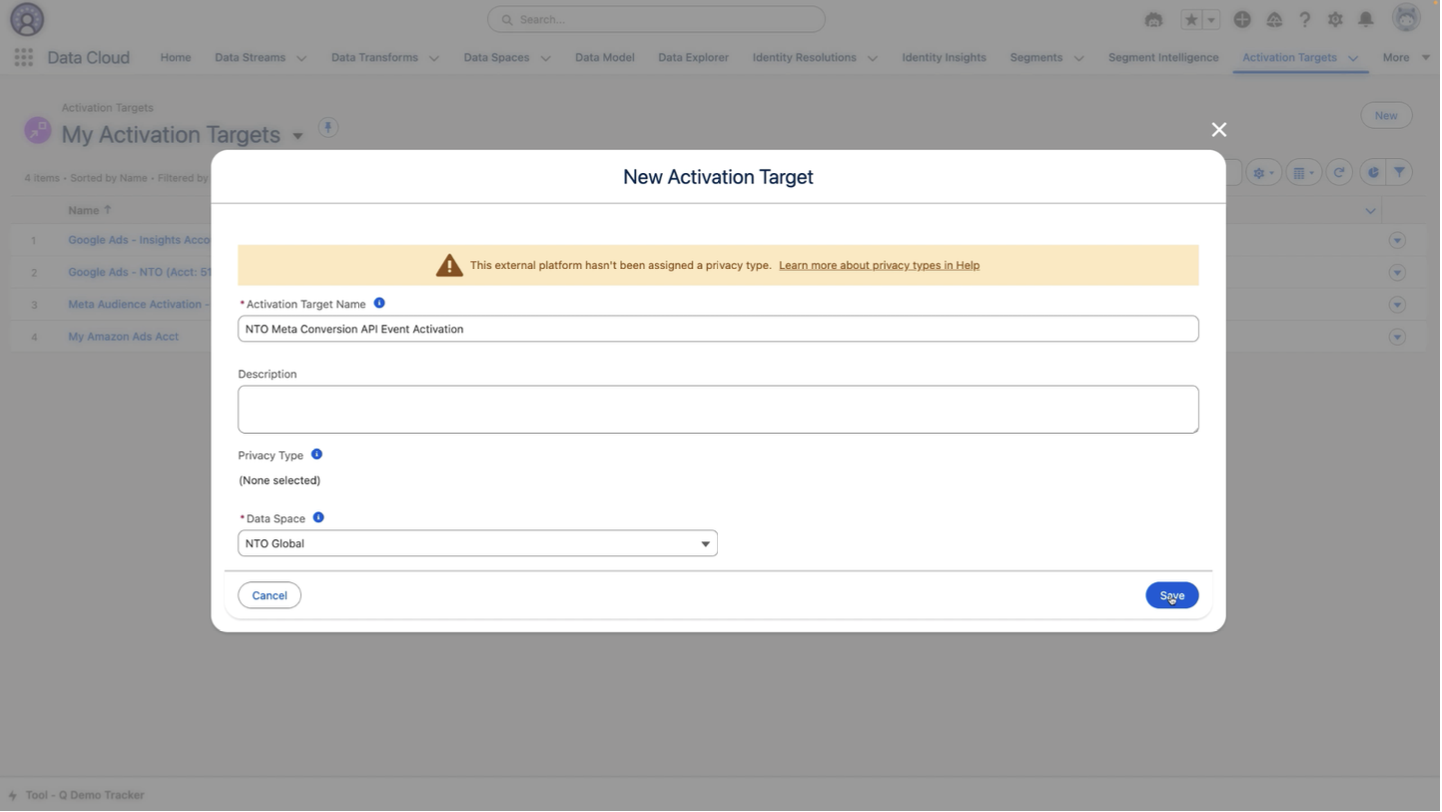
3. Enter an Activation Target name, an optional Description and select a Data Space. Click Save.
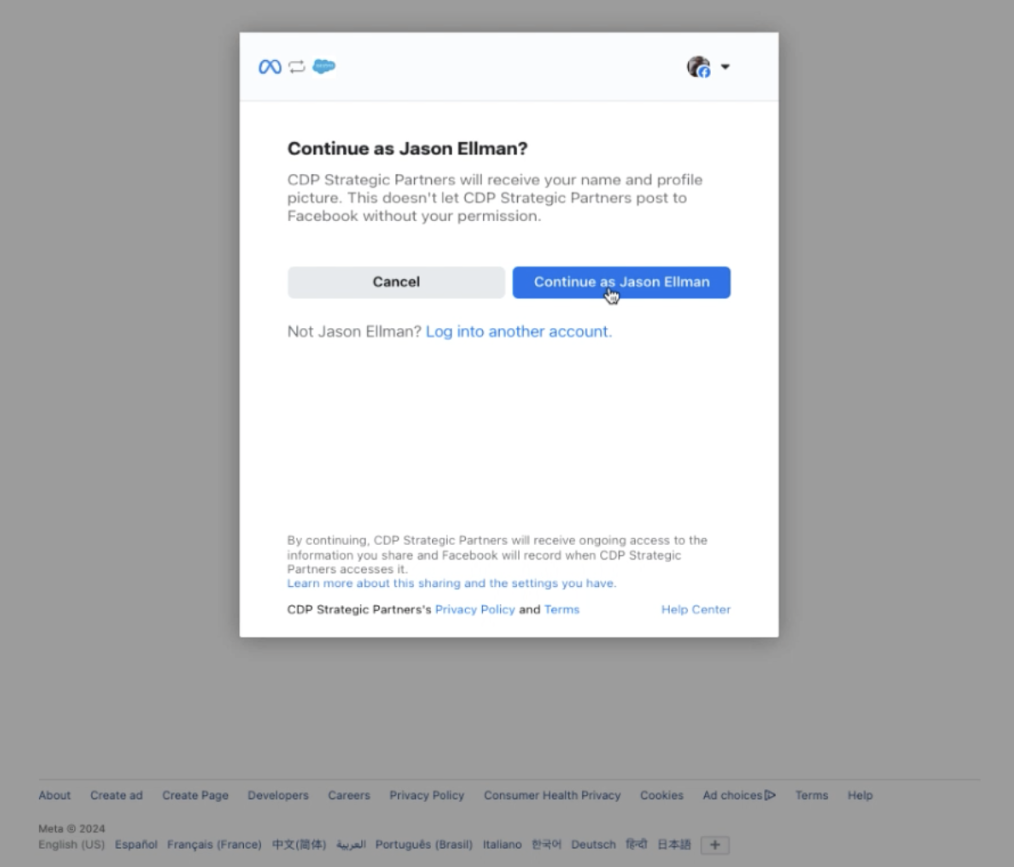
After clicking save, you will be directed out to a Meta Login and asset selection flow.4. Log in to Meta, or if you are already logged in click Continue
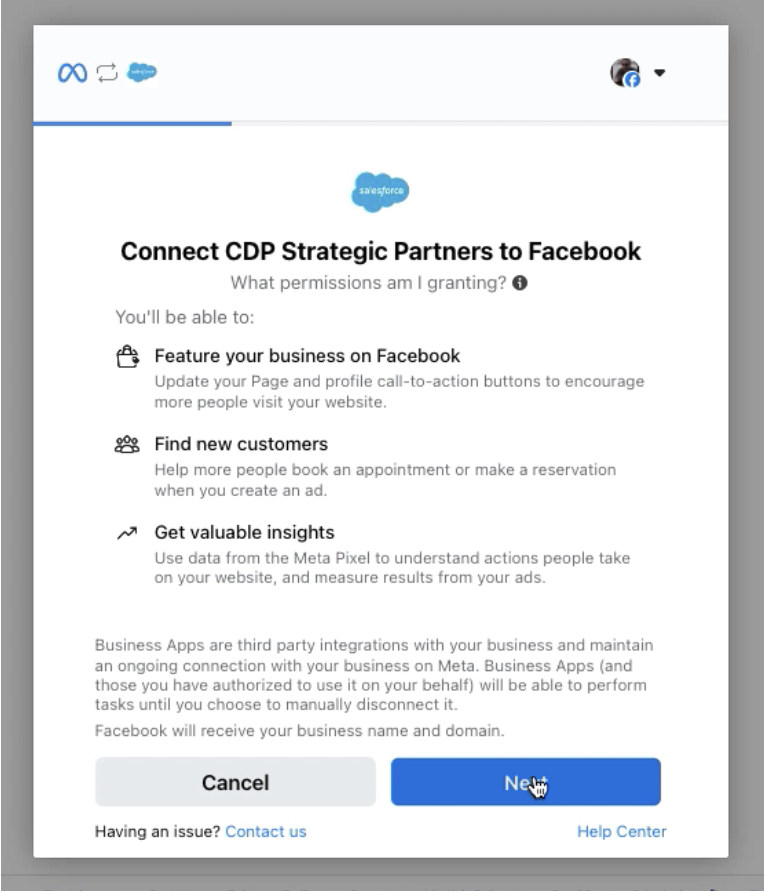
5. Click Next to grant the Salesforce Data 360 App, "CDP Strategic Partners", permission to find Business Suite accounts associated with your user login.
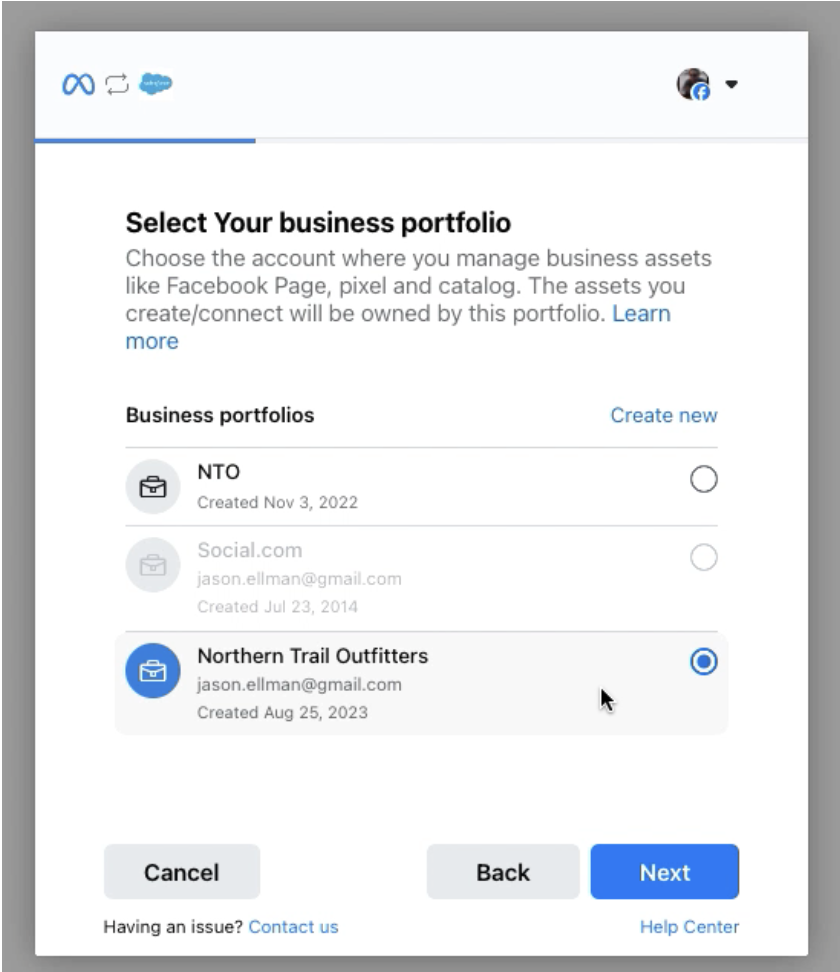
6. Select a Business Portfolio and a Meta Pixel / Dataset ID
*If you are an admin for more than one company, first select (or confirm) the Business Portfolio that owns the Dataset or Pixel ID of interest
a. Click on Business Portfolio.b. Select the Business Portfolio Account that owns the Pixel / Dataset to which events should be sent. Click Next
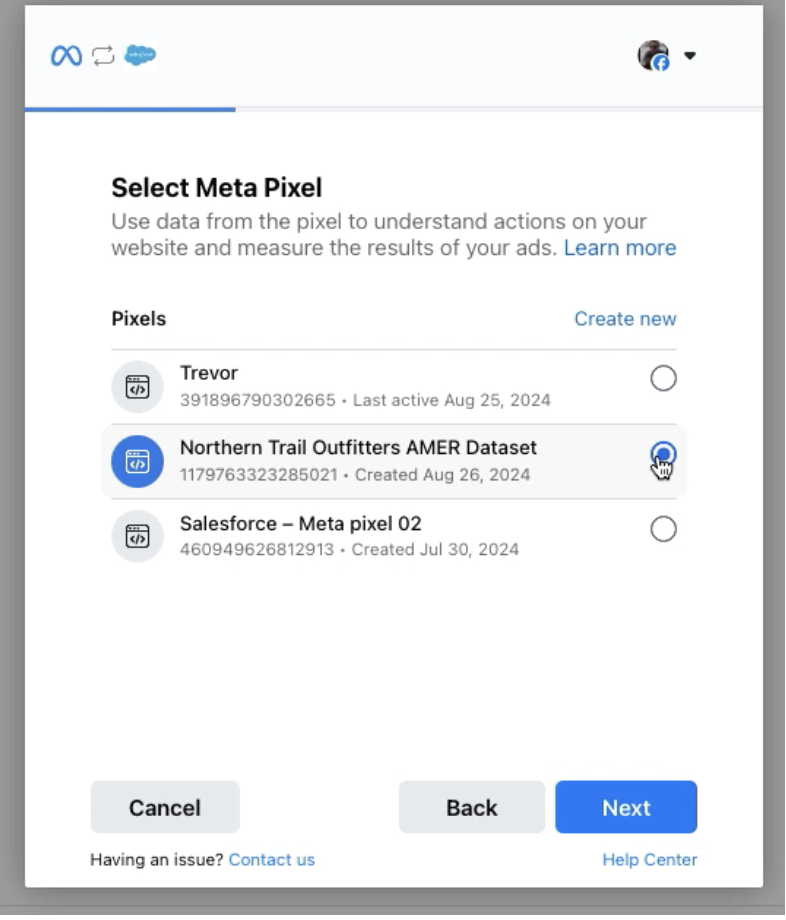
c. Once a Business Portfolio has been selected, if the business owns multiple Pixel IDs or Dataset, select the one you would like to link to this new Data 360 Activation Target. Then click Next
7. Confirm and Save the Selected Business Portfolio & Dataset to Your New Target
● Once you are comfortable with your selections, Click Continue.
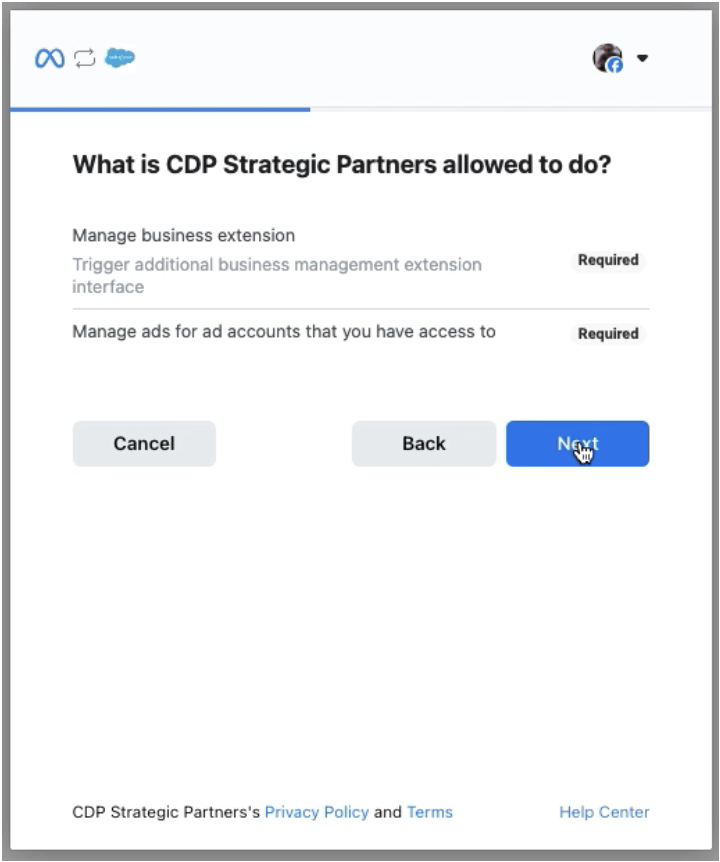
-
● Click Next to grant the Salesforce Data 360 app permission to write event data to the selected Dataset.
-
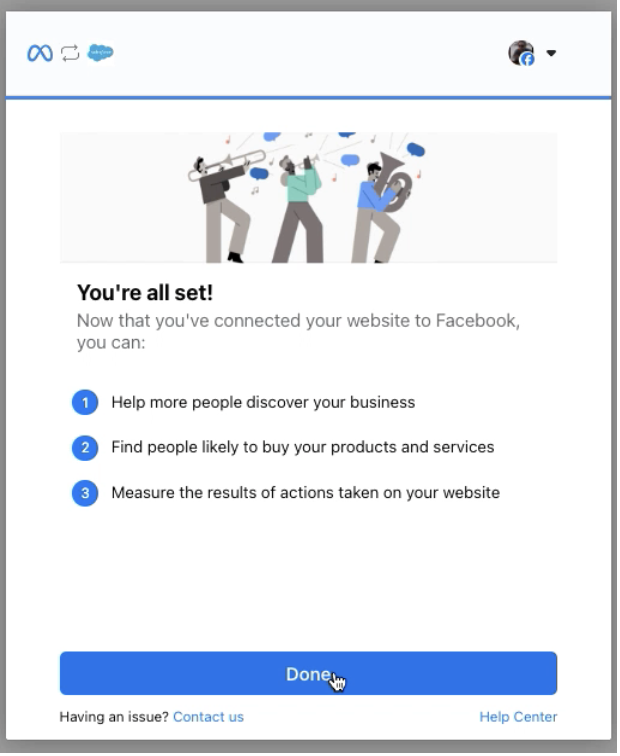
● Click Done
-
After clicking Done, you will be redirected back to the new Activation Target record home in Salesforce Data 360.
Next Step: Create a DMO Activation to Activate Lead Change Data
Once you have completed the work to connect and ingest lead records from your source system, you can proceed with setting up your Data 360 instance to begin sending Lead Record Change Events to Meta CAPI.
Activating Lead Changes to Your Meta Conversion API Target
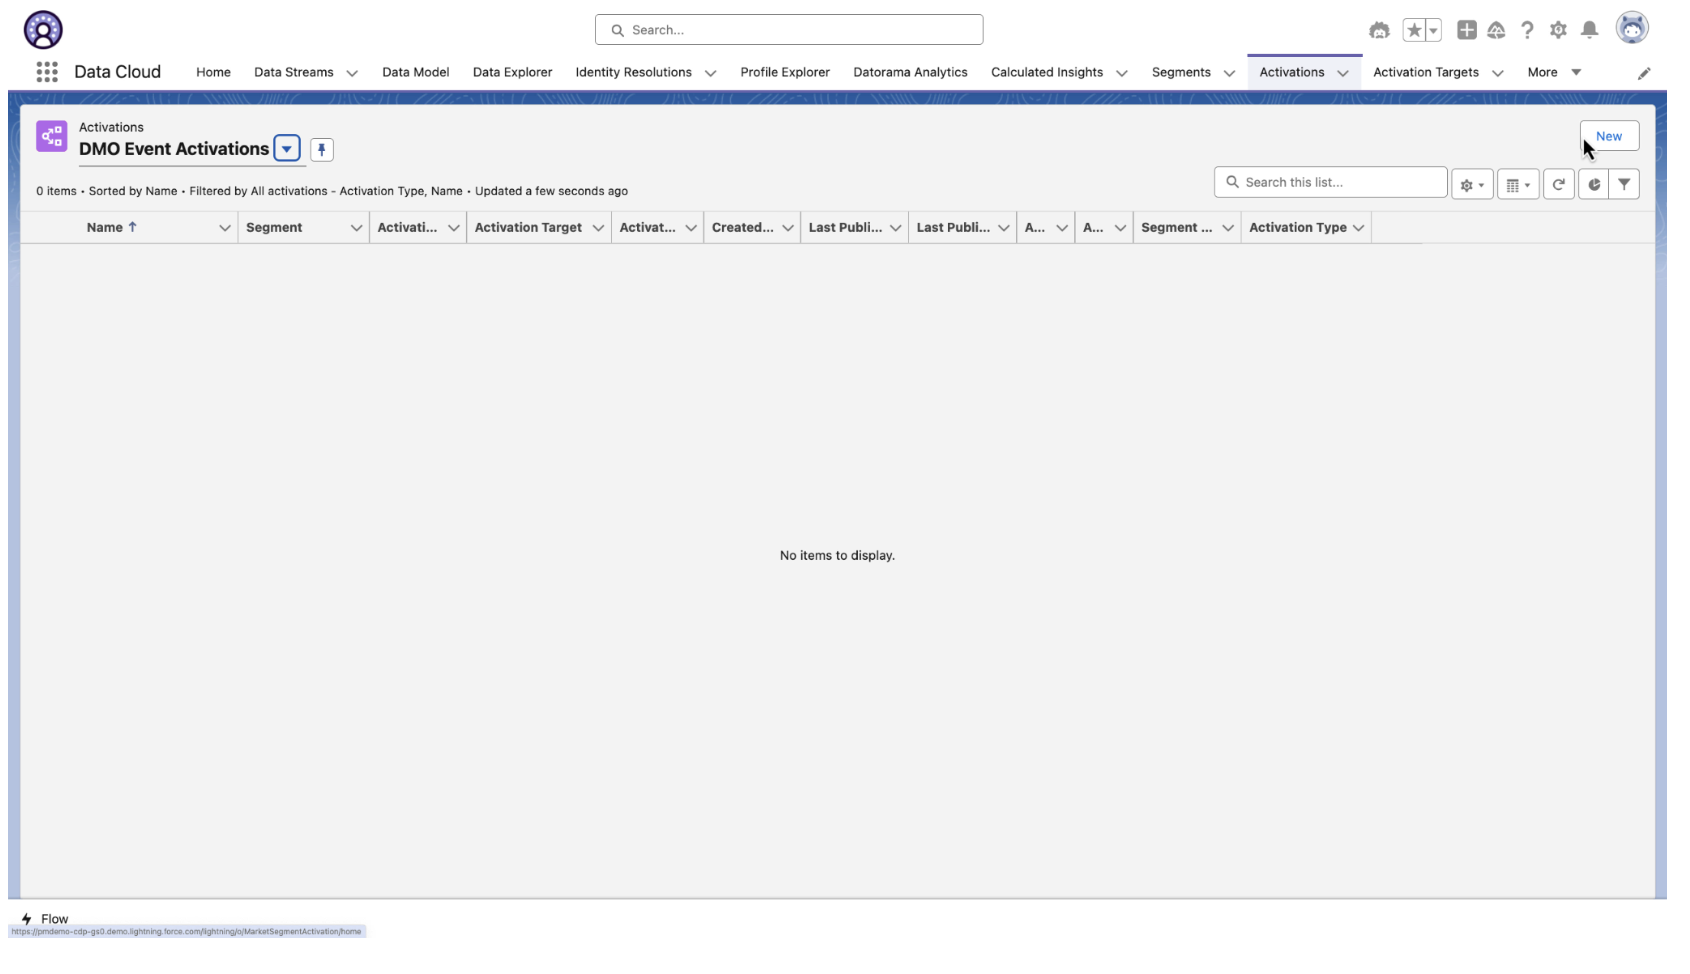
-
Navigate to the Activation tab and click New
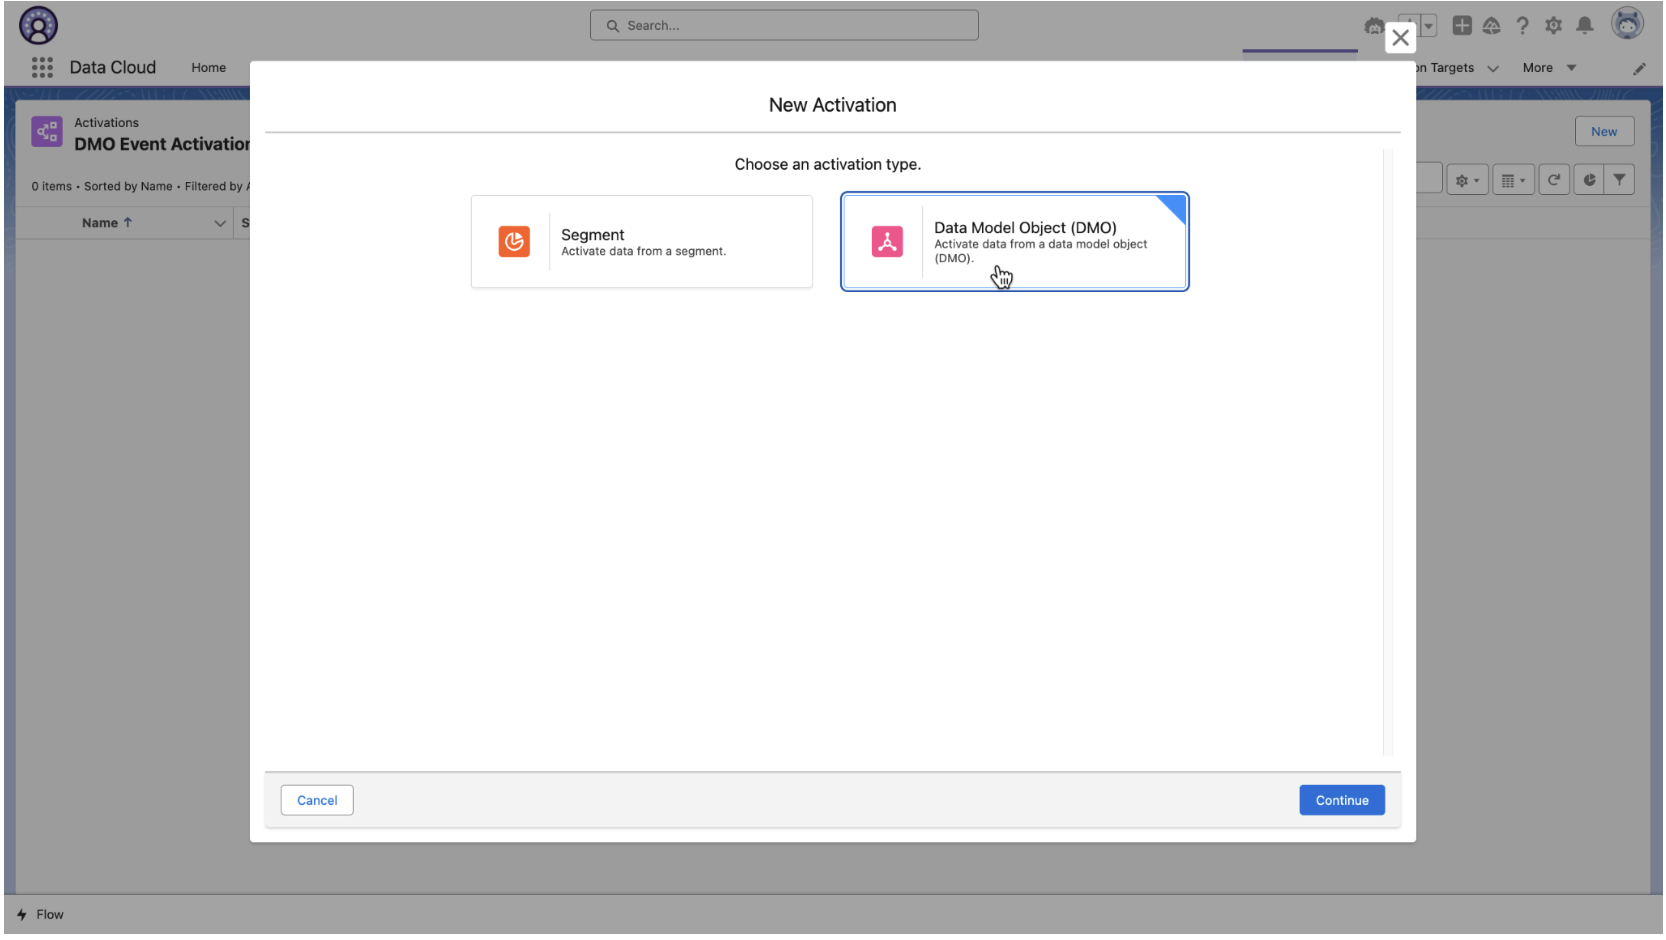
2. Select Data Model Object (DMO) and click New
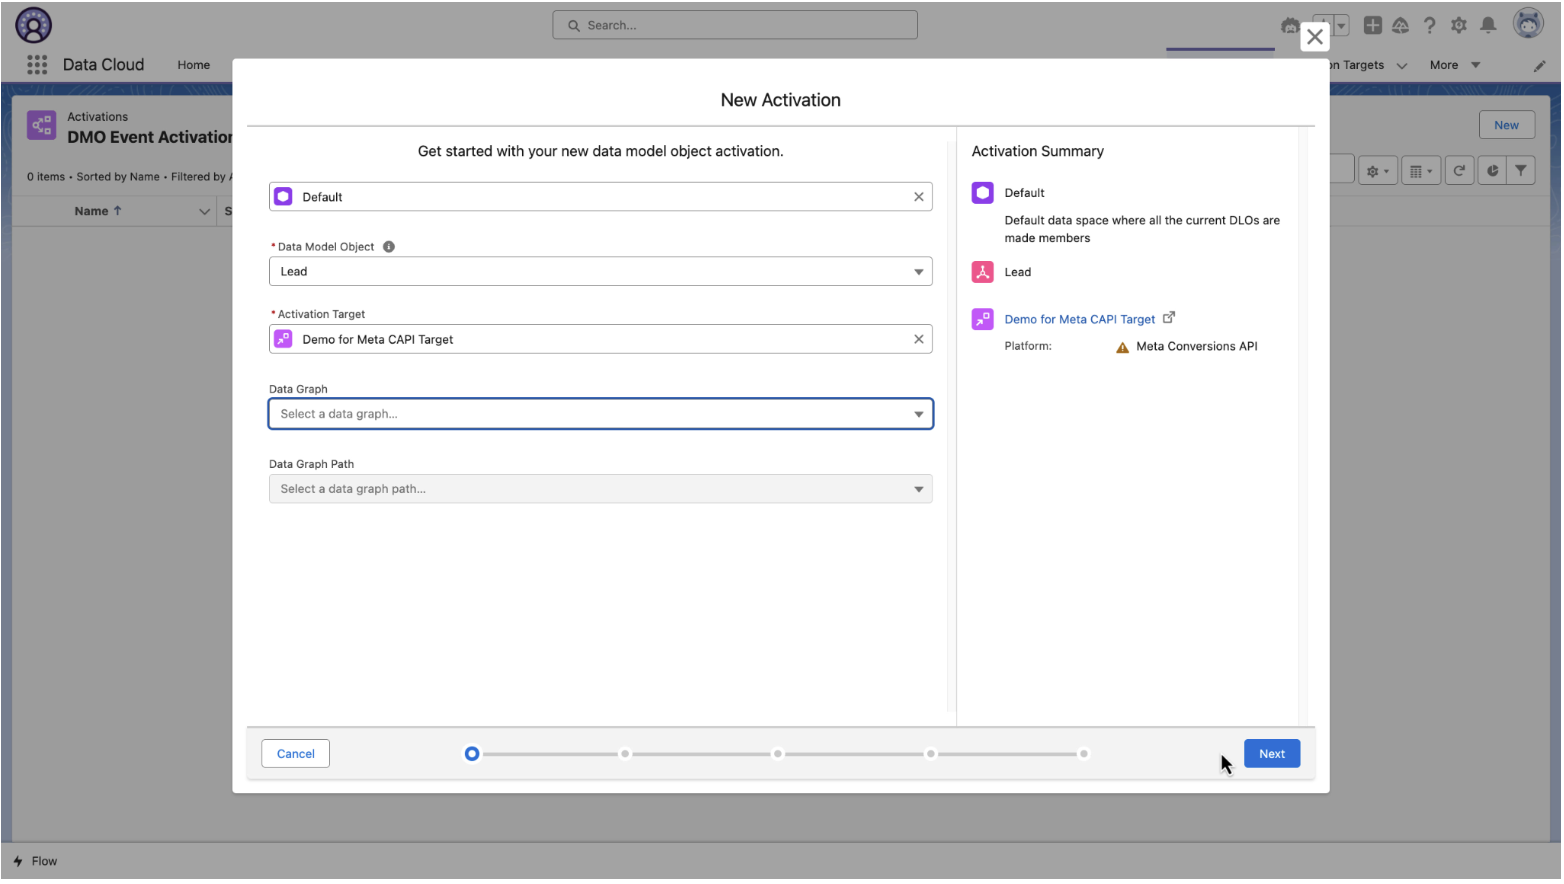
3. Define the following properties via picklist selections, then click Next:
a. Data Space
b. The DMO where your Meta Leads are stored in Data 360
c. The CAPI Activation Target linked to your Pixel / Dataset ID
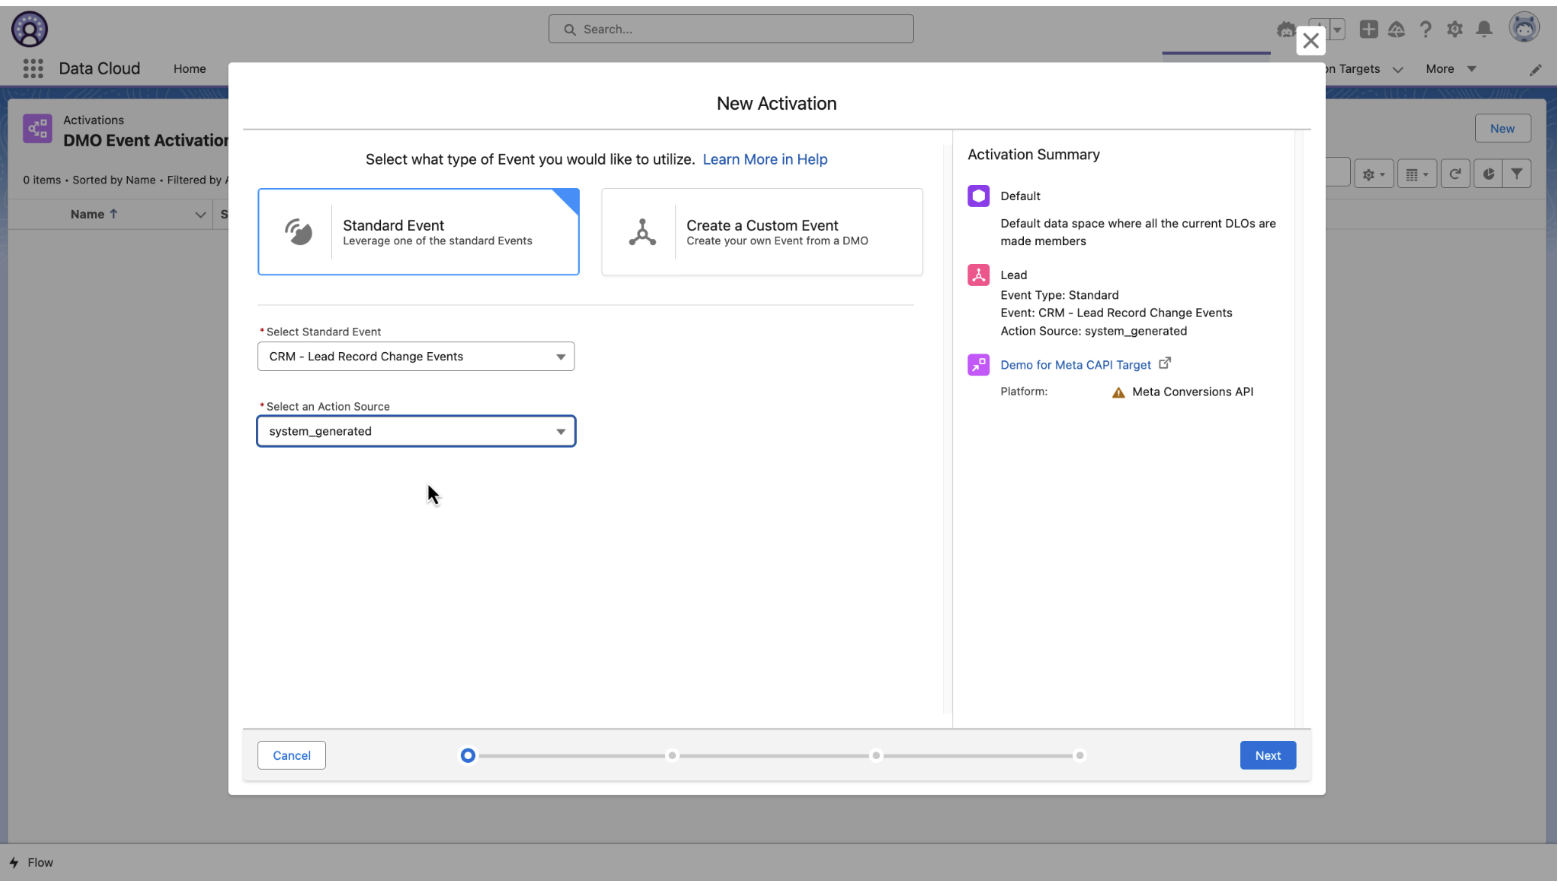
d. (optional) A Data Graph Object4. Select the type and source of the events you want to activate
a. Select the Standard Event tile
b. Select the Standard Event: "CRM - Lead Record Change Events"
c. Select the Action Source: "system_generated
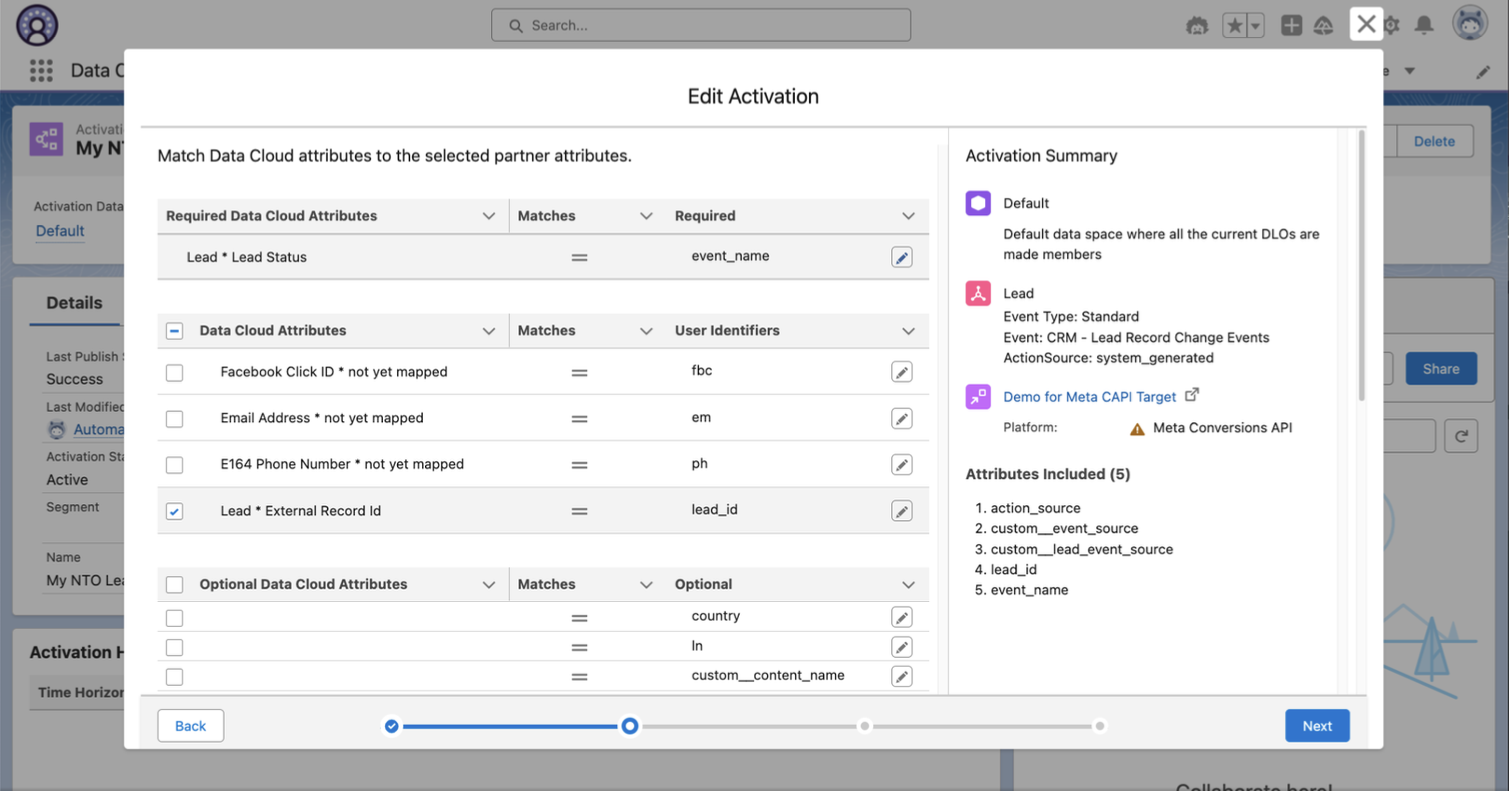
d. Click "Next:5. Map the following Attributes, and click Next:
a. Required:
i. Status/Stage of the Lead or Opportunity → event_name
b. At least 1 of the following User Identifiers:
i. Facebook Click ID → fbc
ii. Email Address → em
iii. E164 Phone Number → ph
iv. Facebook Lead ID → lead_id*Optional: You can assign mappings to any of attributes listed under the other sections if you would like those included in events sent to Meta CAPI
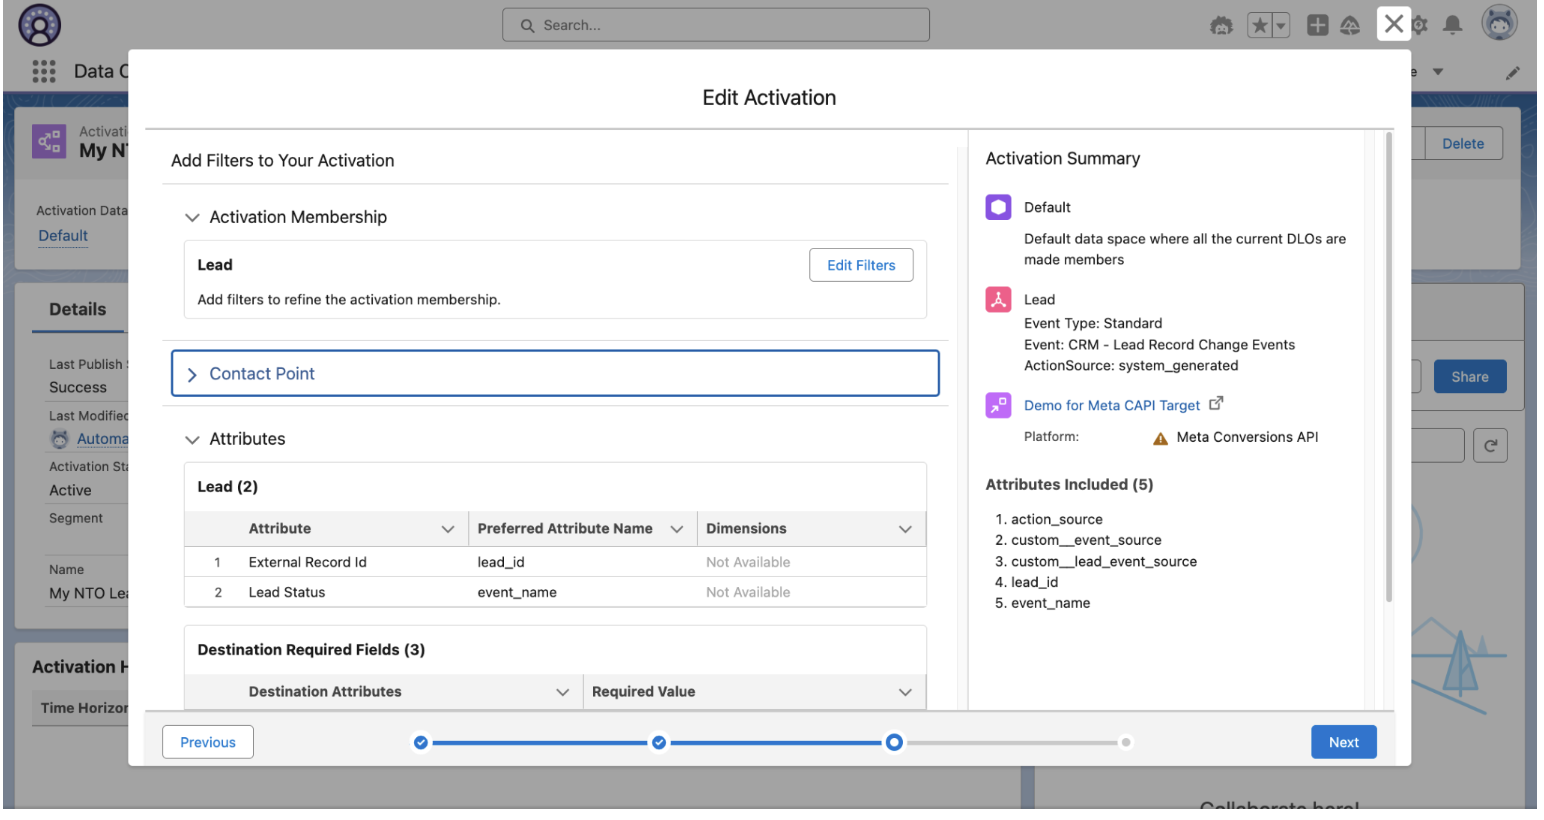
6. Review the Attributes selected and mapped.
a. Optional - Click Add Filters to create inclusion or exclusion filter rules to control what events are ultimately sent
b. Else, click Next to complete the setup.-
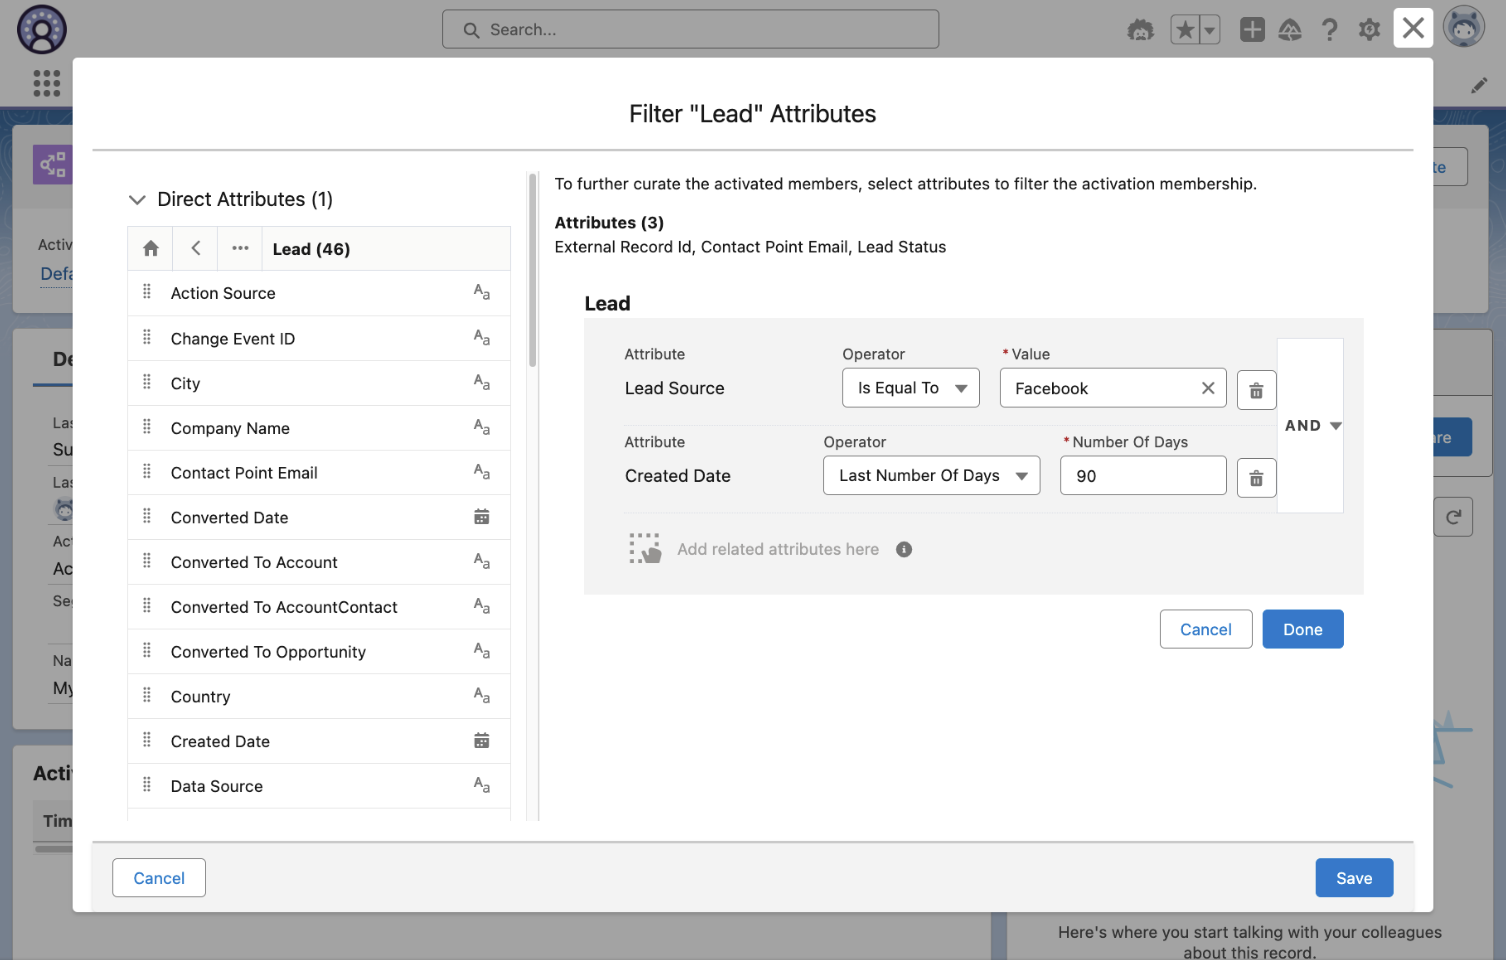
Optional Filter Rule Assignments: Define rule logic to determine which lead change events should ultimately be sent to Meta CAPI. Once complete, click Save.
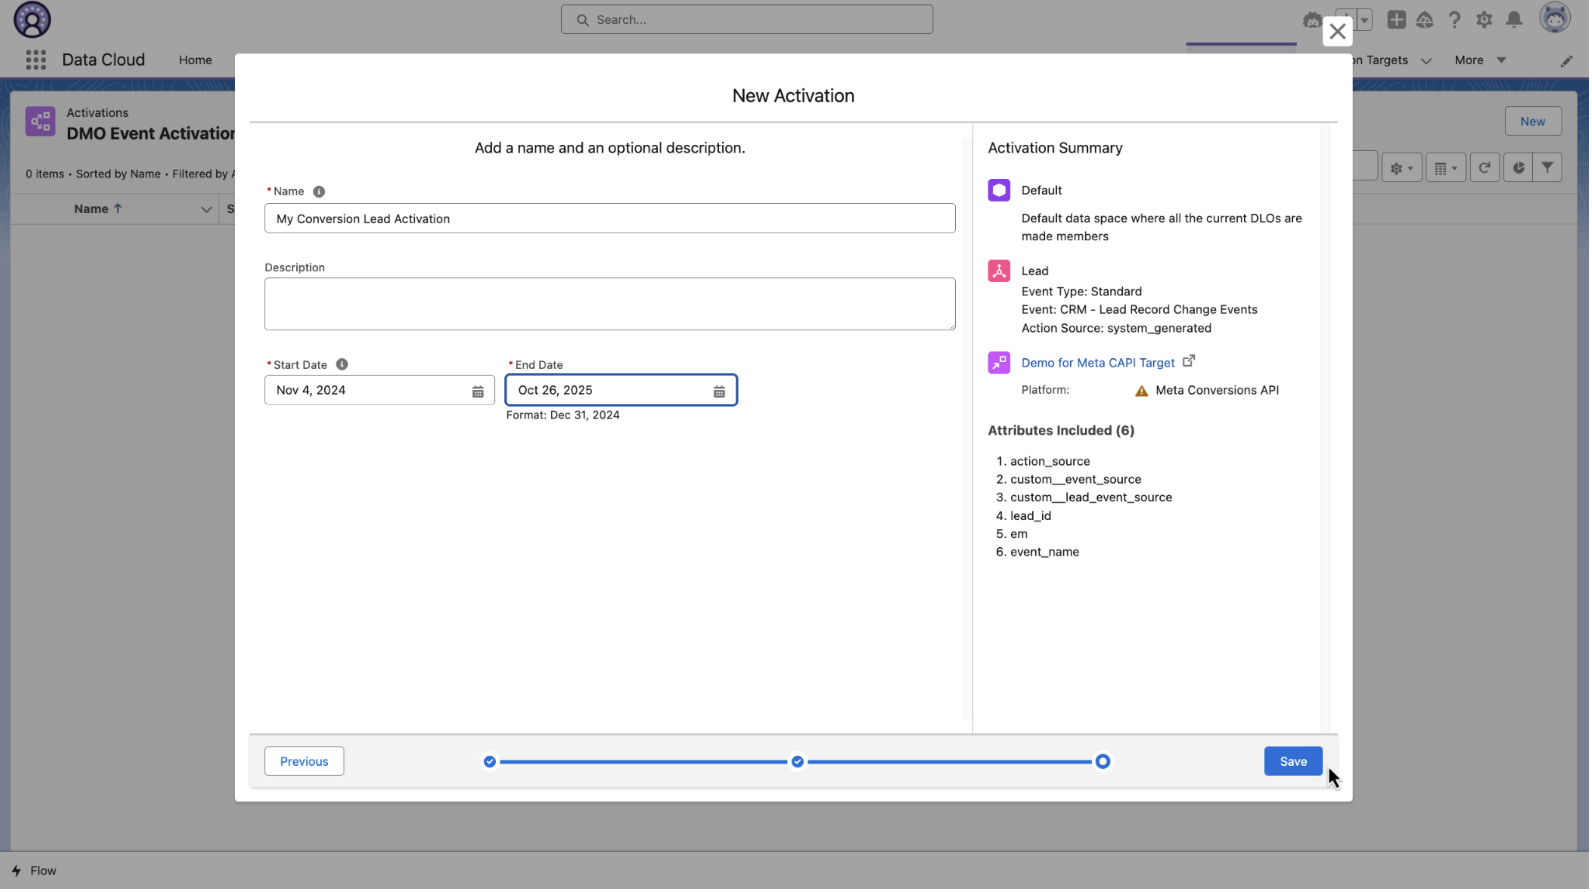
8. Assign a Name, Description and Start/End Date to your Lead Change Event Activation and click Save
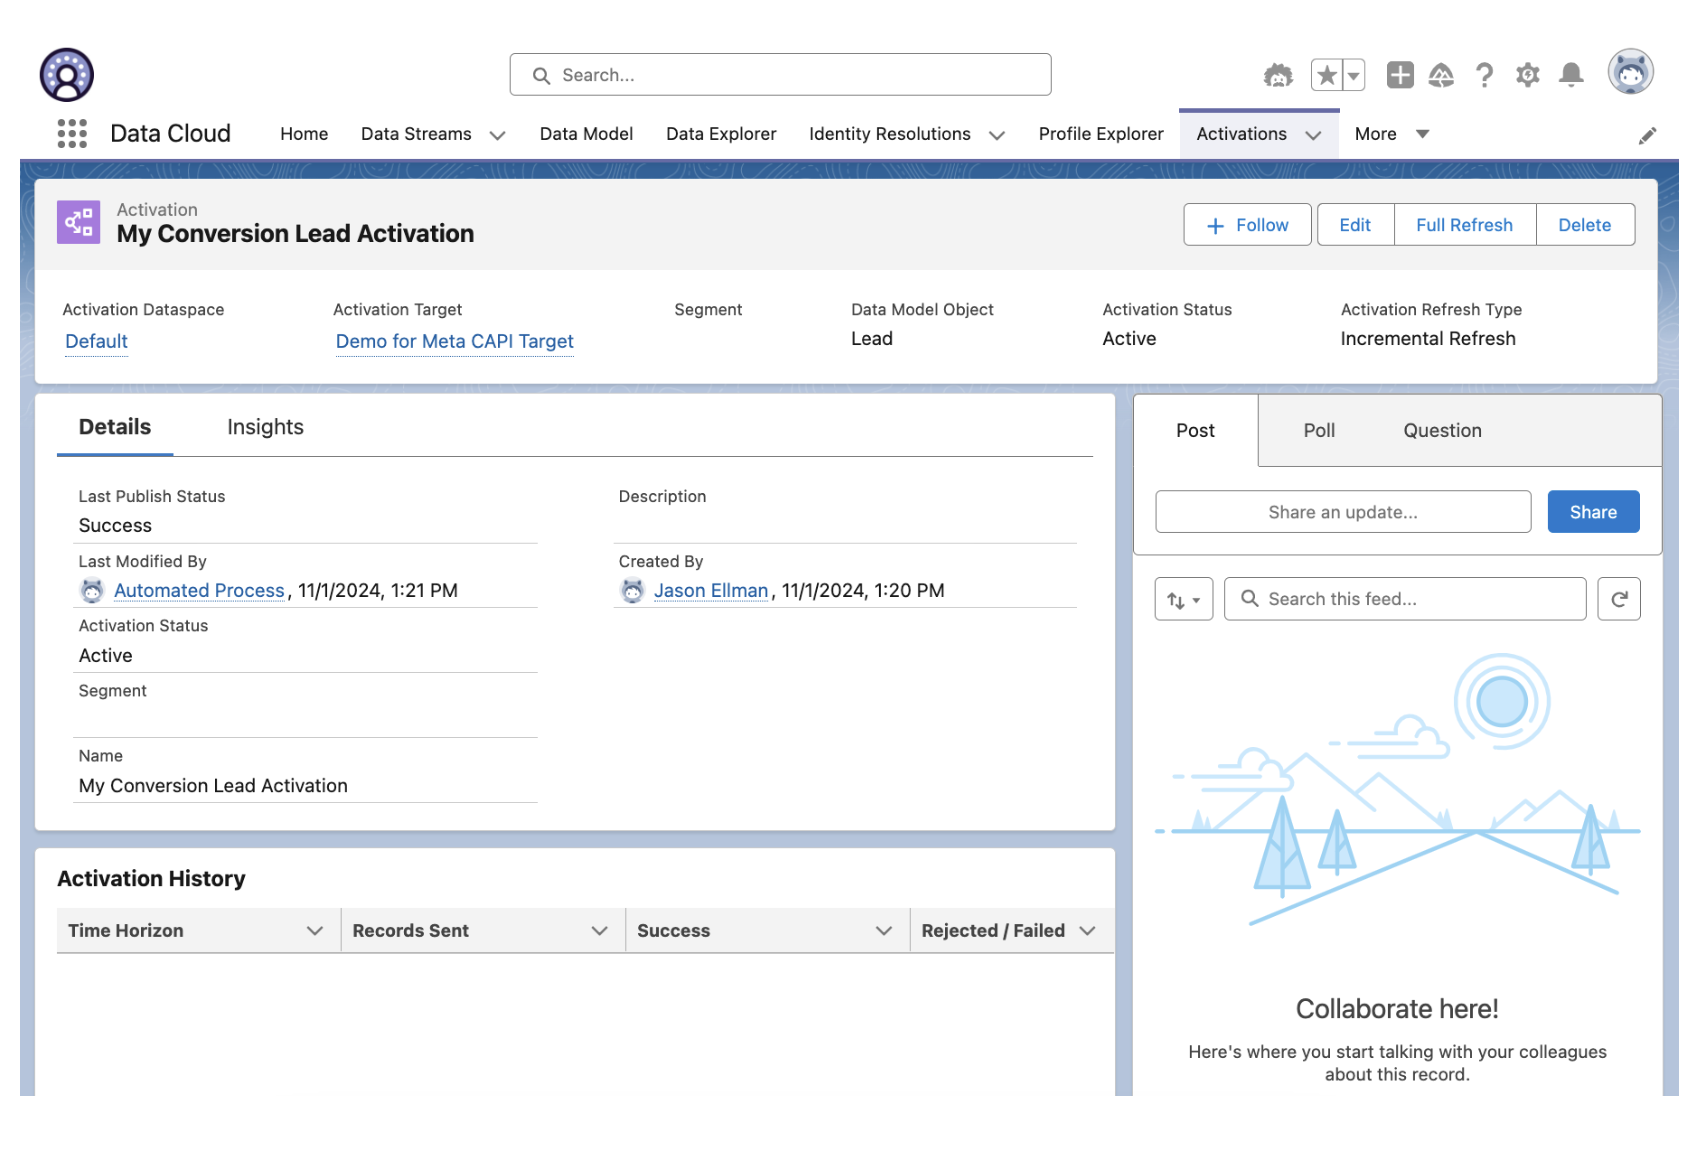
After clicking Save, you will be directed to the Record Homepage of the newly created DMO Activation.
You will be able to monitor the volume of events sent, and their status from this page, as well as confirm accepted event volumes from your Event Manager dashboard in Meta.**Note: If you selected today's date as the Start Date, please allow up to 1 hour for the system to begin qualifying and activating events.
FAQ for Meta CAPI Conversion Leads
My CRM Lead Data Stream in Data 360 is Missing Fields
Example: External Lead ID is not listed as an attribute in the CRM Lead Data Stream
Salesforce CRM objects and attributes must have View All and Read permissions in order for Data 360 to identify and ingest that information.
The Salesforce Lead Capture App stores Meta Instant Form Lead IDs in the External Lead ID field on CRM Lead records. This field sometimes lacks the View All and Read permissions required by Data 360.
If this field, or any other important fields are missing from a Salesforce CRM Data Stream, please work with your Salesforce CRM admin to check and update any missing permissions.
Guidance on how to update object / field permissions, please refer to the following help articles:
-
● Data 360 Org Help Article: Enable Object and Field Permissions to Access Salesforce CRM in Data 360
-
● Salesforce Org Help Article: Enable Object and Permissions in Permission Sets
Once permissions have been updated, you can trigger a resync by navigating to the Salesforce CRM Leads Data Stream record home page in Data 360, and clicking the "Refresh Now".
Once the refresh completes, the missing fields should be available for mapping to the Data 360 Lead DMO.
-
-

Flere ressurser
Knowledge-artikkelnummer
003960741
Hjalp denne artikkelen med å løse problemet ditt?
La oss få vite det slik at vi kan forbedre!