Välj en organisation
How to Add a Prefix Value to Salesforce Sales Account Name
Publiceringsdatum: Apr 20, 2026
Beskrivning
Add a prefix to an Account name during creation if the Account has a specific Record Type, Ensuring consistent naming for easy identification.
Lösning
Leverage a Record -Triggered Flow to run on Account creation and update the Account name if its RecordType meets specific criteria
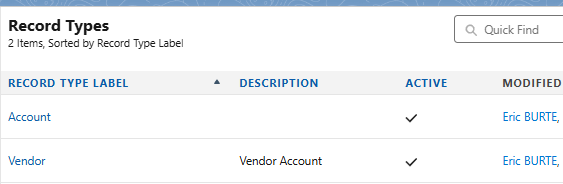
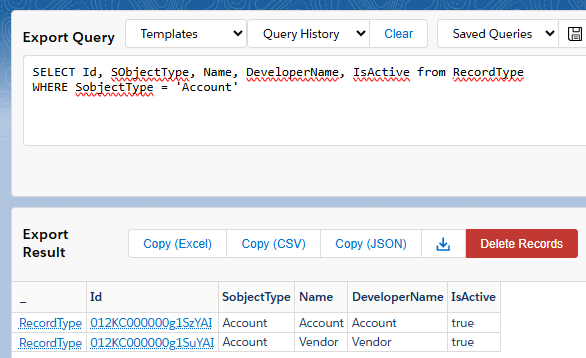
Context: We have previously defined a RecordType Vendor for the Account object. It is the record type that will be used for this article
Step 1: Create a Record -Triggered Flow
In the first step, we will create a Flow
- Go to Setup, type Flows in the Quick find box
- Click New Flow
- Select Start From Scratch, Click Next
- Select Record-Triggered Flow type, and click Create
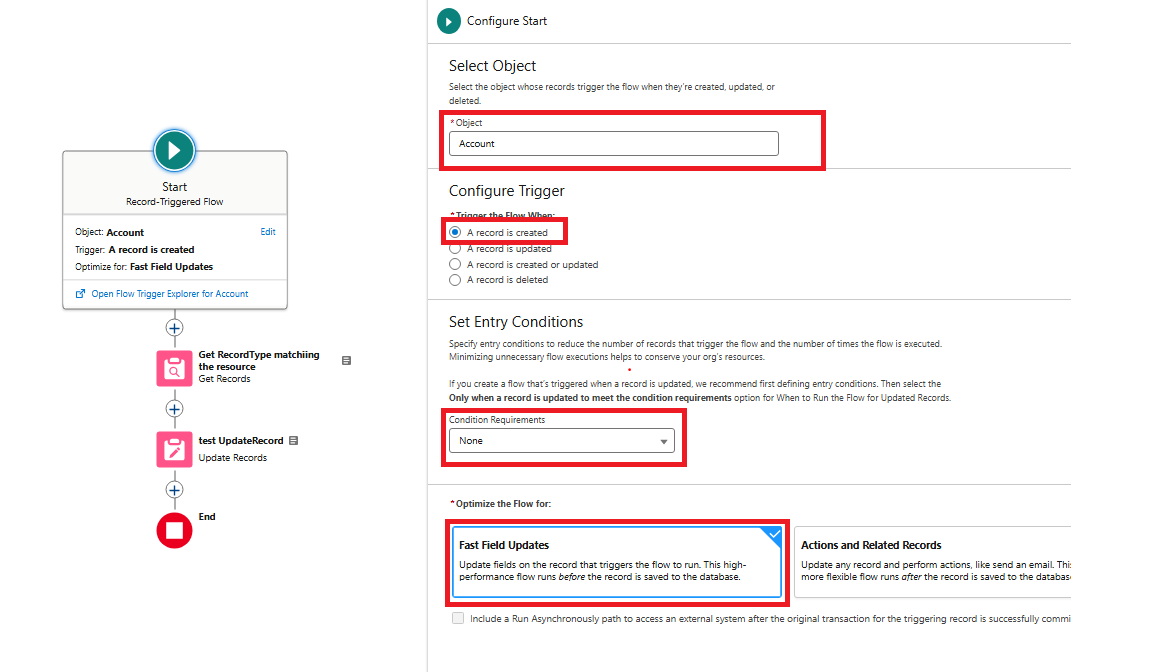
Step 2: Configure the Start Element
- Choose the following object: Account
- Set the trigger to fire when: A record is created
- Keep the entry conditions to None as for now, since we cannot set a filter on Record Type name from there
- Select the mode to optimize the Flow for Fast Field Updates
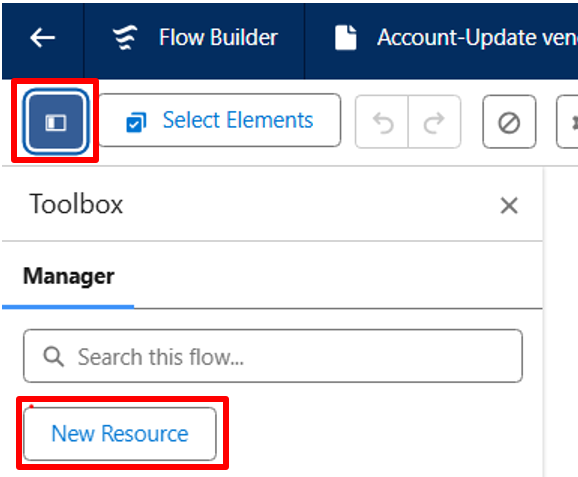
Step 3: Create the variable to store the RecordType Name that will be concerned by the automatism
- Click the Toggle Toolbox button located in the upper left corner of the Flow Builder page
- Click New Resource
Step 4: Choose Resource Type as Constant, Data Type as Text and Value as Vendor. Click Done
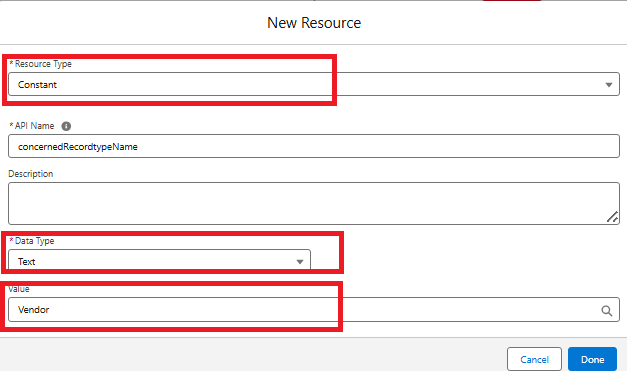
Note: When typing the Constant value, you are proposed to select a predefined Constant value. But here we will just type the text value as a free text
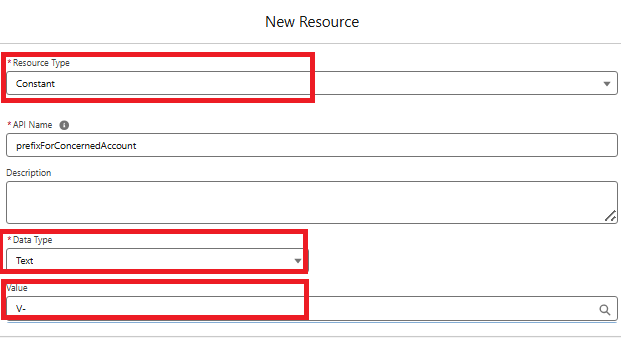
Step 5: Create the second Constant resource now to store the prefix used in the Flow. This prefix could also be managed outside of the Flow using a Custom Metadata Type
- Choose Resource Type as Constant, Data Type as Text and Value as V-. Click Done
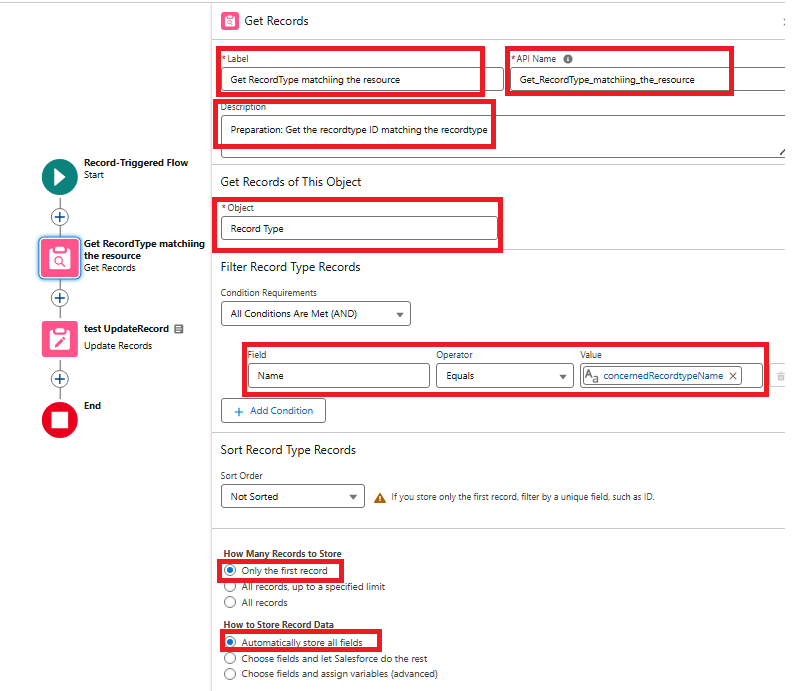
Step 6: Add a GetRecords element to retrieve the RecordType Id from its name
- Click on + to add an element between Start and End, and select Get Records
- Define a Label and a Description. Check the generated API Name
- Select the Record Type object where the Name equals the Account Record Type name that was previously created as a Constant
- Choose to store: Only the first record
- Concerning the record data: Automatically store all fields
Step 7: Create an Update Records element
- Click on + to add an Update Records element after the previously created Get Records element
- Define a Label and a Description. Check the generated API Name
- The option Use the account record that triggered the flow is greyed and checked
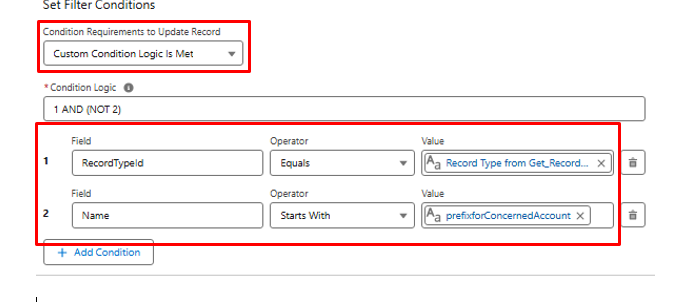
- Add the following conditions:
- RecordTypeId -Equals-{!Get_RecordType_Resource.Id}, Which is the Id retrieved from the previous Get Records element
- Name Starts With-{!prefixForConcernedAccount}, Which is the constant value of the defined prefix V-
- Custom Condition Logics is Met: 1 AND (NOT 2), To update a new account if it is a vendor account that does not start with V-
Step 8: Set the Field value for Name
- Choose Name for the Field to update
- Concerning the value, Click in the input field and select + New Resource, Choose Resource Type as Formula
- Choose a Data Type as Text
- Concerning the value
- From the Formula section, choose to Insert a resource. In the Constant section, select the defined prefix constant: {!prefixForConcernedAccount}
- Type a +
- From the Formula section, choose to insert a resource, go to the Global Variables section in the menu, choose the triggering record, and choose the Name field: {!$Record.Name}
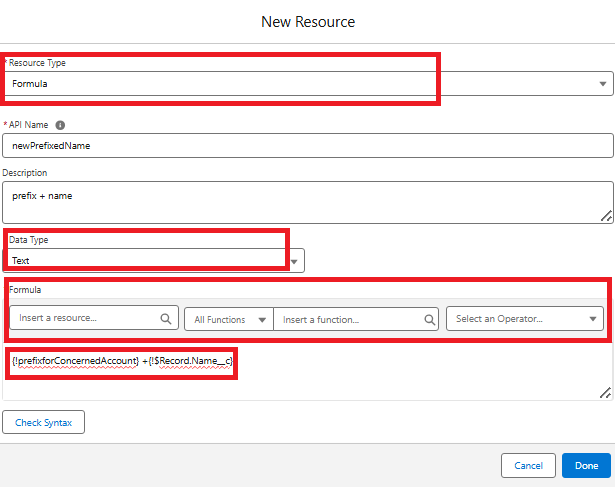
Step 9: Click Check Syntax, and click Done
Step 10: Save the Flow & Activate it!
___________________________________________________
Written by: Eric BURTÉ | Forum Ambassador
Based in France, Eric Burté is Head of Salesforce and AI, within DEVOTEAM Group.
As a Salesforce Expert Director, Eric works with project teams, to support them on the design, build and delivery of their Salesforce projects, and works with his clients in assessment project context, Salesforce ‘Center of Excellence’ teams management, or Design Authority approach implementation.
Submissions reflect only the opinions of the user who made available the Submission and not the opinions of Salesforce, regardless of whether the user is affiliated with Salesforce, and may contain or constitute products, services, information, data, content and other materials made available by or on behalf of third parties ("Third Party Materials). Salesforce neither controls nor endorses, nor is Salesforce responsible for, any Third Party Materials, including their accuracy, validity, timeliness, completeness, reliability, integrity, quality, legality, usefulness or safety, or any applicable intellectual property rights. Any Submissions made available through any message board or forum in response to posted questions, or that otherwise purports to answer any questions, including any questions about Salesforce or Programs, are made available for your general knowledge only and should never be relied upon as answers to your specific questions (even if an answer is marked as a “best” answer or with any similar qualifications). You should always contact Salesforce support for answers to your specific questions. Salesforce has no control over Submissions, and is not responsible for any use or misuse (including any distribution) by any third party of Submissions.
If you have questions, tap into the wisdom of our entire Trailblazer Community here: https://trailhead.salesforce.com/trailblazer-community/feed
Knowledge-artikelnummer
004633778
Löste denna artikel ditt problem?
Berätta för oss vad vi kan förbättra!