조직 선택
Marketing Cloud Next managing UTM
게시 일자: Apr 24, 2026
상세 설명
Configure and automate UTM parameters in Marketing Cloud Next to tag every link, capture source and medium data, and measure campaign performance end-to-end
솔루션
- The Website Engagement DMO
- In Data Cloud, we find the Website Engagement DMO which is fed by different data sources
- Marketing on Core landing Pages are built on an Experience Cloud underlying site. Page Views, Form Submissions, and all Engagement information from it are added to DSOs mapped to the Website Engagement DMO
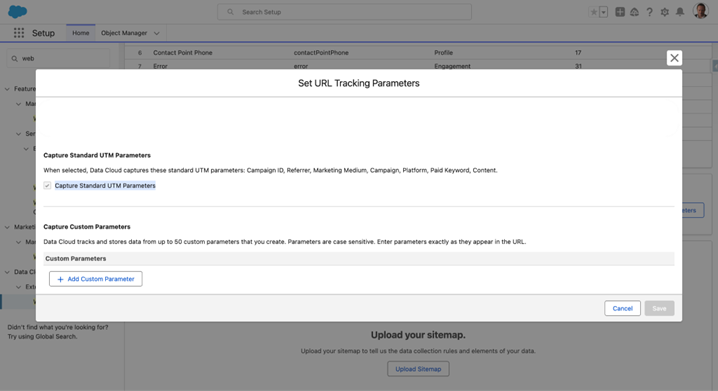
- External sites can also be tracked, by adding a Sitemap, provided by Marketing Cloud Next. All Engagement information from your visitors also finally land into the Website Engagement DMO
- If you use a Consent Banner, those data require your visitors to accept tracking for records to be created in Website Engagement DMO
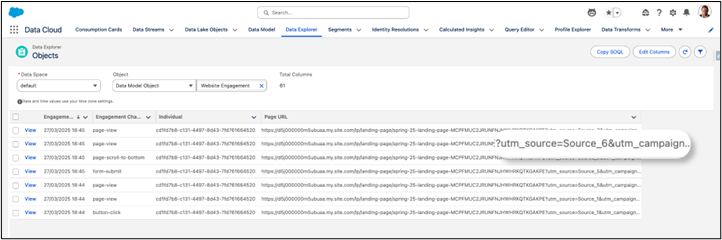
- The Page URL field contains the raw URL where the Engagement happened, including the UTM. Plus, the field Individual Id is the visitor Id, stored in a Cookie by the Tracking Code
Note: if you activate it, in the Connector, the collection of UTMs parameters, these parameters are then stored at the DSO level, update the DSO Schema to take this into account and you can map them to the Website Engagement DMO UTM fields. In the following, you would then be able to use the UTMs directly from the DMO Website Engagement, without the need for the Formula step
2. The Website Engagement DMO
- When a Visitor Anonymous Individual fills a Form, a new Individual is created, and the Individual Id above is used. The information from the Form’s field is also stored in this new Individual record
- Hence, we have Prospects, Leads, Contacts and Anonymous Individuals, all gathered in one Unified Individual thanks to the matching rules of the Identity Resolution process
- That is, we can access, for every Unified Individual, all the engagements on the web of the underlying Individuals by querying the Website Engagement DMO
- Most Automation Platforms store the First Touch or Last Touch UTM, or the Conversion point. Here, we will leverage Data Cloud, to store every touch point with UTM, so we can use this information for almost any use-case later on
- We’ll use a Data Transform in Data Cloud to extract and filter the information we need, and store it in a new DMO, we will call it Unif Touch Points and relate it to the Unified Individual DMO, Unified is a reserved keyword for DMO
- That way, we will be able to use Touch Points UTM in different ways
- Segment Unified Individual based on their Touch Points
- Embed Touch Points in a Data Graph
- Display all UTM as Related Lists thanks Data Cloud Profile Related Records
- We’ll only use utm_source and utm_campaign in this example, but you can add whatever UTM values and in any number you want utm_medium, utm_content, etc
3. Data Transform : Step by Step
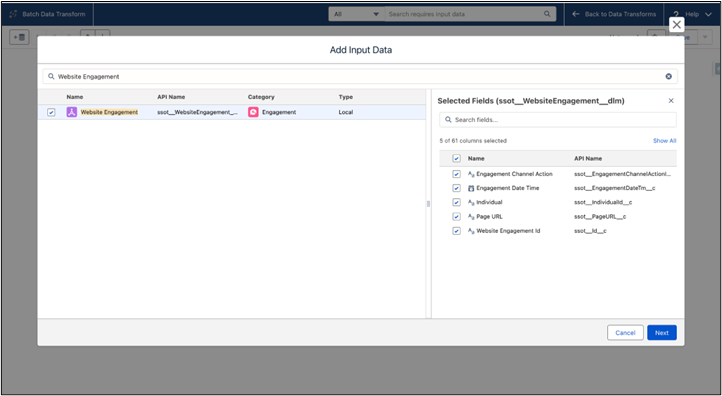
- In Data Cloud, let’s go to Data Transforms > New > select Batch Data Transform > Next. Choose Data Model Object and the Data Space you want > Next > Add Input Data > select Website Engagement and the following fields if already existing and mapped add utm fields as well
- Click Next. From the canvas, click the + sign next to Website Engagement and select Join. Search the Unified Link Individual and select the Following fields
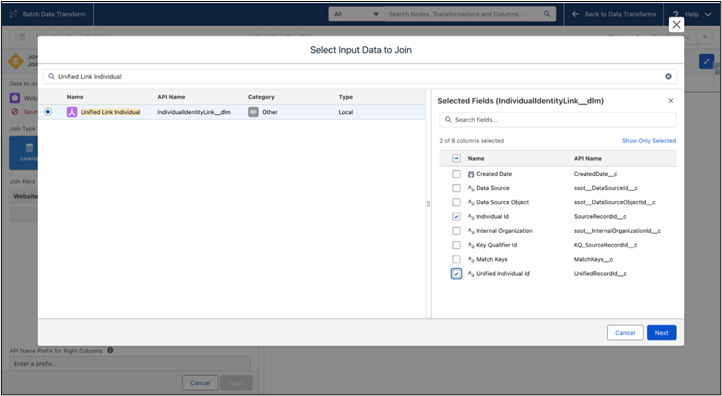
- Click Next, The Unified Link Individual is called a Bridge DMO. When the Identity Resolution process runs and gathers similar Individuals into a Unified Individual, the link between those Individuals and the Unified Individual is stored there
- We’ll use an INNER JOIN, edit the Join keys so the Website Engagement DMO’s Individual and the Unified Link Individual DMO’s Individual Id match. As they are identical, we don’t need to keep the two keys, we’ll uncheck the Individual from the Website Engagement DMO. Here is what you should have
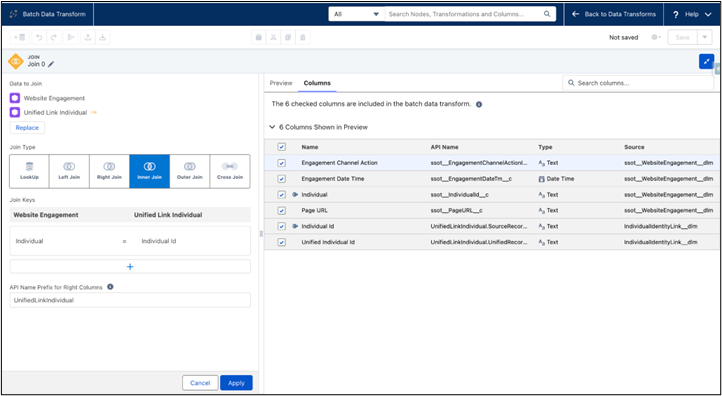
- Click Apply. If you want to see how the data looks so far, open the Preview tab
- The following step can be skipped if UTMs are already available
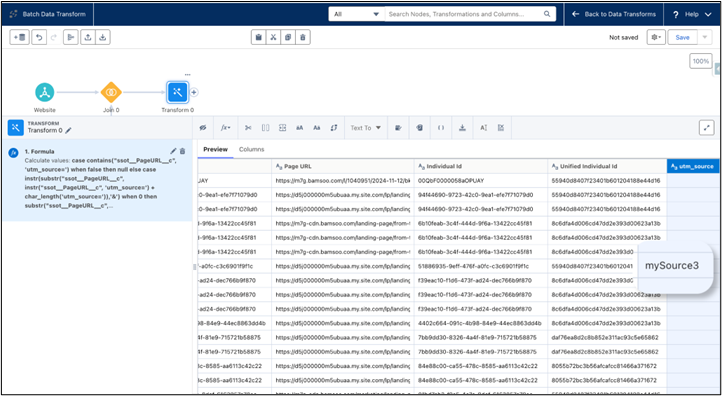
- By clicking on the + sign next to Join 0, add a Transform element to extract the values of utm_source and utm_campaign from the URL stored in Page URL. Click the fx dropdown and choose Custom Formula
- In the input, we’ll enter the following Formula
case contains("ssot__PageURL__c", 'utm_source=')
	when false then null
	else
		case
 			instr(substr("ssot__PageURL__c", instr("ssot__PageURL__c", 'utm_source=') + char_length('utm_source=')),'&')
			 when 0 then
			 	substr("ssot__PageURL__c", instr("ssot__PageURL__c", 'utm_source=') + char_length('utm_source='))
			 else
			 	substr("ssot__PageURL__c", instr("ssot__PageURL__c", 'utm_source=') + char_length('utm_source='), instr(substr("ssot__PageURL__c", instr("ssot__PageURL__c", 'utm_source=') + char_length('utm_source=')),'&') -1)
- This SQL generates the content of a new column which our Data Transform will add to the current data. We’re simply looking to see if the URL contains the string “utm_source=”. If not, we simply set it to null. Else, we check if the remaining string after “utm_source=” contains “&“ or not. If it does not, we copy the current position up to the end of the string, else we only copy the porting before “&”
- Scroll to the bottom of the window, select a Text format, and name the new column “utm_source” and use “utm_source__c” as its API name. Click Apply. You should see a new column in the right preview panel with a value next to the URL containing UTM
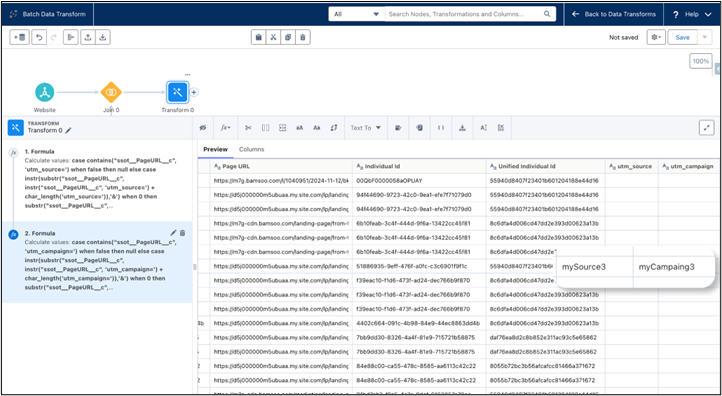
- We’ll add another column by following the same previous steps using campaign instead of source
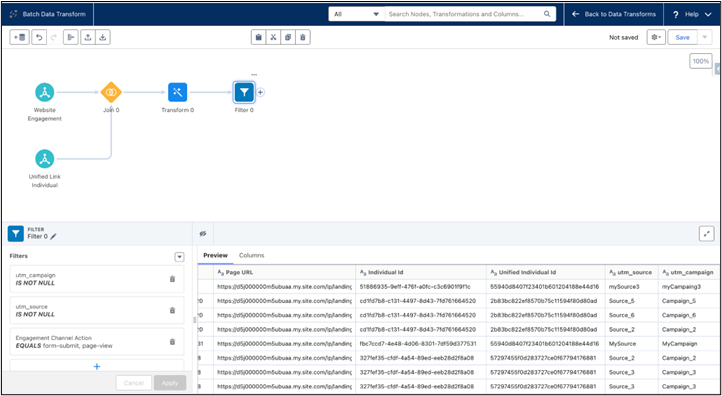
- Next we’ll click the + sign next to our last Transform activity and add a Filter activity. Our goal is to remove information we do not need. So we’ll keep only the URL from the original Website Engagement DMO having UTM, and only records related to the page-view and form-submit
- On the left side of the Filter panel, click the + sign, select utm_source, is_not_null as the operator and click Done. Do the same for utm_campaign. Then add a new filter, select Engagement Channel Action, click form-submit and page-view, then click Apply
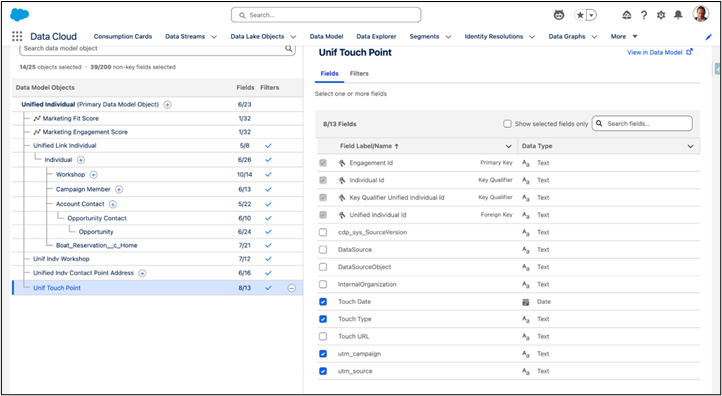
- Now, we will create our new DMO, and set its fields. Click the + sign next to our last Filter activity and select Output. We’ll give our new DMO the name Unif Touch Points, and select Other for its category. We’ll change some names for the new DMO fields so they are more explicit. We select Website Engagement Id as the Primary Key, and Individual Id as a FQK
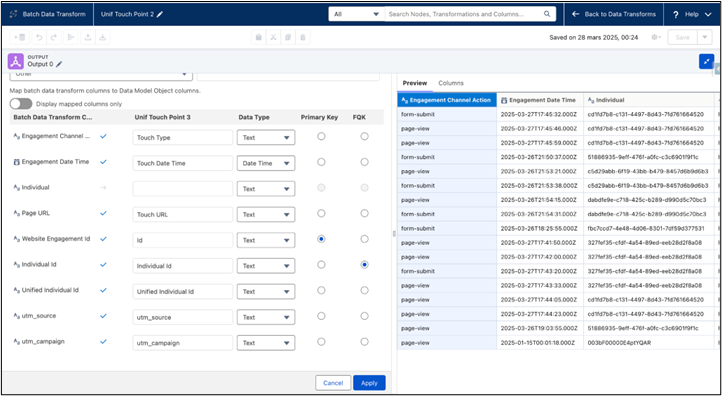
- Click Apply, we are done with the Data Transform. We now need to save it and give it a name. Once done, we can leave the builder by clicking Back to Data Transform. Our new Data Transform is in Processing State. We’ll select Schedule next to the end of the line, so that our DMO is frequently refreshed
- Finally, we will click Run Now in the actions next to the end of the line
- Whenever a new Engagement Data is injected into the Website Engagement DMO, we now store this information at the Unified Individual level, along with the values of the UTM, if existing, in the Unit Touch Points DMO
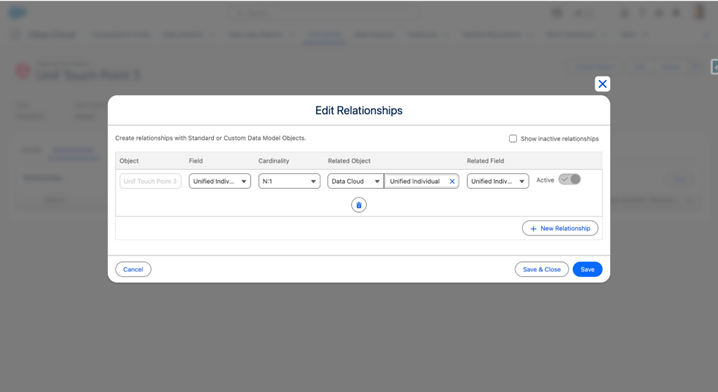
- There is just one missing piece, in the Data Model, we need to link our new DMO to the Unified Individual DMO, so we can use the Unit Touch Points DMO. Go to the Data Model, choose the All Related List, and then select the DMO. Go to Relationships and click New. Click + New Relationship
- Set the parameters as follows, by taking care of adding a N:1 type relationship
4. Using our UTM
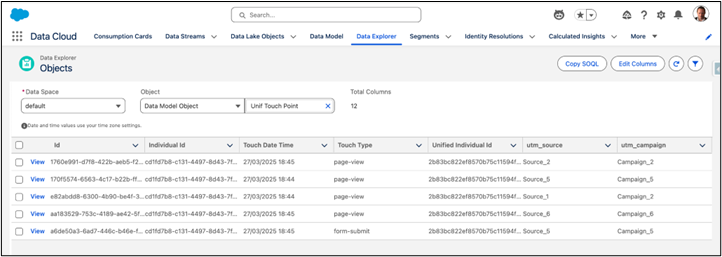
- First, we will make sure our Data Transform works as expected. For this, we’ll go to Data Explorer, select our new DMO, and display its content
- Great! Now let’s create a Segment of all Unified Individuals who submitted a From, thanks to a given Campaign and Source. We go to Segments, click New, use the Visual Builder. Give it a name, choose its publishing frequency, and then Save your Segment
- In Related Attributes, we find our DMO, thanks to the relationship we’ve created between it and the Unified Individuals we are making a Segment with
- We take the utm_campaign field and drag it to the canvas, choose the Campaign or the group of Campaign we are interested in. We do the same for the Source. And finally, we select only form-submit as a Touch Type
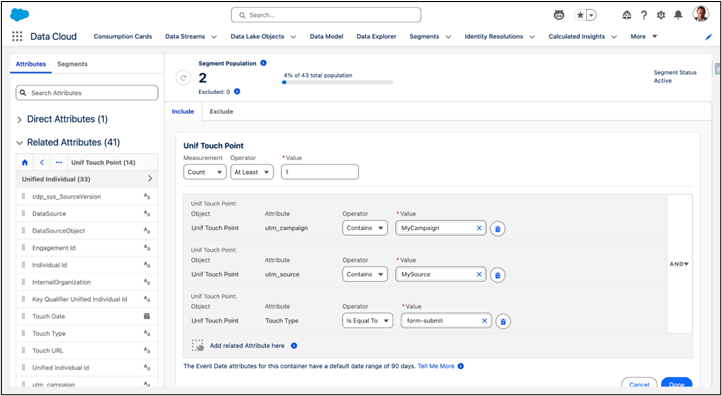
- And there we have it. Adjust to your needs, the UTM data is now available to Segments
- We can also easily embed UTM data in our Data Graph, so we can use our UTM for Decision Splits in our Segment Triggered Flows for example. Just click the + sign next to the Unified Individual DMO, the Unit Touch Points DMO is directly related to it thanks to the relationship we created. Add the DMO and the Fields you want to have access to later
- Finally, we’ll add all the UTM a given Unified Individual has crossed in the entire lifecycles of its composing Individuals, on the Lead and Contact Layout, so that our UTM are always available
- For this, on the Lead Lightning Page of a Lead and Contact, we add the Data Cloud Profile Related Record Lightning Component. We use Lead Id as the Match On Field basically, we'll get the Unified Individual Id from the Lead Id, which is also the Individual Id in Data Cloud and the Unified Link Individual bridge DMO. All Fields have only one choice, and may take some time to populate. Select our Unit Touch Points DMO and Fields to display
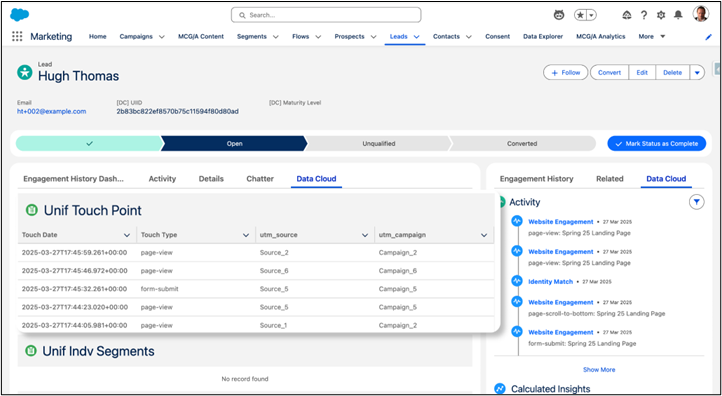
- We leveraged the raw UTM data and transformed it so that it is always up to date and available for Segmenting, inside the Flows, for Email personalization and at the Lead and Contact pages
_____________________________________________________________________________________________________________________________________
Written by: François Perret | Forum Ambassador
François Perret is a Trailblazer Forum Ambassador and Marketing Champion. He currently own 31 Salesforce certifications and He's co-leader of the Aix en Provence Marketer Group. He strongly believe that sharing is learning, and He's passionate about answering questions related to Salesforce Marketing products. He's the founder of Bamsoo, a French Salesforce Partner specialized in implementing an optimizing Account Engagement and Marketing Cloud Next.
Submissions reflect only the opinions of the user who made available the Submission and not the opinions of Salesforce, regardless of whether the user is affiliated with Salesforce, and may contain or constitute products, services, information, data, content and other materials made available by or on behalf of third parties ("Third Party Materials). Salesforce neither controls nor endorses, nor is Salesforce responsible for, any Third Party Materials, including their accuracy, validity, timeliness, completeness, reliability, integrity, quality, legality, usefulness or safety, or any applicable intellectual property rights. Any Submissions made available through any message board or forum in response to posted questions, or that otherwise purports to answer any questions, including any questions about Salesforce or Programs, are made available for your general knowledge only and should never be relied upon as answers to your specific questions (even if an answer is marked as a “best” answer or with any similar qualifications). You should always contact Salesforce support for answers to your specific questions. Salesforce has no control over Submissions, and is not responsible for any use or misuse (including any distribution) by any third party of Submissions.
If you have questions, tap into the wisdom of our entire Trailblazer Community here: https://trailhead.salesforce.com/trailblazer-community/feed
Knowledge 기사 번호
004754258
이 기사를 통해 문제를 해결했습니까?
개선을 위한 의견을 보내주세요.