Seleziona un'organizzazione
Route Email Through AWS Direct Connect (DX) for Hyperforce
Data pubblicazione: May 4, 2026
Descrizione
AWS Direct Connect (DX) is a dedicated private network connection between your corporate infrastructure and AWS, which hosts Hyperforce. Unlike standard internet routing, AWS DX provides a consistent, low-latency, high-throughput private link directly into the AWS network — bypassing the public internet entirely. This is especially important for organizations with strict data residency, compliance, or security requirements that mandate all Salesforce traffic (including email) must travel over private circuits rather than public paths.
If you need to route Hyperforce email traffic through your AWS DX circuit, read on. This is for Sales, Service, and Industries Cloud customers.
Before you begin, you'll need to know:
- The email domain(s) that need traffic routed through AWS DX
- The region of your Salesforce orgs that are using AWS DX
Email typically uses around 60 IP addresses. To avoid adding so many IPs to your router policies for DX, you can configure an email relay to your domain, which limits your email to a smaller set of IPs. This setting doesn’t impact email deliverability, even if you don’t have a dedicated email relay server. Make sure to test the relay configuration in a sandbox—incorrectly configured relays can cause email loss. You may also want to regenerate your inbound email service addresses.
Why it matters for Salesforce Hyperforce:
Salesforce Hyperforce is the next-generation Salesforce infrastructure built natively on public cloud providers, including AWS. When your org is on Hyperforce (hosted on AWS), all traffic — including outbound email from Salesforce — by default routes through the public internet to reach your mail servers.
Salesforce Hyperforce is the next-generation Salesforce infrastructure built natively on public cloud providers, including AWS. When your org is on Hyperforce (hosted on AWS), all traffic — including outbound email from Salesforce — by default routes through the public internet to reach your mail servers.
-
With AWS DX configured:
- Outbound emails from Salesforce (e.g., password resets, workflow emails, case notifications) travel over your private AWS DX circuit to your corporate mail infrastructure
- This keeps sensitive email traffic off the public internet
- Your organization's email security policies (DLP, content inspection, archiving) can be applied consistently since all email passes through your controlled relay
Risoluzione
Configure an Email Relay and Email Domain Filter
These steps are described in detail in Set Up Email Relay and Set Up an Email Domain Filter. You can follow these abbreviated instructions to configure an email relay and domain filter for each of your email domains. Read the articles for more complete information.
This example uses yourdomain.com as the host.
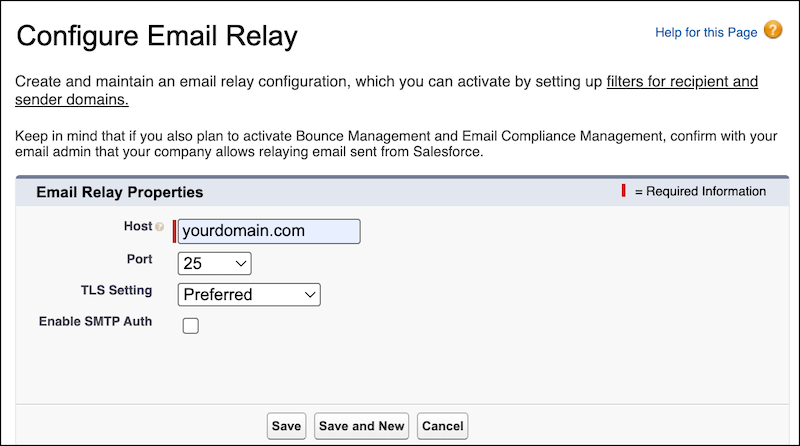
Configure the Email Relay
- From Setup, in the Quick Find box, enter Email Relays, and select Email Relays.
- Select Create Email Relay.
- For Host, enter the hostname,
yourdomain.com. Accept the other defaults or customize the values according to Set Up Email Relay, then save.
Configure the Domain Filter
- From Setup, in the Quick Find box, enter Email Domain Filters, and then select Email Domain Filters.
- Select Create Email Domain Filter.
- Configure these settings with these values:
- Sender Domain: *
- Recipient Domain:
yourdomain.com - Email Relay: Select the Email Relay created in the previous step.
- Active: Check the box
- Save the page.
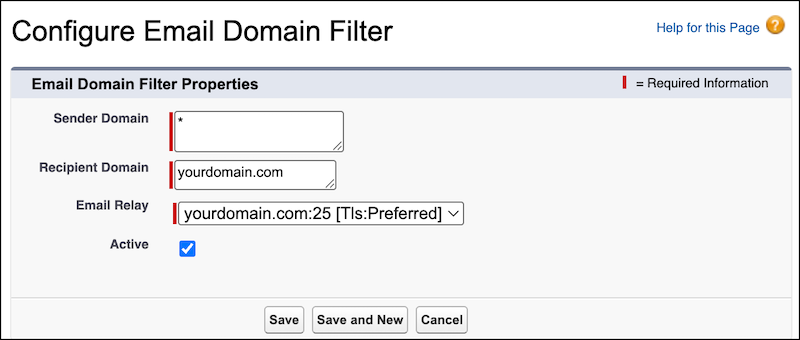
If you have multiple email domains, repeat these steps to route each domain to its own relay.
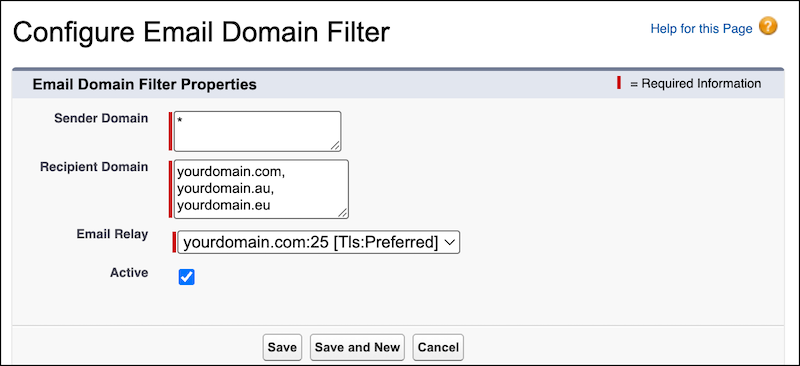
If you prefer to route multiple domains to the same relay, enter the domains in Recipient Domain of the email filter, separated by commas. In this example, yourdomain.com, yourdomain.au, and yourdomain.eu all route to the same relay.
Get IP Addresses for Your Email Relay
After you configure the email relay and domain filter, you must add Hyperforce email IP addresses to your router’s allowlist. The article Ensure you can receive email from the Salesforce application contains a table of IPs used for email relay MTAs for Hyperforce instances, organized by country. Allow all of the IPs specified for your country. If you’re not sure of your country, read Where is my Salesforce instance located? The first 3 letters of your instance name are your country.
Test Your Email Relay Configuration
Before enabling your email relay configuration in production, test it in a sandbox organization to make sure the configuration is valid and mail flows smoothly. After you've validated the sandbox configuration, you can turn on the same configuration in production.
Here are some scenarios you can use to test your email setup.
- Outbound System Emails from Salesforce
- Make sure you can receive emails that Salesforce sends to your users. For example:
- Create a new user in one of the configured relay domains and check if you get a welcome email
- Reset a user's password in one of the configured relay domains and check if you get a password reset email
- Outbound User Emails
- Send an email to a user in one of the configured relay domains and make sure they can receive it.
- Inbound Emails
- Create an inbound email service, like email2apex or email2case.
- Send an inbound email to the service you created and make sure it routes to the Salesforce network correctly.
As you test each scenario, confirm the expected results by checking the email logs. You can read more about email logs in Use Email Logs to Monitor Emails Sent from Salesforce.
- Outbound Verifications
- Check that the recipient received the email and that it was routed correctly.
- Make sure the relay address is filled out and matches your expectations.
- Confirm that the email domain of the recipient matches the relay rules you set up.
- Verify that the email was delivered by checking for a log line with Mail_Event=D.
- Check that the remote host is the IP of the relay that you configured in the relay rules.
- Inbound Verifications
- Make sure the inbound email was received, routed, and processed by Salesforce correctly.
- Check that there's at least one Mail_Event=R and one Mail_Event=D log line for the message that you sent to the email services address. There can be more than one log line for a single inbound email, if the system forwarded the email through several internal steps.
Regenerate Inbound Email Service Addresses
If you generated inbound email service addresses while your org was in our first-party datacenters, your inbound mail continues to route through the first-party datacenter even after your org migrates to Hypeforce. To route inbound emails exclusively through Hyperforce, regenerate your service addresses after the migration.
See the knowledge article Recreate error free inbound routing addresses for detailed instructions on regenerating your inbound email service addresses.
Risorse aggiuntive
Hyperforce IPs to Allow - Sales, Service, Industries, and Tableau Clouds
Set Up AWS Direct Connect (DX) for Hyperforce
Ensure you can receive email from the Salesforce application
Set Up Email Relay
Set Up an Email Domain Filter
Use Email Logs to Monitor Emails Sent from Salesforce
Recreate error free inbound routing addresses
Numero articolo Knowledge
004867762
Questo articolo ha risolto il problema?
Facci sapere, così possiamo migliorare!