Välj en organisation
Data 360- Create a Customer 360 View using Data 360 Related Lists
Publiceringsdatum: Dec 1, 2025
Beskrivning
The main purpose of using Data 360 (formerly Data Cloud) related lists in Salesforce is to surface unified, real-time customer data directly on standard or custom records—like Contacts, Accounts, or Cases—without duplicating or storing that data in the core CRM.
Main Benefits:
- 360° Customer View: Show rich, unified data from multiple sources (e.g. web behavior, purchase history, loyalty data) right on CRM records.
- Real-Time Insights: Related lists are powered by live data from Data 360, not static copies—so you always see the latest info.
- No Duplication Needed: You can access external or streaming data without copying it into Salesforce objects, saving storage and syncing effort.
- Actionable Context: Sales or service reps can make better decisions by seeing contextual data (e.g., most recent purchases, support interactions, campaign engagements) all in one place.
Example Use Cases
On a Contact record, you might add a Data 360 related list showing:
- Last 5 website visits
- Recently abandoned shopping carts
- Open support tickets from another system
- Recent email engagement
Lösning
Document purpose:
The purpose of this document is to walk through step by step to expose a Data 360 object in CRM to be used by service representative.
Use Case is the Company has purchase orders outside CRM and want it to be visible to their human agents in CRM using Data 360 Related Lists.
Prerequisites / notes:
In order to follow this guide, you need a Data 360 Sandbox, or other development environment type which is ideally empty of other data to ensure no issues occur with current development practices. A Developer sandbox may therefore be preferred. Data 360 must be activated on the Sandbox to be used.
Note: Data Services Credits will be consumed as part of this exercise.
High Level Implementation Steps:
- Import CRM Data for customer profile into CRM
- Import Customer profile and Transaction history(Reservations , orders etc) into Data 360
- Map the data to the standard DMOs (Individual, Contact Point Email , Contact Point Phone, Party )
- Create and Run Identity Resolution
- Open the object where you want the related list to be displayed and configure Data 360 Related List.
- Add the related list to object form and save it to display .
Detailed Steps:
1. Import CRM Data
Download a CSV file that contains contact data, and import it using the Data Import Wizard.
- Download this CSV file by right-clicking and selecting "Save Link As". Make sure you save it as a CSV (.csv) file, and not a text (.txt) file. You don't need to use Excel.
- Use the Data Import Wizard to import the file:
- Kind of data: Accounts and Contacts
- Type of import: Add new records
- Match Contact by: Name
- Where is your data located?: CSV
- File: Choose File
- Character Code: ISO-8859-1 (the default)
- Values Separated by: Comma
- Map all fields:
- FNAME to Contact: First Name
- LNAME to Contact: Last Name
- CELL to Contact: Mobile
Note: if you need further assistance, see Trailhead here: Import Data to CRM
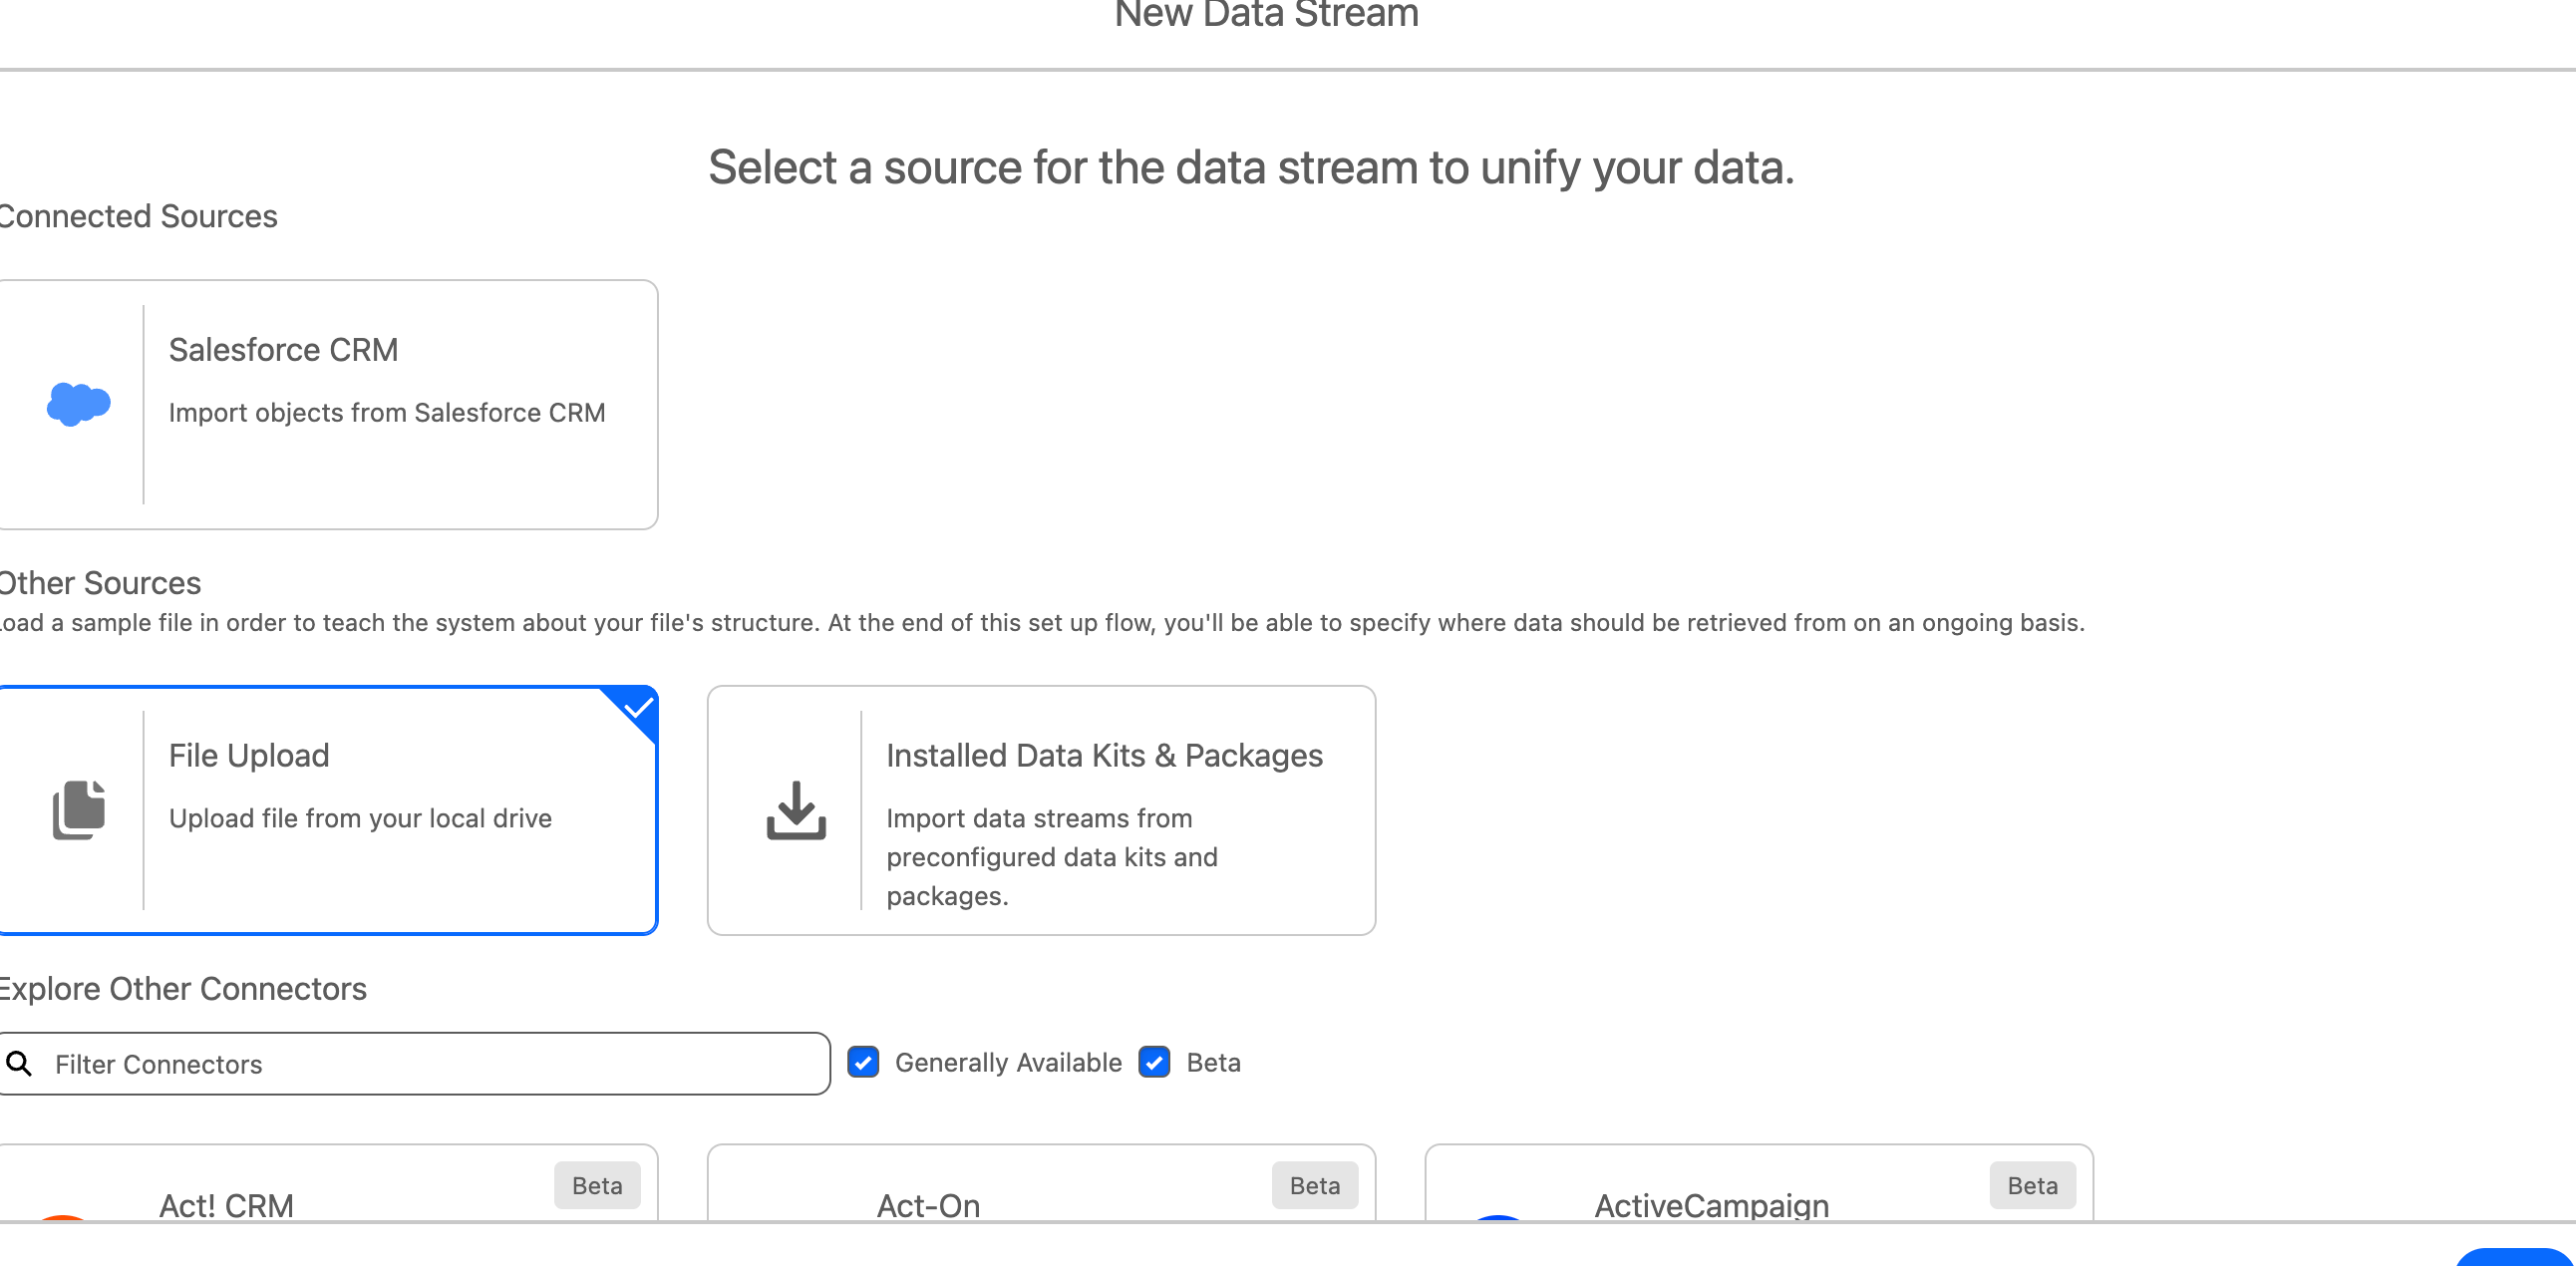
2. Import CSV Data to Data 360
We will now simulate an upload from a external system, e.g. an on-premise customer database, this will be used to create our unified profile combing Salesforce CRM data to this external data.
- Navigate to Data 360
- Click on Data Streams
- On the new Data Streams page select File Upload
- Select the StoreCustomers.csv file
- Select Profile as the Category and Customer ID as the Primary Key
- Click Next and leave as default Data Space, do not set any filters
3. Create CRM Data Stream
- Check if you already have a Contact Data Stream first, if you this can be refreshed, if you have refresh this Data Stream
- If you do not have a Contact CRM Data Stream set this up
- ADD DIAGRAM
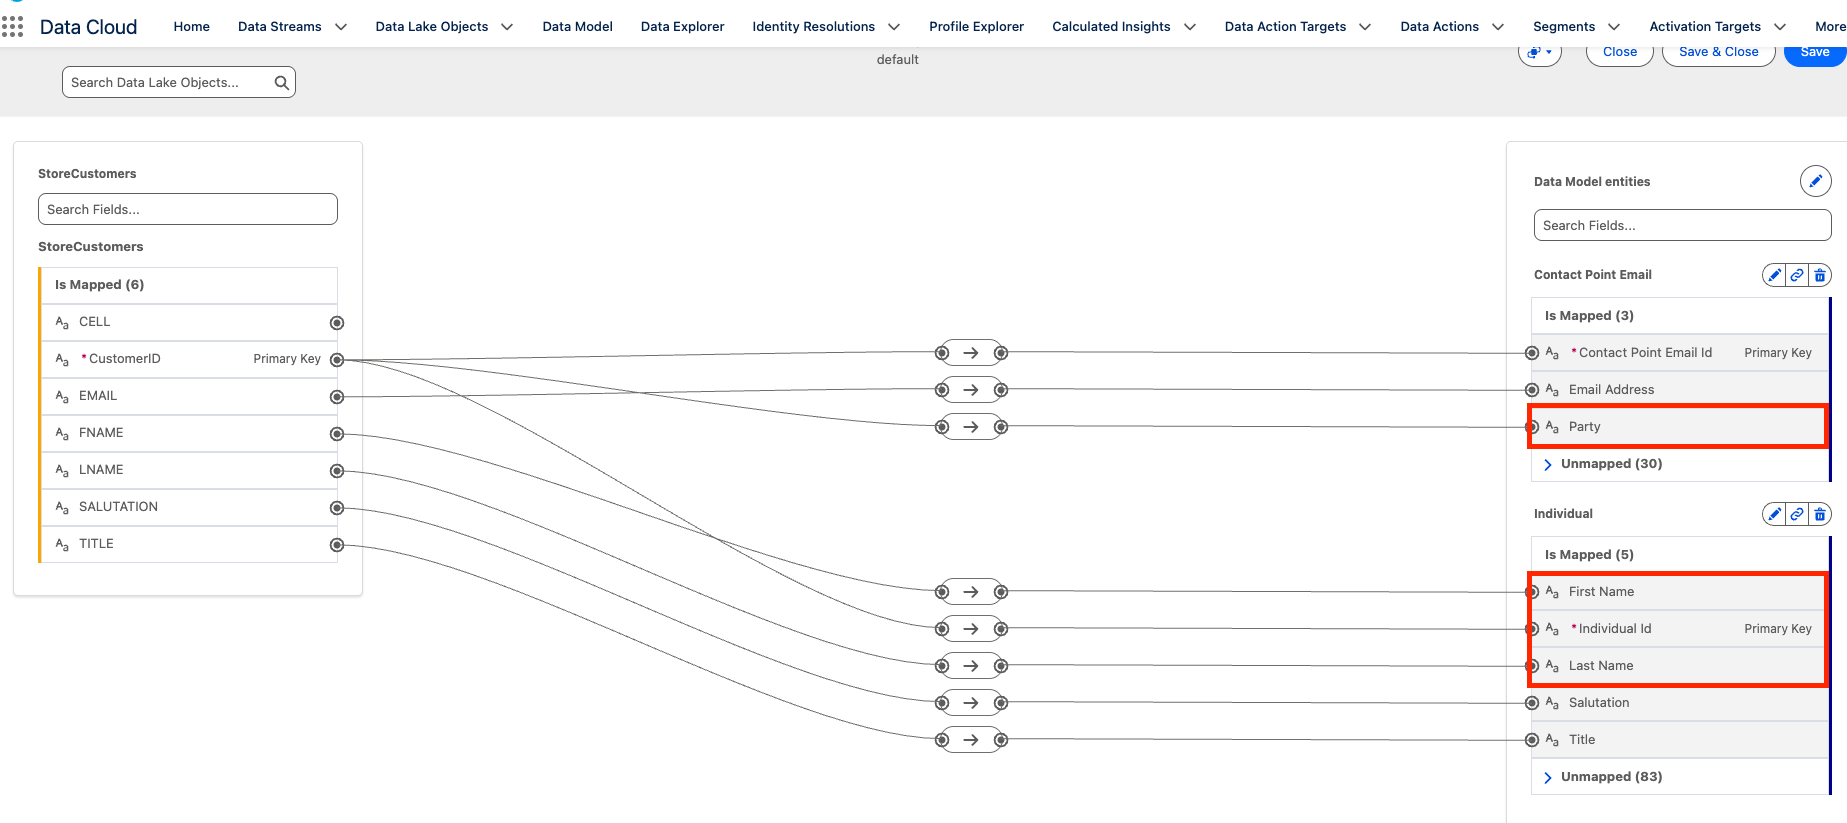
4. Data Mapping
- Ensure the Contact CRM DLO is mapped to Individual DMO correctly (it will likely be mapped to other DMOs also)
- Map your CSV upload StoreCustomers.csv DLO to Individual, .
- Make sure you map the Customer Id to individual ID and Party attribute in Individual. The last name of the customer also needs to be mapped to the individual for Identity Resolution to work.
- Map Email to the Contact Point Email DMO
- Map EMAIL to Contact Point Email Id and Email Address
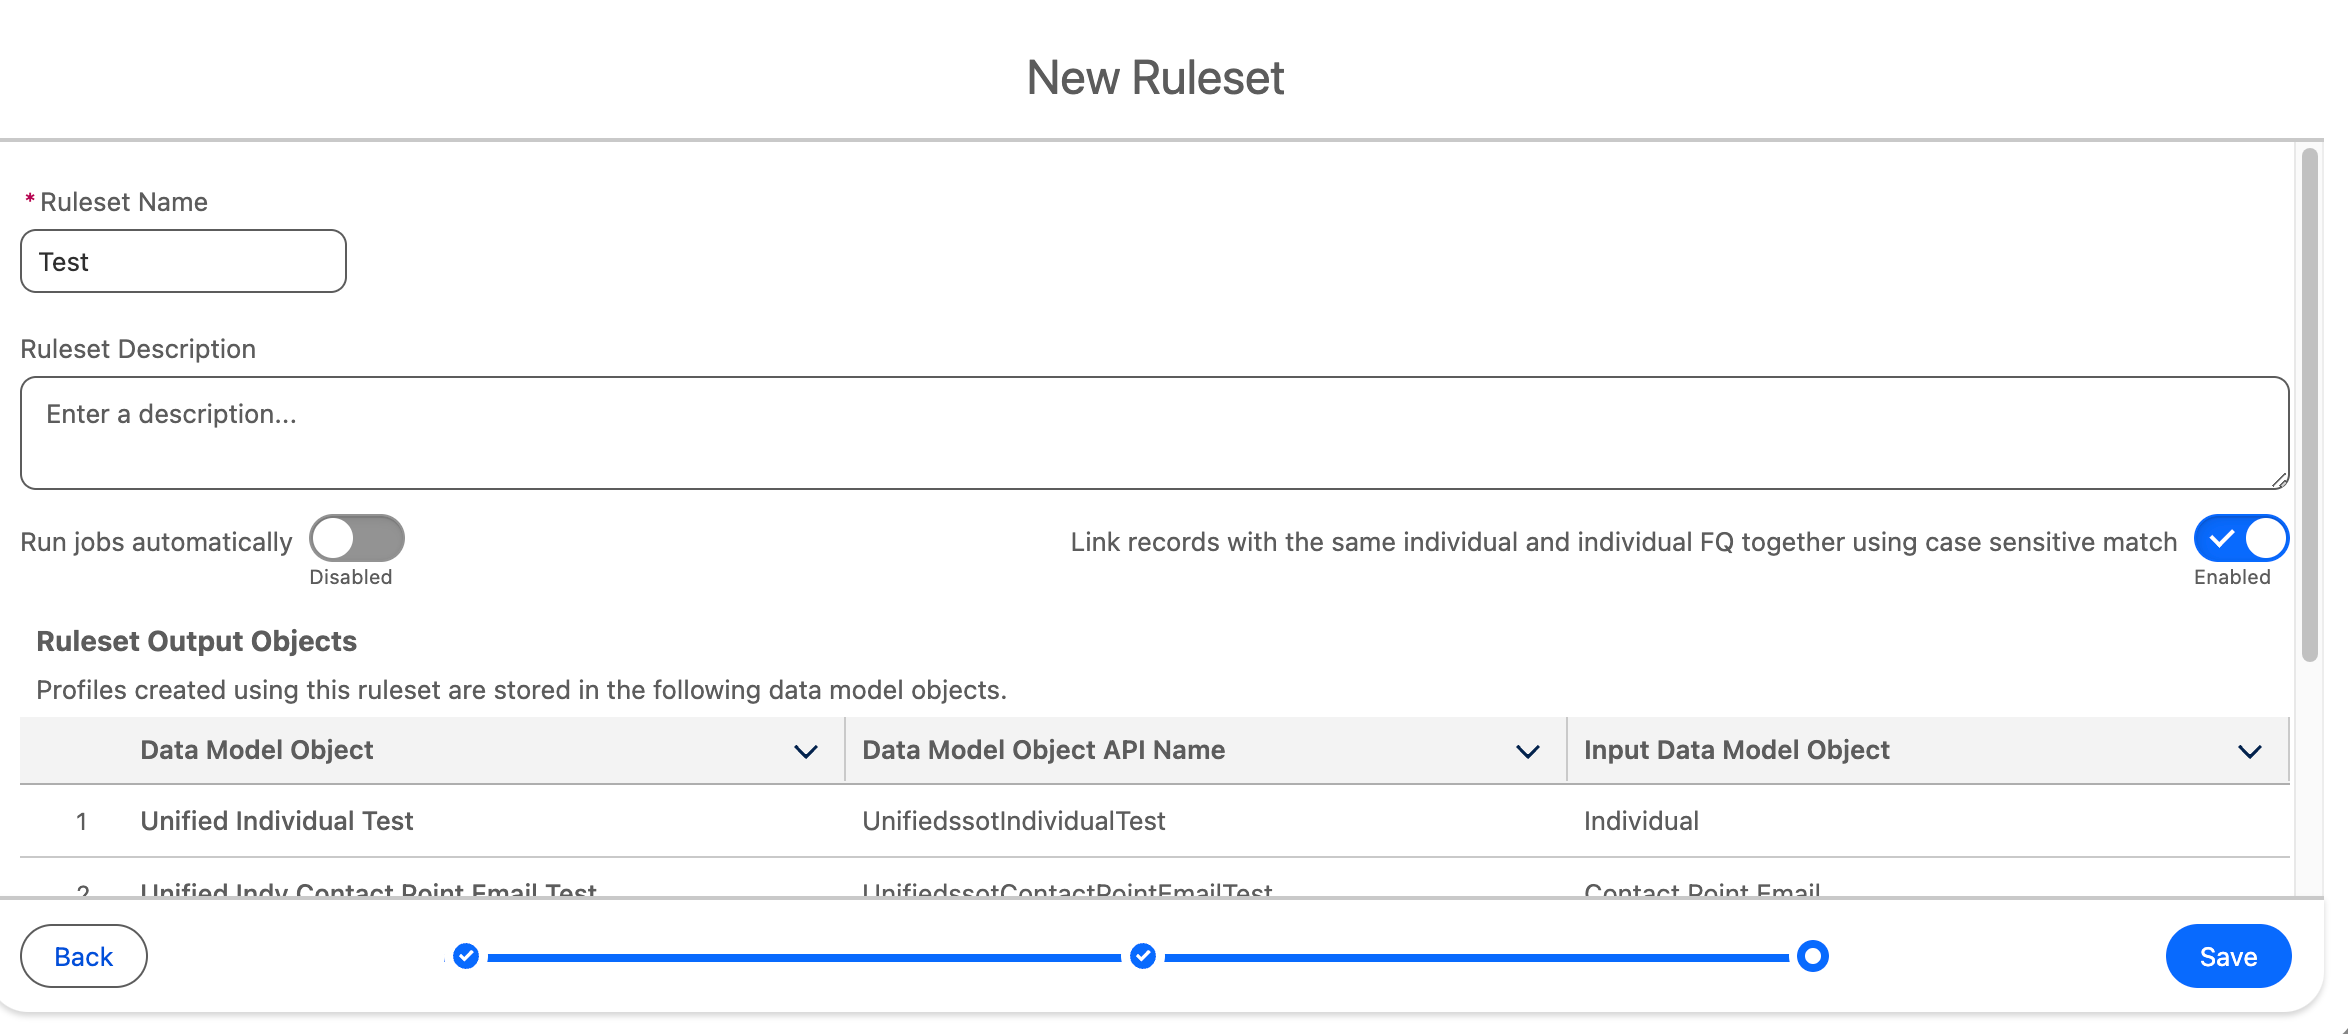
5. Create Identity Resolution Ruleset
- Navigate to Identity Resolutions
- Click create new Rule Set using default Data Space, Individual as primary object and use ‘Test’ as Ruleset ID
- Click Next
- Use ‘Test’ as Ruleset Name
- Disable Run jobs automatically
- Press Save
- Under Match Rules click configure
- Click Next
- Configure Match Rule 1
- Select Fuzzy Name and Normalized Email
- Click Next
- Leave all settings as is and click Next
- Press Save
- Press Run Ruleset
- Ruleset will take up to an hour to run, check back to ensure it’s run, you can continue with the next steps in the meantime
6. Import Customer Transaction History
We will now import customer transaction data as a CSV, Transaction History .csv, we are simulating this coming from an external system using the CSV upload to speed up the process.
- Create a new Data Stream of type File Upload
- Upload this file and use the following settings
- Use Engagement as Data Type
- DATE as Event Time Field
- TRANSACTION_ID as Primary Key
- Click Next and Deploy
- Map the Transaction History DLO
- Click Select Objects, Select Custom Data Model and press New Custom Object
- Press Save
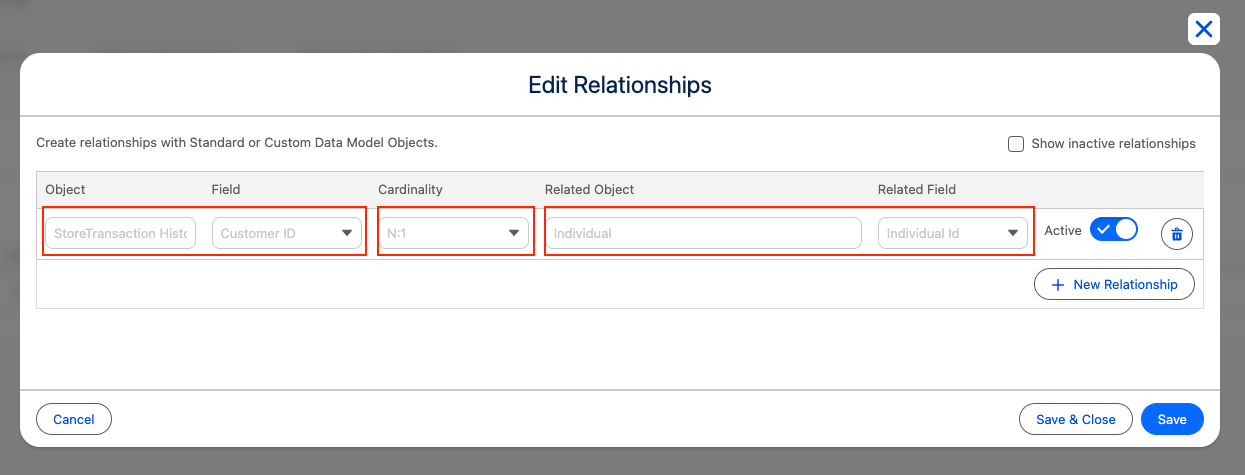
7. Create the Relationship between Transaction DMO and Individual
Create the relationship between the transaction History and Individual DMO by clicking the Relationships tab highlighted below.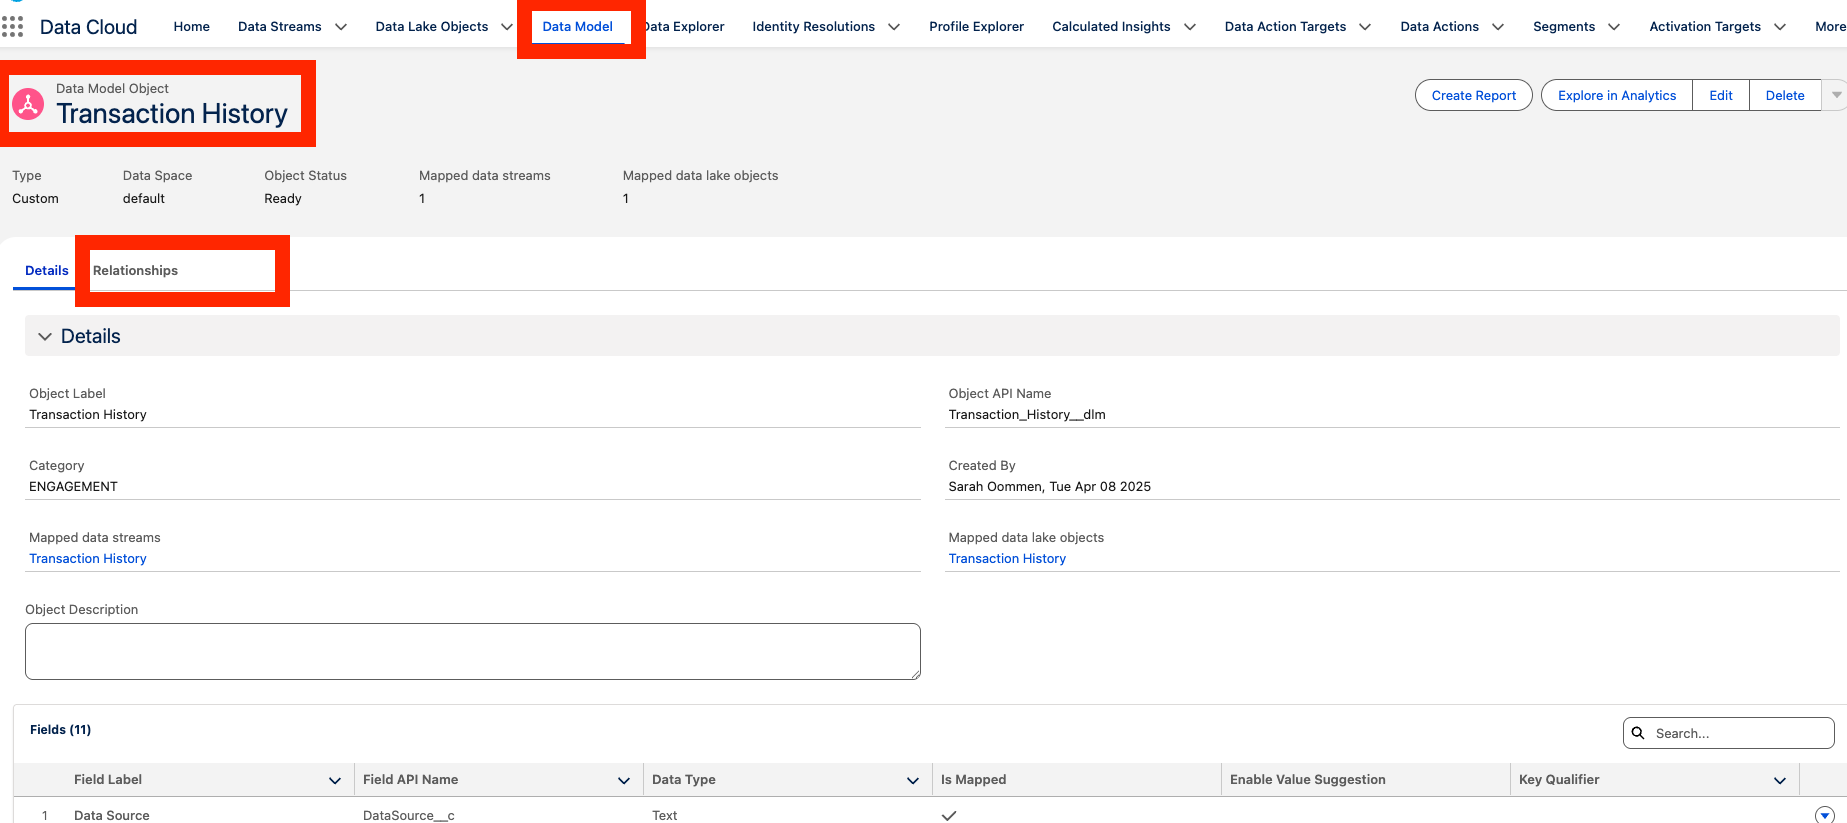
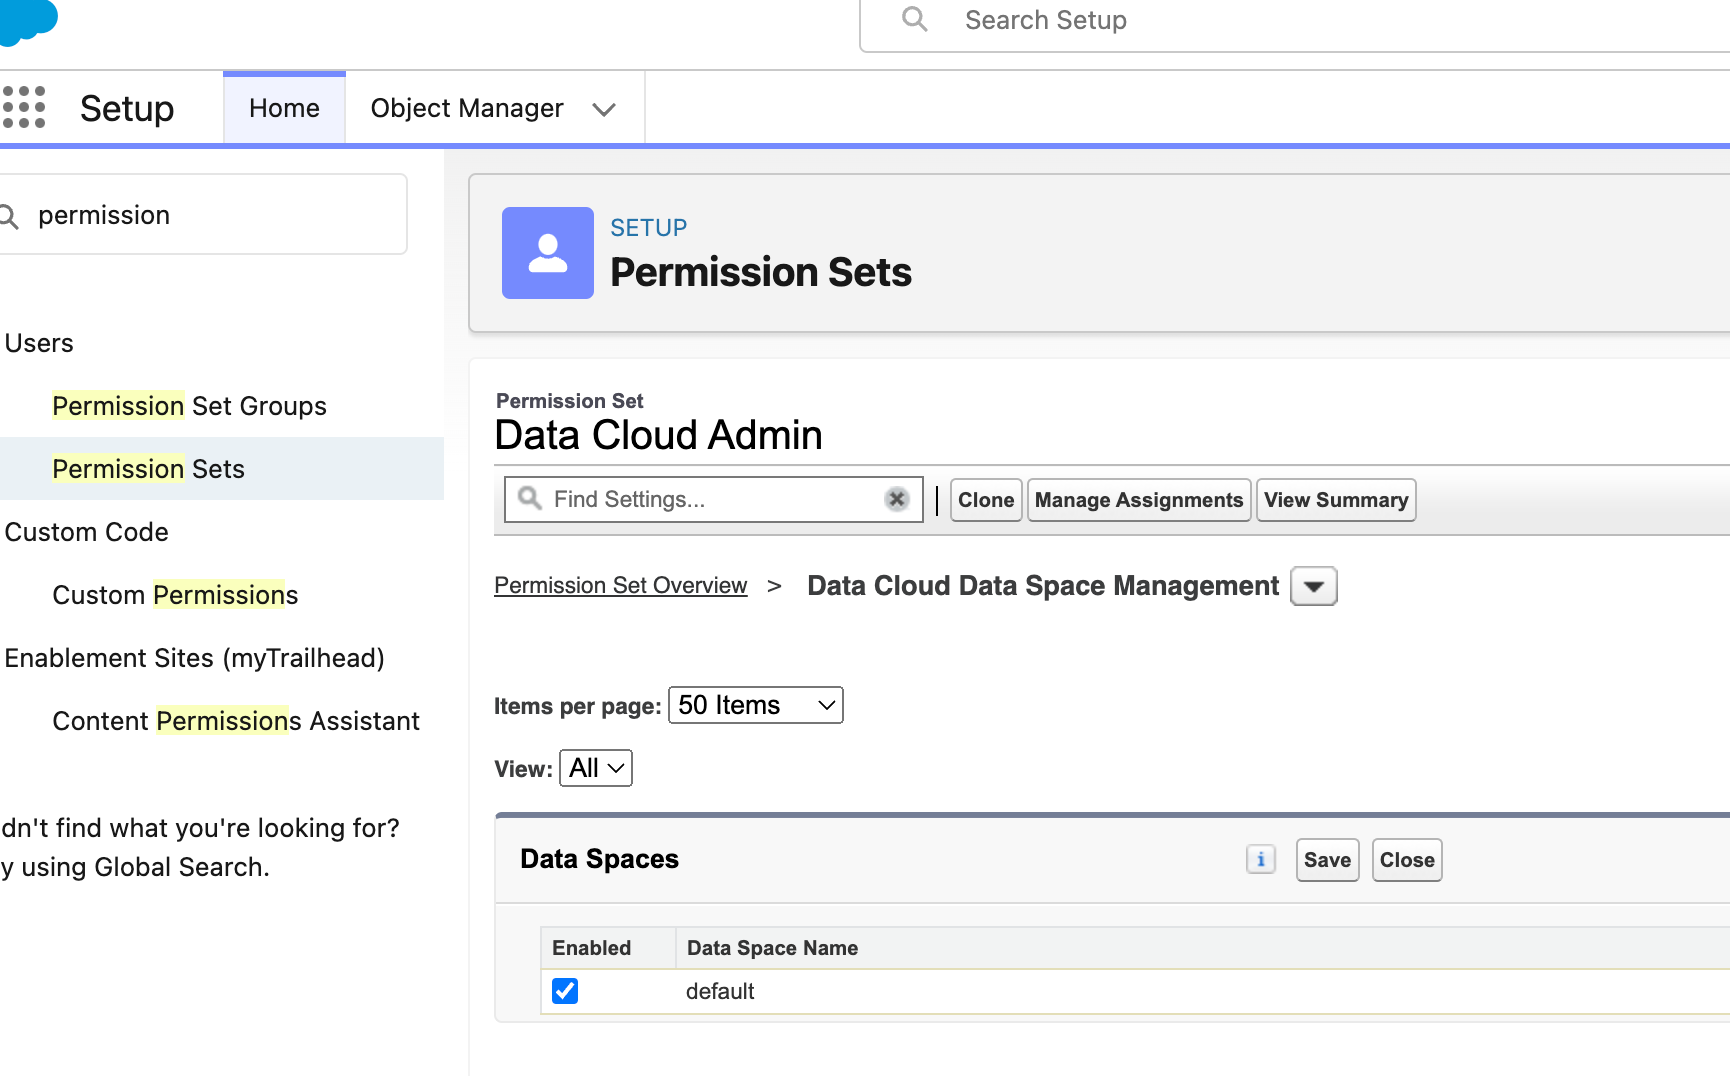
8. Ensure Data Space Permissions for Data 360 Admin
- In CRM Setup
- Find Permissions Sets
- Select the Data 360 Admin Permission Set
- Click Edit next to Data Spaces
- Select default Data Space and press Save
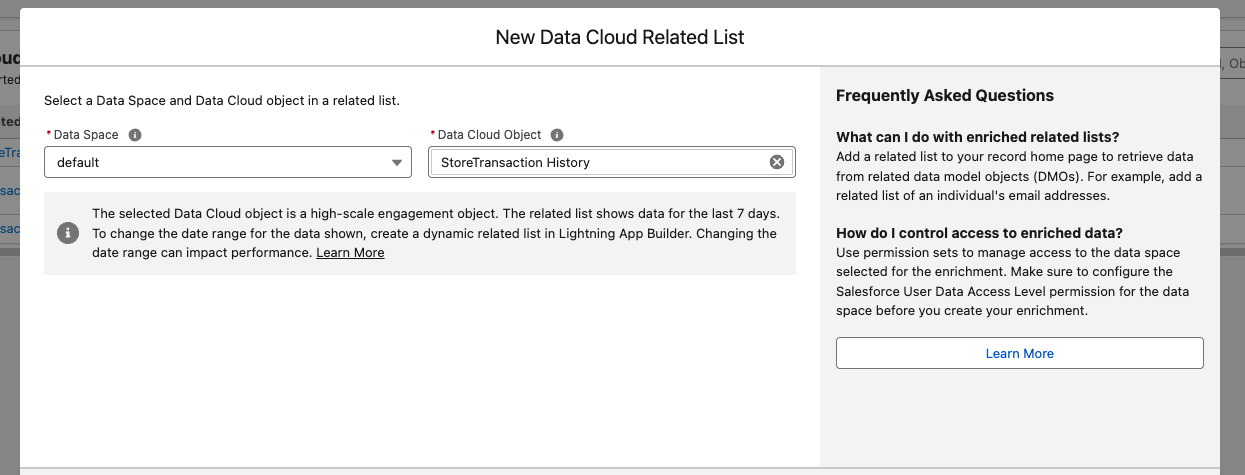
9. Create Related List and add it to page Layout.
- Click the Setup icon , then click Setup.
- Click Object Manager.
- Click Contact, (not Contract).
- Click Data 360 Related List.
- Click New.
- For Data 360 Object, choose Store Transactions .
- Click Next.
- Update Child Relationship Name to Store Transactions
- Click Next.
- Update Related list label to Store Transactions.
- Click Next.In the left menu, click Lightning Record Pages.
Click Contact Record Page.
Click Edit.
Drag a Dynamic Related List - Single into the Related tab above Opportunities.

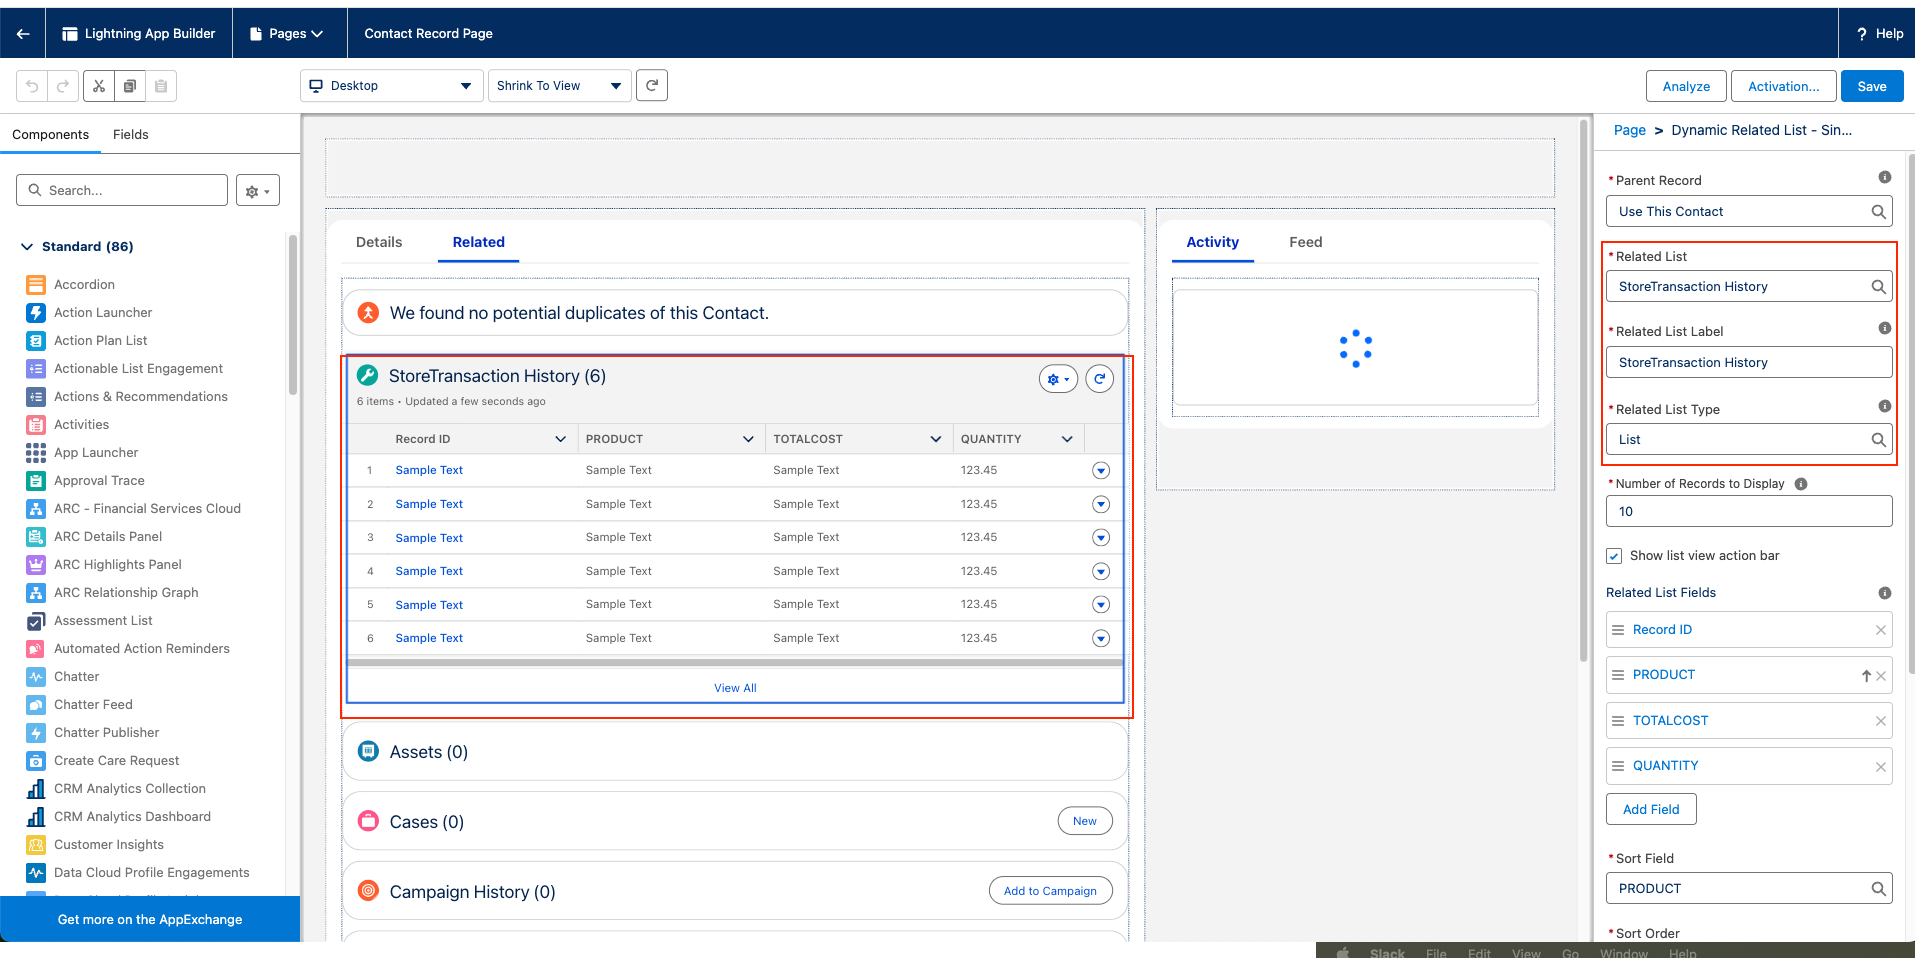
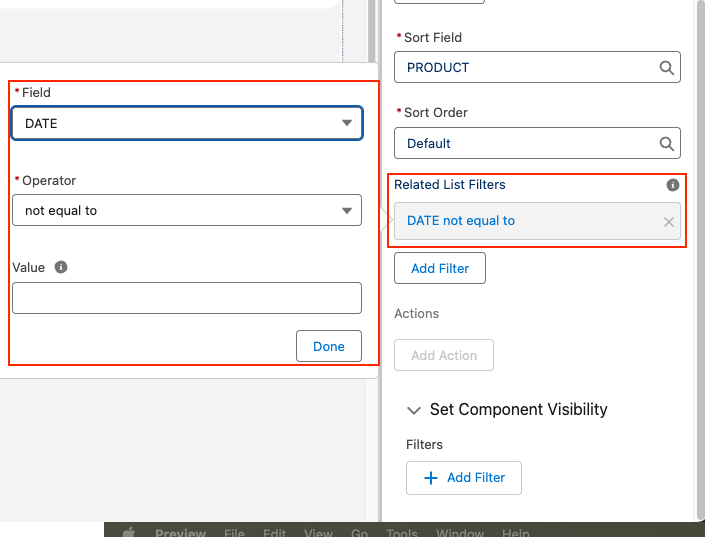
- The related list by default only shows history of transactions in last 7 days in order to overide the same we need to add a filter criteria
- Under Related List filters, click Add Filter.
- For Field, choose Date.
- For Operator, choose not equal to.
In other words, if the date isn’t empty, show the transaction. If a filter isn’t added, only the past 7 days of data appear. In your org the data is probably older than that. - Click Done.
- Click Save.
- Close the Lightning App Builder browser tab to return to the Data 360 app.
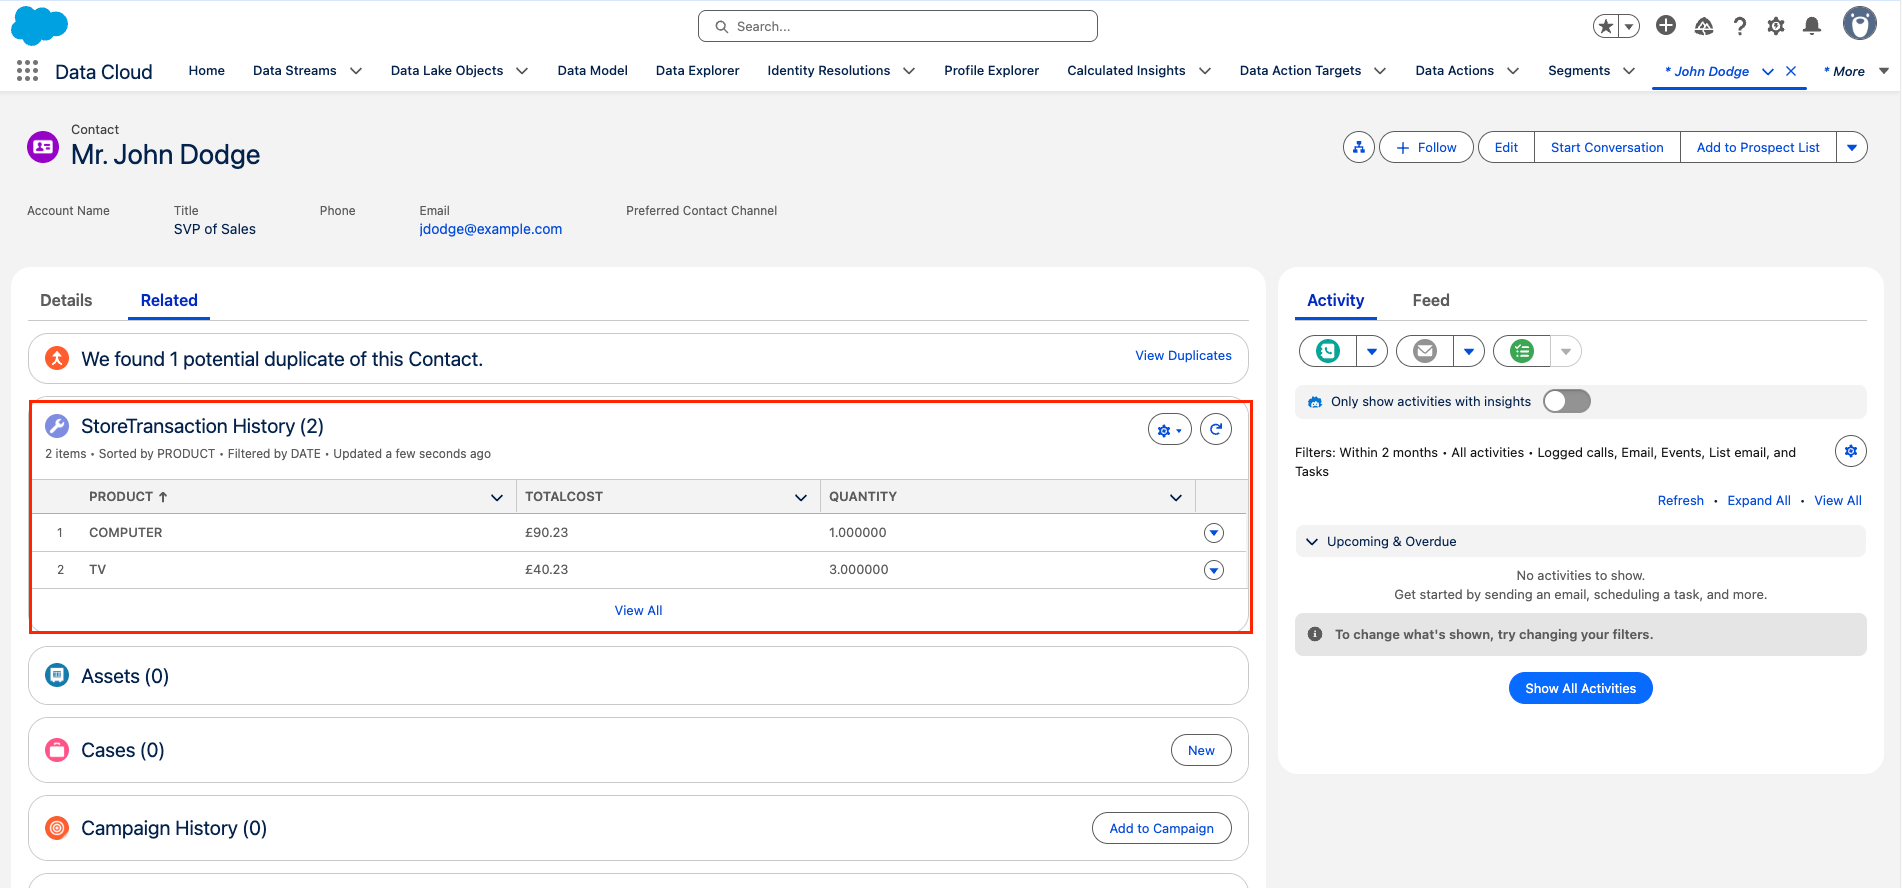
View your Related List on the contact Page as shown below
Related Docs:
Turn On Data 360
Import Data to CRM
Enrich Your Org with 360 Data And Insights
Use Data 360 Related Lists to Enrich Your Contacts and Leads
Enrich Your Applications with Data 360 Data and Insights (Ch. 5)
Knowledge-artikelnummer
005101842
Löste denna artikel ditt problem?
Berätta för oss vad vi kan förbättra!