Organisation auswählen
How to Automatically Update a Salesforce Opportunity When Its Converted Lead Is Updated Using Record-Triggered Flow
Veröffentlichungsdatum: Oct 8, 2026
Beschreibung
This article focuses on Lead-Opportunity synchronization, but the same approach can be applied to any related converted objects. In Salesforce, the Converted Opportunity ID is located on the Lead, which deviates from a conventional database model where the Id would typically reside on the child or related object. This distinction influences the condition entries employed.
Lösung
This article answers the question: how do you use a Salesforce Record-Triggered Flow on the Lead object to automatically update a converted Opportunity when its original Lead is updated? The steps cover the required permission, the custom fields, the flow configuration, testing, and alternative approaches.
Prerequisite: View and Edit Converted Leads Permission
To edit converted Leads, ensure that the user has the View and Edit Converted Leads permission enabled.
Step 1: Assign the View and Edit Converted Leads Permission with a Permission Set
- In Setup, go to Permission Sets.
- Click New to create a Permission Set.
- Enter a descriptive Label such as Converted Lead Management.
- Select the type of Users who will use this Permission Set.
- In the Permission Set, open App Permissions.
- Click Edit, enable View and Edit Converted Leads, and click Save.
- Click Manage Assignment > Add Assignment, select the required Users, and click Assign.
Step 2: Create a Custom Field on the Lead Object
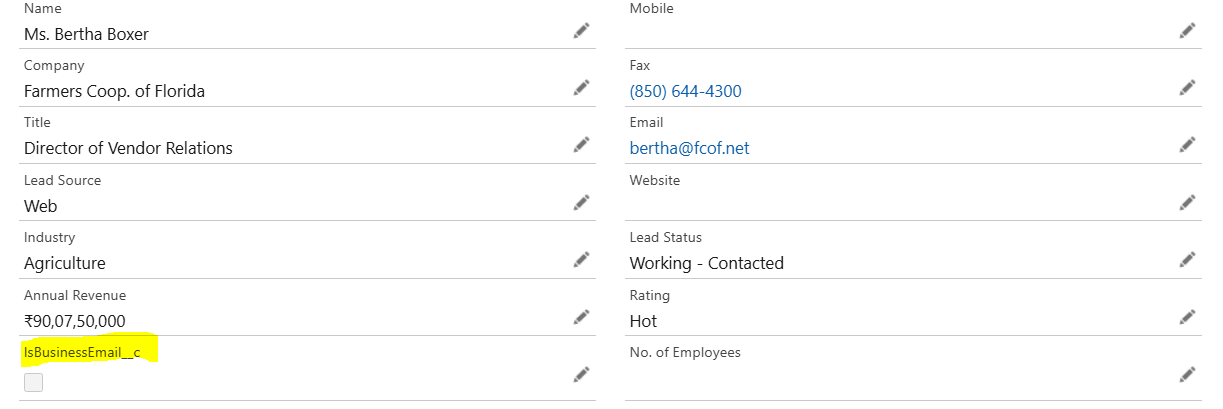
- Implement a Checkbox field on the Lead object.
- This field, designated as IsBusinessEmail__c, is accessible via Setup > Object Manager > Lead > Fields & Relationships.
- Its purpose is to store a Boolean value indicating whether the email associated with the record is a business email.
Step 3: Create Two Fields to Synchronize on the Opportunity Object
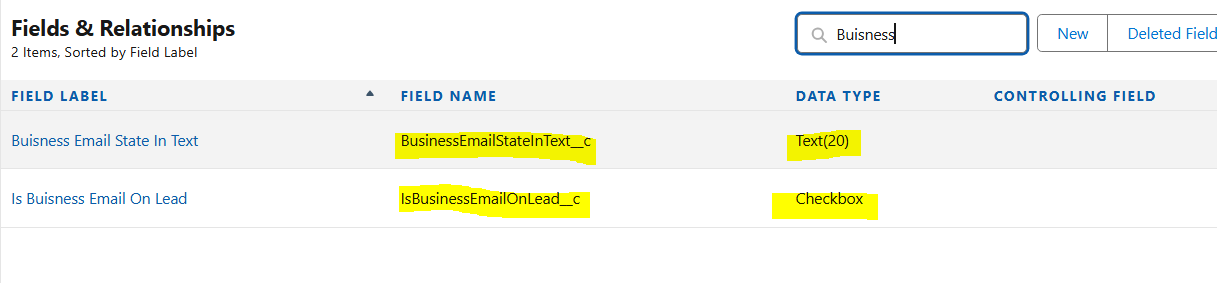
On the Opportunity object, create two fields to be synchronized under Setup > Object Manager > Opportunity > Fields & Relationships.
- One Checkbox field IsBusinessEmailOnLead__c, which has the same data type as the field created on the Lead object.
- One Text field BusinessEmailStateInText__c, designed to receive text that is True or False, based on the Boolean value from the Lead.
- This field may also accommodate other relevant values, including the concerned email address.
Step 4: Create a Record-Triggered Flow on the Lead Object
Use a Record-Triggered Flow that updates a converted Opportunity with a value from its original Lead.
- Create a Record-Triggered Flow on the Lead object.
- Go to Setup, type Flows in the Quick Find Box.
- Click New Flow.
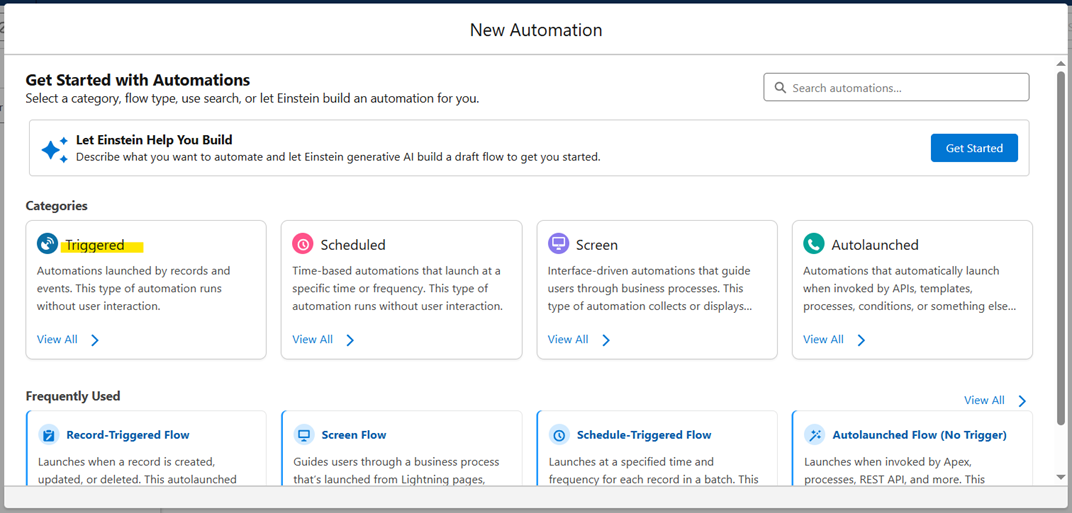
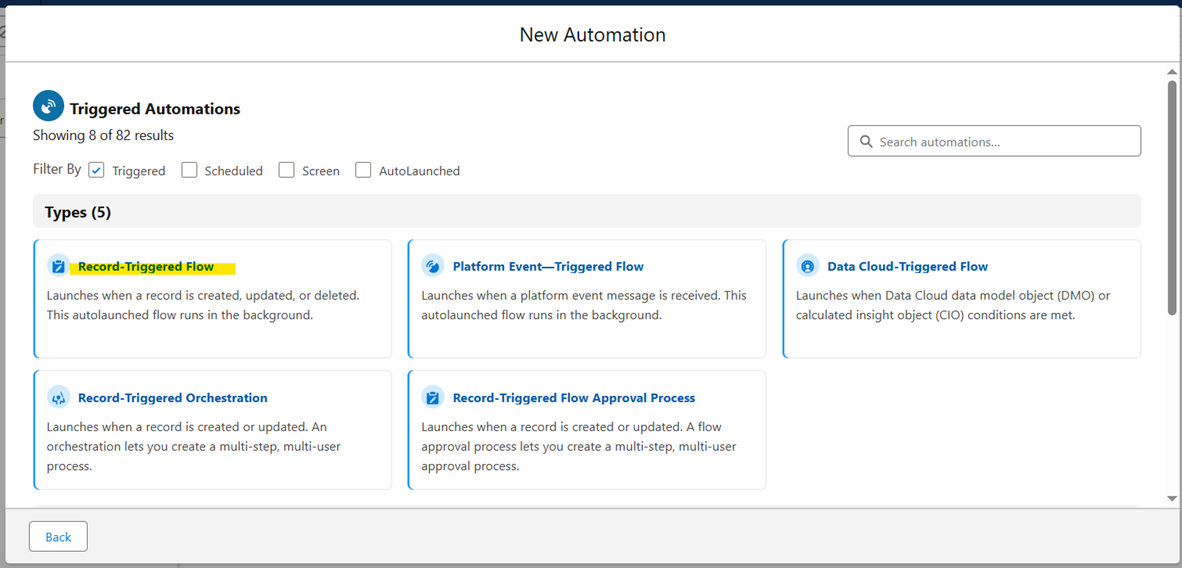
- Select Triggered > Record-Triggered Flow.
Step 5: Configure the Flow Start Element in Flow Builder
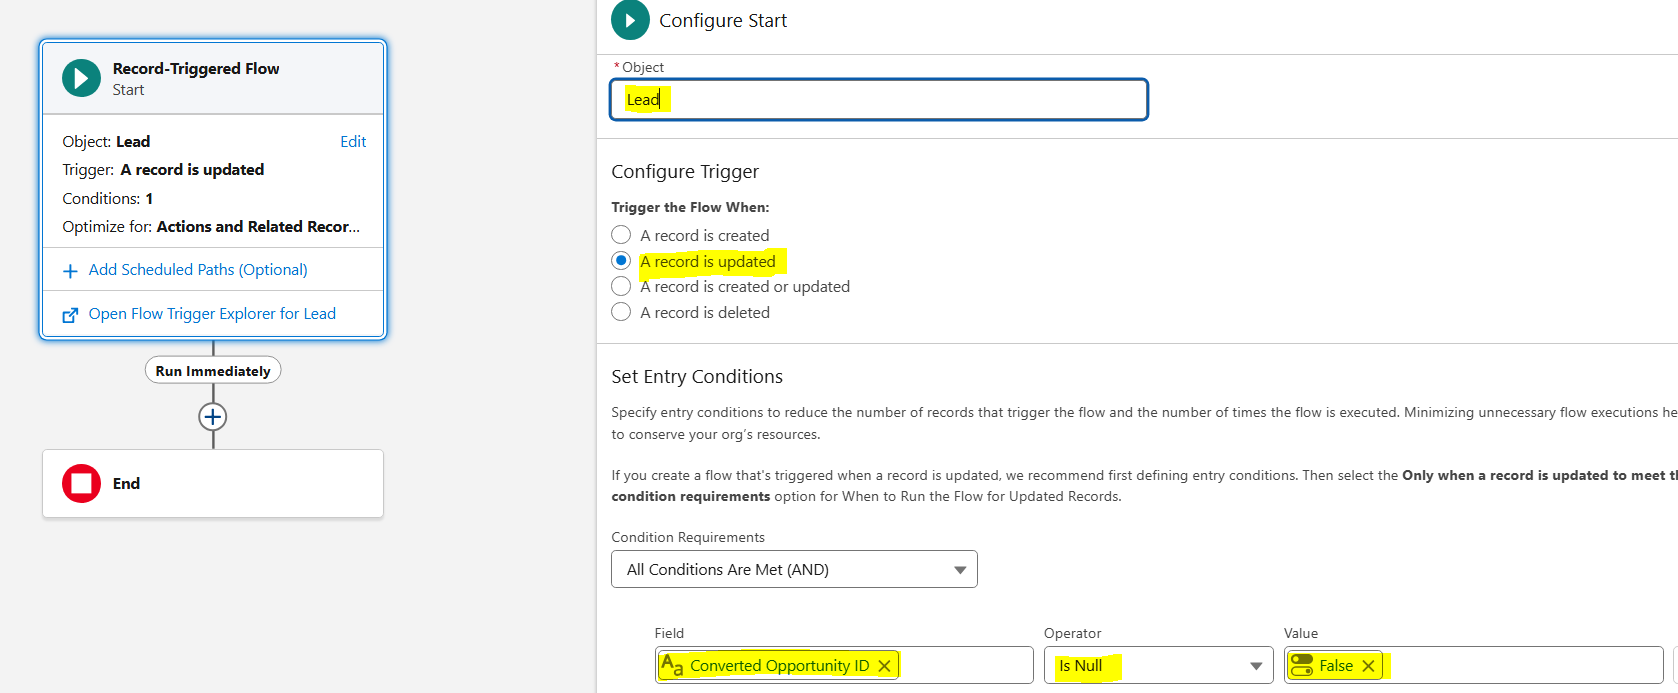
When the Flow Builder page appears, configure it as follows.
Notes:
- The test here is done on the Converted Opportunity ID being not null, but it could also be done on the Converted Boolean field.
- This Lead/Opportunity synchronization example illustrates the use case, but the same logic works with any other objects that are related by an ID. The difference may be that the Converted Opportunity ID is located on the Lead, whereas in a classical database model, the ID may be located on the child or related object, which could alter the Condition Entries.
| Setting | Value |
|---|---|
| Object | Lead |
| Trigger the Flow When | A record is updated |
| Condition Requirements | All Conditions Are Met (AND) |
The Condition Requirement should be as follows:
| Field | Operator | Value |
|---|---|---|
| Converted Opportunity ID | Is Null | False |
| Setting | Value |
|---|---|
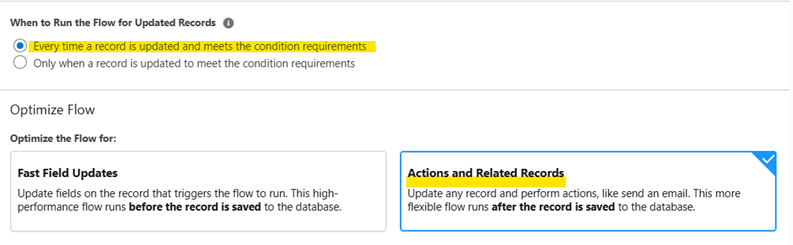
| When to Run the Flow for Updated Records | Every time a record is updated and meets the condition requirements |
| Optimize the Flow for | Actions and Related Records |
Step 6: Add an Update Records Element to Update the Opportunity
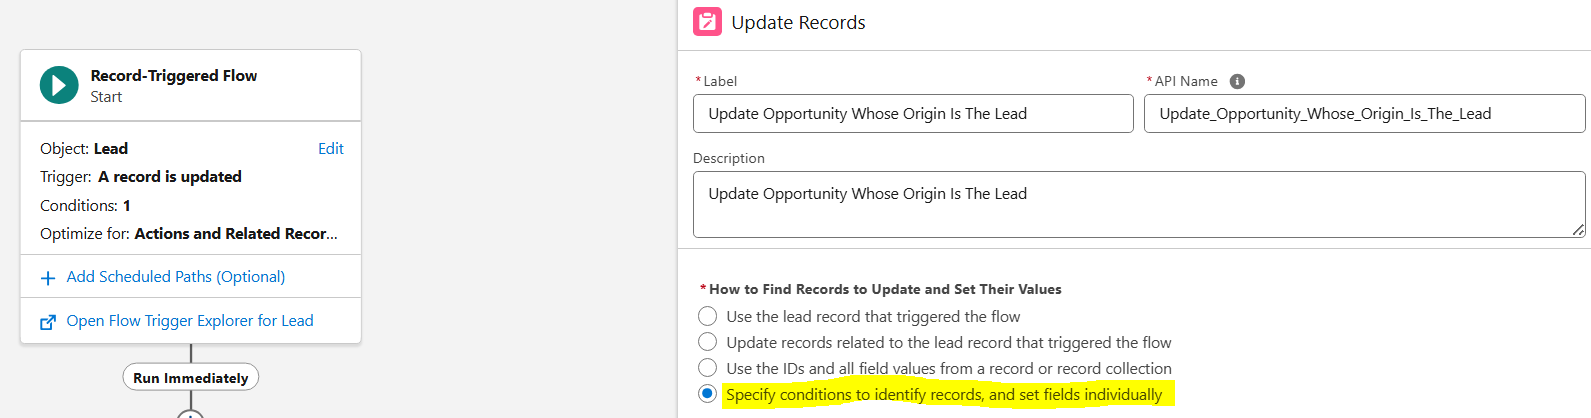
Add an Update Records element that updates the Opportunity whose ID equals the Converted Opportunity ID of the triggering Lead record.
- Click the + icon below the Start block.
- Select the Update Records element.
- Select the option that allows Specifying Conditions. This handles both the Get query and the Update actions.
Notes:
- By specifying conditions, you do not need to position a Get Records element before the Update element.
- While not mandatory, it is best practice to always provide a Description for the elements and resources used in the Flow.
- Select the Opportunity object, as this is the type of records that this Flow updates.
- For the Filter Opportunity Records section, use the criteria below to target the Opportunity for an update.
- Condition Requirements: All Conditions Are Met (AND).
- Field: Choose Opportunity ID.
- Operator: Equals.
- Value: Navigate to Triggering Lead > Converted Opportunity ID or type {!$Record.ConvertedOpportunityId}.
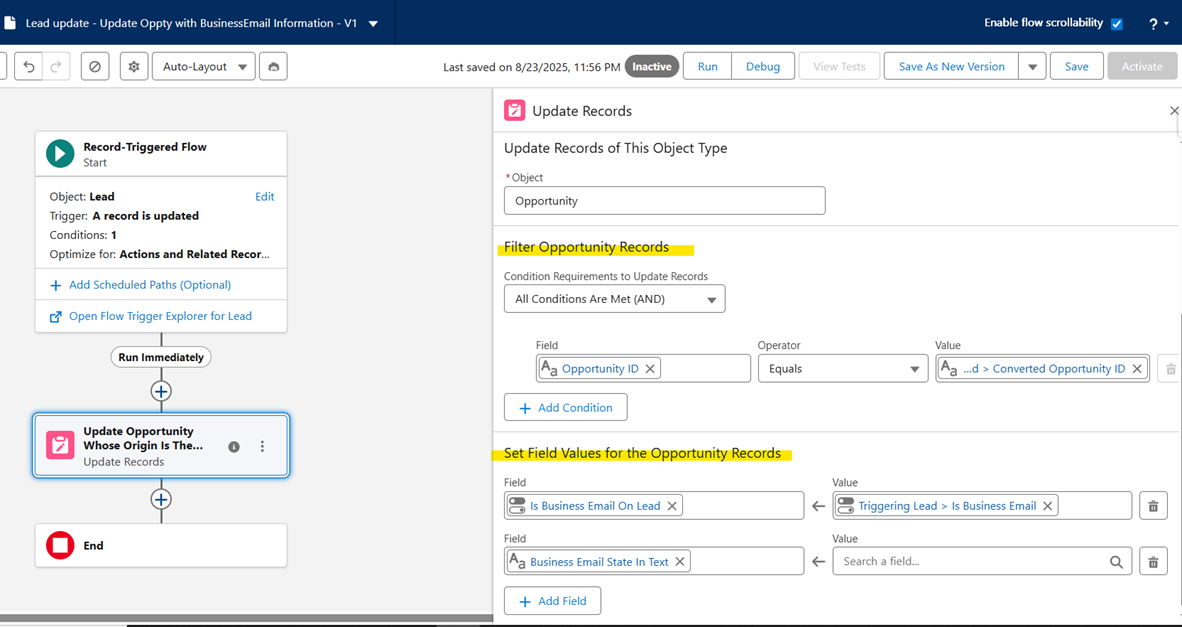
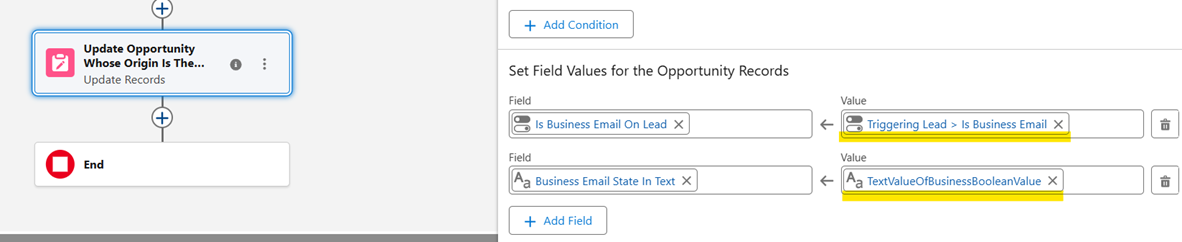
- In the Set Field Values section, directly map the Boolean field from the Lead to the corresponding Boolean field on the Opportunity, as both fields share the same data type.

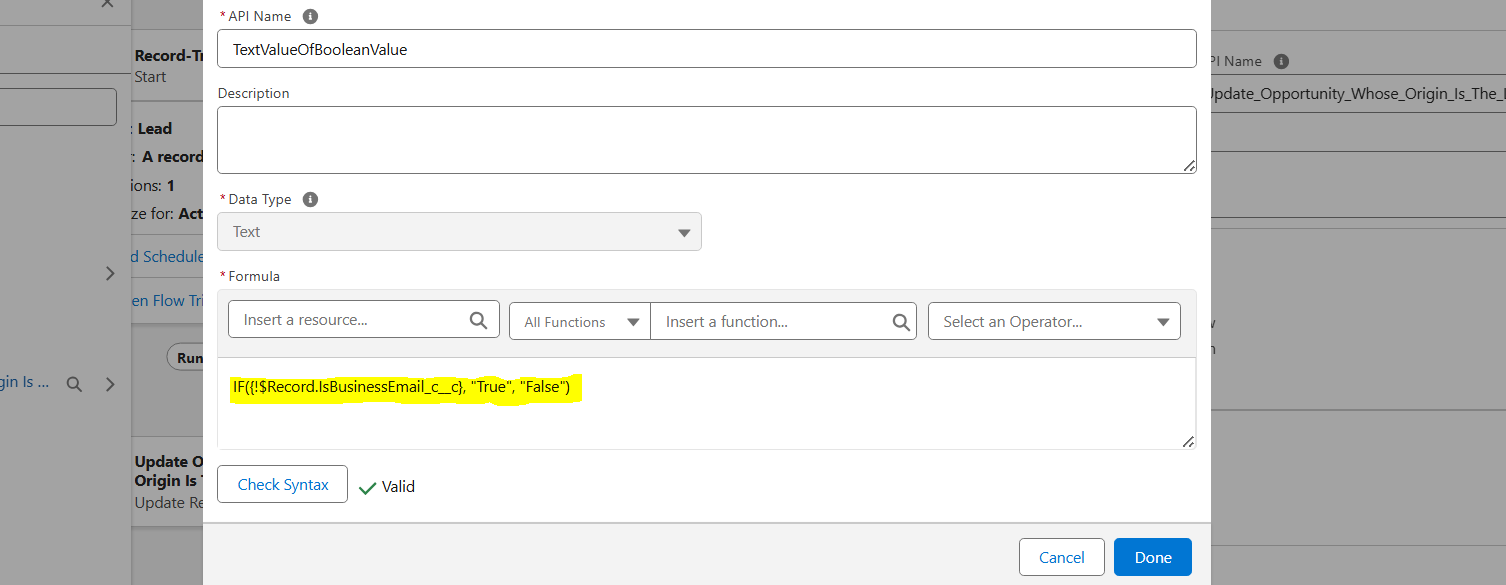
- To map to the text field, create a New Resource because the Data Types are different. Click in the value input field and select +New Resource.

When specifying the resource type, select Formula and define it as follows. Data Type: Text. The formula returns the text "True" when the Lead checkbox is checked and "False" when it is not.
IF( {!$Record.IsBusinessEmail__c}, "True" , "False" )
The Update Records element then appears as follows.
Note: The Flow can also be enriched with Fault Paths or error handling. To further enhance security during build and deployment, consider creating Flow test scenarios.
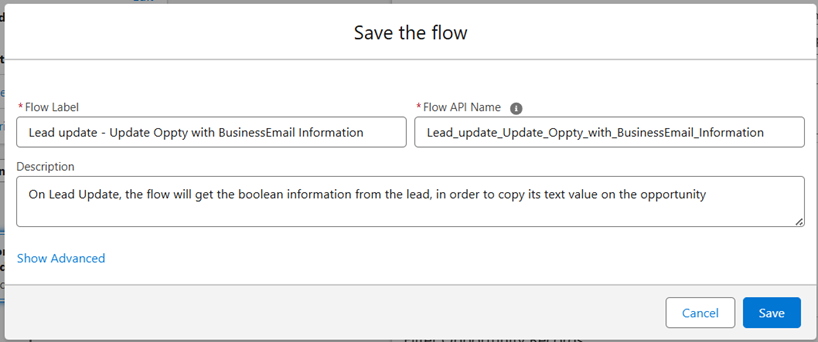
Step 7: Save and Activate the Flow
Step 8: Test the Flow and Verify Opportunity Synchronization with the Lead
- To test this Flow, apply it to a Lead at various stages of its lifecycle, both before and after conversion.
- Create a new open Lead, then update it.
- Convert the updated Lead and check the associated Opportunity.
- Create a Report with converted Lead information to view combined Lead and Opportunity fields.
- Observe that Opportunity fields are not populated upon initial Lead conversion, as the flow triggers only on Lead updates.
- Update the Lead again from its record page.
- Confirm that the Opportunity has been correctly updated by reviewing the Report and the Opportunity record.
Alternative Approaches for Synchronizing Lead Data with an Opportunity
Alternative A: Use Lead Conversion Field Mapping
- Standard Lead Conversion functionality allows the mapping of fields from a Lead to an Opportunity during the conversion process.
- This mapping applies only to Opportunity creation upon Lead Conversion and cannot be re-applied for Lead updates after the Opportunity has been established.
- Navigate to Setup > Object Manager > Lead > Fields & Relationships > Map Lead Fields.

Mapping requirements:
- For successful field mapping, fields on both the Lead and Opportunity objects must share the same data type. For instance, a custom Checkbox/Boolean field on the Lead can only be mapped to a Boolean field on the Opportunity.
- Mapping fields with differing data types is not supported.
Alternative B: Directly Point to the Lead Field Value
- To avoid duplicating Boolean information on the Opportunity field, especially if it does not add value, consider using a lookup field. This field, located on the Opportunity object, points to the original Lead and gives access to its fields through this connection.
- You need to create Flow logic to update this Lead ID field on the Opportunity during Lead Conversion. This is similar to the Flow described in this article.
- Once set up, you can create a Formula field on the Opportunity object. For a Boolean, use OriginalLead__r.IsBusinessEmail__c. For a Text field, use IF(OriginalLead__r.IsBusinessEmail__c, "True", "False").
Or add the Lead field directly to the Opportunity Lightning Page:
- Edit the page from an Opportunity record page, or go to Setup > Object Manager > Opportunity > Lightning Record Pages, or use Page Layouts if Lightning Pages have not been used for this object.
- Click Upgrade Now on the layout to switch to a Dynamic Form if it is not already.
- From the left panel, select the Fields tab.
- Select Original Lead.
- Select the Is Business Email Lead field to display on the Opportunity.
- Save and Assign the new Lightning Record Page to the relevant Applications or Profiles.
Alternative C: Use a Screen Flow or a Lightning Web Component (LWC)
- You can add a Screen Flow or a Lightning Web Component (LWC) to the Opportunity Record Page to display information from the original Lead.
- This avoids creating a Lead Lookup Field on the Opportunity, because the component can query the Lead object whose ConvertedOpportunityId equals the Current Record's ID without storing this field on the Opportunity object.
- The Screen Flow Component is useful because it can be configured without code, and visibility criteria can be added to show or hide it according to the User or information on the record.
Zusätzliche Ressourcen
Nummer des Knowledge-Artikels
005185010
Konnten Sie Ihr Problem mithilfe dieses Artikels lösen?
Geben Sie uns Feedback, damit wir uns verbessern können.