Seleziona un'organizzazione
Steps to Perform upgrading Mule Runtime Version And Java version using Upgrade tool
Data pubblicazione: Mar 23, 2026
Descrizione
Note: This guide uses an upgrade from Runtime 4.4.x(Java 8) to Runtime 4.9.x(Java 17) as an example. You can use any other runtime version that supports Java 17, as long as it is a higher version than the one you are upgrading from.
1. Preparation
-
Download Files: From the MuleSoft Support Portal, download two packages:
-
The Upgrade Tool
-
The new Runtime 4.9.x package (e.g.,
mule-enterprise-standalone-4.9.7)
-
-
Unzip Files: Unzip both downloaded packages into your working directory.
-
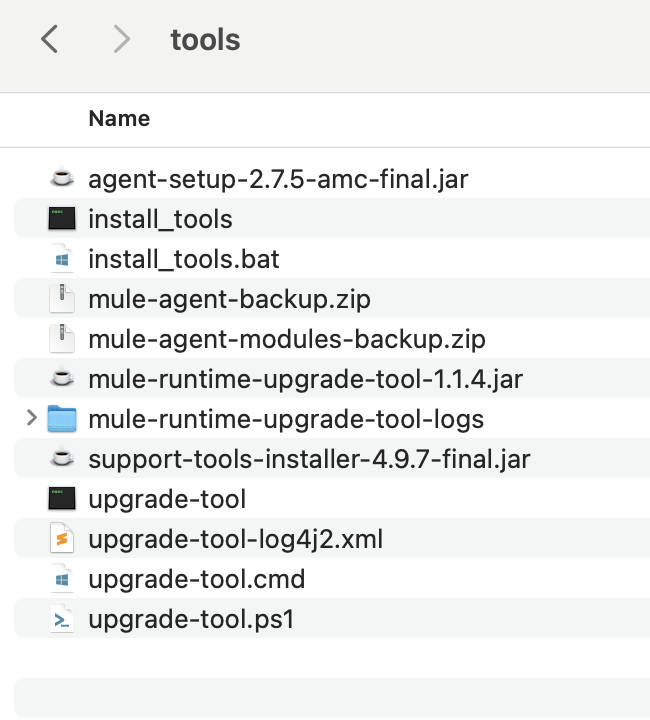
Copy Tool: Copy all files from the unzipped Upgrade Tool folder and paste them into the
toolsdirectory of your existing Runtime 4.4.x instance.
2. Run the Upgrade Command
Prerequisite: Ensure Runtime Server 4.4.x is stoped and Java 17 is installed and is the active Java version on your machine.(https://www.java.com/en/download/help/version_manual.html)
-
Open your terminal.
-
Navigate to the
toolsfolder of your existing Runtime 4.4.x instance (where you just pasted the upgrade files). -
Execute the following command, using the complete and absolute path to the newly unzipped
mule-enterprise-standalone-4.9.7folder:./upgrade-tool upgrade -n /full/path/to/mule-enterprise-standalone-4.9.7 (Mac/Linux Command)
upgrade-tool upgrade -n /full/path/to/mule-enterprise-standalone-4.9.7 (Windows Command)

3. Troubleshooting: wrapper.conf Conflict
You might encounter the following error after running the command:

ERROR: The config file 'conf/wrapper.conf' was updated in the new version, make sure the one you want to use with the changes needed is in the 'ready' folder
Solution:
-
Backup: Keep a copy of the old
wrapper.conffile from your Runtime 4.4.xconfdirectory for reference. -
Copy and Replace: Copy the
wrapper.conffile from the new Runtime 4.9.x directory (e.g.,.../mule-enterprise-standalone-4.9.7/conf/wrapper.conf). -
Paste this new file into two locations:
-
The
confdirectory of your old Runtime 4.4.x instance. -
The
readyfolder created by the tool:[Your-Runtime-4.4-Path]/tools/upgrade-tool/mule-config-conflicts/ready/
-
-
Re-run the upgrade command from Step 2.
4. Start and Verify the Server
-
Start the server using the following command from the
bindirectory:./mule start(Mac/Linux)
mule start(Windows) -
Log in to Anypoint Platform and check Runtime Manager to verify that the server has been successfully upgraded to Runtime 4.9.x and the Java version is listed as 17.

5. Post-Upgrade Troubleshooting
If the server fails to start or is not registering correctly in Anypoint Platform:
-
Check Logs: Check the
mule_ee.logfile inside your runtime'slogsfolder for specific error messages. -
Memory-Related Adjustments (If Required):
-
The upgrade from Java 8 to Java 17 and a new Runtime version may change memory requirements.
-
If you see memory-related issues in the logs, compare your new
wrapper.confwith the backup of your old (4.4)wrapper.conf. -
You may need to update the following properties in the new
wrapper.confto match your previous custom settings:
Properties# Example memory settings to verify wrapper.java.additional.7 = -XX:MaxMetaspaceSize=xxxxm wrapper.java.additional.8 = -XX:MetaspaceSize=xxxm # Initial Java Heap Size (in MB) wrapper.java.initmemory = xxxx # Maximum Java Heap Size (in MB) wrapper.java.maxmemory = xxxx#Addition customer properties eg:
wrapper.java.additional.17=mule.env=dev
wrapper.java.additional.18=mule.key=myEncryptionKey123
wrapper.java.additional.19=mulesoft.anypoint.client_id=xxxxx-x-x-x-xxx -
-
After applying any necessary changes, restart the server and verify again in Anypoint Platform.
Numero articolo Knowledge
005228568
Questo articolo ha risolto il problema?
Facci sapere, così possiamo migliorare!