Velg en organisasjon
Salesforce Voice Amazon Connect CCP Loading Issue with "net::ERR_NAME_NOT_RESOLVED" Error
Publiseringsdato: Jun 9, 2026
Beskrivelse
If the user has manually tested a successful SSO authentication as specified in 'SSO Authentication Error Scenarios for Salesforce Voice (formerly Service Cloud Voice)' and still sees the Omni-Channel Dial-Pad as grayed-out, please verify the following:
- Open the Console App page with Omni-Channel added
- Open Browser Developer Tools & navigate to 'Network' tab
- Wait for a few seconds to allow multiple 'ccp-v2' network request entries to show up
- Observe if the 'status' for these entries is "net::ERR_NAME_NOT_RESOLVED"
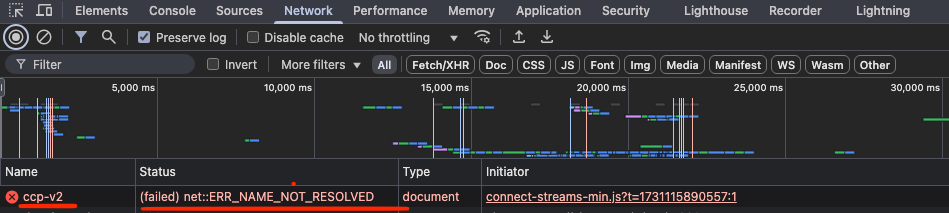
If the user observes this error for 'ccp-v2' network requests in Browser Developer Tools, it means that the callCenter metadata for this Contact Center has an incorrect value in 'Instance Name' field/attribute.
Due to this, despite having a successful SSO Authentication at Amazon Connect, the ccp load request is being sent to an incorrect Connect Instance domain/URL which does not exist, therefore "ERR_NAME_NOT_RESOLVED" message is seen for such a request.
Løsning
This error occurs because the callCenter metadata for the Contact Center contains an incorrect value in the Instance Name (reqInstanceName) attribute. The CCP load request is sent to a non-existent Amazon Connect domain, causing the net::ERR_NAME_NOT_RESOLVED error. To fix this, update the callCenter metadata with the correct Instance Name value by following these steps:
1. Retrieve callCenter metadata for your contact center using a package.xml with following content (ensure replacing your contact center's api name in the placeholder) :
<?xml version="1.0" encoding="UTF-8"?>
<Package xmlns="http://soap.sforce.com/2006/04/metadata">
<types>
<members>{your_contact_center_internal_name}</members>
<name>CallCenter</name>
</types>
<version>64.0</version>
</Package>
2. Go to callCenters folder & open the file named {your_contact_center_internal_name}.callCenter
3. Update the 'reqInstanceName' attribute value with the "correct value" & deploy the updated callCenter metadata
4. Open the Console App page with Omni-Channel added & open Browser Developer Tools
5. Right-click on the Browser's refresh button besides the URL bar & choose 'Empty cache & hard reload'
6. Let the Console App page load fully and then change your status in Omni-Channel to Busy/Available for Voice Calls
***The "correct value" is of the format [Contact_Center_Internal_Name + OrgId_When_Contact_Center_Was_Created] and it can be retrieved by following either of these two approaches :-
- From Amazon Connect Instance's Home Page
- Copy the "Telephony Provider Settings" link from Salesforce Contact Center Settings page
- Open a new tab, paste the copied link and hit enter
- Once the Amazon Connect Home page loads, copy the "correct value" before ".my.connect.aws/home"
- From AWS Management Console
- Login to AWS Management Console & navigate to 'Amazon Connect' service
- Choose the correct AWS region & go to you Connect Instance
- Copy the "correct value" from ‘Directory’ field
Flere ressurser
Knowledge-artikkelnummer
005316460
Hjalp denne artikkelen med å løse problemet ditt?
La oss få vite det slik at vi kan forbedre!
