Выбрать организацию
Automatically update Actual Start and Actual End times using Salesforce Field Service Mobile App
Дата публикации: Apr 24, 2026
Описание
This article explains how Service Appointment Start and End Time fields are used in Salesforce Field Service. These fields define planned schedules, allowed start times, customer-facing arrival windows, and actual work timings. It also highlights how mobile flows can be used to automatically capture the Actual Start and Actual End times, ensuring accurate tracking and efficient scheduling.
Решение
- Because the Actual Start and End fields are not pre-determined prior to delivery of the Service Appointment, they should be automatically set by automation.
- To set this up, you first should audit your existing processes.
- If your field technicians are not using a Mobile Flow during their delivery, you should ensure that they do.
- The solution below will give you a baseline Mobile Flow that you can expand as needed for your exact business needs. And if you are already using Mobile Flows, it will give you an idea of how they could be modified to automatically fill the Actual Start and Actual End fields.
Notes:
- The Field Service core features, Managed package, and Mobile app are available in Enterprise, Unlimited, and Developer Editions
- To access the Field Service Mobile app, users need the Field Service Mobile user license
- User should install Salesforce Field Service Starter Kit from AppExchange
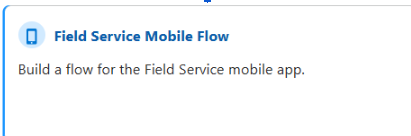
Step 1: First go into Flows within Setup and start creating a new Flow of the Field Service Mobile Flow type. It should look like this
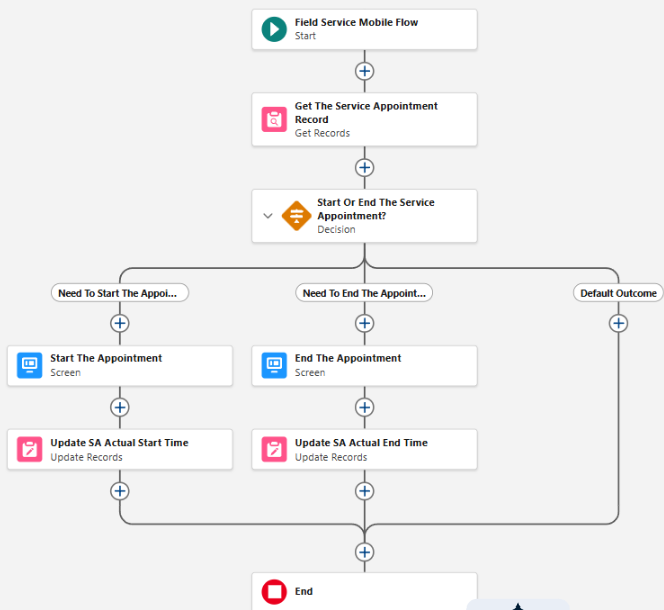
- To help you understand the full Flow before we go through building it step by step, this is what the end result will look like
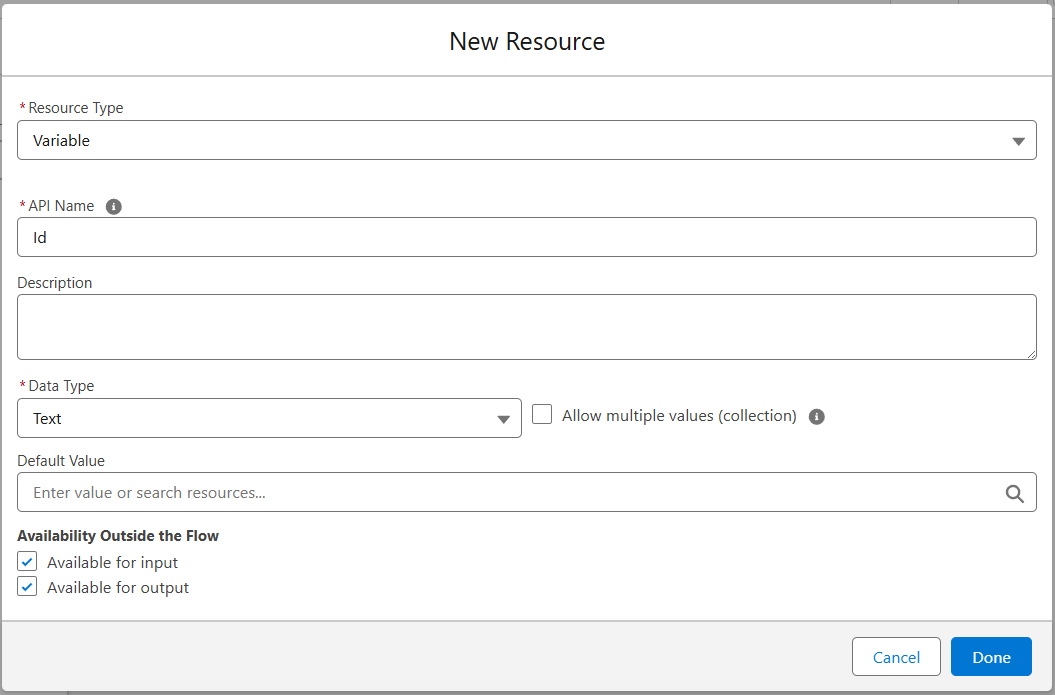
Step 2: Before building anything, first create a Variable of name Id and Data Type as Text and you can set Available for input and Available for output to True, as shown below
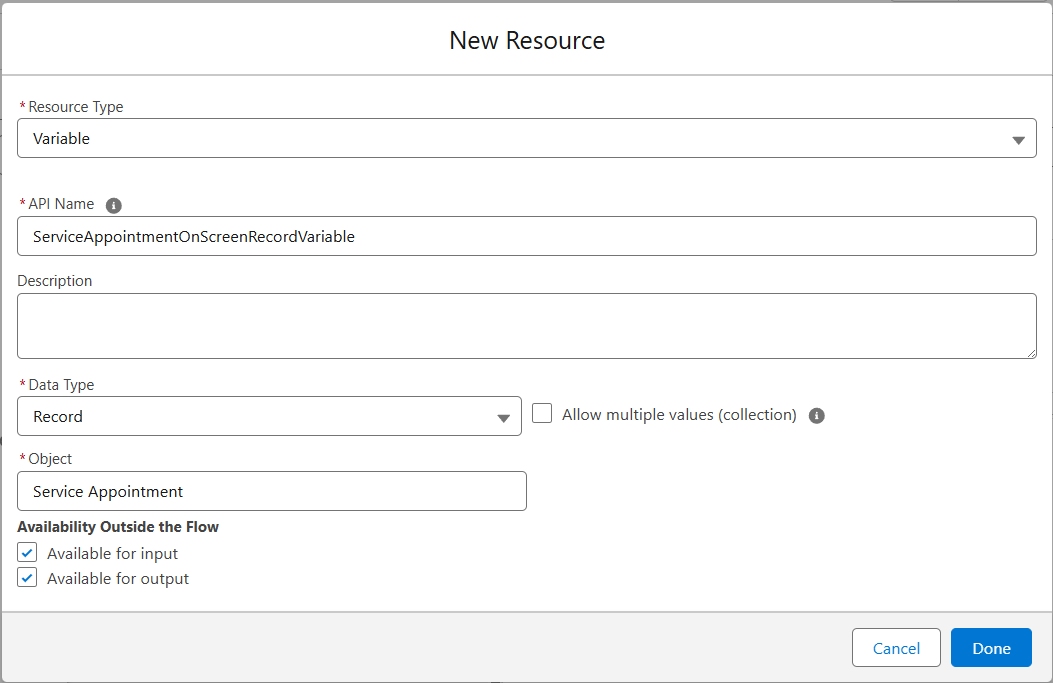
Step 3: Before building the Flow, create Variable with the API Name ServiceAppointmentOnScreenRecordVariable, set the Data Type to Record, and select the Service Appointment object. Also, ensure that both Available for input and Available for output are set to True, as shown below
Step 4: After the Start element of the Flow, add a Get Records element. Name it the Service Appointment Record and use the Id variable you just created to find a Service Appointment record with the Service Appointment ID equal to the variable Id from Step 2
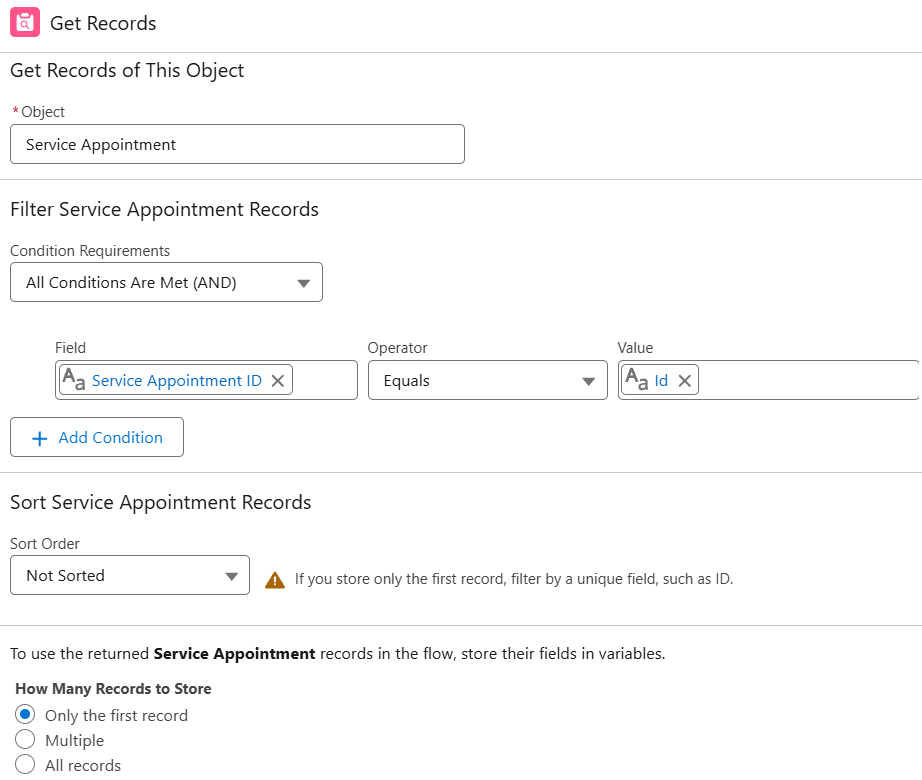
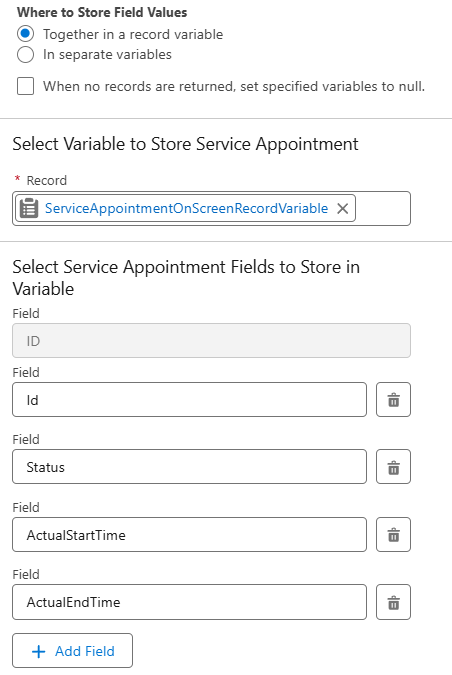
- Scroll to the bottom part of the configuration of the Get Records Flow element and do not change the Where to Store Field Values configuration. And add the ServiceAppointmentOnScreenRecordVariable Record Variable to the Record in the Select Variable to Store Service Appointment section of the element configuration screen
- And immediately after in the Search fields textbox search for Status and add the Status field. Click Add Field and then search for Actual Start, API field name is ActualStartTime and add it. Repeat this to add Actual End, API field name is ActualEndTime. If you require any additional fields for your specific business logic you can click Add Field and search for them. The only fields the Flow will be able to see from your Get Records action will the fields added here
Step 5: The next step is to build a Decision element to know if it is necessary to ask the technician to Start or End the Service Appointment. So add a Decision element and Label it Start Or End The Service Appointment?
- We need to build two Outcomes and we will leave the Default Outcome alone. Bare in mind, our business logic may vary here. This is a simplistic use case for demonstrative purposes
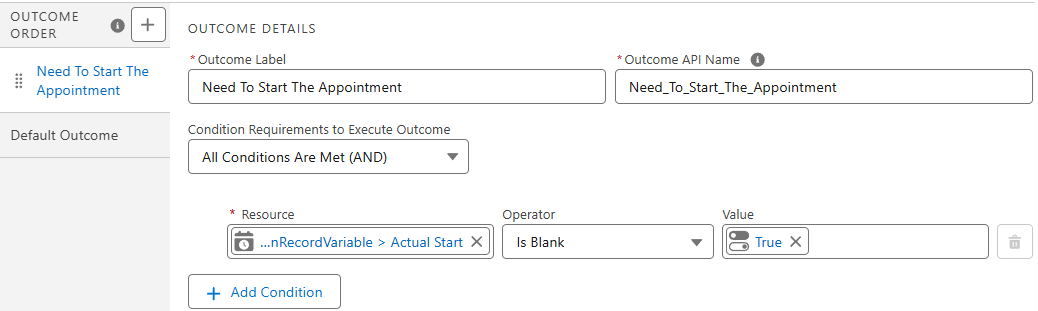
- For Outcome 1, Label it Need To Start The Appointment
- Add a single condition by selecting the Actual Start field from the ServiceAppointmentOnScreenRecordVariable, Record Variable from Step 3 for the Resource
- Set the Operator to Is Blank and the Value to Global Constant False. This setup ensures the Outcome is triggered when the Actual Start field is blank
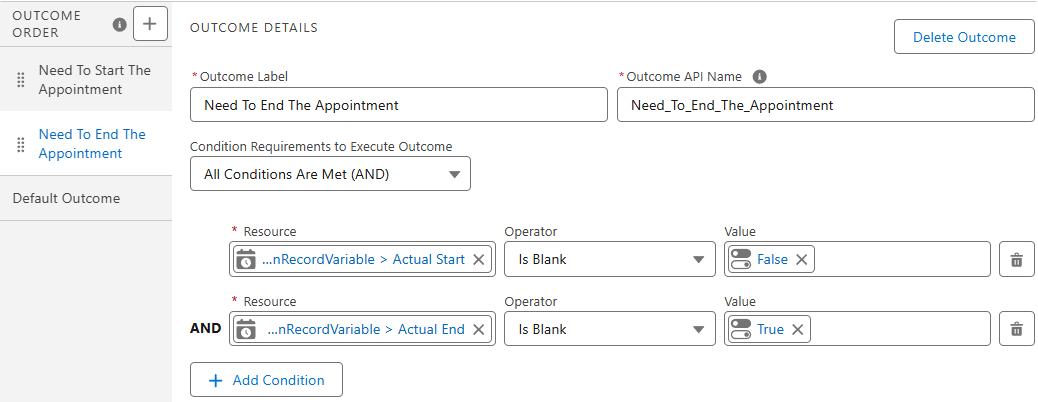
- Then you must add a new Outcome and Label it Need To End The Appointment
- This will have two conditions, and you can leave the Condition Requirements to Execute Outcome as All Conditions Are Met (AND)
- You must again select the Actual Start field from the ServiceAppointmentOnScreenRecordVariable Record Variable from Step 3 for the Resource. The Operator will be set to Is Blank again. But the Value must be set to the Global Constant False
- Then you will click the + Add Condition button to add a second condition
- This time select the Actual End field from the ServiceAppointmentOnScreenRecordVariable Record Variable from Step 3 for the Resource. The Operator will be set to Is Blank again. But the Value must be set to the Global Constant True
- Now you have three paths in your Flow
Step 6: Now let's work on the Need To Start The Appointment path. The first thing to add on this path is a Screen element and give it a Label of Start The Appointment
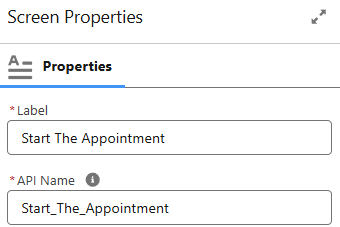
- In the Configure Footer setting check the radio boxes Hide Previous and Hide Pause to simplify the Screen
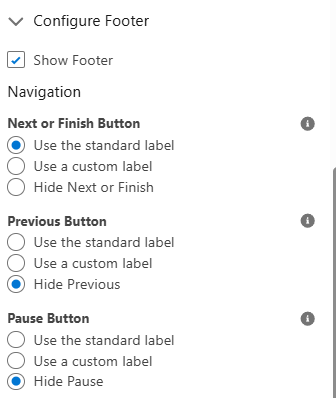
- Then add a Display Text Screen Component to the Screen. Give it and API Name of StartAppointmentDisplayText and leave a simple message on it such as Please click below to proceed with Starting this Service Appointment. This will set the current time as the Actual Start time of the Appointment
- Click Done at the bottom to save the configuration
Step 7: Under the Start The Appointment Screen element add a Update Records element and Label is Update Service Appointment Actual Start Time
- Change the How to Find Records to Update and Set Their Values value to the radio button labeled Specify conditions to identify records, and set fields individually
- Select the Service Appointment Object
- To filter to the correct record, search by the Field Service Appointment ID with Operator Equals and set the Value to the variable Id from Step 2
- Lastly, in the Set Field Values for the Service Appointment Records section of the Update Records action select the Field Actual Start and set it to Global Variable CurrentDateTime
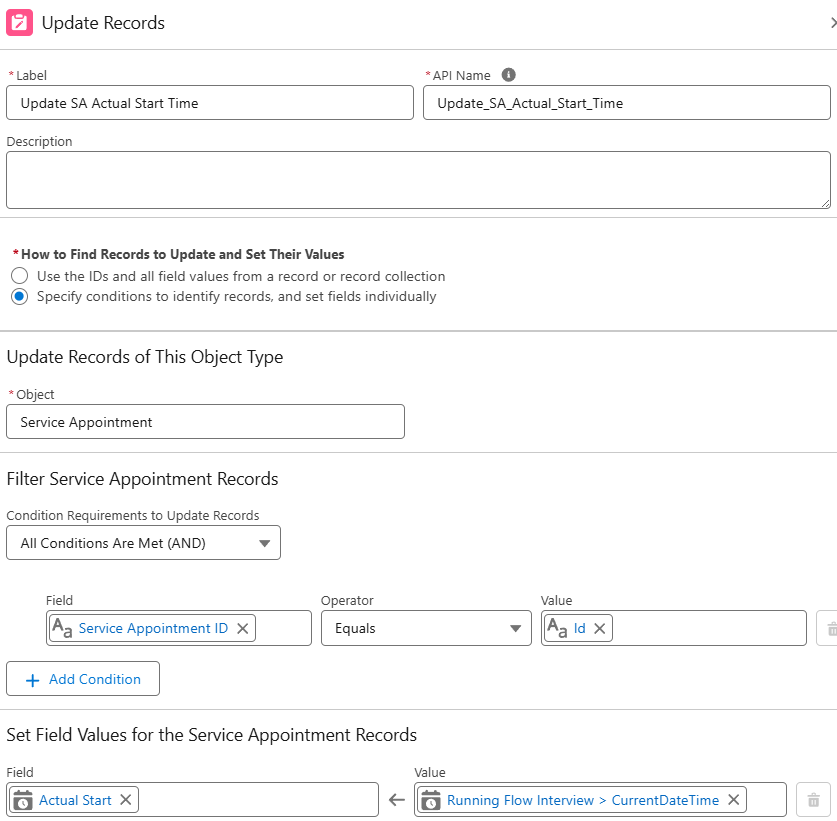
Step 8: Now let's repeat a similar protocol on the Need To End The Appointment path. The first thing to add on this path is a Screen element and give it a Label of End The Appointment just like in Step 6
- In the Configure Footer setting again check the radio boxes Hide Previous and Hide Pause to simplify the Screen
- Add a Display Text Screen Component to the Screen and set the API Name as EndAppointment DisplayText
- Enter a simple message such as Please click below to proceed with ending this Service Appointment
- This setup ensures that when the user proceeds, the current time is captured as the Actual End time of the Appointment
- Click Done at the bottom to Save the configuration
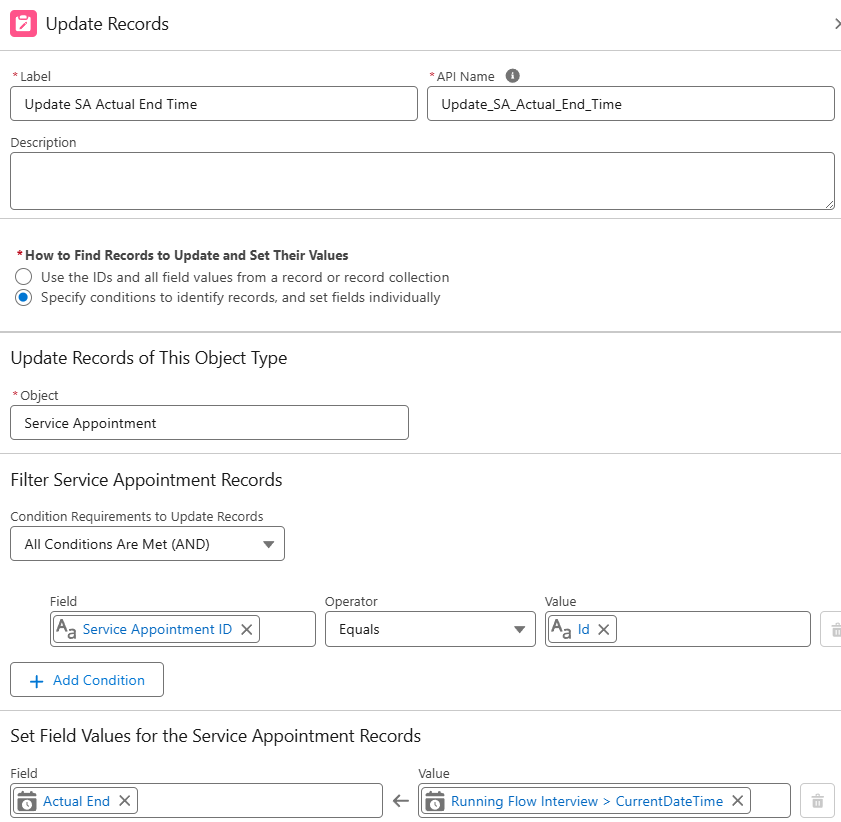
Step 9: Under the End The Appointment Screen element add a Update Records element and Label is Update Service Appointment Actual End Time
- Change the How to Find Records to Update and Set Their Values value to the radio button labeled Specify conditions to identify records, and set fields individually
- Select the Service Appointment Object
- To filter to the correct record, search by the field Service Appointment ID with Operator Equals and set the Value to the variable Id from Step 2
- Lastly, in the Set Field Values for the Service Appointment Records section of the Update Records action select the Field Actual End and set it to Global Variable CurrentDateTime
- We're all set! Ensure that you Save and Activate the Flow. It is highly recommended to test it on a sample record before deploying it for team-wide use in a live environment
- We can customize this as much as necessary to add in required business logic, capture additional input from the field technicians, or anything else the business requires
- The most important thing to know is that this will always capture the time when the technician interacts with the Screen. So, for accurate results, good user training is key to ensure they use the Screens at the appropriate time
Written by: Vuk Stajic | Forum Ambassador
Vuk is the owner of MVRK Inc., a niche Salesforce implementation partner and ISV. He has been a Trailblazer Community Forum Ambassador since the start of the program. Vuk has a passion for helping others learn Salesforce and loves answering questions on the community. He is also a coach to budding independent Salesforce experts through his program, the Salesforce Solopreneur Blueprint.
Submissions reflect only the opinions of the user who made available the Submission and not the opinions of Salesforce, regardless of whether the user is affiliated with Salesforce, and may contain or constitute products, services, information, data, content and other materials made available by or on behalf of third parties ("Third Party Materials). Salesforce neither controls nor endorses, nor is Salesforce responsible for, any Third Party Materials, including their accuracy, validity, timeliness, completeness, reliability, integrity, quality, legality, usefulness or safety, or any applicable intellectual property rights. Any Submissions made available through any message board or forum in response to posted questions, or that otherwise purports to answer any questions, including any questions about Salesforce or Programs, are made available for your general knowledge only and should never be relied upon as answers to your specific questions (even if an answer is marked as a “best” answer or with any similar qualifications). You should always contact Salesforce support for answers to your specific questions. Salesforce has no control over Submissions and is not responsible for any use or misuse (including any distribution) by any third party of Submissions.
If you have questions, tap into the wisdom of our entire Trailblazer Community here: https://trailhead.salesforce.com/trailblazer-community/feed
Номер статьи базы знаний
005318696
Эта статья решила вашу проблему?
Оставьте свой отзыв, чтобы мы могли стать лучше!
