Seleziona un'organizzazione
GovCloud Plus First Employee Agent (Legacy Builder)
Data pubblicazione: Jul 21, 2026
Descrizione
A step-by-step guide for building your first Agentforce Employee Agent in the Legacy Agentforce Builder in a Salesforce Government Cloud Plus Environment. PDF of instructions.
Prerequisites
-
Edition: Enterprise Edition or higher
-
Verify in Setup > Company Information > Edition, or confirm with the customer's order form.
-
-
Agentforce license: An Agentforce add-on license must be active on the org. Verify in Setup > Company Information.
-
Admin Permissions:
|
User Permissions |
|
|
Permission Set Licenses |
|
|
Permission Sets |
|
Risoluzione
Step 1: Provision Data Cloud (required for data libraries and agent analytics)
Agentforce is integrated with Data Cloud and generative AI features so you can build observable and trusted agentic experiences. We’ll verify and set up these features to prepare your org for your first agent.
If you’re preparing a free Agentforce Developer org, Data Cloud is provisioned and enabled for you. We recommend verifying your Data Cloud installation.
-
Make sure proper permission sets and permission set licenses are assigned to your user (see Admin Permission table above)
-
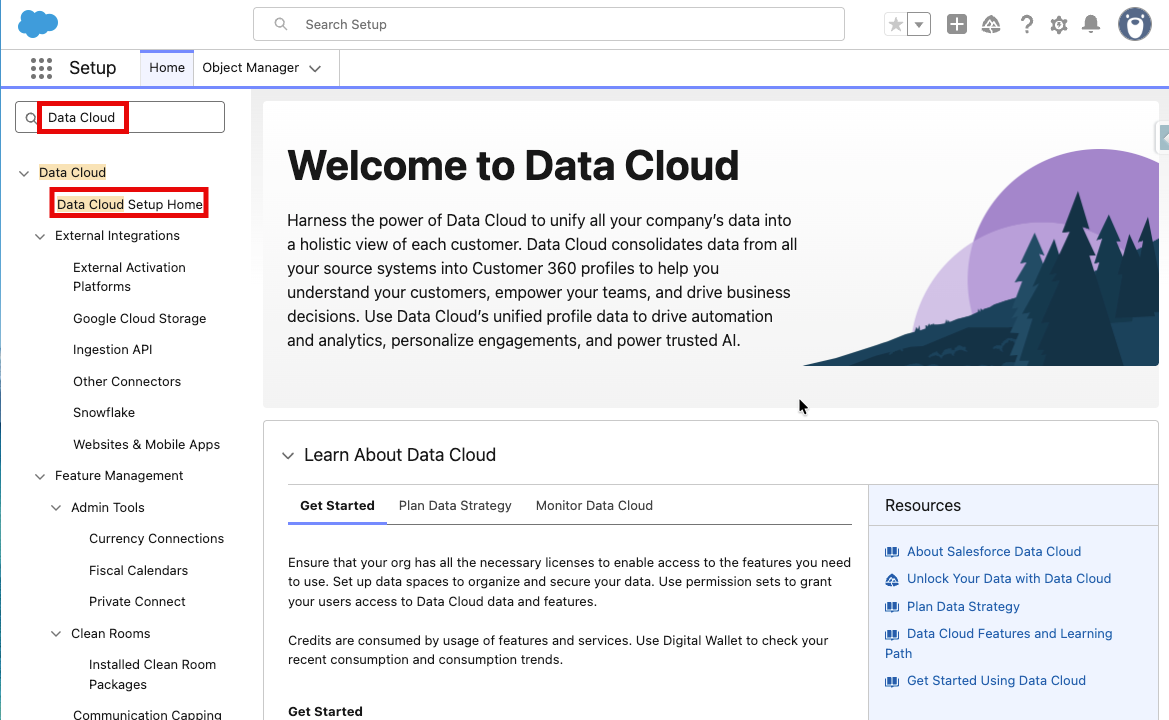
In Setup, search Data Cloud
-
Click Data Cloud Setup Home (note you can also reach Data Cloud home from the setup gear)
-
Click Get Started to begin provisioning
-
Follow the guided prompts
-
Allow 30+ minutes for provisioning to finalize before moving to other steps
Step 2: Enable Einstein Generative AI
Turn on Einstein to use generative AI features, including Agentforce, across Salesforce.
-
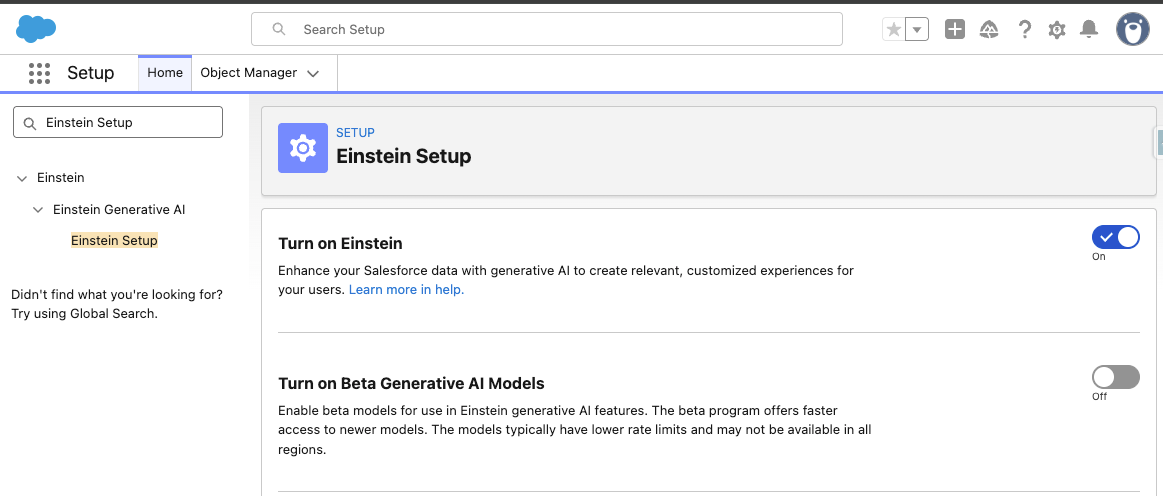
In Setup, search Einstein Setup
-
Click Einstein Setup
-
Turn on Einstein
-
Accept terms, if prompted
-
Refresh your browser
Step 3: Enable Agentforce
Turn on Agentforce to start building, customizing, testing, and launching AI agents.
-
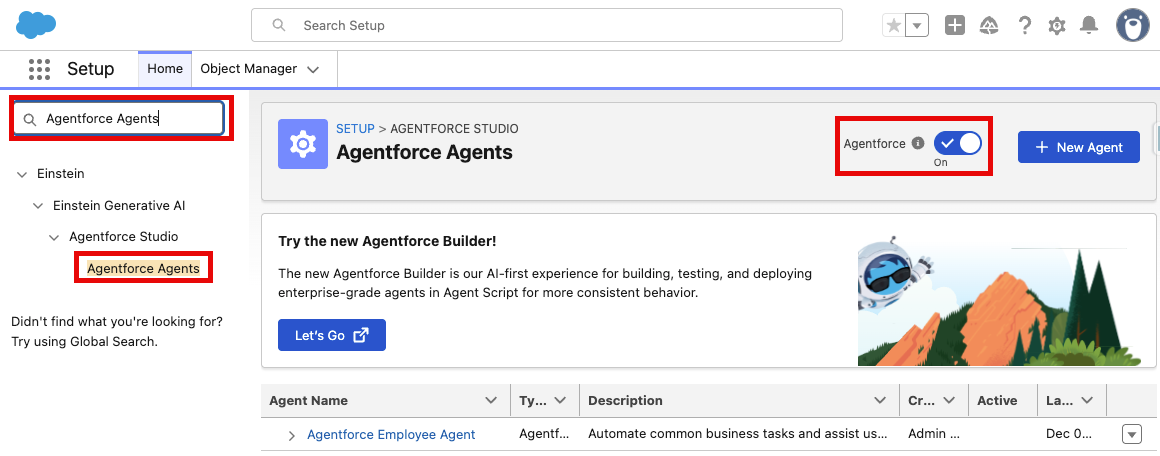
In Setup, type Agentforce Agents
-
Click Agentforce Agents
-
Turn Agentforce On
Step 4: Enable Einstein Trust Layer
Build trust in your agents and other generative AI features. Use the Einstein Trust Layer to personalize data privacy controls that are integrated into the end-user experience.
Note: Pattern-based and field-based data masking for large language models (LLMs) is disabled for Agentforce. Einstein Trust Layer includes several policies and features to help protect sensitive data from misuse or leaks beyond data masking.
To learn more about the Einstein Trust Layer visit the following sources:
Steps to enable Einstein Trust Layer:
-
Ensure Data Cloud provisioning is complete
-
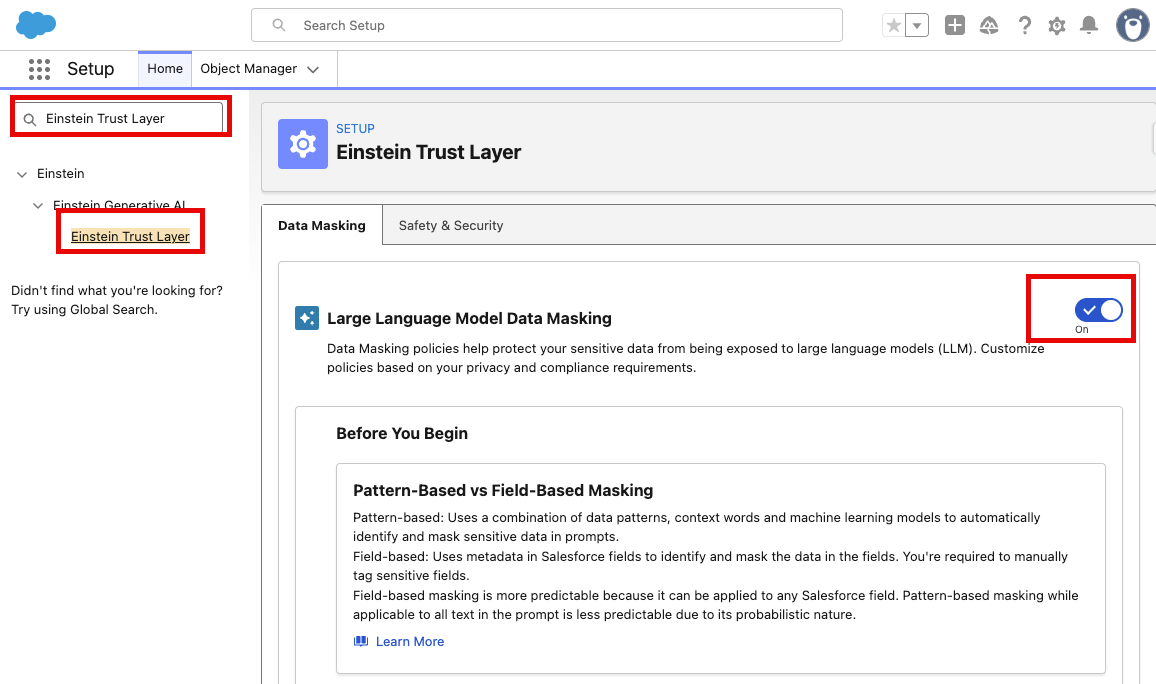
In Setup, type Einstein Trust Layer into the Quick Find box
-
Toggle on Large Language Model Data Masking
-
Review the Data Masking and Safety & Security options and configure per your organization's data governance requirements
Step 5: Assign Permission Sets (Employee Agent)
Access to Agentforce Employee agents is granted using permission sets or profiles. You can add agent access to existing permission sets or profiles from the page for your agent.
The steps below create a custom permission set for the Out of the Box Employee Agent.
-
Go to Setup > Permission Sets > New
-
Create a custom permission set
-
Click Save
-
On the newly created Permission Set Detail Page, scroll to Data Cloud Space Management
-
Click Edit
-
Check the Enabled box
-
Click Save
-
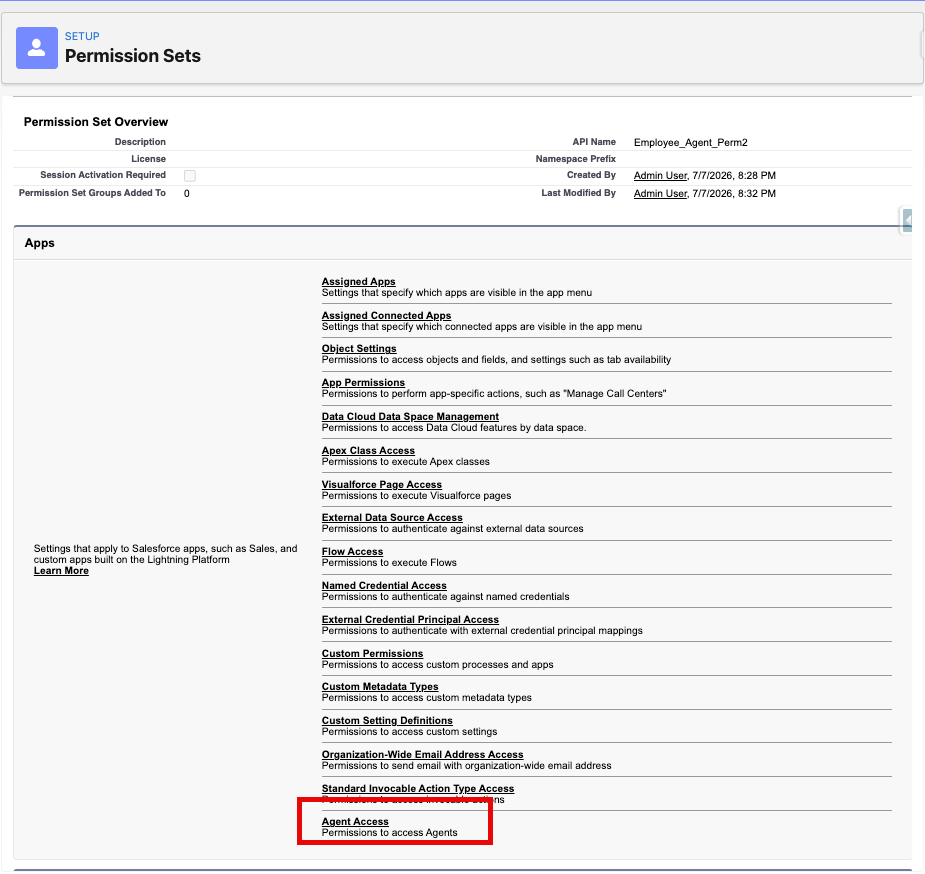
Back on the created Permission Set Detail Page, scroll down to Agent Access
-
Click Add the Agentforce Employee Agent to Enabled Agents
-
Click Save
-
Click Manage Assignments and assign to the appropriate users
-
The Agentforce agent will now be visible to users
-
This will need to be repeated for all Employee Agents after they are created
Step 6: Create Your First Agentforce Employee Agent
Use the default Agentforce Employee Agent template to get a head start on creating an agent. Subagents and Actions will help the Employee Agent reason and execute tasks on behalf of users.
A Subagent represents a specific job the agent is designed to perform, such as checking case status or scheduling an appointment. Subagents were formerly called Topics; you may see both terms in the Builder UI and documentation.
An Action is a predefined task the agent executes to complete a job, such as querying records, running a Flow or Apex, or calling a prompt template. Actions are assigned to subagents and define the inputs, outputs, and permissions for each operation. They are how the agent moves beyond conversation to retrieve data and perform real work in Salesforce and connected systems.
-
Navigate to Setup and search Agents in Quick Find
-
Click Agentforce Agents
-
Click New Agent on the top right side of the screen
-
Ensure Create From Template is highlighted
-
Select the Agentforce Employee Agent template note this is different from the Slack Employee Agent
-
Click Next
-
On the next screen leave the General FAQ Subagent selected to utilize the Out of the Box Answer Questions with Knowledge feature
-
Click Next
-
Provide Agent Details
-
Agent Name: What users will see when selecting the agent
-
Description: Explains the goals of your agent but will not be used by the agent to understand its role
-
Role: The job description of your agent
-
Company: Where you will put your agents or company
-
It is recommended to check the Keep a record of conversations with enhanced event logs to review agent behavior box to help test and troubleshoot your agent
-
-
Click Next
-
On the Select Data Sources Screen, do not click anything as you will create a library in the next step
-
Click Next
-
Select the Out of Box Agentforce Employee Agent Library or a custom library you have created. *Note: the General FAQ Subagent requires a data library
-
Click Create
-
The default General FAQ Subagent should be pre-added with the Answer Questions with Knowledge action
Step 7: Configure a New Agentforce Data Library
Agentforce Data Libraries aim to simplify the configuration of Semantic search through chunking and indexing providing Salesforce Agents or Prompt Templates with content based on Salesforce Knowledge articles or files (text, HTML, or PDF). You can find more information about building Agentforce Data Libraries on the Salesforce Help Site.
-
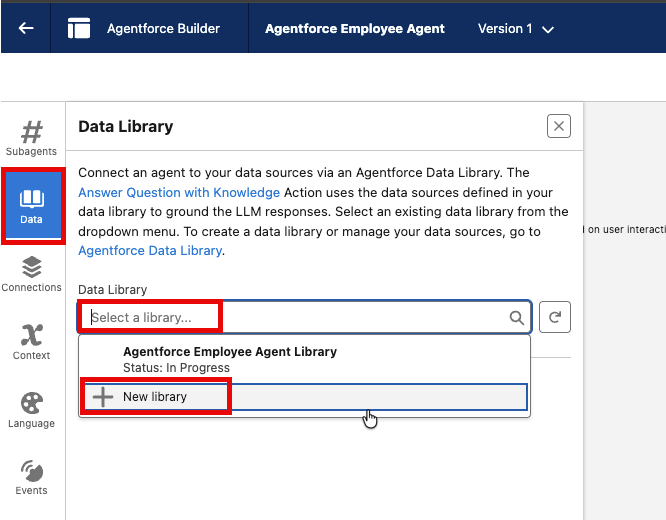
In the Agent Builder, find the Data section in the Explorer panel
-
Select New Library
-
Data Space will default to default
-
Library Name should describe the library content
-
Upload your data source: Text (4MB limit), HTML (4MB limit), or PDF (100MB limit)
-
Wait for indexing to complete
-
-
Click Save
Step 8: Test Your Agent in the Agentforce Builder
-
In the Agent Builder, interact with the agent
-
Ask questions the agent should answer from the Data Library
-
If the agent cannot answer:
-
Rebuild the Data360 Search Index
-
Verify the Data Library shows as Active (Setup > Agentforce Data Library > View Status of your library and ensure it says Active)
-
Confirm the agent user has proper permissions to the underlying objects and data spaces
-
-
Activate your agent by clicking Activate on the top right corner of the screen
-
If a warning message appears click Ignore and Activate
-
Add your newly activated Employee Agent to the permission set you created earlier or it will not be available to users
Step 9: Test Your Agent in your Sales or Service App
-
Exit out of Agentforce Builder by clicking the back arrow
-
In Setup, Click App Launcher on the top left corner
-
Type Sales Console or Service Console
-
Select the console
-
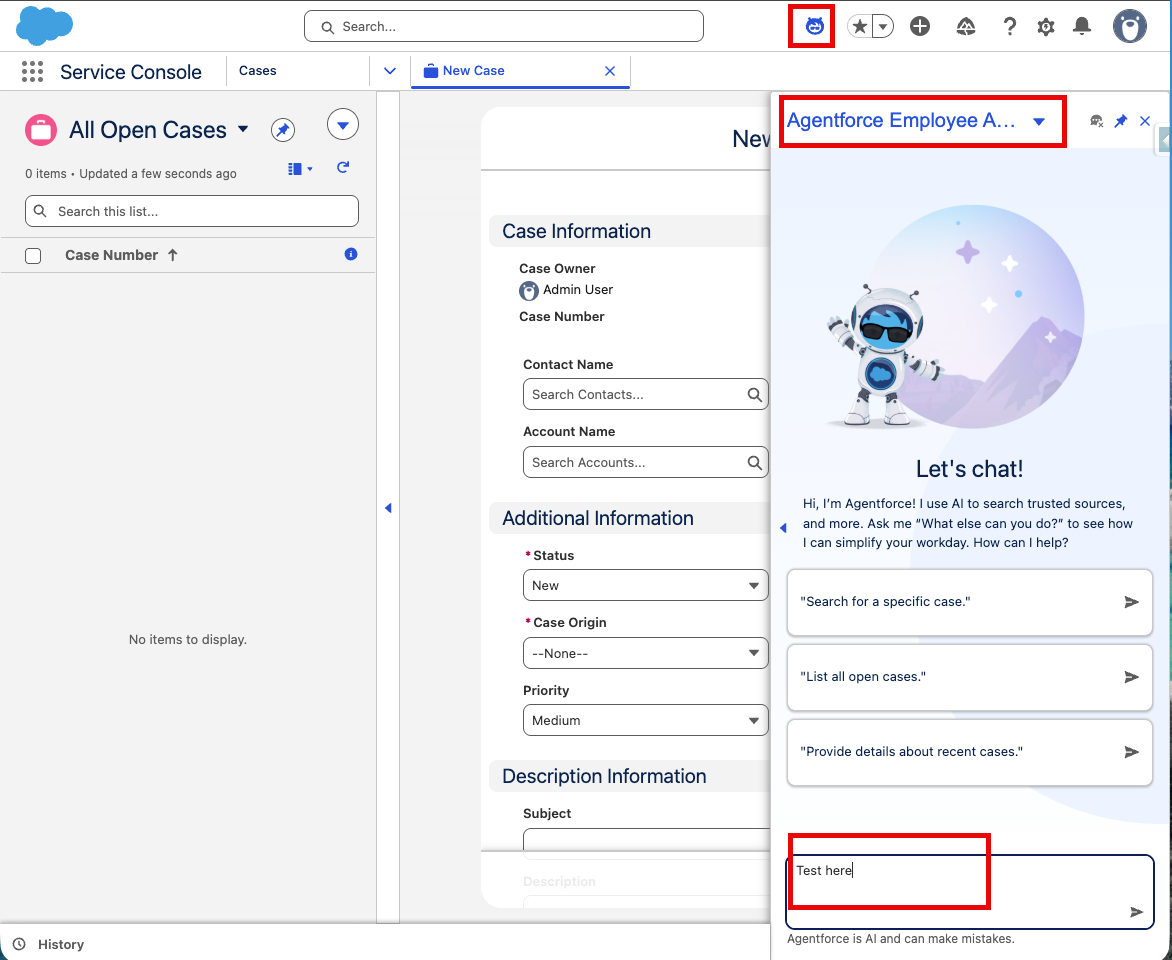
In the top right corner of the App, click the Agentforce icon
-
Make sure the correct agent is selected for testing
-
Repeat test from the builder
Risorse aggiuntive
Common Pitfalls
|
Issue |
Resolution |
|---|---|
|
"Prompt not found" error when creating agent |
Verify all required add-on licenses are provisioned (AgentforceBuilderAddon, etc.) and Einstein is fully enabled |
|
Data Library not visible in builder |
Make sure the Default Data space is added to the Agentforce permission set you create |
|
Agent not pulling data from Data Library |
Rebuild Search Index, refresh Data Stream, verify Data Cloud is fully provisioned |
|
Non-admin can't create agents |
Assign Manage AI Agents + Customize Application permissions |
|
PII / Data Masking token limit errors |
Legacy builder handles larger payloads; if hitting the 65K token limit, disable PII detection or reduce prompt size |
References
|
Topic |
Link |
|---|---|
|
Enable Einstein |
https://help.salesforce.com/s/articleView?id=ai.generative_ai_enable.htm&type=5 |
|
Enable Agentforce |
https://help.salesforce.com/s/articleView?id=ai.agent_setup_enable.htm&type=5 |
|
General Agentforce Setup | |
|
Agent Builder Introduction |
https://help.salesforce.com/s/articleView?id=ai.agent_builder_intro.htm&type=5 |
|
Upgrade to New Builder |
https://help.salesforce.com/s/articleView?id=ai.agent_setup_create_upgrade.htm&type=5 |
|
Agentforce Data Library |
https://help.salesforce.com/s/articleView?id=ai.data_library_parent.htm&type=5 |
|
Agent Setup Permissions |
https://help.salesforce.com/s/articleView?id=ai.agent_setup_explore_types.htm&type=5 |
Implementation guides (PDF)
-
Employee-Facing Agents Implementation Guide
-
Customer-Facing Agents Implementation Guide
Trailhead
Numero articolo Knowledge
005389134
Questo articolo ha risolto il problema?
Facci sapere, così possiamo migliorare!
