Velg en organisasjon
Resolve Passkey Login Issues in Salesforce
Publiseringsdato: Oct 12, 2026
Beskrivelse
When registering for Salesforce multi-factor authentication (MFA), users are prompted to create a passkey. Understand and resolve issues with creating and using passkeys.
Salesforce requires MFA for all employee users and phishing-resistant MFA for users with privileged permissions. For more information about these requirements, including detailed enforcement timelines, see these articles.
Løsning
Quick Links:
- When users see “Create a Passkey” prompts
- Access your account when you’re locked out
- Passkey doesn’t work across devices
- After a sandbox refresh, users are prompted to add a passkey
- Passkeys for Partner Admin Shared Logins
- User can’t create a passkey
- SSO users complete MFA with the identity provider, but are still prompted to create a passkey
- Integration or API user account can’t log in because of MFA
- Experience Cloud users see a prompt to create a passkey
- Mobile app passkey issues
- Users with the “Waive Multi-Factor Authentication for Exempt Users” permission are prompted to create a passkey
- How to disconnect a passkey that isn’t working
- How to add a passkey from your personal settings
When users see “Create a Passkey” prompts
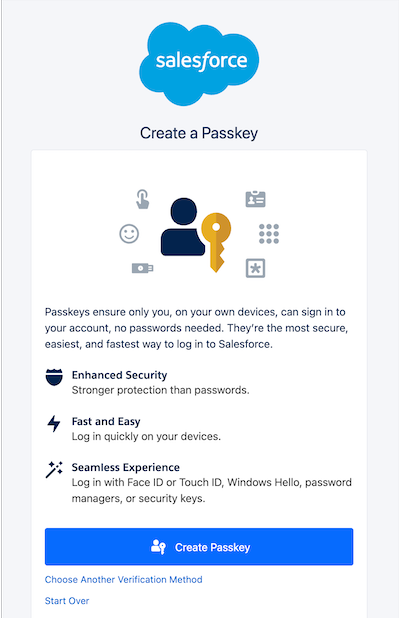
When MFA is enforced, users who don’t meet the requirements are required to register an MFA verification method. Salesforce defaults to a passkey-first MFA registration flow, as described in this release note.
Salesforce enforces stricter MFA requirements for users with privileged permissions: the System Administrator profile or the Modify All Data, View All Data, Customize Application, or Author Apex user permissions. Salesforce requires these users to use phishing-resistant MFA. If not using a phishing-resistant MFA service from the SSO provider, privileged users are required to register a passkey with Salesforce to satisfy the requirement.
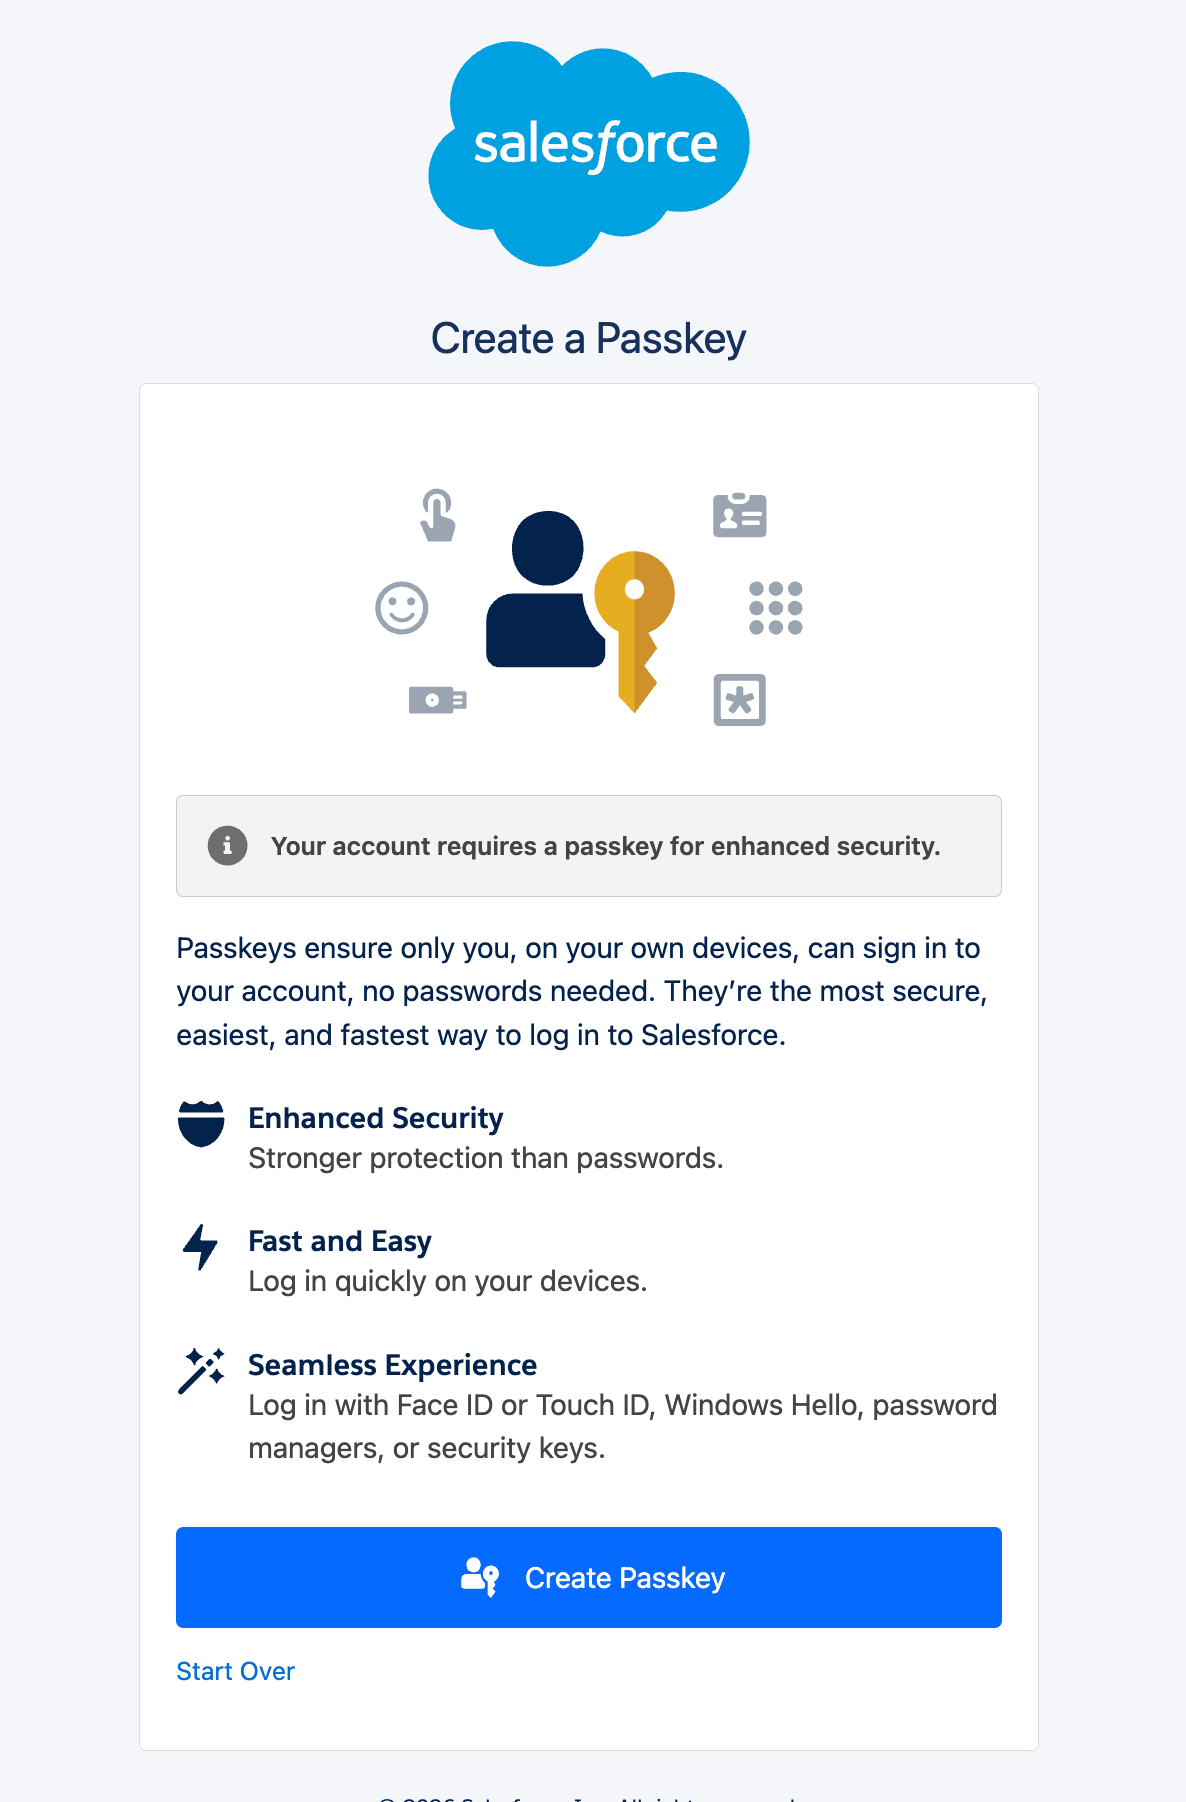
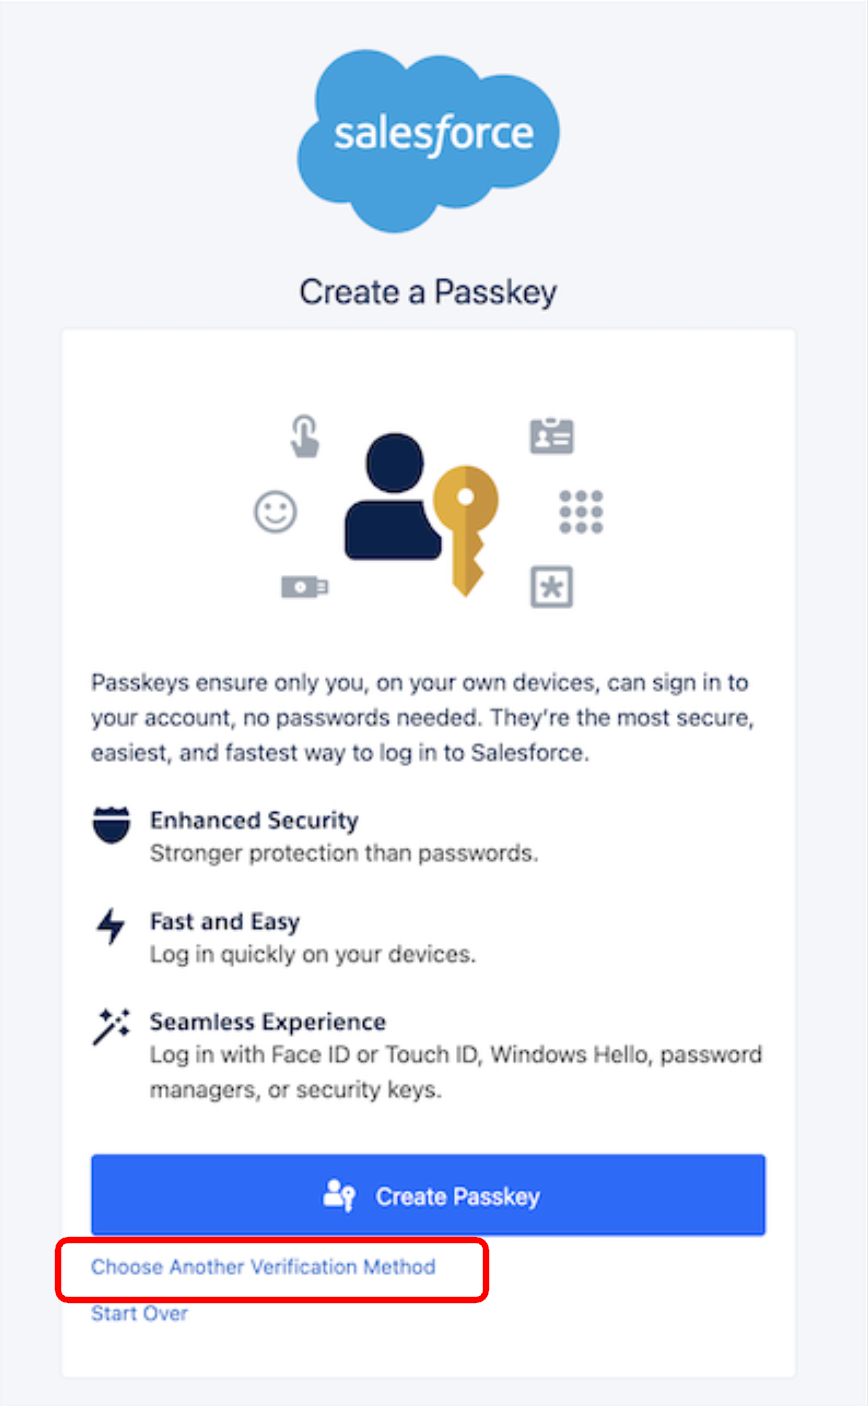
Employee users without these privileged permissions are still required to use MFA, but they are not required to use passkeys. They can click “Choose Another Verification Method” to set up Salesforce Authenticator or a third-party authenticator app instead. However, passkeys are still the first option shown to all users.
Note: The “Choose Another Verification Method” option isn’t available to users with privileged permissions because these users are required to use phishing-resistant MFA.
Access your account when you’re locked out
Recover your account if you’re locked out due to these passkey issues:
-
Your registered passkey isn’t working.
-
You can’t create a passkey.
-
Your registered passkey is on one device, such as your desktop, and you can’t use it to log in to another device, such as your mobile phone.
-
You don’t have access to the device where your passkey is registered.
Admin users:
If another admin is available in your org:
-
Ask them to generate a temporary verification code by using the steps in this article.
-
Go to your Salesforce login page.
-
-
Enter your username and password.
-
When prompted by Salesforce, enter the temporary verification code.
-
Keep these considerations in mind when using temporary verification codes.
-
-
An admin sets the expiration time for the code—between 1 and 24 hours.
-
You can log in with the same code as often as needed until the code expires.
-
You can have only one temporary verification code at a time.
-
If you forget or lose a code before it expires, an admin can manually expire the old code and generate a new one.
-
An admin can generate up to six codes per hour for each user.
-
- To avoid getting locked out, disconnect any passkeys that aren’t working and add a new passkey while you’re logged in. We also recommend that you add multiple passkeys so that you have backups. Before you add a passkey, review extra considerations for these use cases and issues.
- Passkey doesn’t work across devices
- Users are prompted to add a passkey after a sandbox refresh
- Passkeys for Partner Admin Shared Logins
- User can’t create a passkey
- SSO users complete MFA with the identity provider, but are still prompted to create a passkey
- Integration or API user account can’t log in because of MFA
- Experience Cloud users see a prompt to create a passkey
- Mobile app passkey issues
- Users with the Waive Multi-Factor Authentication for Exempt Users permission are prompted to create a passkey
Assign the Manage Multi-Factor Authentication in User Interface permission to at least two admins. This preventative measure ensures that no single admin can lock the org out of MFA management.
If you’re the only Salesforce admin in your org: Contact Salesforce Customer Support and provide your org ID and your admin account’s username. Support can disconnect your existing passkey so that you can add a new one.
Common issues and resolutions
Passkey doesn’t work across devices
You created a passkey on one device, but you can’t use it on another device. For example, you set up a passkey on your desktop. When you try to log in to Salesforce on your mobile phone, it doesn’t work.
Cause:
Your passkey isn’t synced across devices and is currently only available on the device where you set it up.
Resolution:
Use a synced passkey that’s stored in a password manager. As long as you’re logged in to the password manager on every device, you can use synced passkeys across all of your devices.
Alternatively, instead of using synced passkeys:
-
Set up a device-bound passkey on each of your devices.
-
If you have a physical security key, such as a YubiKey, you can use it across devices.
-
If you have a device that can scan QR codes, you can use a passkey on that device to log in from other devices. For example, you can set up a passkey on your phone and use it to log in from your desktop.
Before choosing a solution, review these tips and considerations.
-
Synced passkeys: Choose a password manager to use synced passkeys.
-
Some operating systems have built-in password managers, such as these options:
-
You can also use third-party tools, such as these common password managers:
-
-
Device-bound passkeys on each device: This option requires you to log in with a temporary verification code on each new device where you don’t have a passkey yet.
-
Physical security keys for cross-device use: You need your security key to access your devices.
-
Passkeys with QR codes: To use this option, you need another device that supports passkeys, such as a mobile phone.
To set up synced passkeys:
-
Set up your password manager of choice and make sure that you’re logged in.
-
If currently locked out, get access to your account without using a passkey.
-
Add a new passkey. With synced passkeys, your password manager can prompt you to set up and save the passkey. Follow the on-screen prompts.
-
To test your synced passkey, try to log in to Salesforce on another device. Make sure that you’re logged in to your password manager on the new device.
To set up device-bound passkeys on each of your devices:
-
If currently locked out, get access to your account without using a passkey.
-
Once you’re logged in, add a new passkey.
-
For each device where you want to log in and set up a new passkey, get a new temporary verification code from a Salesforce admin and use it to log in, using the instructions linked from step 1.
-
Repeat these steps on every device that you use to access Salesforce. Each passkey remains bound to the device where you set it up.
To set up physical security keys:
-
If currently locked out, get access to your account without using a passkey.
-
Insert your physical security key into your device.
-
Add a new passkey. When your browser, device, or operating system prompts you to use your passkey, use your security key. If you don’t see a security key option right away, check if the prompt includes other options. For example, on Google Chrome, select “Save another way.”
-
Test your security key by logging in from a new device.
To use passkeys with QR codes:
-
If currently locked out, get access to your account without using a passkey.
-
On your first device, such as your mobile phone, set up a passkey. Here are instructions for iPhone and Android.
-
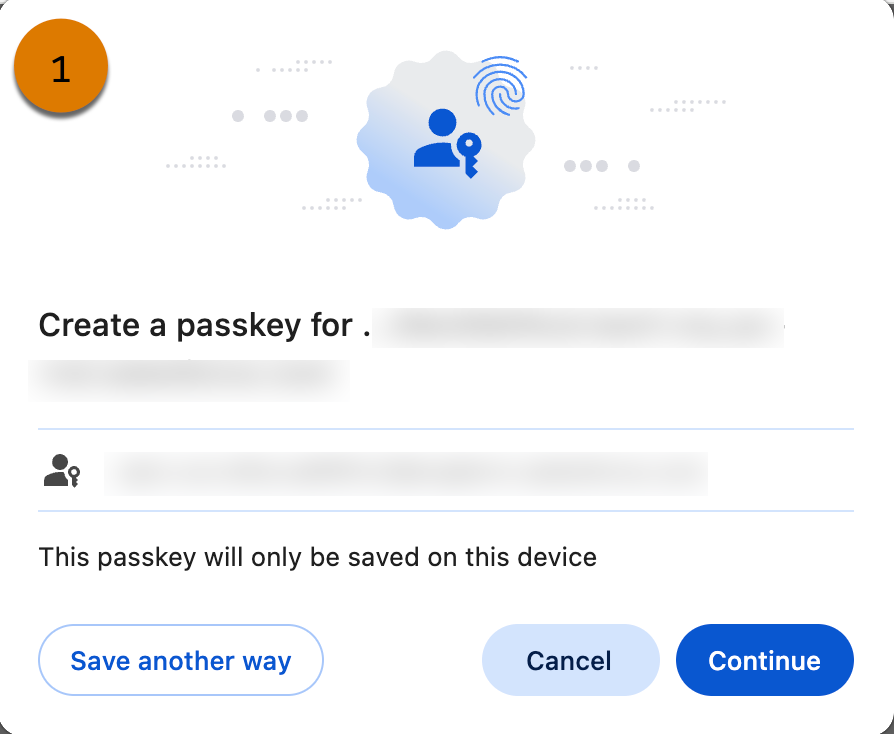
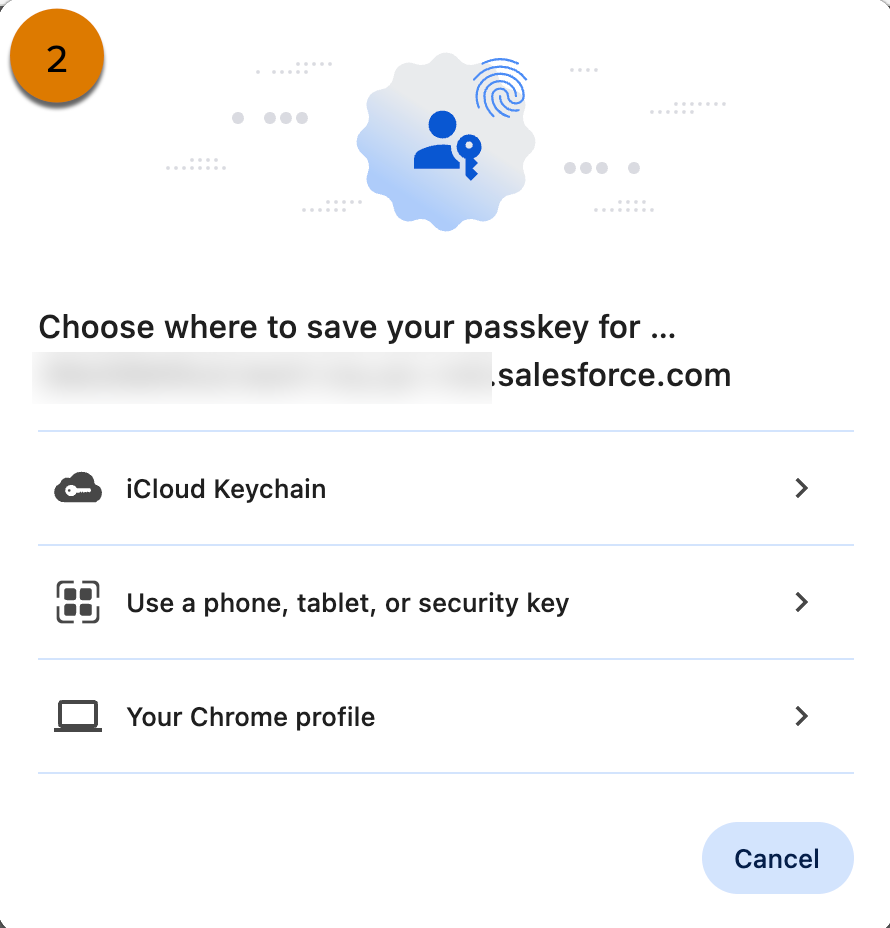
On your second device, such as your desktop, add a new passkey. When your browser, device, or operating system prompts you to create a passkey, select the option to use a QR code. If you don’t see a QR code right away, check if the prompt includes other options. For example, on Google Chrome, you see an option to “Save another way” (1). From there, you can select the option to use a phone, tablet, or security key (2), which displays a QR code (3).
-
Note: Your experience might be different from what you see in these screenshots. It depends on your device, browser, and operating system.
-
-
Use your first device to scan the QR code.
-
At the prompt from your first device, use your passkey.
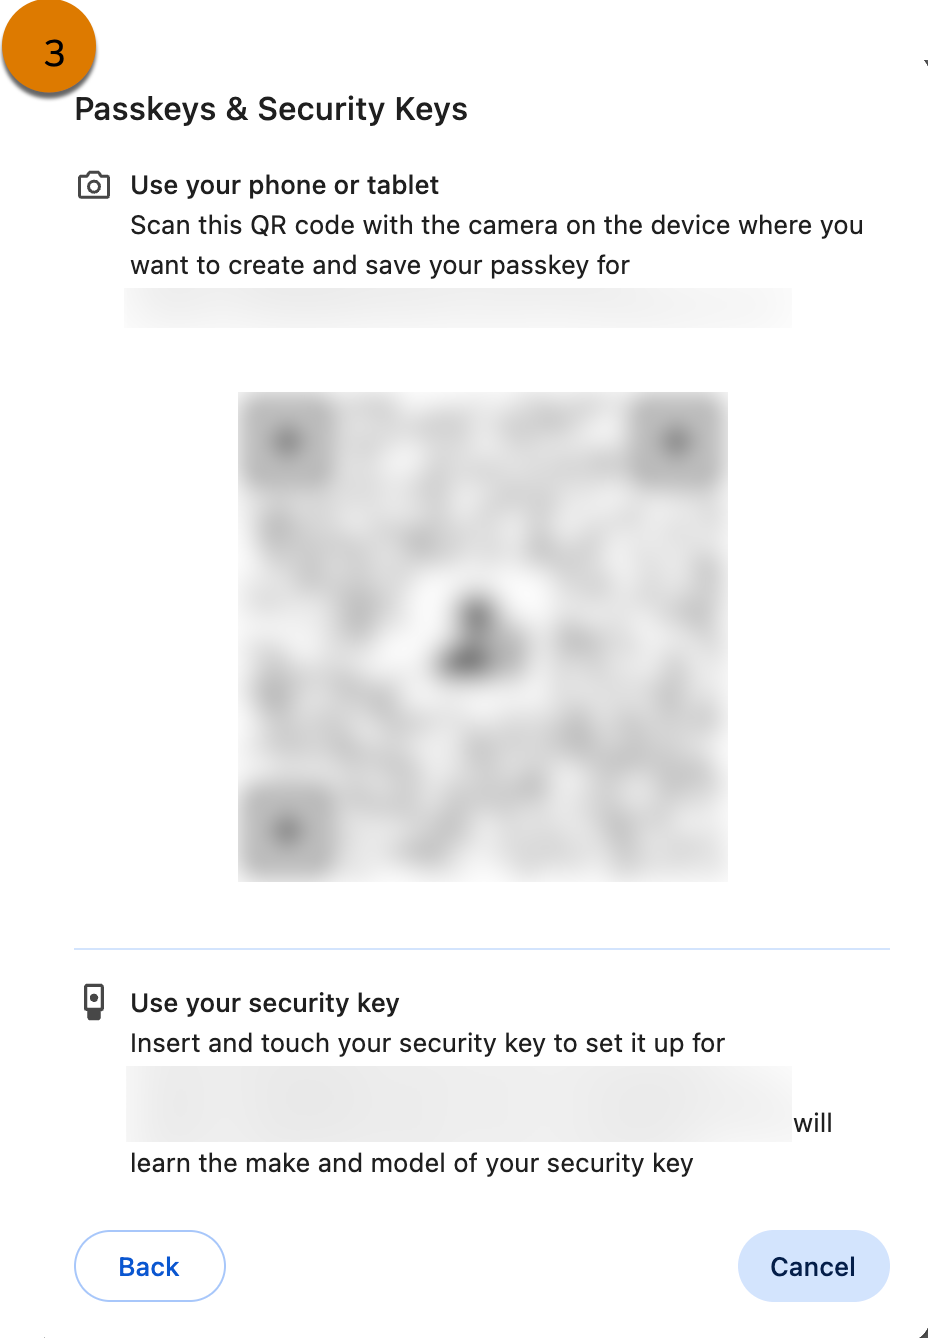
On your second device, you’re now logged in.
After a sandbox refresh, users are prompted to add a passkey
Cause:
Newly refreshed sandboxes don’t inherit all verification settings from the production environment.
-
Direct login and single sign-on (SSO): Users who had a passkey registered in production can still be prompted to re-register in the refreshed sandbox until they complete the flow at least once. Or, they’re prompted to use their registered passkey, but it doesn’t work.
-
SSO only: Sandbox refreshes don't fully inherit SAML SSO configurations. If you previously had phishing-resistant MFA set up for SSO, re-enable it in the refreshed sandbox.
Resolution:
-
Direct login: Re-register your passkey in the sandbox by following the prompts to create a passkey at login. If the sandbox is prompting you to use your previously registered passkey and it isn’t working:
-
SSO: To re-enable your phishing-resistant SSO in a previously configured sandbox:
- Get access to your account.
- For steps to re-enable SAML in the refreshed sandbox, see SSO (Single Sign-On) SAML Settings Behavior During Sandbox Refresh — What Is Copied and What Changes.
Passkeys for Partner Admin Shared Logins
To use a passkey across devices for Partner Admin Shared Logins, you need a synced passkey that’s stored in a password manager. As long as you’re logged in to the password manager on every device, you can use synced passkeys across all of your devices. See Passkey doesn’t work across devices and follow the steps to set up synced passkeys. To use synced passkeys, all Partner Admins need to be logged in to the password manager on their devices.
User can’t create a passkey
A user clicks Create Passkey, but their browser, device, or operating system can’t complete passkey registration. This issue can present in a few different ways:
-
The browser prompt times out or displays "This device cannot be used."
-
Nothing happens after the user clicks Create Passkey.
-
The user selects Cancel on the browser dialog and gets stuck on an error screen.
Cause:
To use a passkey, a user’s browser, device, and operating system must meet these requirements:
-
A supported browser: Chrome, Edge, Firefox, or Safari.
-
At least one way for the user to verify their identity:
-
Apple device users: A password-protected user account, Face ID, Touch ID, or another method that’s supported by your Mac, iPhone, or other Apple device
-
Windows users: Windows Hello with a PIN, fingerprint scanner, or face scanner
-
A physical security key, such as a YubiKey or Titan key
-
Another device, such as a mobile phone, that has an authenticator built into it. Depending on your device and operating system, use it to scan a QR code from your main device and then prove your identity using the second device’s authenticator.
-
Passkeys (built-in authenticators and security keys) are enabled at the org level. As part of the phishing-resistant MFA enforcement rollout, Salesforce automatically sets these verification method settings on the Identity Verification page in Setup — no admin action is required to turn them on. The settings are:
- Let users verify their identity with a built-in authenticator (passkey) such as Touch ID or Windows Hello—automatically enabled
- Let users verify their identity with a physical security key (passkey) such as U2F or WebAuthn— automatically enabled
- Show all permitted verification method options for MFA registration—automatically disabled, so that MFA registration begins with passkeys instead of showing users all verification methods
Resolution:
User steps:
-
Confirm that you’re using a supported browser: Chrome, Edge, Firefox, or Safari.
-
Confirm that your device supports passkeys and that passkeys are enabled on your device’s operating system. Here are links to documentation for Mac OS and Windows.
-
If your current device doesn’t support passkeys and you don’t have a hardware security key, check whether you have another device that supports passkeys, such as a mobile phone with a device PIN or Face ID. You can use this device to log in to your Salesforce account from another device.
-
In your first device, when prompted to add a passkey, click Create Passkey.
-
When you get a prompt from your browser to add a passkey, look for an option to use a phone or tablet.
-
Use your first device to scan the QR code.
-
Complete authentication by using the passkey on your second device. Look for a prompt to verify your identity. For example, your mobile phone prompts you to use Face ID.
-
SSO users complete MFA with the identity provider, but are still prompted to create a passkey
A user logs in through an SSO identity provider, such as Okta or Microsoft Entra ID, and completes MFA. But before they can access Salesforce, they get another prompt to create a passkey.
Cause:
Salesforce requires SSO identity providers to send authentication signals during login that prove that they meet MFA requirements. If you see a prompt to create a passkey after already completing MFA, it means that the SSO provider doesn’t send the right signals to Salesforce or that the signals aren’t in an accepted format. For an overview of how SSO identity providers send authentication signals, see MFA with an SSO Identity Provider.
Salesforce requires phishing-resistant MFA for privileged users. Non-privileged employee users can satisfy their MFA requirements with either phishing-resistant or standard MFA.
Resolution:
-
Log in via SSO and note which passkey prompt you see.
-
If it includes a message that says “Your account requires a passkey for enhanced security,” it means that the user has privileged permissions, but the authentication signal isn’t phishing-resistant.
-
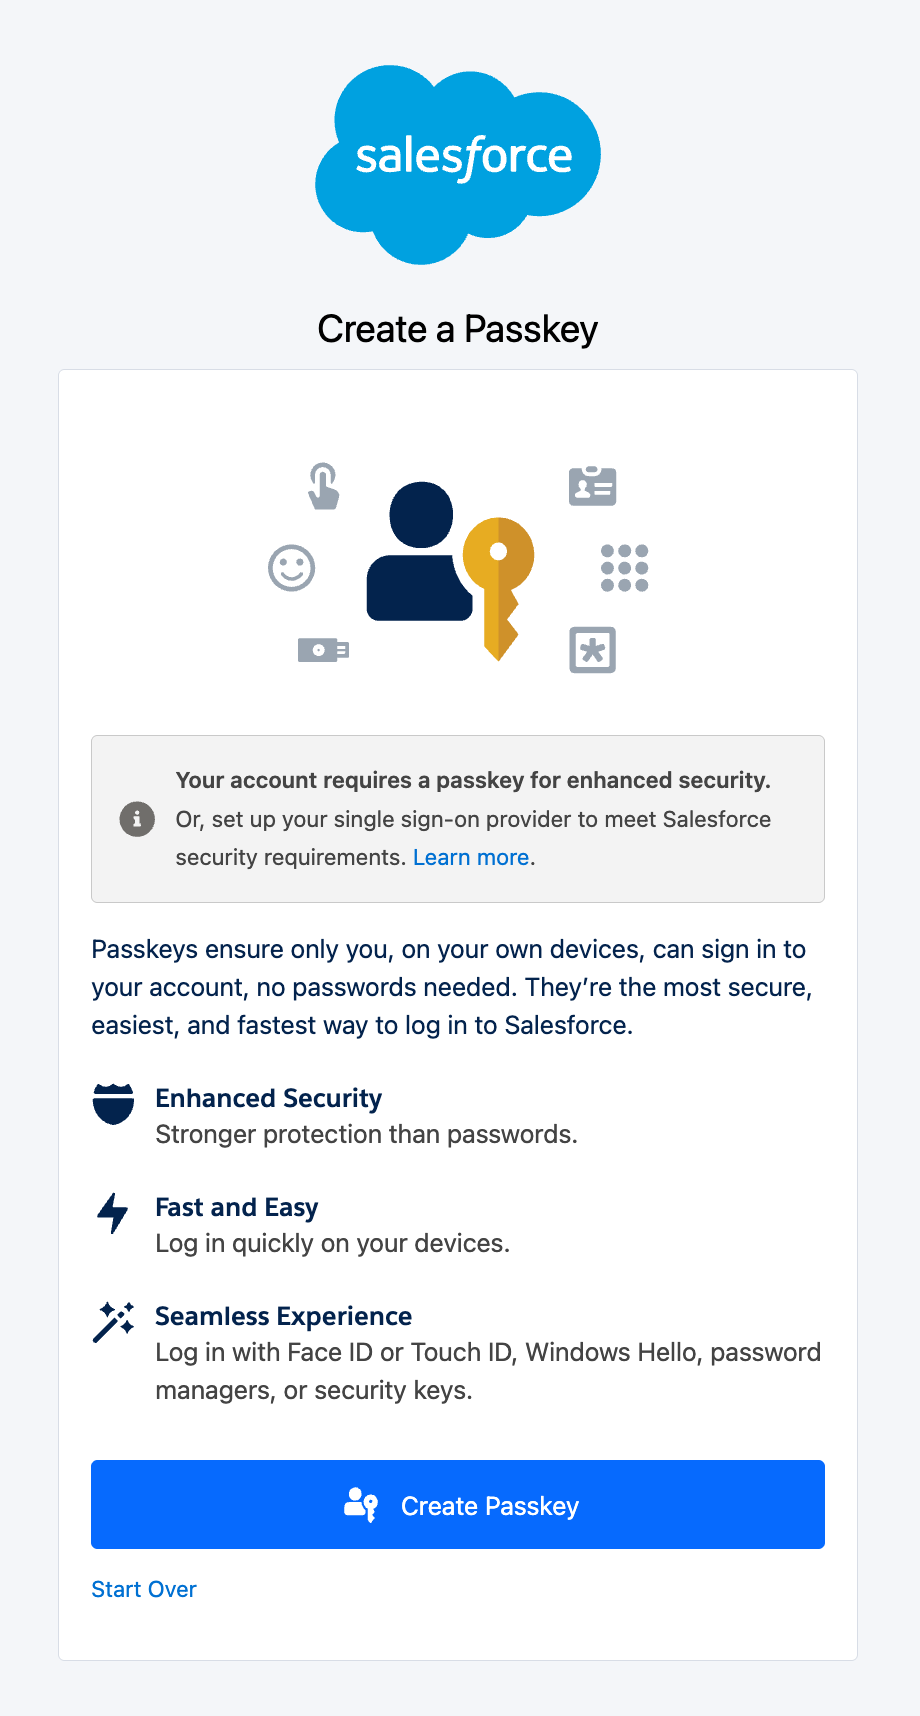
-
- If this message isn’t included, the SSO login doesn’t satisfy the MFA requirement for non-privileged users (either phishing-resistant or standard authentication signals).
- If this message isn’t included, the SSO login doesn’t satisfy the MFA requirement for non-privileged users (either phishing-resistant or standard authentication signals).
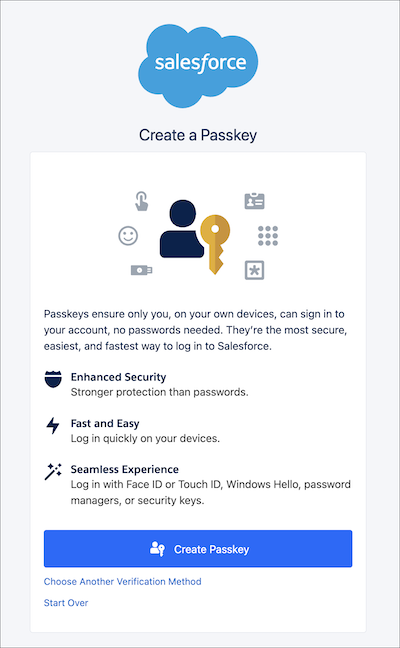
Check which authentication signals your SSO identity provider sends during login
-
(SAML and Open ID Connect SSO) Use the Login History.
-
(SAML SSO only) Use the SAML Assertion Validator.
Use the Login History:
-
To create a login history entry to troubleshoot, log in via SSO.
-
From Setup, in the Quick Find box, find and select Login History.
-
Edit your current view or create a view that includes these fields, and save the changes.
-
-
Authentication Context Class Reference
-
Authentication Method Reference
-
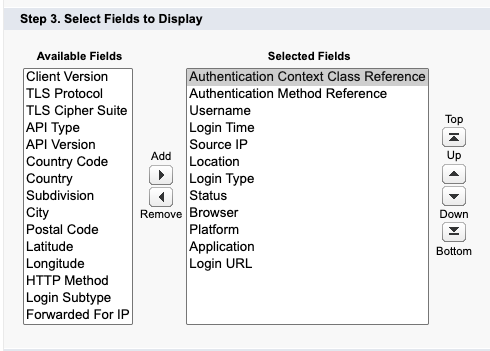
4. Find the row for your recent SSO login. Note the exact values for the Authentication Context Class Reference (ACR) and Authentication Method Reference (AMR).
5. Check the authentication method tier. Any weak value that isn’t documented here isn’t supported.
|
Tier |
SSO Authentication Method Reference (AMR) Signals |
SSO Authentication Context Class Reference (ACR) Signals |
|
Phishing- |
cert, face, fido, fido2, fpt, hwk, iris, passkey, phr, pki, pop, pwlesspasskey, retina, sc, smartcard, smartcardpki, softwarepki, swk, tlsclient, x509 |
fido, fido2, fpt, hwk, passkey, phr, pki, pwlesspasskey, retina, smartcard, smartcardpki, softwarepki, swk, tlsclient, x509 |
|
Standard MFA |
mfa, mobiletwofactorcontract, okta_verify, pin, pgp, publickey, rsa, timesynctoken, user, vbm |
mfa, mobiletwofactorcontract, okta_verify, pgp, publickey, rsa, timesynctoken, vbm |
|
Weak / No MFA |
pwd, sms, tel, email | |
6. Review how Salesforce evaluates AMR and ACR claims from your SSO identity provider.
|
Protocol |
Claim |
Matching Strategy |
Example |
|
OIDC |
AMR |
OIDC AMR is an array (e.g., [hwk, mfa]) matched with exact value comparison. This value is case-sensitive. |
hwk matches ✓, HWK does not match ✗ |
|
SAML |
AMR |
Attribute values in a semicolon-separated string (e.g., hwk;face;mfa) will be parsed and evaluated; comma-separated values are not evaluated. This value is not case-sensitive. |
hwk matches HWK ✓ (case-insensitive) urn:custom:auth:mfa → splits to segments → mfa matches ✓ https://example[.]com/auth/hwk → splits on / → hwk matches ✓ |
|
OIDC |
ACR |
Checks if the ACR element contains the value, so short tokens like mfa match full URNs like urn:oasis:names:tc:SAML:2.0:ac:classes:mfa This value is not case-sensitive. |
urn:oasis:names:tc:SAML:2.0:ac:classes:Smartcard → lowercase → contains smartcard ✓ |
|
SAML |
ACR |
Checks if the ACR element contains the value, so short tokens like mfa match full URNs like urn:oasis:names:tc:SAML:2.0:ac:classes:mfa This value is not case-sensitive. |
urn:oasis:names:tc:SAML:2.0:ac:classes:MFA → lowercase → contains mfa ✓ |
- After you have identified the authentication signals that your SSO identity provider sends:
Configure your SSO identity provider to send supported authentication signals
For high-level setup steps, see Set Up MFA with an SSO Provider.
If you can’t update your SSO identity provider immediately: while you work on this update, temporarily use the Salesforce MFA service on top of your SSO identity provider’s service.
Integration or API user account can’t log in after MFA enforcement
Cause:
While API login doesn’t require MFA, some integrations use authentication methods that complete UI login. These UI logins still require MFA. Here’s a list of authentication methods that use UI logins.
- OAuth web-server flow
- OAuth user-agent flow
- OAuth username-password flow—scheduled for retirement.
- SOAP login ()—scheduled for retirement.
Resolution:
To see which authentication methods your apps use, review the Login History.
- Check the Login Subtype field for these OAuth 2.0 flows, which require UI login.
- OAuth Web-Server
- OAuth User-Agent
- OAuth Username-Password
- Check if the app is using SOAP login() calls. Look for these entries:
- Login Subtype: SOAP API
- LoginType: Other Apex API or Partner Product
- API Type: SOAP Enterprise, SOAP Partner, or SOAP Tooling
To eliminate the UI step, migrate integrations that use these authentication methods to the JWT bearer flow or client credentials flow.
Experience Cloud users see a prompt to create a passkey
Resolution:
Salesforce doesn’t require MFA for external users—any user with these licenses:
Starting in August 2026, external users, such as customers and partners, no longer see the “Create a Passkey” page when they access the Experience Cloud site. This fix is available on a rolling basis.
Note: If passwordless login with passkeys is enabled for the org, external users can see an unexpected passkey prompt. Disable the “Allow passwordless login with passkeys” setting on the Identity Verification page in Setup.
If an internal user logs in to an Experience Cloud site, Salesforce still requires MFA. Internal users have these licenses:
To review a user’s license:
-
From Setup, in the Quick Find box, find and select Users.
-
Click the user’s name and review their license.
-
If the user is on an internal license and is legitimately an internal employee, MFA is required and the prompt is expected.
Mobile app passkey issues
See PRMFA with Salesforce Mobile App Logins.
Note: Starting in July 2026, the login flow displays the username field first, then prompts for a passkey or password.
This change can affect UI automations that you use to test mobile logins. For more information, see Prepare for Login Changes.
Users with the Waive Multi-Factor Authentication for Exempt Users permission are prompted to create a passkey
This behavior is expected when MFA is enforced. Unless you have an approved temporary extension to use this user permission, it no longer exempts users from MFA after enforcement. For more information about MFA behavior with extensions, see MFA and Phishing-Resistant MFA Post-Enforcement Passkey Prompts and Extension Behavior.
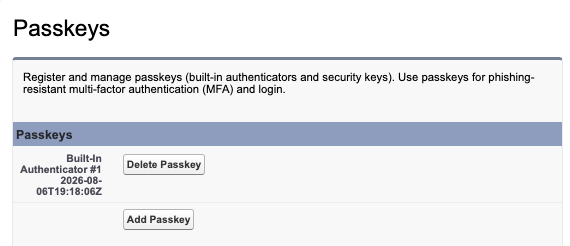
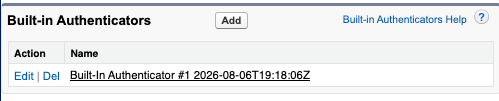
Disconnect a passkey that isn’t working
-
When you’re logged in, go to your personal settings. There are two options to manage passkeys:
-
In the Quick Find box, find and select Passkeys. If you get a blank page, try switching to Salesforce Classic or clearing your browser cookies.
-
Can’t find the Passkeys page? From your personal settings, go to Advanced User Details instead and find Built-in Authenticators. Your registered passkeys are listed there.
-
-
Delete your registered passkey.
-
Passkeys page: find your currently registered passkey and click Delete Passkey.
-
Advanced User Details page: Click Del.
-
Add a passkey from your personal settings
-
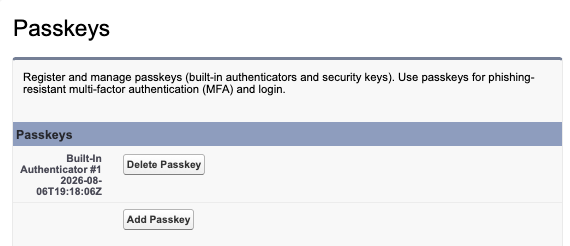
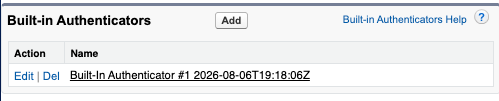
Go to your personal settings. There are two options to manage passkeys:
-
In the Quick Find box, find and select Passkeys. If you get a blank page, try switching to Salesforce Classic or clearing your browser cookies.
-
Can’t find the Passkeys page? From your personal settings, go to Advanced User Details instead and find Built-in Authenticators. Your registered passkeys are listed there.
-
-
Add a new passkey. If using synced passkeys: before adding a new passkey, make sure that your password manager is set up and that you’re logged into it.
-
-
From the Passkeys page: Click Add Passkey.
-
From the Advanced User Details page: Click Add.
-
If prompted, verify your identity with a code sent to your email address or phone number, or with a registered MFA verification method.
-
Click Create Passkey.
-
Your password manager (if using synced passkeys), browser, device, or operating system prompts you to create a passkey. Follow the on-screen prompts to finish creating and saving your passkey.
-
Note: If you don’t immediately see an option to add the type of passkey that you want, such as a physical security key, check if the prompt allows you to select other options.
-
-
Flere ressurser
Change Log
| Date | Change |
| August 10, 2026 | Clarified that Passkeys are enabled at the org level by default (no Admin action required) when Salesforce rolls out Phishing-Resistant MFA enforcement via these Identity Verification settings found in Setup:
|
| August 7, 2026 | Initial publication |
- MFA and Phishing-Resistant MFA Post-Enforcement Passkey Prompts and Extension Behavior
- Lightning Login and Built-in Authenticator (Passkey) Conflict Causing Login Deadlock
- How to Disconnect a Multi-Factor Authentication (MFA) Verification Method as an End User
- Common Multi-Factor Authentication (MFA) Troubleshooting for Sales and Service
Knowledge-artikkelnummer
005390721
Hjalp denne artikkelen med å løse problemet ditt?
La oss få vite det slik at vi kan forbedre!
