
You are here:
Configure Advanced Pricing for Commerce in Your B2B Store
Configure Advanced Pricing powered by Revenue Cloud in order to use several Commerce features, including subscriptions and the Request for Quote feature.
Required Editions
Advanced pricing configuration involves these steps:
- Determine whether your org uses a pricing recipe
- Enable Advanced Pricing for automatic recipe setup
- Add pricing elements to an existing pricing recipe
- Sync pricing data
- Configure pricing procedure
- Refresh B2B store pricing decision tables
See Also
Determine Whether Your Org Uses a Pricing Recipe
Before you begin, check whether your org uses a pricing recipe.
- From Setup, in the Quick Find box, enter Pricing Recipes, and then select Pricing Recipes.
- Check the recipes list to see if a pricing recipe is available.
-
Choose your setup path.
- If your org doesn't have a pricing recipe, see Enable Advanced Pricing for Automatic Recipe Setup.
- If your org has a pricing recipe, see Add Pricing Elements to An Existing Pricing Recipe.
Enable Advanced Pricing for Automatic Recipe Setup
Follow these steps if your org doesn't have a pricing recipe. Salesforce automatically enables the pricing recipe, decision tables, and pricing procedure template for you.
- In the navigation sidebar, select a store from the Store dropdown.
- Select Settings | Store.
- Go to the Pricing tab.
-
Under Advanced Pricing Setup, turn on Advanced Pricing for Commerce
Powered by Revenue Cloud. If you don't see the setting enabled, refresh
your browser.
This setup can take a few minutes to complete. After you enable Advanced Pricing for Commerce Powered by Revenue Cloud, the Commerce Default Pricing Procedure is added and activated in your org.
- Proceed to Sync Pricing Data.
Add Pricing Elements to an Existing Pricing Recipe
Follow these steps if your org already has a pricing recipe. You can either merge the pricing elements from the Commerce default pricing recipe with your existing pricing recipe or use the Commerce default pricing recipe.
-
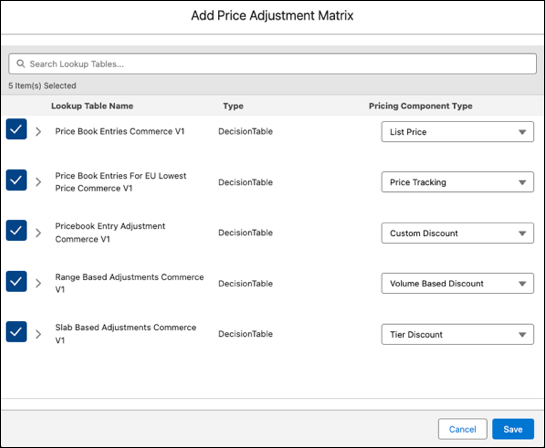
Modify price adjustment matrices.
Map each decision table to the pricing components where that table is used. For a list of Commerce decision tables and their corresponding pricing component types, see Refresh B2B Store Pricing Decision Tables.
 Tip If your org has multiple pricing recipes, add custom decision table mappings to the active recipe. Pricing procedures can only access custom mappings from the active recipe. Custom mappings added to inactive recipes are ignored. For more information, see Considerations for Working with Multiple Pricing Recipes.
 - If the pricing procedure isn't active, activate it. See Simulate and Activate Your Pricing Procedure.
- From your store, select Settings | Store.
- Go to the Pricing tab.
- Under Advanced Pricing Setup, make sure Advanced Pricing for Commerce Powered by Revenue Cloud is turned on.
- Proceed to Sync Pricing Data.
Sync Pricing Data
Sync your pricing data to provide the most recent information to decision tables mapped to a pricing recipe.
- From Setup, in the Quick Find box, search for and select Salesforce Pricing Setup.
- In the Select a Pricing Recipe section, select CommerceDefaultRecipe.
- Sync pricing data.
- Proceed to Configure Pricing Procedure.
Configure Pricing Procedure
Configure a pricing procedure for your store to calculate prices.
-
From the App Launcher, find and select Pricing Procedures and
check if a procedure exists. Depending on your setup, either clone the default template
or create a new version of your existing procedure.
- If you don't have a pricing procedure, clone the default template:
- From the App Launcher, find and select Expression Set Templates.
- Select Commerce Default Pricing Procedure.
-
If your org supports multiple currencies, under Pricing Setting, map the Currency
field to the
CurrencyIsoCodecontext tag. -
Save the template as a new pricing procedure.
Assign a rank, and mark the pricing procedure as active. Salesforce recommends that you don't change the default name of the pricing procedure.
- If you have a pricing procedure, create a new version:
- From the App Launcher, find and select Pricing Procedures.
- Select your existing pricing procedure.
- Click Save As and select New Pricing Procedure Version.
- Enter a new version number and save.
-
If your org supports multiple currencies, under Pricing Setting, map the Currency
field with the
CurrencyIsoCodecontext tag. Note To turn on multicurrency in your org that has active pricing procedures linked to predefined Salesforce Pricing lookup tables, deactivate your pricing procedure, turn on multicurrency, and then activate your pricing procedure.
 - In Expression Set Properties, assign a rank, and then activate the pricing procedure. Salesforce recommends that you don't change the default name of the pricing procedure.
-
Verify that your pricing procedure is active in the org and in your store.
-
From the App Launcher, find and select Pricing
Procedures.
Make sure your new or modified pricing procedure is displayed.
- In your store, go to Website Design, and then click Experience Builder. Go to the Product page and refresh it to verify that the correct price is displayed.
-
From the App Launcher, find and select Pricing
Procedures.
- Proceed to Refresh B2B Store Pricing Decision Tables.
