
You are here:
Media Transparency Center Setup
Learn how to set up the Media Transparency Center for the first time.
There are five steps to setting up the Media Transparency Center:

Step 1: Identify Essential IO (Insertion Order) Fields
Buy Data, the data containing all your planned activities and costs (sometimes also referred to as ‘Media Plan’ or ‘Planned Data’), can come in through a variety of platforms, such as Salesforce, MediaOcean, Nexelus, Google Sheets, and others. While Buy Data might arrive in different formats, it must contain a core set of fields that are essential for an IO’s structure and function.
These are the essential fields:
- ID
- Name
- Start/End Dates
- Cost Types
- Rate
- Margin (optional)
- Budget
Here are some examples of field these fields’ values:

STEP 2: Set up Custom Cost Types
Marketing Cloud Intelligence has a set of default Cost Types you can use for your IOs. These Cost Types are as follows: CPM, CPC, CPCV, CPE, CPV, VCPM, CPA, dCPM, dCPC and FLAT. However, if your Buy Data contains a Cost Type that isn’t one of these, you can add it using the ‘Custom Cost Types’ option in the Workspace settings. Creating a Custom Cost Type can be done quickly and easily, as follows:
- Define the Cost Type in Media Transparency Center
First navigate to the Cost Center by clicking the Intelligence (Datorama) logo on the top right, then your User Name, then Workspace in the left pane menu, and finally on ‘Cost Center’.
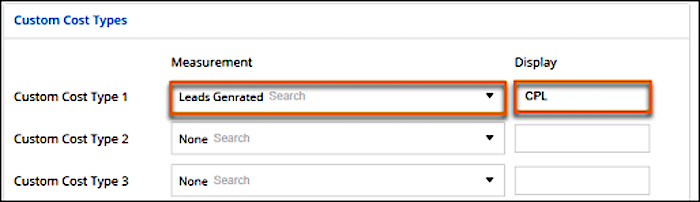
Then set your Custom Cost Type by selecting the Measurement to which it applies, and assign a Display Name exactly as it appears in the Buy Data file.
For example, GoingSolar’s digital marketing activity puts a strong emphasis on generating leads for prospective clients. Because leads are an expensive yet important resource, their generation amid all marketing costs is closely watched. GoingSolar’s Buy Data therefore has CPL (Cost per Lead) as one of its main Cost Types. CPL isn’t on the list of default Cost Types, so it has to be set up as a Custom Cost Type:
Things to consider when configuring a Custom Cost Type:
- The Measurement you select to base the Custom Cost Type upon can only be a Mapped Field that exists in your Delivery Data. It is impossible to base Custom Cost Types on Filtered or Calculated Measurements.
- The selected Measurement can only be Mapped in one of the following Data Stream Types: Ads, Conversion Tags, or Ads Verification'.
- Custom Cost Type for a given IO is calculated as follows: <Selected Measurement>
X IO Rate.
So in our example, if a given IO has generated a total of 211 Leads within a certain date range, and the IO Rate for CPL for that IO is $2.5, the calculation the system would perform is: 211 X $2.5 = $527.50:

- Since the calculation performed by the Media Transparency Center for a Custom Cost
Type is always a direct multiplication of the <Selected Measurement> by the ‘IO
Rate’, calculations that require additional steps, must have these steps applied from
within the mapping of the Selected Measurement. For example, if the Custom Cost Type
required is the ‘Cost per 1,000 Leads’, then the Leads Generated value has to be
divided by 1,000 from within the mapping of the Leads Generated measurement:
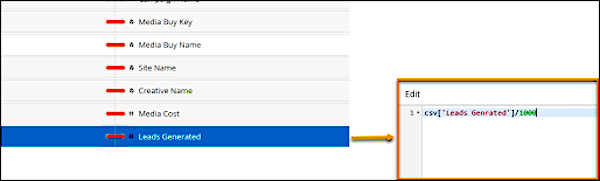
This way, when the Multiplication in the Transparency Center occurs, the Selected Measurement is already pre-divided by 1,000.
- Apply a Cost Type function in the Buy Data data stream mapping
- Apply a Cost Type function in the Buy Data data stream mapping.
For any Custom Cost Type created, in order for it to work, it has to be referenced from the Mapping of the Buy Data Stream using a dedicated Custom Cost Type Function:
COSTTYPE(<Name of Cost Type Field in the Buy Data File>)
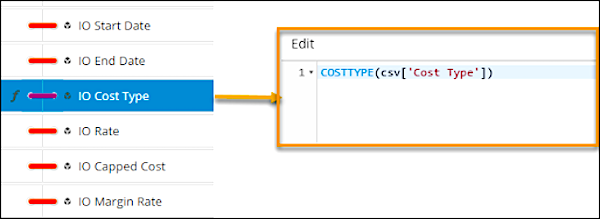
This function searches for the Cost Type value in the Cost Center, obtains the Selected Measurement and uses that to multiply by the IO Rate.
Since Custom Cost Types are generally used in addition to Standard Cost Types, could handle both cases in the Mapping formula of ‘IO Cost Type’. In such a case, the formula would be as follows:
if(csv['Cost Type']=='CPL')
{
   return COSTTYPE(csv['Cost Type']);
}
   else
{
   return csv['Cost Type'];
}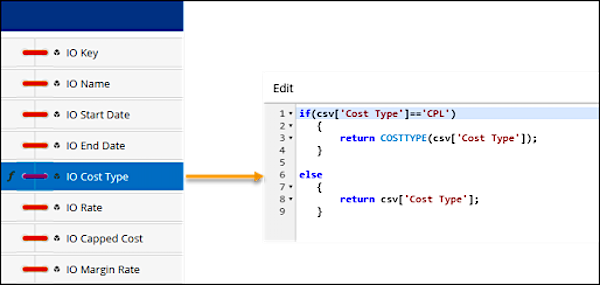
STEP 3: Mapping your Buy Data
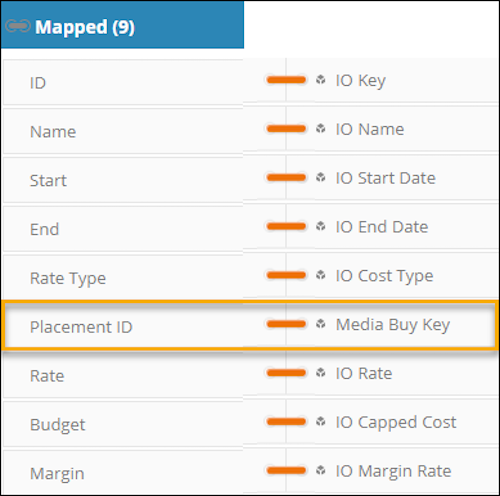
The following screenshot shows how each of the essential IO Fields should be mapped:
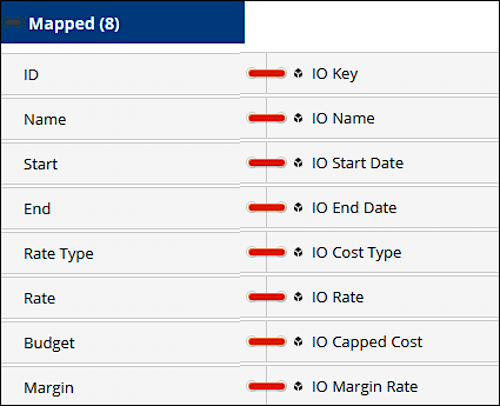
The IO Key or ID can either be found in the source file itself as the key that uniquely identifies each row in question, as shown below:
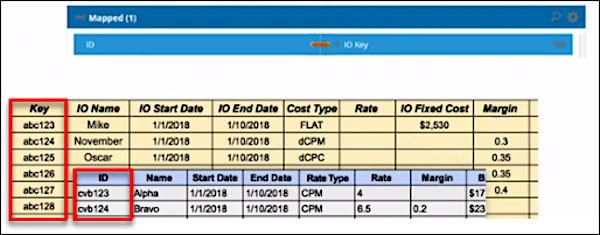
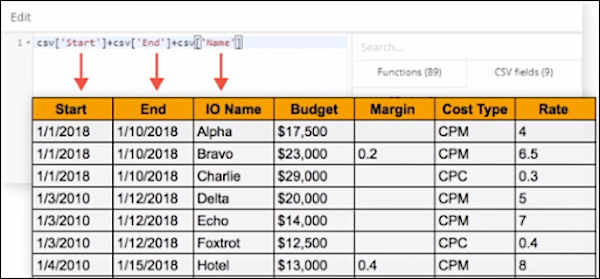
If it isn’t present in the file as a unique identifier, you can create an IO Key using a mapping formula to concatenate a group of fields that together identify each row uniquely:
The IO Name is the name given to the marketing activity in question. A common practice is to name the row after the Campaign that this IO represents. Like the IO Key, the IO Name can also be created or modified using a mapping formula
The IO Start Date and IO End Date indicate the date range during which an IO is active. Recalculations aren’t carried out for dates on which an IO is NOT active.
The next fields refer to the IO Measurements:
- IO Cost Type denotes the type of Recalculation that will be performed for a given IO. For example, CPM means that if a certain IO has generated 20,000 Impressions, the Recalculated Cost is: (20,000 / 1000) * IO Rate = 20 * IO Rate
- IO Rate is the Planned Cost or ‘price tag’ for every unit (or 1000 units). This is the rate that is used for cost recalculations for a given IO. For example if a certain IO’s Cost Type is CPC and its IO Rate is $0.20, then the Recalculated Cost would be: Total Number of Clicks X $0.2
- IO Margin is optional. It denotes the Margin that is added to the Recalculated Cost (or to the Media Cost in cases of Dynamic Cost recalculations).
- IO Capped Cost indicates the maximum value for Actualized Cost and its subsequent calculations, capping them out after this value has been reached.
STEP 4: Connecting your Buy Data to your Delivery Data
You can connect your buy data to your delivery data using one of the following four methods:
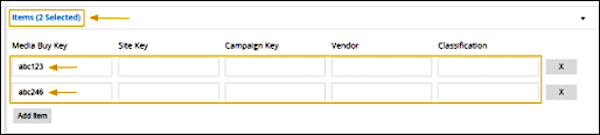
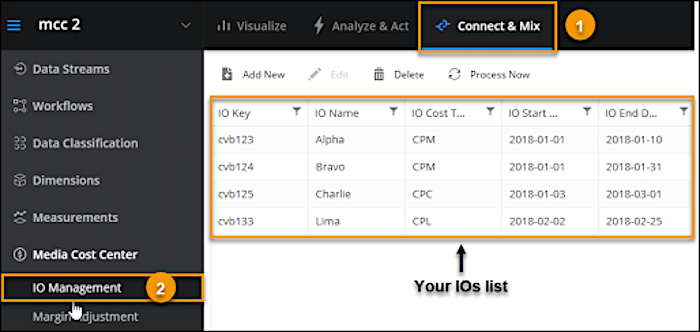
- Associating each individual IO with its Delivery Items from the UI:
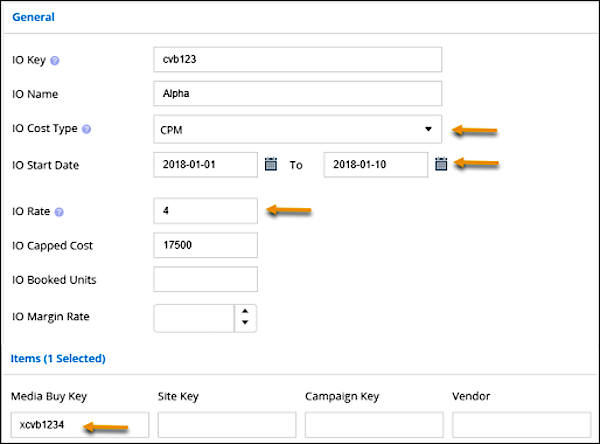
Start from the IO management tab, locate the relevant IO from the list and double-click it in order to edit. Then, scroll down to the tab at the bottom entitled ‘Items’ and expand it in order to enter Delivery items that this IO is associated with. In the example below, the Delivery items added are identified by their Media Buy Keys:
You can also link IOs to Delivery data using a combination of Site and Campaign Keys, or by ‘Classification’ as explained separately in method 4. Linking your IOS to your Delivery data from within each individual IO however, isn’t the best method to use when having to create this association at scale.
- Mapping your Delivery data as part of your Buy Data:
Your Delivery Item Keys might appear in the Buy Data file, as shown here:
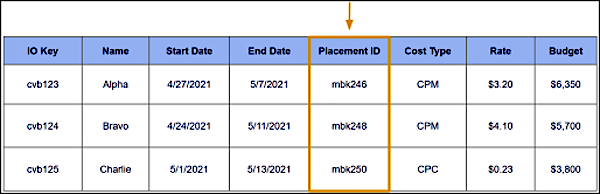
In this case, you can associate the IO Keys with the Delivery Item Keys by simply mapping the relevant Delivery Field to the matching Intelligence Field in the Buy Data data stream:
The availability of the Delivery Items in your Buy Data however is rare and in most cases you won’t be able to use this solution.
- Using an additional Buy Data Stream
You can associate your IOs with your Delivery Data by creating an additional Buy Data, data stream (in addition to the original Buy Data Stream you already have) which includes your IO Keys alongside your Delivery Item Keys:
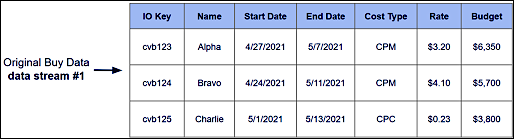
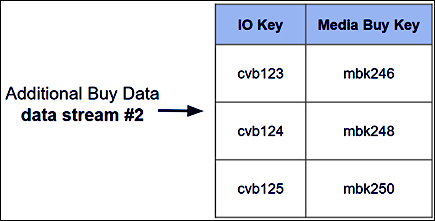
Since MTC data is at the workspace level rather than at the data stream level, all ‘buy data’ data streams created under the same workspace are part of the same pool of buy data. Therefore, any matching IO Key values ingested by different ‘buy data’ data streams are effectively considered as the same IO entity, thus creating an association between IO keys and Media Buy Key Delivery Items in the above example.
- Using the ‘MTC Classification’ method
IOs can be associated with Delivery Items by virtue of a shared MTC classification. In the example below, IO Key cvb123 in the buy data and three media buy keys within the delivery data, all share the same classification value 'term1'. The result is that IO key cvb123 is associated with the three delivery items that have the same classification:
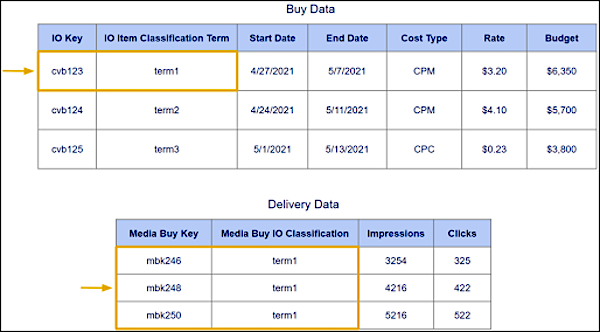
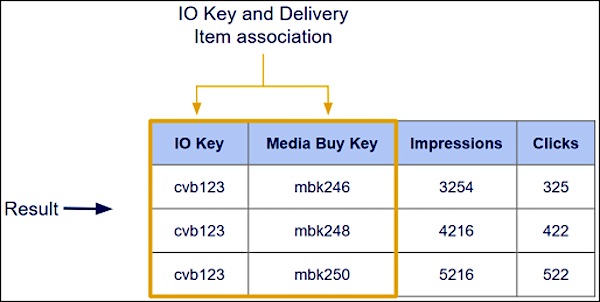
When using the MTC Classification method, in order to assign a classification value within the Buy Data data stream, use the ‘IO Item Classification Term’ and in order to assign a classification value within the Ads (Delivery) data, use the ‘Media Buy IO Classification’
STEP 5: QA Your Data
The first step is to ensure that the uploaded Buy Data has been converted successfully into IOs. To do this, navigate to the IO Management tab, where you should see all the IOs displayed:
Next, access a few IOs randomly to make sure the IO Attributes such as IO Cost Type, IO Start Date, IO End Date, IO Rate etc. are correct.
Additionally, verify that the IO's associated Delivery Keys are correct:
You can now visualize the connection between the Buy Data and the Delivery Data by creating a Table Widget or a Pivot Table that has the IO Name with some of its Main Attributes of Interest. Also make sure you include the Measurements related to the IO Cost Types, and the IO Recalculated Cost as shown in the following example:
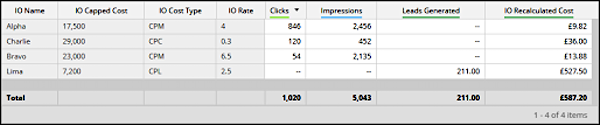
Finally, using the visualized data above, test the following:
- IO Recalculated Cost for selected IOs as per the Measurement to which the Cost Type applies and the IO Rate.
- If you have any Custom Cost Types, test the calculation for those as well.
- Look out for any “Other” values in the IO Name column. Any such values would suggest that the row in question pertains to Delivery activity for which no IO has been defined, or one that has been defined incorrectly with wrong Delivery Item Keys, or an incorrect date range.