
You are here:
Set Up Appointment Management
Appointment Management gives your users an easy way to schedule, modify, and cancel appointments. The experience is powered by Flow Builder. You craft the perfect interaction and decide when and how to create related records like work orders.
Required Editions
| View supported editions. |
| User Permissions Needed | |
|---|---|
| To configure the Field Service managed package: | Customize Application |
| To create a permission set: | Manage Profiles and Permission Sets |

Important
Legacy Chat will be retired on February 14, 2026. To avoid service interruptions to your end users, switch to enhanced Chat (formerly Messaging for In-App and Web). Enhanced Chat offers many of the legacy Chat features that you love plus asynchronous conversations that can be picked back up at any time. Learn about migrating in Help and Trailhead.
Important Enable Field Service and install the latest version of the
Field Service managed package before setting up Appointment Management.
-
Update your Field Service permission sets.
- In the Field Service Admin app, on the Field Service Settings tab, Click Permission Sets.
-
Ensure that the FSL Self Service permission set is up to date.
If you don’t have the FSL Self Service permission set in the Field Service managed package, you don’t have the latest version.
- Give users the self-service permission set that comes with the Field Service package.
-
Create a scheduling flow with actions for your users to follow. You can create separate
flows to book a new appointment, modify an existing appointment, or cancel an upcoming
appointment.
For a new appointment flow:
- Collect details from your users for a Work Order and Service Appointment and query the getSlots method in the Field Service Managed Package. Use an Apex class to query the method.
- For your query, you need the Service Appointment ID, the Scheduling Policy ID, and the Operating Hours ID.
- Serialize getSlots results into a JSON string and pass that as an input to the Appointment Scheduling Flows component to display the available slots for your user to select.
- With the user selected slot, attempt to book a new appointment by using the ScheduleService.Schedule method in the Field Service Managed Package. Record any success or failure messages returned from the method and add a loop in your flow to retry booking or display an error message.
- Save the flow as Embedded Appointment Management Flow type and Activate it. Use the flow in step 6.g.
-
For a modify appointment flow:
- The Embedded Service application passes a service appointment ID to your modify appointment flow.
- With the ID, look up the existing service appointment record. Add logic in your flow to modify details like the description or the time for the appointment by accepting relevant information from the user.
- You can again use the getSlots method with the Appointment Scheduling component to let your users pick a new time.
- Save the flow as Embedded Appointment Management Flow type and Activate it. Use the flow in step 6.g.
-
For a cancel appointment flow:
- The Embedded Service application again passes a service appointment ID to your cancel appointment flow.
- Using the ID, look up the service appointment record and set its Status to Canceled to cancel the appointment.
- Save the flow as Embedded Appointment Management Flow type and Activate it. Use the flow in step 6.g.
- To create and configure a connected app, follow the Connected Apps instructions. For authentication, use the Authenticate Apps with OAuth help.
-
Create and configure an Embedded Service deployment.
- From Setup, in the Quick Find box, enter Embedded Service, then select Embedded Service Deployments and click New Deployment.
-
Choose Appointment Management as your conversation type and
Next.
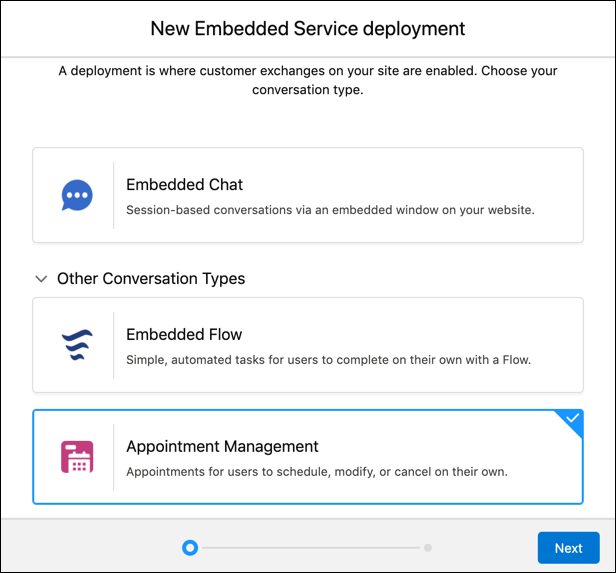
 Note If you don't see the selection, Appointment Booking isn't enabled.
 -
On the New Embedded Service Deployment panel, in Embedded Service
Deployment Name enter your appointment booking name.
Note The deployment is shown in a list on the Embedded Service page. If you have several deployments, use a descriptive name so it’s easy to distinguish each one.
- The API Name field is automatically populated.
- Under Site Endpoint, select the site you want to use and save your changes.
- In Embedded Service Deployment Settings, click Start next to the Appointment Management settings.
- Optionally, select Let Customers Schedule New Appointments and Let Customers View Their Appointments on the Appointment Management Settings page. Save your changes.
- In the Scheduling flows section, click Edit.
- To set the flows, use the new versions you created in the previous steps for New Appointment, Modify Appointment, and Cancel Appointment.
- For authorization with an Experience site login, see Connected Apps. Refer to Authorize Apps with OAuth for custom login methods.
- To customize the images used in the flow, click Edit under Additional Branding. Enter your Logo Image URL.
- To go back to the Deployment home, click APPOINTMENT_BOOKING at the top of the page.
- To activate the embedded service, click the slider to Deployment header.
- Click Get Code next to embedded code snippets.
- On the Embedded Service Code Snippets page, click Copy to Clipboard, save the code snippets for later, and click Done.
-
Create a Cross-Origin Resource Sharing (CORS) record.
- From Setup, in the Quick Find box, enter CORS, then select CORS and click New.
- Enter the correct URL domain of the site where you place the embedded service, https://MyDomainName.my.site.com, and save your work.
Note To access or view appointments with Appointment Management, the user must have a Customer Community User profile with the FSL Self Service permissions set.Note Appointment Management can also be set up with Lightning Scheduler. See the Set Up Scheduling for Authenticated External Users instructions first to meet any prerequisites before following the previous steps. Add Inbound Flows to a Website provides more background.
Konnten Sie Ihr Problem mithilfe dieses Artikels lösen?
Geben Sie uns Feedback, damit wir uns verbessern können.
