
You are here:
Customize the Client Card
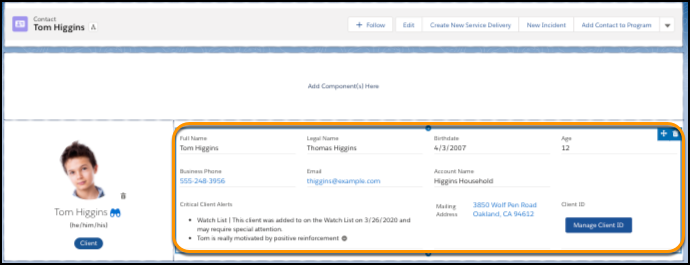
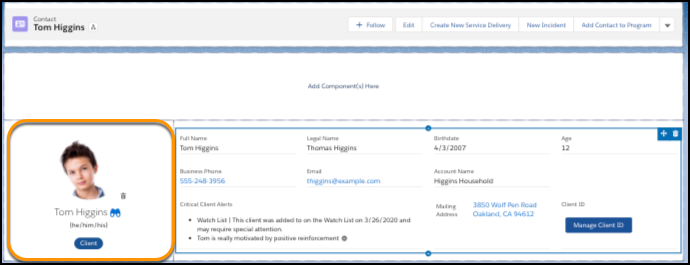
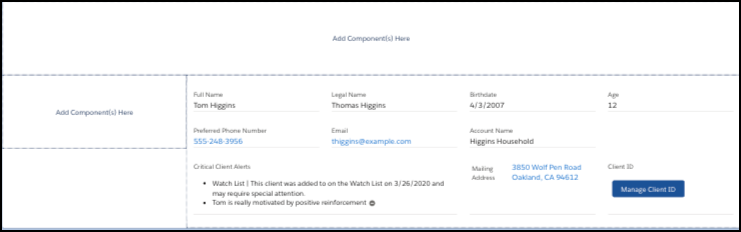
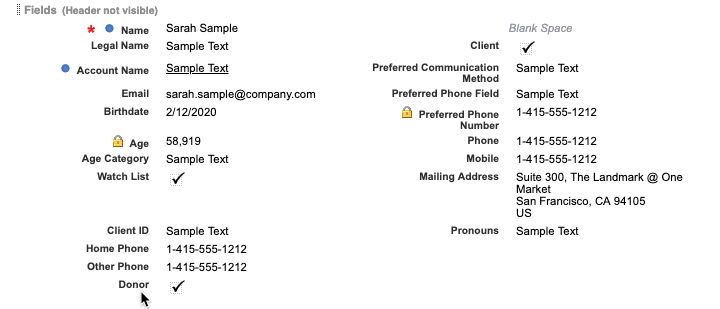
The Client Card displays at the top of a Contact record and shows all of the most important information about a Contact, including name, a photo, contact information, critical alerts, and Client ID.
- Show or Hide Elements
Edit the Client Card to hide Client Alerts, Mailing Address, or the Manage Client ID button. - Exclude the Client Photo
Remove the Client Photo Component from the Client Card. - Add the Client Photo
Add the Client Photo component to the Client Card. - Customize Fields
Customize which fields are displayed on the Client Card. - Customize Role Badges
Display badges that denote the roles a Contact plays in your organization; for example, Client, Donor, or Volunteer. - Customize the Client ID Generator
To generate Client IDs based on your organization's numbering convention, customize the Client ID Generator.
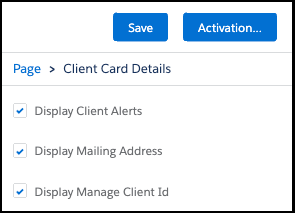
Show or Hide Elements
Edit the Client Card to hide Client Alerts, Mailing Address, or the Manage Client ID button.
-
Click the Contacts tab.
-
Click a Contact’s name.
-
Click
 , then click Edit Page.
 -
Click on the Client Card component to edit Client Card Details.
-
Select the elements you want to show.
-
Click Save.
-
Use
 to return to the Contact record.
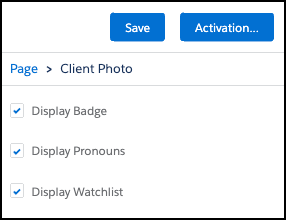
In the Client Photo area, you can choose to hide the Badge, Pronouns, or Watchlist.
- Click , then click Edit Page.
-
Click the Client Photo component to edit its elements.
-
Select the elements you want to show.
-
Click Save.
-
Use
to return to the Contact record.
Exclude the Client Photo
Remove the Client Photo Component from the Client Card.
-
On the Contact detail page, click
, then click Edit Page. -
Click
 in the Client Photo Component.
-
Drag the Client Card details to the top component slot.
-
Click Save.
-
Use
to return to the Contact record.
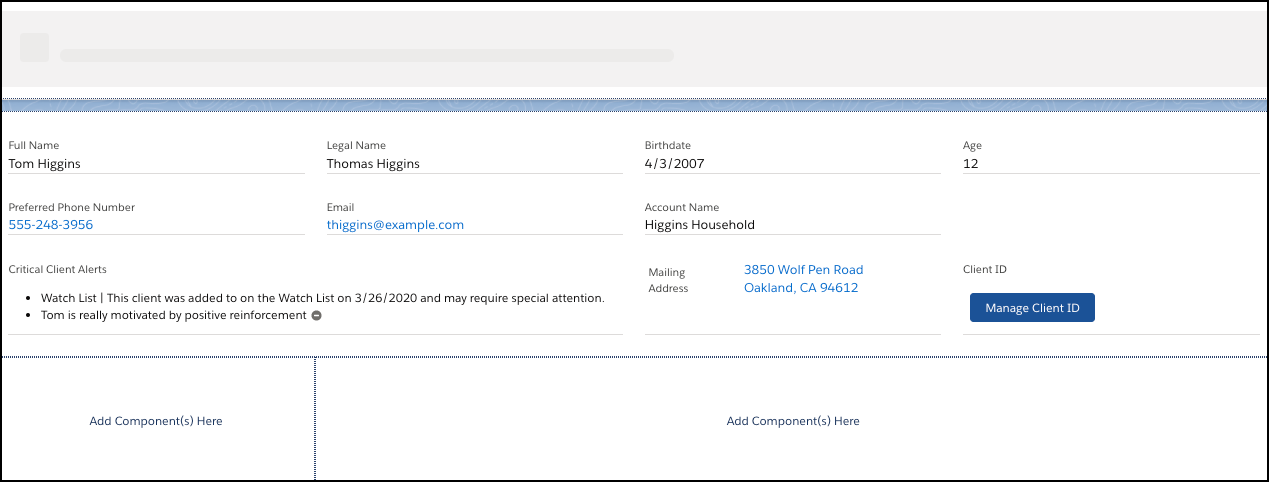
The Client card without a photo now looks like this:
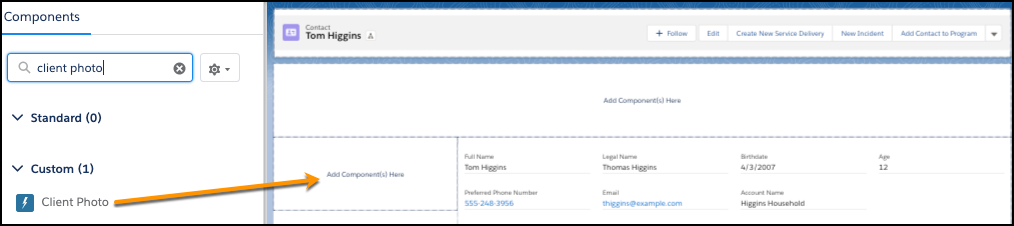
Add the Client Photo
Add the Client Photo component to the Client Card.
-
Click
, then click Edit Page. -
Search for the Client Photo component.
-
Drag the component back to the Client Photo slot on the page.
-
Click Save.
-
Use
to return to the Contact record.
Customize Fields
Customize which fields are displayed on the Client Card.
-
Click
, then click Setup. -
Click the Object Manager tab.
-
In the list of objects, click Contact.
-
Click Field Sets.
-
Click Client Card.
-
Drag the field into the Client Card field set and place it where you want it to appear on the Client Card. To remove a field, drag it back to the palette.
-
Click Save.
Customize Role Badges
Display badges that denote the roles a Contact plays in your organization; for example, Client, Donor, or Volunteer.
By default, the Case Management app includes one role badge, Client. This badge displays on the Client Card under the Client Photo.
You can create additional badges as needed. In this example, we'll create a custom Donor Role Badge.
-
Click
, then click Setup. -
Click the Object Manager tab.
-
In the list of objects, click Contact.
-
Click Fields & Relationships.
-
Click New.
-
Select Checkbox.
-
Click Next.
-
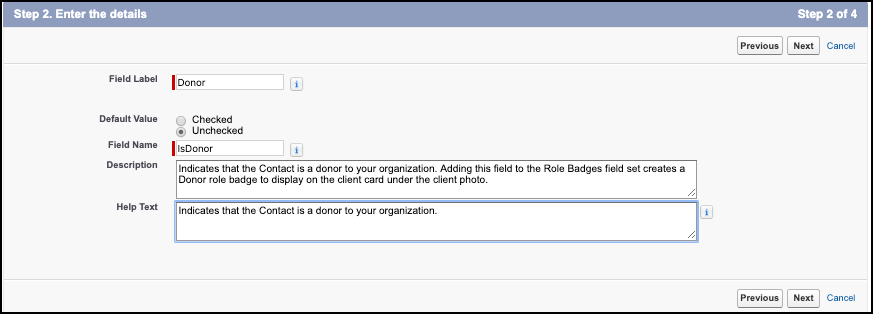
Enter the details of the checkbox.
-
Enter a Field Label. In our example, we enter Donor.
-
Next to Default Value, select Unchecked.
-
The field name is automatically populated.
-
Optionally, add a description and help text that describes to your users what the checkbox does.
-
-
Click Next.
-
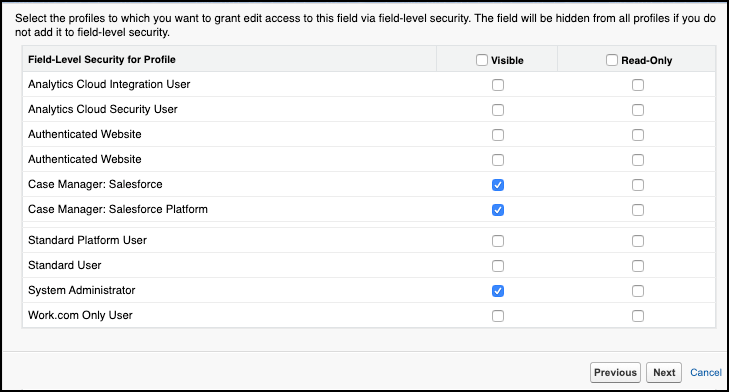
Select Visible for the appropriate profiles, including Case Manager: Salesforce, Case Manager: Salesforce Platform, and System Administrator.
-
Click Next.
-
Add the field to the Case Management Layout.
-
Click Save.
Next, place the custom field on the Case Management page layout:
-
Click Page Layouts.
-
Click Case Management Page Layout.
-
From the field layout palette, drag the Donor field under the Client field on the page layout.
-
Click Save.
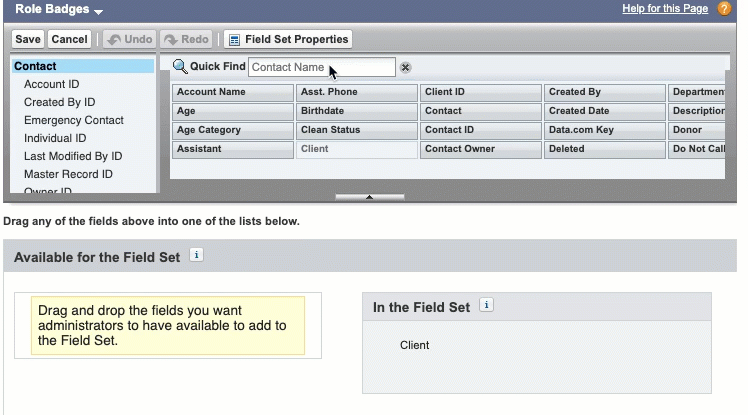
Now, add a field to the Role Badges field set:
-
Click Field Sets.
-
Click Role Badges.
-
Enter the name of the role badge you created in Quick Find. In our example, we enter Donor.
-
Drag the Donor field from the palette to In the Field Set, under the Client field.
-
Click Save.
Customize the Client ID Generator
To generate Client IDs based on your organization's numbering convention, customize the Client ID Generator.
When a user clicks Manage Client ID on a Client Card, then clicks Generate Random Client ID, the client is assigned a unique Client ID following a Client ID Pattern. The default Client ID Pattern is 8-randomly generated numbers. You can customize the Client ID Pattern to match the convention used by your organization. Your custom Client ID Pattern must contain at least 8 characters and can use the following placeholders:
-
% - random number
-
@ - random letter
-
Any other character returns itself
For example, CL-@@@@%%%% could return CL-RXFD1793 or CL-THDL0485.
- Click , then click Setup.
-
Enter Custom Settings in the Quick Find box, then select Custom Settings.
-
Click Manage next to Client Settings.
- Choose the part of your organization to apply the Client ID Pattern to:
- To set the Client ID Pattern for everyone, click New above Default Organizational Level Value. If a Client ID Pattern already exists, you'll see Edit instead of New. Edit the pattern in Client ID Pattern, then click
Save.
- To set the Client ID Pattern for a specific profile or user, click New above Setup Owner. You can also edit or delete an existing setting. Specify a profile or user, edit the pattern in Client ID Pattern, then click Save.
- To set the Client ID Pattern for everyone, click New above Default Organizational Level Value. If a Client ID Pattern already exists, you'll see Edit instead of New. Edit the pattern in Client ID Pattern, then click