
You are here:
Recommended Configuration
Once you have the NPSP basics set up, we recommend adding these configurations to help your users find information and create records more quickly and easily.
These recommended steps aren't essential for NPSP to function—but they will help your users find information and create records more quickly and easily.
- Add the NPSP Lightning App
Create a new Lightning App for Nonprofit Success Pack. - Configure Compact Layouts
Compact layouts determine what fields you see on the highlights panel of a record, and when you hover over a lookup field. They also determine the fields you see in the highlights area of a record on the Salesforce mobile app. - Add “Mx.” to Salutation Field on Contact
It's important to use the right salutation for each constituent in mailings and other communications. Add the value of Mx. to the Salutation field on Contact to include people who prefer it. - Enable the Get Started with NPSP Page
NPSP includes a Get Started page designed for new users who are at the beginning of their journeys with Nonprofit Success Pack. We very intentionally selected the content, links, and videos on the pages to help new users learn about different aspects of the Nonprofit Success Pack in a logical order so that they can quickly get up and running and on their way to being power users.
Add the NPSP Lightning App
Create a new Lightning App for Nonprofit Success Pack.
- Click
 , then click Setup.
 - Enter App in the Quick Find box, then click App Manager. You should see the Lightning Experience App Manager.
- Click New Lightning App.
- Enter the following information:
- App Name: Nonprofit Success Pack
- Developer Name (gets filled in automatically): Nonprofit_Success_Pack
- Description: (Lightning Experience) Manage your nonprofit processes.
- Choose a logo: Upload a graphic.
- Primary Color Hex Value: #00A1E0
- Click Next.
- On the App Options tab, select Standard Navigation and for the Setup Experience select Setup (full set of Setup options).
- Click Next.
- On the Utility Items (Desktop Only) tab, click Next.
- On the Navigation Items tab, add the following tabs to the Selected Items (in this order):
- Getting Started
- Home
- Accounts
- Contacts
- Opportunities
- Recurring Donations
- Campaigns
- Reports
- Dashboards
- NPSP Settings
- Click Next.
- On the User Profiles tab, choose the appropriate profiles. In the Trial, we assigned the app to all standard profiles.
- Click Save & Finish. You should now see the new Lightning app in the Lightning App Manager list. And see the new tile in the App Launcher. When you click on the tile in the app launcher, you see the Getting Started tab in NPSP.
Create an NPSP Administrator Lightning App
The NPSP Lightning app that is included in the trial doesn't include some important admin-specific tabs (that existing NPSP orgs are accustomed to seeing by default). So, we recommend that you also create an Administrator Lightning app. Call it "NPSP Admin" (or something that you'll easily recognize in the App Launcher) and include any tabs that are relevant for admins in your org. Here are some suggestions:
Create List Views
A list view is a filtered list based on one kind of record, such as Accounts or Contacts, that you access from the record tab. We recommend that you create list views for Accounts and Opportunities.
Account List Views
| List View Name | Filters | Fields |
|---|---|---|
| Organization Accounts | Account Record Type = Organization | Account Name, Account Site, Billing State/Province, Phone, Type, Account Owner Alias |
| All Accounts | N/A | Account Name, Billing State/Province, Phone, Total Gifts, Total Gifts Last N Days, Average Gift, Type, Account Record Type |
| Household Accounts | Account Record Type = Household | Account Name, Formal Greeting, Informal Greeting. Total Gifts, Average Gift, Best Gift Year, Household Phone |
Opportunity List Views
| List View Name | Filters | Fields |
|---|---|---|
| All Donations | Opportunity Record Type = Donation | Opportunity Name, Account Name, Amount, Close Date, Stage, Opportunity Owner Alias |
We’ll create the first one together—a list view of Organization Accounts that displays a list of Accounts filtered by Record Type=Organization, and display fields Account Name, Account Site, Billing State/Province, Phone, Type, Account Owner Alias.
Keep in mind that there are three parts to configuring a list view:
Create the List View
Create a list view for NPSP.
- Click the Accounts tab.
- Click
 .
. - Click New.
- In the Name field, enter Organization Accounts.
- NPSP automatically generates a List API Name.
- Select All users can see this list view.
- Click Save.
Update the Display Fields
Add fields on your NPSP list view.
- Select Organization Accounts from the list view dropdown.
- Click , then click Select Fields to Display.
- Move the default fields from Visible Fields to Available Fields.
- Move the following fields to the Visible Fields list: Account Name, Account Site, Billing State/Province, Phone, Type, Account Owner Alias.
- Click Save.
Add Filters
Add filters to list views to easily find or edit different types of records in NPSP.
- Select Organization Accounts from the list view dropdown.
- Click
 .
. - Click Add Filter.
- Select Account Record Type for the Field.
- Select equals for the Operator.
- Select Organization for the Value.
- Click Done.
- Click Save.
- Now create the rest of the list views shown in Create List Views.
Configure Compact Layouts
Compact layouts determine what fields you see on the highlights panel of a record, and when you hover over a lookup field. They also determine the fields you see in the highlights area of a record on the Salesforce mobile app.
Set up your compact layouts so that the fields your users need to view at a glance are front and center. It may not seem like a big deal, but small changes like this can make a big difference in user acceptance and overall happiness with NPSP.
NPSP installs these compact layouts:
- Contact: NPSP Contact Compact Layout
- Account: NPSP Household Account, NPSP Organization Account
- Opportunity: NPSP Donation Compact Layout
- Campaign: NPSP Compact Layout
Use these compact layouts as is, or use them as a starting point for your additional customizations.
Clone Compact Layouts To Preserve Your Changes
Have you ever customized a Compact Layout, tested it, deployed it … and then discovered a few weeks later that it had reverted to the default layout?
If so, you're not alone. And no, you're not going crazy.
The issue is that packaged Compact Layouts, unlike regular page layouts, get push upgraded whether you like it or not. This means that with any upgrades to NPSP, Compact Layouts for Accounts, Contacts, and other objects get pushed to your organization, overwriting any customizations you may have made. Which can lead to a lot of confusion, not to mention downright aggravation.
Here's a quick, three-step process to avoid this frustration:
- Clone the packaged Compact Layout.
- Make changes to the cloned layout.
- Set the cloned version as the primary Compact Layout.
Let's walk through an example:
The staff at Colorado Community Bakery know that it's important to respect how their customers want to be addressed. They want to add a custom field, Preferred Pronouns, to their Compact Layout for Contacts, so that this information is front and center.
1. They start by cloning a packaged Compact Layout.

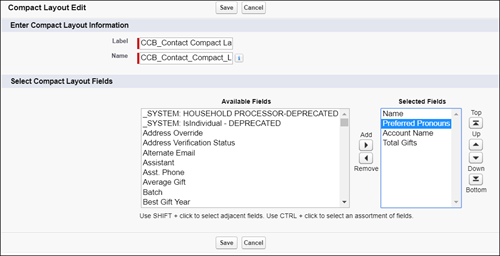
2. Next, they add their custom field to the cloned Compact Layout and click Save:
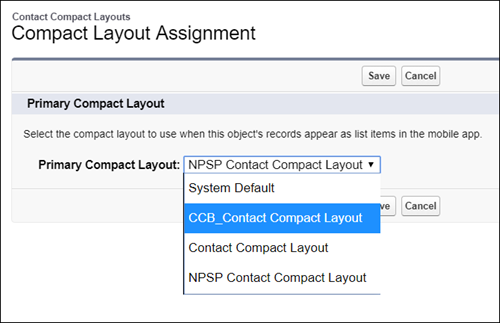
3. Finally, they set the new cloned Compact Layout as the primary Compact Layout:
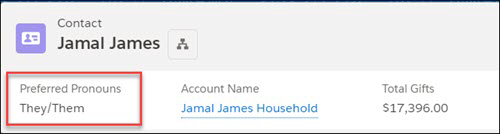
Since they're using a cloned Compact Layout rather than a packaged Compact Layout, they can now be confident that their customizations will remain in place throughout any product upgrades.
Add “Mx.” to Salutation Field on Contact
It's important to use the right salutation for each constituent in mailings and other communications. Add the value of Mx. to the Salutation field on Contact to include people who prefer it.
The Contact Salutation field is not exposed in the Lightning setup UI. To edit this field, switch to the Salesforce Classic interface:
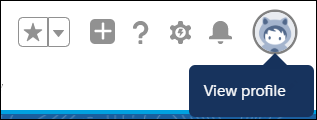
- Click the View Profile icon.
- Click Switch to Salesforce Classic.
- Click Setup.
- In the Quick Find box, enter Contacts, then click Fields under Contacts.
- In the Contact Standard Fields section, click Edit next to the Salutation field.
- Click New.
- Enter Mx., then click Save.
Once you’ve made your changes, switch back to Lightning Experience by clicking the Switch to Lightning Experience link.

Customize Gender Picklist Values for Relationships
How the Gender Picklist values work and use translation workbench to customize values.
Gender Picklist Values Overview
If you want to use gender values other than Male and Female or add additional values, you can use Translation Workbench to edit these values.
By default, NPSP Relationships use the Male and Female gender values to determine Reciprocal Relationships according to your Manage Relationships Settings.
Simply editing the Gender picklist field is not sufficient if you want to change the default values and still have NPSP use gendered reciprocal relationships. For example, if you wanted to change the default gender values from Male to Male-Identifying and Female to Female-Identifying, just editing the picklist values in the Gender field without following the rest of the steps outlined in this document would cause NPSP to generate gender-neutral reciprocal Relationships, such as Sibling rather than Brother or Sister, or Sibling's Child rather than Niece or Nephew.
The rest of this document shows you how you can both change NPSP's default gender values and still maintain gendered reciprocal relationships.
Enable Translation Workbench
Translation Workbench is a tool that lets you translate text in Salesforce into other languages. The tool also lets you change and customize text within the same language in managed packages such as NPSP.
- Click , then click Setup.
- From Setup, enter Translation Workbench in the Quick Find box, then select Translation Language Settings.
- Click Enable.
You should see English in the list of Supported Languages, and it should be Active. If it's not Active, click Edit, select the Active checkbox, and add yourself as a Translator (see below). If you don't see English listed at all, you'll need to do this:
- Click Add.
- Select English as the Language.
- Make sure Active is selected.
- Under Identify Translators for This Language, select your name and click Add to move your name to the Selected List.
- Click Save when you're finished.
Translate the Default Gender Custom Labels
Update the options in the Gender field.
Now customize the labels:
- From Setup, enter
Custom Labelsin the Quick Find box, then select Custom Labels under the User Interface menu. - Click the letter M to narrow down the list of Custom Labels.
- Click Male.
- Click New Local Translations/Overrides.
- Select English as the language.
- In the Translation Text box, enter the terms you want to use for the Male category. You can also provide a comma-delimited list. For example, Male-identifying, Transgender, or Nonbinary.
- Click Save when complete.
- Repeat this process for the Female Custom Label if necessary.
Lastly, make sure that the Gender picklist field on the Contact object also includes the values you added via Translation. (See Add or Edit Picklist Values in Salesforce Help and Training.) Once that's done, the NPSP can use your custom Gender values to auto-create reciprocal Relationships as defined in the Male/Female/Neutral table in Relationship Reciprocal Settings.
Enable the Get Started with NPSP Page
NPSP includes a Get Started page designed for new users who are at the beginning of their journeys with Nonprofit Success Pack. We very intentionally selected the content, links, and videos on the pages to help new users learn about different aspects of the Nonprofit Success Pack in a logical order so that they can quickly get up and running and on their way to being power users.
Expose Tab
- From Setup, enter Profile in the Quick Find box, then click Profiles.
- Click the profile that needs access to the tab.
- Click Object Settings.
- Click Get Started with NPSP.
- Click Edit and change the tab setting to Default On.
- Click Save.
- Repeat these steps for any profile that needs access.
Grant Access to the Get Started Completion Checklist States
- While still in Object Settings, click Get Started Completion Checklist States.
- Click Edit.
- In the Object Permissions section, select Read, Create, Edit, and Delete.
- In the Field Permissions section, select Read Access for all fields, and Edit Access for these fields:
- Item Id
- Owner
- User
- Click Save.
Grant Access to GS_ChecklistSetup and GS_ApplicationStatusController Apex Classes
- While still in the profile editor, click
 next to Object Settings and select Apex Class Access.
 - Click Edit.
- Move
GS_ChecklistSetupandGS_ApplicationStatusControllerto the Selected list. - Click Save.
- Repeat these steps for any profile that needs access to the Get Started page.
Grant Access to the Get Started Custom Metadata Types
- While still in the Profile Editor, click next to Apex Class Access and select Custom Metadata Types.
- Click Edit.
- Add NPSP Get Started Checklist Item and NPSP Get Started Checklist Section to the Enabled Custom Metadata Types list.
- Click Save.
Add Tab to the Lightning App
Add the Get Started with NPSP tab to the Nonprofit Success Pack Lightning App:
- From Setup, enter App Manager in the Quick Find box, then click App Manager.
- In the row for the Nonprofit Success Pack Lightning App, click , then click Edit.
- Under App Settings, click Navigation Items.
- To add the tab for users:
- Move Get Started with NPSP to the Selected Items list.
- Click Save.
- Under App Settings, click User Profiles.
- Move any profiles that should have access to the Get Started with NPSP tab to the Selected Profiles list.
- Click Save.