
Plan and Implement a Site.com Website
There are many approaches to building a website. The process that best suits your needs depends on many factors, such as the size of your team and the tasks you're responsible for. If you're a site administrator or designer, you’re involved in every stage, including adding and maintaining the site's content. Alternatively, you can have contributors who add, edit, and maintain this content. And if you're a contributor, you can be responsible for editing and updating all of the site's content, or you can work with other contributors, designers, and site administrators to bring the site to completion. There are various stages involved in creating a site with Site.com.
Required Editions
| Available in: Salesforce Classic |
Available for purchase in: Enterprise, Performance, and Unlimited Editions Available (with limitations) in: Developer Edition |
| User Permissions Needed | |
|---|---|
| To create or import Site.com sites: | Site.com Publisher User field enabled on the user detail page |
| To build, edit, and manage Site.com sites: | Site.com Publisher User field enabled on the user detail page AND Site administrator or designer role assigned at the site level |
| To edit only content in Site.com sites: | Site.com Contributor User field enabled on the user detail page AND Contributor role assigned at the site level |
- Plan the Site Design and Page Layout (Site administrator or
designer)—Before building the pages of the site, spend time planning the
site design and basic layout. This stage is key to ensuring a consistent look
and feel with the minimum amount of effort. From a hierarchical point of view,
think about how many pages you need and whether they have subpages. Also
consider how you want site visitors to navigate around your site.
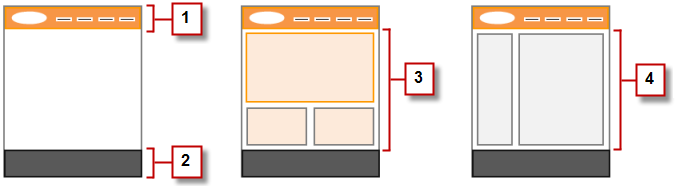
Next, plan the layout of the pages and identify the common elements that every page has. In this example, the site has a header section that includes the company's logo and menu (1), and a footer section (2). However, the main section of the home page (3) differs from the rest of the site pages (4). Take note of these similarities and differences, because they affect how you create your site pages.
- Create the Site (Site administrator or designer)—When you've completed
the planning stage, you're ready to get started! Log into the Site.com app and
go to the Site.com tab, where you can create your first
site. Your new blank site opens in Site.com
Studio, a powerful environment for building the pages of your
site.
 Note Only users with the Site.com Publisher User field enabled on their user detail page can create and import sites.
 - Import Assets (Site administrator or designer)—If you're working with a design agency, they can provide all of the files and assets you need, including a CSS style sheet. If you've created your own design, cut up the design and collect the assets, images, and files you plan to use in the site. Import the assets into Site.com Studio, where they appear in the Assets section of the Overview tab.
- Create a Page Template (Site administrator or designer)—When you've decided on the layout, the quickest and most effective method is to use page templates to build the basic layout and then base your site pages on it. Try to keep the design of your main page template simple to make it easier to modify in the future. For more complicated site designs, such as the example graphic, you can use the main page template as the basis for a child template to achieve maximum flexibility. When you create your page template, you can choose from predesigned layouts that include headers, footers, and columns, or you can create a blank page template.
- Lay Out the Page (Site administrator or designer)—After you create the page template, you can modify the layout further to match the design of your site.
- Create the Site Pages (Site administrator or designer)—Using the template as a base, you can quickly create the site pages, which automatically inherit all the elements of the page template. Or if you need a standalone page that doesn't follow the site's overall design, you can create a blank page instead.
- Add Features and Page Elements (Site administrator or designer)—Use Site.com's prebuilt page elements to add features such as navigation menus, images, and data services, and include content blocks that contributors can edit. And add interactive, animated effects using events and actions.
- Make Your Website Look Good (Site administrator or designer)—Take advantage of cascading style sheets (CSS) to develop the look and feel of your website. If you're not completely up to speed with CSS, the Style pane provides an easy, visual way to create and manage styles. Or if you're a CSS expert who likes to get straight into the code, you can hand-code the site's style sheets.
- Add and Edit Content (Contributor)—At this stage, if you're a contributor, the site is usually ready for you to add and edit content such as text, images, videos, and hyperlinks. And as you work, you can upload any images or files you need.
- Review and Test the Site (Contributor, designer, or site administrator)—Testing the changes to the pages of your site happens throughout the development cycle. As a contributor, designer, or site administrator, you must preview your changes to ensure they display as expected in a browser. And if you're a site administrator or designer, you can send a preview link to the site's reviewers so they can review the finished product before it goes live.
- Publish the Site (Site administrator only)—After testing is complete, you're ready to go live with your new site. Just set the site's domain information and then publish your changes to make your site live!
- Site.com Tab Overview
If you can't see the Site.com tab, go to the Site.com app. It's available in the Lightning Platform app menu in the Salesforce header. Then click the Site.com tab to view the list of your Site.com sites. - Using Site.com Studio as a Site Administrator or Designer
Site.com Studio provides a dedicated site-building environment for site administrators and designers. - Using Site.com Studio as a Contributor
Site.com Studio provides a dedicated content-editing environment for contributors. - Understand the Site Administrator and Designer's Overview Tab
As a site administrator or designer, when you open a site in Site.com Studio, it opens on the Overview tab. Here you can access and manage the site's components and configure the site's properties. - Understanding the Contributors's Overview Tab
As a contributor, when you open a site in Site.com Studio, it opens on the Overview tab. Here you can access and edit the site's pages and content, and import images and files.