
Add Flow Merge Fields with Data 360 Objects to a Sales Email Prompt Template
Create and preview an example sales email prompt template that uses a flow with Data 360 objects.
Required Editions
| Available in: Lightning Experience |
| Available in: Enterprise, Performance, and Unlimited Editions with the Einstein for Platform, or Einstein or Agentforce for Sales or Service add-on, or Agentforce Foundations |
| User Permissions Needed | |
|---|---|
| To create and manage prompt templates in Prompt Builder: | Prompt Template Manager permission set
OR Customize Application permission set |
Say you’re a Salesforce admin, and your sales team requests an easier way to send emails to contacts about nearby Marketing events.
Your sales team wants to use Data 360 data to get information about each contact’s location. By using Data 360 data, you can use information that was consolidated across multiple data sources. This information can be more up to date than the contact record alone. To learn more about data consolidation, see Unify Source Profiles. This example uses the standard data bundles for the Salesforce CRM connector. Your Data 360 setup, objects, and fields can differ.
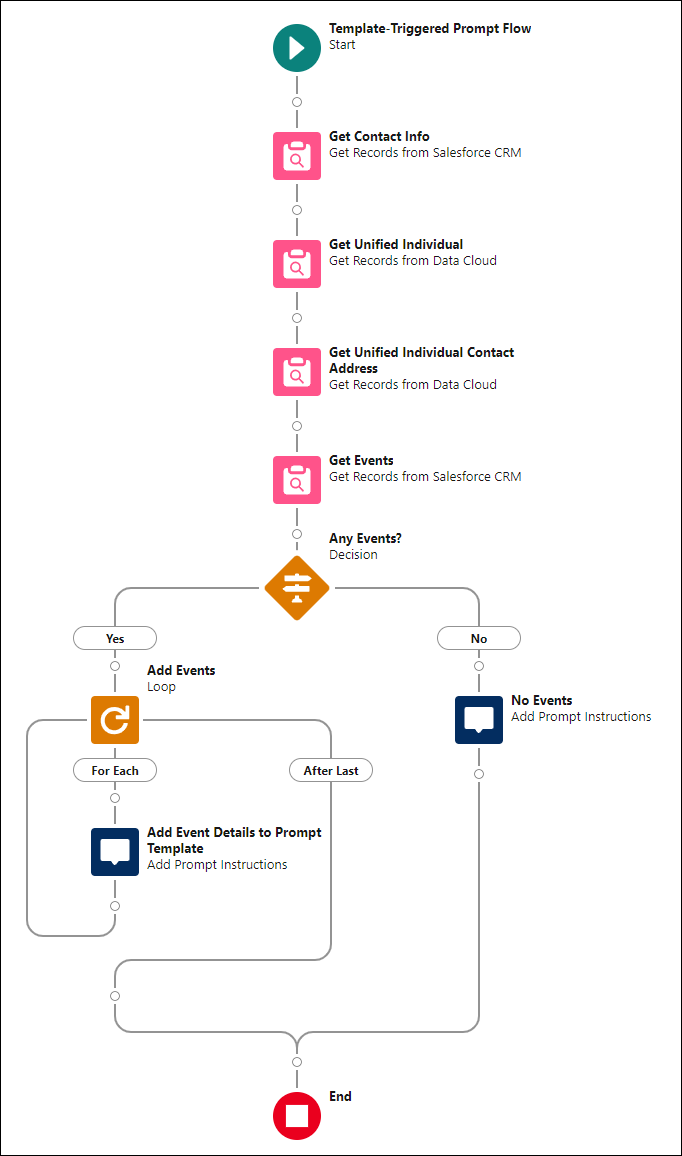
You create an email prompt template that launches a prompt template flow to get Marketing events in the same city and state as your contact. You use a flow to get a list of events and their locations for the LLM. In Flow Builder, the flow looks like this.
- Turn on Einstein.
- From Setup, in the Quick Find box, enter Einstein Setup, and then click Einstein Setup.
- Turn on Einstein.
- Create the flow.
- From Setup, in the Quick Find box, enter Flows, and then click Flows.
- Click New Flow.
- From Flow Builder, select Template-Triggered Prompt Flow, and then click Create.
- Configure the flow.
- For Prompt Template Type Capability, select Sales Email Template
Capability.A capability makes it possible to pass data between the flow and the prompt template. When you create a prompt template in Prompt Builder, you select its prompt template type.
- For Recipient, select Contact.
- For Prompt Template Type Capability, select Sales Email Template
Capability.
- Add a Get Records element. This Get Records element retrieves contact information.
- For Label, enter Get Contact Info.
- For Data Source, select Salesforce Object.
- For Object, select Contact.
- For Condition Requirements, select None—Get All Contact Records.
- For How Many Records to Store, click Only the first record.
- Add another Get Records element. This Get Records element finds the unified individual data
from Data Cloud that matches the contact information.
- For Label, enter Get Unified Individual.
- For Data Source, select Data Cloud Object.
- For Data Space, select the data space you want to use, for example default.
- For Object, select your unified individual data model object (DMO), for example Unified Individual 0000.
- For Condition Requirements, select All Conditions Are Met (AND).
- For Field, select the field that represents the contact’s first name, for example ssot_FirstName__c.
- For Operator, select Equals.
- For Value, select {!Get_Contact_Info.FirstName}.
- Click Add Condition.
- For Field, select the field that represents the contact’s last name, for example ssot_LastName__c.
- For Operator, select Equals.
- For Value, select {!Get_Contact_Info.LastName}.
- Click Add Condition.
- For Field, select the field that represents the contact’s birth date, for example ssot_BirthDate__c.
- For Operator, select Equals.
- For Value, select {!Get_Contact_Info.Birthdate}.
- For How Many Records to Store, click Only the first record.
- Add a third Get Records element. This Get Records element retrieves the unified
individual’s contact information.
- For Label, enter Get Unified Individual Contact Address.
- For Data Source, select Data Cloud Object.
- For Data Space, select the same data space as before.
- For Object, select your unified individual contact point address DMO, for example Unified Indv Contact Point Address 0000.
- For Condition Requirements, select All Conditions Are Met (AND).
- For Field, select ssot_Id__c.
- For Operator, select Equals.
- For Value, select {!Get_Unified_Individual.ssot__Id__c}.
- For How Many Records to Store, click Only the first record.
- Finally, add a fourth Get Records element to get event data.
- For Label, enter Get Events.
- For Object, select Event.
- For Condition Requirements, select All Conditions Are Met (AND).
- For Field, select IsArchived.
- For Operator, select Equals.
- For Value, select $GlobalConstant.False.
- Click Add Condition.
- For Field, select Location.
- For Operator, select Contains.
- For Value, select {!Get_Unified_Individual_Contact_Address.ssot__CityId__c}.
- Click Add Condition.
- For Field, select Location.
- For Operator, select Contains.
- For Value, select {!Get_Unified_Individual_Contact_Address.ssot__StateProvinceId__c}.
- For How Many Records to Store, click All Records.
- Add the Decision element.
- For Label, enter Any Events?
- On New Outcome, for Label, enter Yes.
- For Condition Requirements to Execute Outcome, select All Conditions Are Met (AND).
- For Resource, select Events from Get_Events.
- For Operator, select Is Null.
- For Value, select $GlobalConstant.False.
- Click Default Outcome.
- For Label, delete the text, and enter No.
- For the No outcome path, add the Create Prompt Instructions element.
- For Label, enter No Events.
- For Prompt Instructions, enter No upcoming Marketing events near you.
- For the Yes outcome path, add the Loop element.
- For Label, enter Add Events.
- For Collection Variable, select Events from Get Events.
- On the For Each path, add the Prompt Instructions element.
- For Label, enter Add Event Details to Prompt Template.
- For Prompt Instructions, enter: Event details: {!Add_Events.Subject}, {!Add_Events.Description}, {!Add_Events.Location}, Start Time: {!Add_Events.StartDateTime}.
- Click Save.
- For Flow Label, enter Marketing Events Summary.
- Save your changes, and click Activate.
Now, you can insert the prompt template flow into the sales email prompt template “Draft an email for a contact about regional marketing events” from the Example Prompt Template Library. For a step-by-step guide to adding a prompt template flow to a sales email prompt template, see Add Flows Without Data 360 Objects to a Sales Email Prompt Template.
