
Connect an Agent to Enhanced Chat v2
Connect a Service or Employee agent to Enhanced Chat v2.
Required Editions
| Available in: Lightning Experience |
| Available in: Enterprise, Performance, Unlimited, and Developer Editions. Required add-on licenses vary by agent type. |
To learn about channel support for other agent types, see the documentation for that type. |

| User Permissions Needed | |
|---|---|
| To build and manage Service Agents: | Manage Agentforce Service Agents AND Manage AI Agents OR Customize Application |
| To build and manage Employee Agents | Manage AI Agents OR Customize Application |

Connect an Agent to Enhanced Chat v2 in Agentforce Builder
To connect an agent to Enhanced Chat v2 in the new Agentforce Builder, set up the Enhanced Chat v2 connection. Agentforce Builder creates the channel and Enhanced Chat v2 deployment for you.
- Add the Enhanced Chat v2 connection to your agent. On the Review Language Settings window, click Got It.
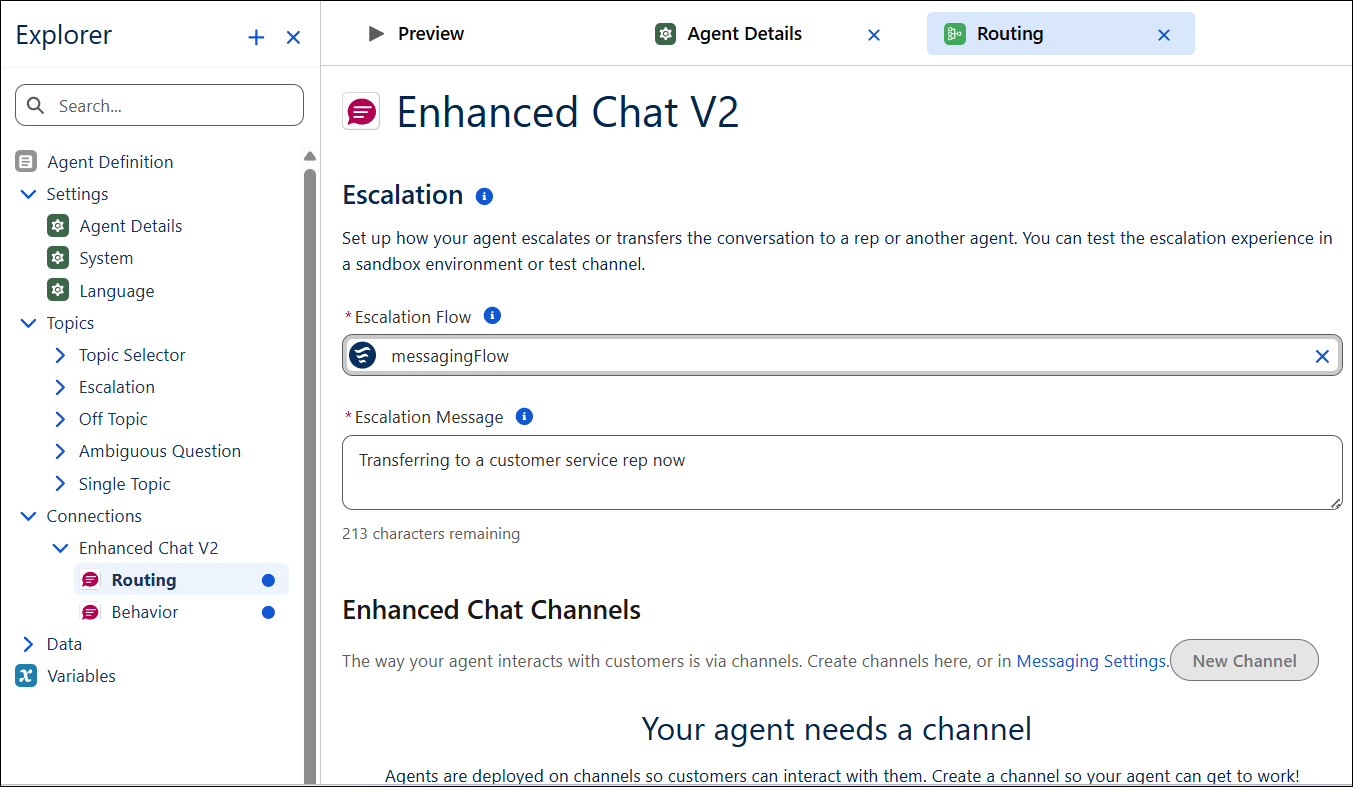
- On the Explorer panel, expand Enhanced Chat v2 in the Connections section. Then click Routing.
- If you don’t have one already, create and activate an escalation flow. Then, on the Routing page, add the escalation flow and an escalation message to your agent.
-
Commit your agent. Then, on the Routing page, click New
Channel.
-
In the New Channel window, enter these field values.
- Name: Name of the channel
- Developer Name: Must be unique and no more than 80 characters.
- Domain: The website where you want to host the deployment.
- Fallback Queue: When your agent is unavailable, conversations are routed to this queue. See Create Queues.
-
If this is your first Enhanced Chat channel, review and accept the terms and conditions.
Then click Create Channel. To see the new channel, refresh the
page.
It can take up to 10 minutes for Salesforce to create the Enhanced Chat v2 channel and deployment.
-
Optionally, customize the
voice on the Voice Settings page. By default, the language is English (United States)
and the voice is Mark. For more information about the languages and locales Agentforce Voice
supports, see Agentforce Voice
Considerations.
Voice settings apply to all of your agent’s voice-enabled connections.
- To customize your Enhanced Chat v2 deployment settings, click the channel name on the Routing page. Then, on the Messaging Settings setup page, click the deployment name. For a list of features available for Enhanced Chat v2, see Compare Enhanced Chat v1 to Enhanced Chat v2.
-
Preview your enhanced web chat setup. To open your
Enhanced Chat v2 deployment's preview page, click
 next to the deployment name on the Routing page. Then select Preview
Deployment.
next to the deployment name on the Routing page. Then select Preview
Deployment.
-
When you're ready, publish your deployment and then add it to your external web site or Salesforce site. To copy your deployment's code
snippet, click next to the deployment name on the Routing page and then select View Code
Snippet.
You can only deploy Agentforce Employee agents on Enhanced Chat v2 to Experience Cloud sites.
- If you're deploying an Employee agent, give users access to the agent and set up credential-based user verification for your Enhanced Chat channel. Employee agents on Enhanced Chat v2 run in the context of the logged-in user. Unauthenticated users aren't supported.
Route Messages Directly to a Service Agent in the Legacy Builder
To connect a service agent to Enhanced Chat v2, first create an Enhanced Chat v1 and switch to v2 before publishing the embedded service deployment. If you’ve created a channel, go directly to step 2.
-
Create an Enhanced Chat v1 Messaging Channel. In the
Channel Routing window, enter these field values.
- Routing Type: Agentforce Service Agent
- Agentforce Service Agent: Select your agent's name. If your agent name doesn't appear, activate your agent, and try again.
- Fallback Queue: Select a messaging queue to route to if no agent is available.
- On the Embedded Service Deployment Settings page for the deployment that you created, click Switch to v2.
- Click Switch & Publish.
- On the Embedded Service Deployments Settings page, click Test Enhanced Web Chat to preview and verify your branding and configurations.
- Agents connected to Enhanced Chat v2 use the Escalation subagent and an outbound Omni-Channel flow to transfer conversations. Set up outbound routing for your agent to support escalations.
- When you're ready, publish your site.
- Add the Enhanced Chat v2 to your external web site or to your Salesforce site.
Route Messages to a Service Agent with an Omni-Channel Flow in the Legacy Builder
Route messages to a service agent with an Omni-Channel flow.
- Create an inbound Omni-Channel flow from scratch that routes messages to your agent.
-
For the Route Work action in your inbound Omni-Channel flow, enter these field
values.
- Record ID: The record ID variable that you created to store values in your Omni-Channel flow in step 1.
- Service Channel: Messaging
- Route To: Select the Agentforce Service Agent type, and then select your agent's name. If your agent type and name don’t appear, activate your agent, refresh Flow Builder, and try again.
- A messaging queue. When your inbound Omni-Channel flow can't route conversations to your agent, it sends the conversation to this queue. Select a messaging queue that supports the Messaging Session object.
- Create an Enhanced Chat v1 messaging channel. Add your inbound flow to the channel, and then activate the channel. You can connect your agent to multiple inbound channels, but you can connect an inbound channel to only one agent.
- Open your agent in the legacy builder. On the Connections panel, confirm that your inbound Omni-Channel flow appears in the Inbound Routing section of the Enhanced Chat v2 connection. If a flow doesn’t appear, activate the flow and refresh the builder.
- On the Embedded Service Deployment Settings page for the deployment that you created, click Switch to v2.
- Click Switch & Publish.
- On the Embedded Service Deployments Settings page, click Test Enhanced Web Chat to preview and verify your branding and configurations.
- Agents connected to Enhanced Chat v2 use the Escalation subagent and an outbound Omni-Channel flow to transfer conversations. Set up outbound routing for your agent to support escalations.
- When you're ready, publish your site.
- Add the Enhanced Chat v2 to your external web site or to your Salesforce site.
