
You are here:
Customize the Chatter Group Layout and Publisher
Add and remove fields, buttons, look-ups, and related lists to change the layout of groups.
Required Editions
| Available in: Salesforce Classic and Lightning Experience |
| Available in: Group, Essentials, Professional, Enterprise, , Performance, Unlimited, Developer, and Contact Manager Editions |
| User Permissions Needed | |
|---|---|
| To customize Chatter group layouts: | Customize Application |
- From Setup, enter Group Layouts in the Quick Find box, then select Group Layouts.
- Click Edit next to the group layout that you want to customize, or click New to create a layout.
-
From the palette on the top of the page, drag fields, buttons, and other user interface
elements. Drag these elements to different sections to add them to the group layout. To
remove elements from the layout, drag them back to the palette. To make sure your action
works in the Salesforce mobile app and Lightning Experience, be sure the following are in
your group layout:
- Post
- Announcement (announcements aren’t available in the Salesforce mobile app)
- File
- Poll
- Edit Group
- New Group Member
- Manage Notifications
- Delete Group
- Leave Group
All group layout changes affect the Salesforce mobile app and Lightning Experience. Group publisher changes appear everywhere. For example, imagine that you delete the Files related list or a field in the Group Details section. Your changes appear only in the app and Lightning Experience. They don’t appear in Salesforce Classic.
- To save the layout, click Save.
Example Let’s allow group owners and managers to archive and activate groups from the
Salesforce mobile app and Lightning Experience. Drag the Archive field to the Group Detail
section. 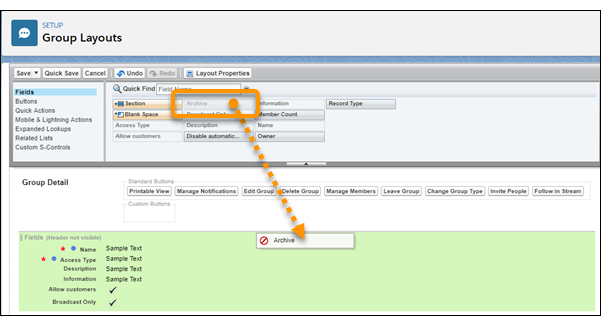
To assign group layouts by user profiles, click Page Layout Assignment on the group layout list view.
Did this article solve your issue?
Let us know so we can improve!