
You are here:
Create a Custom List View in Salesforce Classic
To see a specific set of contacts, documents, or other object records, create a list view. For example, create a list view of accounts in your state, leads with a specific lead source, or opportunities above a particular amount. You can also create views of contacts, leads, users, or cases to use for mass email recipient lists.
Required Editions
| Available in: Salesforce Classic |
| Available in: All Editions |
| User Permissions Needed | |
|---|---|
| To create custom list views: | Read on the type of record included in the list AND Create and Customize List Views |
| To create, edit, or delete public list views: | Manage Public List Views |
| To share list views with groups of users by role: | View Roles and Role Hierarchy |
-
Click Create New View at the top of any list page or in the
Views section of any tab home page.
 Note If you don’t see Create New View, you don’t have the “Create and Customize List Views” permission. To request the permission, contact your Salesforce admin.
 -
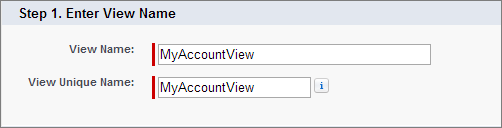
Enter the view name. The view name is shown in the views dropdown list.
-
Enter a unique view name. The API and managed packages use this unique name.
The unique name must be unused in both public and private list views. Private list views are only searchable if you have access to them.
-
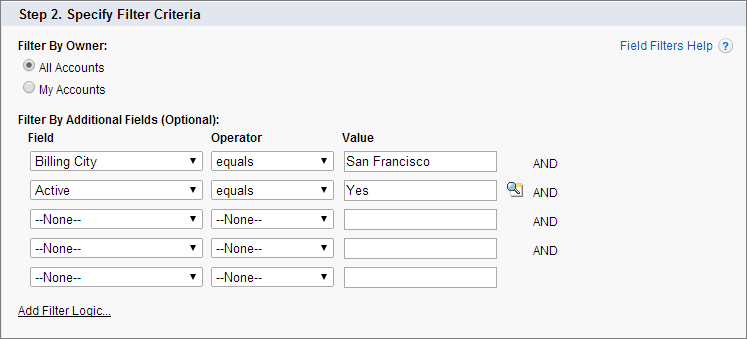
Specify your filter criteria. If you want more filter fields, click Add
Filter Logic... and then click Add Row. You can have
up to 10 fields in your filter criteria.
Usually, you filter by additional fields. For example, this image shows a list view that displays only active accounts in the org whose Billing City is equal to “San Francisco.”
Entering illogical filter criteria, such as someDate <= null, can cause unexpected behavior in a list view. When you use a list view in a more strict context, such as with a Visualforce standard list controller, illogical filter criteria can cause errors.
-
Select the fields you want to display on the list view.
The default fields are automatically selected. From the fields that are in your page layout, you can display up to 15 different fields in your view.

When you select a long text area field, the list view displays up to 255 characters.
- Click Save. The view appears in the View dropdown list so you can access it later.
Here’s what your list view can look like when you’re done:

You can change the number of records displayed per page using the dropdown on the lower-left corner of the list view.
As a Salesforce admin or a user with the “Manage Public List View” permission, you can hide the list view, so only you can see it. Click Edit next to the list view name. Select Visible to certain groups of users. Choose the type of group or role from the dropdown list, select the group or role from the list, then click Add.
Enterprise, Unlimited, Performance, and Developer Edition users can give access to a public group or role, including all users below that role.
List views are visible to your Experience Cloud site users with Customer Community Plus, Partner Community, Lightning Platform Starter, and Lightning Platform Plus licenses, if the Visible to all users setting is enabled for views of objects in site user profiles. To make list views visible only to your Salesforce users, select Visible to certain groups of users. Then share the view with the All Internal Users group or a selected set of internal groups and roles.
When implementing an Experience Cloud site, create custom views that contain only relevant information for site users. Then make those views visible to site users by sharing them with the All Customer Portal Users group, or a set of site groups and roles.
When you enable digital experiences, list views shared with the Roles and Internal Subordinates sharing group are automatically shared with the Roles, Internal, and Portal Subordinates group instead. If you don’t want external users to access these list views, update your sharing settings.