
You are here:
Create a Data 360 Sandbox
Create a Data 360 sandbox to use for development, testing, or training without compromising the data and applications in your production org. Data 360 supports all the sandbox types: Developer, Developer Pro, Partial Copy, and Full Copy. Data 360 sandboxes contain only metadata. No data is replicated when you provision Data 360 in a sandbox, even in partial copy and full copy sandboxes.
Required Editions
| Available in: All Editions supported by Data 360. See Data 360 edition availability. |
| User Permission Set Needed | |
|---|---|
| To create a Data 360 sandbox: | Permission set:
|
This process includes multiple steps in Data 360 and Salesforce Platform. Bookmark ( ) this page or keep it open in a separate window to refer to this topic.
Before you begin, complete these prerequisites.
- Using Data Cloud One? Before creating sandboxes and connecting them with Data Cloud One, make sure your production orgs don't have companion connections yet. If you create companion connections between your production Salesforce org and Data Cloud home org before creating a sandbox, the metadata in that sandbox has to be cleaned up. This clean-up can take several weeks. Contact Salesforce Customer Support for details. For other Data Cloud One Sandbox limitations, see Using Data Cloud One with a Sandbox.
- Provision Data 360 in your production org.
- Verify your sandbox isn't cloned from another sandbox. Go to Setup and search Sandboxes in Quick Find. In the list of existing sandboxes, confirm that there isn't a value in the "Copied From" column for your sandbox.
Step 2: Enable Data 360 in an Existing Sandbox
Use the license match feature to set up Data 360 in a sandbox created before Data 360 was provisioned in your production org. This feature lets you to inherit Data Cloud licenses from the production org without refreshing the sandbox. However, there are a few important considerations to keep in mind:
- Make sure that the production org has Data 360 provisioned for the license match to work.
- The license match process copies only Data Cloud licenses. The license match doesn't copy organization preferences, values, metadata, or permissions. You can set up custom configurations, integrations, and other metadata manually in the sandbox.
- Complete Data 360 provisioning in your sandbox first. Confirm that provisioning is active before you activate Agentforce or Einstein features.
- Enable Data 360 in your production org. See Turn on Data 360.
- In the sandbox org, go to Setup, enter Company Information in the Quick Find box, and then select it.
-
Click Match Production Licenses.
Allow up to 24 hours for the license synchronization to complete. If you attempt to access Data Cloud Setup before the license sync completes, the Data Cloud Setup menu is unavailable.
Step 3: Turn On Data 360 in the Sandbox
- Log in to your sandbox.
-
From Data Cloud Setup, click Get Started.
Setup can take a few minutes. If you created a sandbox before Data 360 sandbox was generally available, you must refresh the sandbox before you can successfully provision Data 360 in the sandbox.
Step 4: Configure the Connections
When you create a Data 360 sandbox, connections are replicated, but the authorization data isn't, so the connections in the sandbox org have a status of Inactive. Activate each sandbox connection, and provide the authorization information to bring data into the sandbox.
After you turn on Data 360, wait about 1 hour before performing this step so that the background processing can complete.
- In your sandbox org, select Data Cloud Setup.
-
In the Quick Find box, enter the connector type you want to activate.
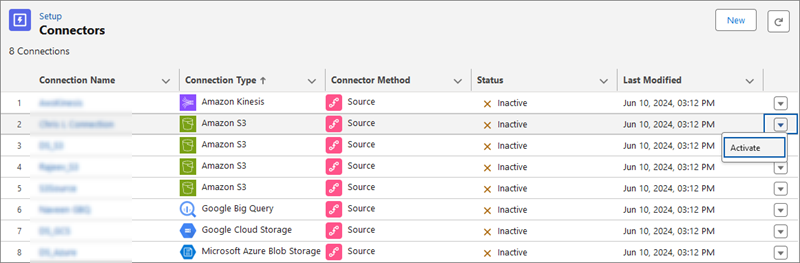
For non-CRM connectors, enter Other Connectors. Select the connectors from the list. From the dropdown menu, select Activate.
For Salesforce CRM home org connector, enter Salesforce CRM. Select the connector from the list. From the dropdown menu, select Activate. The CRM connection changes from your production org ID to your sandbox org ID.
For other Salesforce CRM connectors, follow the steps for the CRM home org connection. You can activate the connection to any production or sandbox org. Enter the org credentials for the connection, and click Log In. Confirm the connection by entering the Data 360 org identifier. You can find this ID on the modal under Data 360 Org Details. This identifier specifies which Data 360 org retrieves data from your source org.
- Check the checkbox to agree to create the connection and click Activate.
After you activate a connection, the data streams or other components that use the connection become active.
Step 5: Activate Data Actions and Data Action Targets
If you have data actions or data action targets in your production org, they’re replicated in a sandbox, but you must explicitly enable them.
- In your sandbox, in the Data Cloud app, click Data Actions or Data Action Targets.
- From the dropdown menu, select Enable.
Step 6: Enable Data Share Targets
If you have data share targets in your production org, they’re replicated in a sandbox, but they’ll be in an inactive state and you must explicitly enable them.
- In your sandbox, in the Data Cloud app, click Data Share Targets.
- Open an inactive data share target and click Edit.
- Add the connection configuration details and click Save. The data share target turns active.