
You are here:
Add a Business Object to Load the Display Details
When you tap a list item on the parent list, for the master-detail handler to load the item detail, create a business object (CurrentDisplay).
Required Editions
| Available in: Enterprise and Unlimited Editions where Consumer Goods Cloud is enabled |
| User Permissions Needed | |
|---|---|
| To add and configure a business object | Customizer, Developer |
You can configure the behavior of the master-detail handler to reload the list even if the list item is unselected. For example, when you modify the values of fields such as name and description, the app updates those values in the detail area. The app also automatically saves the updates you make to the business objects and runs the validations required to save the changes, regardless of whether a save action was initiated by the user.
-
In your VS Code based Modeler workspace, create a business object by running
this command -
sf modeler workspace add.The framework creates the default functions required for a business object.? Select the resource you want to add. businessobject ? Specify a name for the businessobject: Display ? Select the module to which businessobject 'Display' should be added. MyDisplay ? Do you really want to create the businessobject 'Display'? Yes Successfully created businessobject 'BoMyDisplay'. */Users/demoUser/modeler_demo/src/MyDisplay/BO/BoMyDisplay/BoMyDisplay.businessobject.xml */Users/demoUser/modeler_demo/src/MyDisplay/BO/BoMyDisplay/Mv2/CreateAsync/BoMyDisplay.AfterCreateAsync.bl.js */Users/demoUser/modeler_demo/src/MyDisplay/BO/BoMyDisplay/Mv2/CreateAsync/BoMyDisplay.BeforeCreateAsync.bl.js */Users/demoUser/modeler_demo/src/MyDisplay/BO/BoMyDisplay/Mv2/DoValidateAsync/BoMyDisplay.AfterDoValidateAsync.bl.js */Users/demoUser/modeler_demo/src/MyDisplay/BO/BoMyDisplay/Mv2/DoValidateAsync/BoMyDisplay.BeforeDoValidateAsync.bl.js */Users/demoUser/modeler_demo/src/MyDisplay/BO/BoMyDisplay/Mv2/Initialize/BoMyDisplay.AfterInitialize.bl.js */Users/demoUser/modeler_demo/src/MyDisplay/BO/BoMyDisplay/Mv2/Initialize/BoMyDisplay.BeforeInitialize.bl.js */Users/demoUser/modeler_demo/src/MyDisplay/BO/BoMyDisplay/Mv2/LoadAsync/BoMyDisplay.AfterLoadAsync.bl.js */Users/demoUser/modeler_demo/src/MyDisplay/BO/BoMyDisplay/Mv2/LoadAsync/BoMyDisplay.BeforeLoadAsync.bl.js */Users/demoUser/modeler_demo/src/MyDisplay/BO/BoMyDisplay/Mv2/SaveAsync/BoMyDisplay.AfterSaveAsync.bl.js */Users/demoUser/modeler_demo/src/MyDisplay/BO/BoMyDisplay/Mv2/SaveAsync/BoMyDisplay.BeforeSaveAsync.bl.js * /Users/demoUser/modeler_demo/src/MyDisplay/DS/DsBoMyDisplay_sf.datasource.xml -
Define the simple properties of the business object.
<SimpleProperties> <SimpleProperty name="pKey" type="DomPKey" dataSourceProperty="pKey" /> <SimpleProperty name="name" type="DomText" dataSourceProperty="name" /> <SimpleProperty name="description" type="DomLongDescription" dataSourceProperty="description" /> <SimpleProperty name="competitorDisplay" type="DomBool" dataSourceProperty="competitorDisplay" /> </SimpleProperties> -
To load display records from the database, define the DsBoMyDisplays data
source.
- Configure the columns and corresponding mapping attribute names used in business object. simple properties.
- To read a single Display record by a given pKey or id, define a condition and a parameter.
- Specify a pKey parameter and use it in the query condition to select a specific record.
<DataSource name="DsBoMyDisplays" backendSystem="sf" businessObjectClass="BoMyDisplay" external="false" editableEntity="Display__c" schemaVersion="2.0"> <Attributes> <Attribute name="pKey" table="Display__c" column="Id" /> <Attribute name="name" table="Display__c" column="Name" /> <Attribute name="description" table="Display__c" column="Description__c" /> <Attribute name="competitorDisplay" table="Display__c" column="Competitor_Display__c" /> </Attributes> <Entities> <Entity name="Display__c" alias="" idAttribute="Id" /> </Entities> <QueryCondition> <![CDATA[ Display__c.Id = #pKey# ]]> </QueryCondition> <OrderCriteria/> <Parameters> <Parameter name="pKey" type="TEXT" /> </Parameters> </DataSource> -
To save the updated value, when the sales rep modifies a value in the detail
area, the app should save the business object. Call the
Facade.saveObjectAsyncframework function in the standard methodbeforeSaveAsync, which is called before the business object is saved. -
Business objects aren’t saved by default because in some cases, you need
read-only business objects. To make the business object storable, add this code
in the
beforeSaveAsyncmethod -var promise=Facade.saveObjectAsync(me);.The save function takes the simple properties of the business object and updates the database record by using the mappings defined in the data source. - Save your changes.
-
To test the changes, build the contracts by running this command.
sf modeler workspace build - Refresh the simulator app.
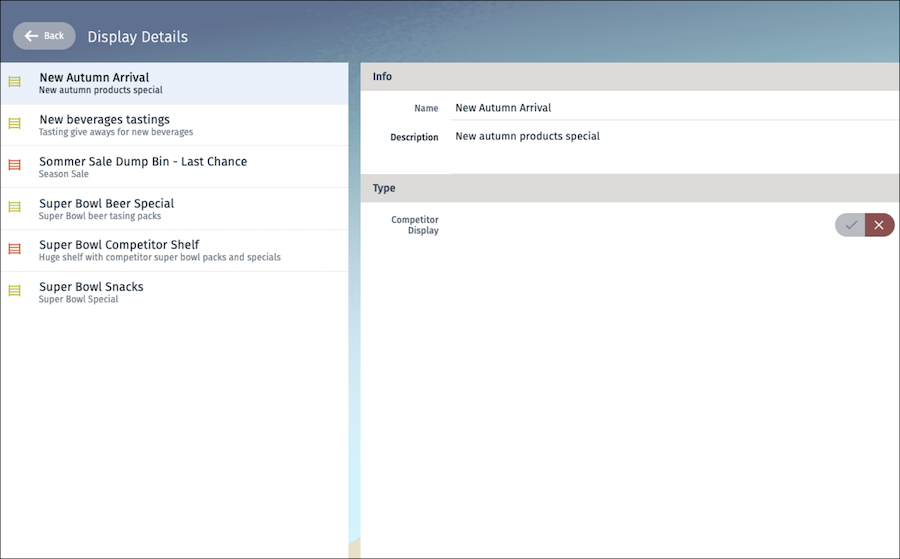
- On the Display card, click SHOW ALL DISPLAYS.
The new UI page opens as shown.
Did this article solve your issue?
Let us know so we can improve!
